Product Information Guide
Page 10
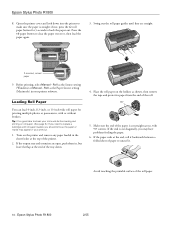
... end of the roll. 90° 5. Epson Stylus Photo R1800 2/05 If the output tray and extension are straight. Place the roll paper on the holders as the Source setting (Windows) or Manual - Avoid touching the printable surface of the printer. 2. Press the ) paper button to uncurl...It's a good idea to back the paper out. Before printing, select Manual - Swing out the roll paper guides until they are open, push them in your printout. 1. If crooked, reload paper 9. Epson Stylus Photo R1800 8. Open the printer cover and look down . 4. if not, press the z roll ...
... end of the roll. 90° 5. Epson Stylus Photo R1800 2/05 If the output tray and extension are straight. Place the roll paper on the holders as the Source setting (Windows) or Manual - Avoid touching the printable surface of the printer. 2. Press the ) paper button to uncurl...It's a good idea to back the paper out. Before printing, select Manual - Swing out the roll paper guides until they are open, push them in your printout. 1. If crooked, reload paper 9. Epson Stylus Photo R1800 8. Open the printer cover and look down . 4. if not, press the z roll ...
Product Information Guide
Page 14
... the print head. This section explains how to let the printer check and clean the nozzles. Make sure the printer is turned on the printer for the greatest amount of expansion (some of the image will be cut off ). Epson Stylus Photo R1800 4. Choose Sheet or Manual Roll as the Paper Size setting. 5. Borderless source as the Source...
... the print head. This section explains how to let the printer check and clean the nozzles. Make sure the printer is turned on the printer for the greatest amount of expansion (some of the image will be cut off ). Epson Stylus Photo R1800 4. Choose Sheet or Manual Roll as the Paper Size setting. 5. Borderless source as the Source...
Product Information Guide
Page 15
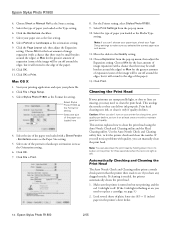
... and Cleaning. 4. Make sure the printer is turned on the screen to replace a cartridge; If the nozzle check pattern has no gaps or lines (as shown below . Epson Stylus Photo R1800 Note: Sizes smaller than 5 minutes. 5. see any dried ink to manually clean the print head. If you... need to clean the print head. 4. The printer prints and examines the nozzle check pattern shown below ), click...
... and Cleaning. 4. Make sure the printer is turned on the screen to replace a cartridge; If the nozzle check pattern has no gaps or lines (as shown below . Epson Stylus Photo R1800 Note: Sizes smaller than 5 minutes. 5. see any dried ink to manually clean the print head. If you... need to clean the print head. 4. The printer prints and examines the nozzle check pattern shown below ), click...
Product Information Guide
Page 16
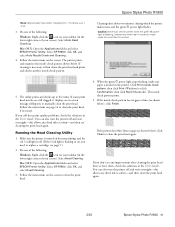
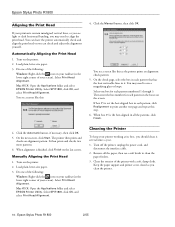
...the Automatic button, if necessary, then click OK. 5. On the next screen, click Start. Manually Aligning the Print Head 1. Load plain, letter-size paper. 3. Select SP R1800, click OK, and select Print Head Alignment. You see a screen like this: 4. You ... the Applications folder and select EPSON Printer Utility. Remove all the patterns, click Finish. 4. Epson Stylus Photo R1800 2/05 You see a screen like this step. 6. Turn on your taskbar (in it several times a year. 1. Epson Stylus Photo R1800 Aligning the Print Head If your printer working at its best, you...
...the Automatic button, if necessary, then click OK. 5. On the next screen, click Start. Manually Aligning the Print Head 1. Load plain, letter-size paper. 3. Select SP R1800, click OK, and select Print Head Alignment. You see a screen like this: 4. You ... the Applications folder and select EPSON Printer Utility. Remove all the patterns, click Finish. 4. Epson Stylus Photo R1800 2/05 You see a screen like this step. 6. Turn on your taskbar (in it several times a year. 1. Epson Stylus Photo R1800 Aligning the Print Head If your printer working at its best, you...

User's Guide
Page 74
... problems, check the solutions beginning on -screen message telling you to manually clean the print head. Follow the instructions on , you need to replace a cartridge; Select Auto Head Cleaning. Select SP R1800, click OK, and select Auto Nozzle Check and Cleaning. 4. If...print head. 1. Select the Maintenance tab and click Auto Nozzle Check and Cleaning. The printer prints and examines the nozzle check pattern shown below. Follow the instructions on EPSON Stylus Photo R1800, and select Printing Preferences. If cleaning is necessary, it displays an on page 93....
... problems, check the solutions beginning on -screen message telling you to manually clean the print head. Follow the instructions on , you need to replace a cartridge; Select Auto Head Cleaning. Select SP R1800, click OK, and select Auto Nozzle Check and Cleaning. 4. If...print head. 1. Select the Maintenance tab and click Auto Nozzle Check and Cleaning. The printer prints and examines the nozzle check pattern shown below. Follow the instructions on EPSON Stylus Photo R1800, and select Printing Preferences. If cleaning is necessary, it displays an on page 93....

User's Guide
Page 81
...EPSON Stylus Photo R1800, and select Printing Preferences. Mac OS X: Open the Applications folder and select EPSON Printer Utility. You see a screen like this step. 6. Select one of your taskbar (in each pattern in all the patterns, click Finish. Note: If the icon does not appear, click Start > Printer (and Faxes), right-click on the printer... glass or loupe. If box #5 is the best-aligned in the boxes on your screen). Click the Manual button, then click OK. Manually Aligning the Print Head 1. Select Print Head Alignment. On the check page, select the box in each ...
...EPSON Stylus Photo R1800, and select Printing Preferences. Mac OS X: Open the Applications folder and select EPSON Printer Utility. You see a screen like this step. 6. Select one of your taskbar (in each pattern in all the patterns, click Finish. Note: If the icon does not appear, click Start > Printer (and Faxes), right-click on the printer... glass or loupe. If box #5 is the best-aligned in the boxes on your screen). Click the Manual button, then click OK. Manually Aligning the Print Head 1. Select Print Head Alignment. On the check page, select the box in each ...


