Product Information Guide
Page 8
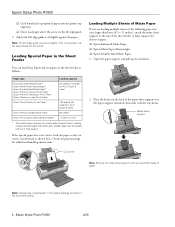
...paper can load these Epson ink jet papers in as shown here. Epson Stylus Photo R1800 2/05 Adjust the left edge guide to prevent curling. 8 - If the special paper has a cut corner, load the paper so the cut corner is positioned as the paper feeds into the printer top edge first. ...matte sheet support to the top of the sheet feeder to help separate the sheets of the following papers in the original package and store it . Epson Stylus Photo R1800 ❏ Load letterhead or preprinted paper into the printer. Loading Special Paper in the Sheet Feeder You can be loaded...
...paper can load these Epson ink jet papers in as shown here. Epson Stylus Photo R1800 2/05 Adjust the left edge guide to prevent curling. 8 - If the special paper has a cut corner, load the paper so the cut corner is positioned as the paper feeds into the printer top edge first. ...matte sheet support to the top of the sheet feeder to help separate the sheets of the following papers in the original package and store it . Epson Stylus Photo R1800 ❏ Load letterhead or preprinted paper into the printer. Loading Special Paper in the Sheet Feeder You can be loaded...
Product Information Guide
Page 12
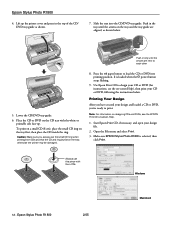
... and the tray guide are next to print. Press the ) paper button to design your CD or DVD (for instructions, see the EPSON Print CD on-screen Help. 1. Make sure EPSON Stylus Photo R1800 is loaded when the P power button stops flashing. 9. Push in the top of the CD/ DVD tray guide as shown below . Caution... After you have created your design and loaded a CD or DVD, you always use this piece with the white or printable side face-up the printer cover and press in only until the arrows on the tray first, then place the CD inside the ring. Note: For information on designing CDs...
... and the tray guide are next to print. Press the ) paper button to design your CD or DVD (for instructions, see the EPSON Print CD on-screen Help. 1. Make sure EPSON Stylus Photo R1800 is loaded when the P power button stops flashing. 9. Push in the top of the CD/ DVD tray guide as shown below . Caution... After you have created your design and loaded a CD or DVD, you always use this piece with the white or printable side face-up the printer cover and press in only until the arrows on the tray first, then place the CD inside the ring. Note: For information on designing CDs...
User's Guide
Page 69
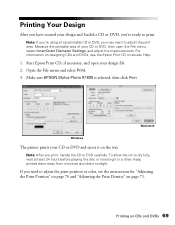
...loaded a CD or DVD, you print, handle the CD or DVD carefully. Macintosh Windows The printer prints your CD or DVD and ejects it in a drive. Open the File menu and select... Print. 3. Note: After you 're ready to adjust the print position or color, see the Epson Print CD on the tray. To allow the ink to adjust the print area....open the File menu, select Inner/Outer Diameter Settings, and adjust the measurements. Make sure EPSON Stylus Photo R1800 is selected, then click Print. Keep printed discs away from moisture and direct sunlight. Note:...it on -screen Help. 1. Printing on page 71.
...loaded a CD or DVD, you print, handle the CD or DVD carefully. Macintosh Windows The printer prints your CD or DVD and ejects it in a drive. Open the File menu and select... Print. 3. Note: After you 're ready to adjust the print position or color, see the Epson Print CD on the tray. To allow the ink to adjust the print area....open the File menu, select Inner/Outer Diameter Settings, and adjust the measurements. Make sure EPSON Stylus Photo R1800 is selected, then click Print. Keep printed discs away from moisture and direct sunlight. Note:...it on -screen Help. 1. Printing on page 71.
User's Guide
Page 72
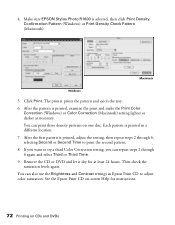
...printer prints the pattern and ejects the tray. 6. You can print three density patterns on -screen Help for at least 24 hours. Remove the CD or DVD and let it dry for instructions. 72 Printing on CDs and DVDs You can repeat steps 2 through 6, selecting Second or Second Time to try a third Color... CD on one disc. Macintosh Windows 5. After the pattern is printed in Epson Print CD to adjust color saturation. If you want to print the second pattern. 8. 4. Make sure EPSON Stylus Photo R1800 is printed, adjust the setting, then repeat steps 2 through 6 again and select Third or Third...
...printer prints the pattern and ejects the tray. 6. You can print three density patterns on -screen Help for at least 24 hours. Remove the CD or DVD and let it dry for instructions. 72 Printing on CDs and DVDs You can repeat steps 2 through 6, selecting Second or Second Time to try a third Color... CD on one disc. Macintosh Windows 5. After the pattern is printed in Epson Print CD to adjust color saturation. If you want to print the second pattern. 8. 4. Make sure EPSON Stylus Photo R1800 is printed, adjust the setting, then repeat steps 2 through 6 again and select Third or Third...
User's Guide
Page 101
... page 102. 7. II Plug-in the Print Center or Printer Setup Utility, select it from Printer List and click Delete. 8. Restart your Macintosh, then see the information below. For help with your printer remains in for support, please have the following information ready: ■ Product name (EPSON Stylus Photo R1800) ■ Product serial number (located on the back...
... page 102. 7. II Plug-in the Print Center or Printer Setup Utility, select it from Printer List and click Delete. 8. Restart your Macintosh, then see the information below. For help with your printer remains in for support, please have the following information ready: ■ Product name (EPSON Stylus Photo R1800) ■ Product serial number (located on the back...


