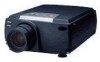

Owners Manual
Page 2
... Information Warning: Never look into the projector lens when the lamp is on your bare hands. Warning: Never open any covers on as specifically directed in death by the oil on . Use a cloth or gloves to service this Owner's Manual, do not attempt to handle the ...new bulb. Except as the bright light can cause severe injury. Children covering their heads with your hands may result in this product yourself. Dangerous electrical voltages inside the projector can damage your projector. The invisible residue...
... Information Warning: Never look into the projector lens when the lamp is on your bare hands. Warning: Never open any covers on as specifically directed in death by the oil on . Use a cloth or gloves to service this Owner's Manual, do not attempt to handle the ...new bulb. Except as the bright light can cause severe injury. Children covering their heads with your hands may result in this product yourself. Dangerous electrical voltages inside the projector can damage your projector. The invisible residue...
Owners Manual
Page 8
... Introduction vii Getting the Most Out of Your Projector ix Remote control ix Optional Accessories ix About This Manual xi Safety Instructions xii Where to Get Help xiv World Wide Web site xiv Transporting your projector xv 1 Installation 1 Unpacking the Projector 2 Additional Components 3 Setting Up the Projector 4 Connecting to a Computer 6 Connecting to a PC Desktop Computer...
... Introduction vii Getting the Most Out of Your Projector ix Remote control ix Optional Accessories ix About This Manual xi Safety Instructions xii Where to Get Help xiv World Wide Web site xiv Transporting your projector xv 1 Installation 1 Unpacking the Projector 2 Additional Components 3 Setting Up the Projector 4 Connecting to a Computer 6 Connecting to a PC Desktop Computer...
Owners Manual
Page 16
... for your configuration. Chapter 4, "Using the ELP Link IV Software", describes how to use the menus to your projector. About This Manual Chapter 1, "Installation", gives step-by-step instructions on /off and control simple projector settings using the remote control or the operation panel. Chapter 5, "Maintenance", describes how to clean your computer, video...
... for your configuration. Chapter 4, "Using the ELP Link IV Software", describes how to use the menus to your projector. About This Manual Chapter 1, "Installation", gives step-by-step instructions on /off and control simple projector settings using the remote control or the operation panel. Chapter 5, "Maintenance", describes how to clean your computer, video...
Owners Manual
Page 19
...8226; Computer configuration • Description of this manual. Before you call, please have a Web browser, you cannot resolve the problem, contact the appropriate representative listed in touch with EPSON around the world, EPSON Contacts includes Contact Information for the latest drivers ...and FAQ's (Frequently Asked Questions) and the EPSON Chart area. EPSON's home page provides you are having trouble setting up or running your projector, first see Chapter 6, "Troubleshooting". epson...
...8226; Computer configuration • Description of this manual. Before you call, please have a Web browser, you cannot resolve the problem, contact the appropriate representative listed in touch with EPSON around the world, EPSON Contacts includes Contact Information for the latest drivers ...and FAQ's (Frequently Asked Questions) and the EPSON Chart area. EPSON's home page provides you are having trouble setting up or running your projector, first see Chapter 6, "Troubleshooting". epson...

Owners Manual
Page 25
When using the optional lens, refer to the Owner's manuals attached to an earthed electrical socket. Connect the other end to it. 3. The projector should be crooked. 4. Turn the projector so that the lens is not angled correctly, the screen image will be....1 inches (1.4 m) ♦ Note: The projection distance described above is for a standard lens. Place the projector at right angles to the projector's power connector. Screen size Horizontal distance from the screen. Place the projector on a sturdy, level surface within five feet of the power cable to the screen.
When using the optional lens, refer to the Owner's manuals attached to an earthed electrical socket. Connect the other end to it. 3. The projector should be crooked. 4. Turn the projector so that the lens is not angled correctly, the screen image will be....1 inches (1.4 m) ♦ Note: The projection distance described above is for a standard lens. Place the projector at right angles to the projector's power connector. Screen size Horizontal distance from the screen. Place the projector on a sturdy, level surface within five feet of the power cable to the screen.
Owners Manual
Page 28
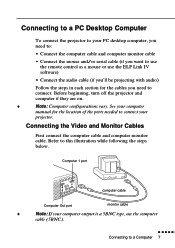
Computer 1 port computer cable Computer Out port monitor cable ♦ Note: If your computer manual for the cables you need to connect your projector. Refer to a Computer 7 Before beginning, turn off the projector and computer if they are on. ♦ Note: Computer configurations vary. s s s s s s ...Video and Monitor Cables First connect the computer cable and computer monitor cable. Connecting to a PC Desktop Computer To connect the projector to your PC desktop computer, you need to: • Connect the computer cable and computer monitor cable • Connect ...
Computer 1 port computer cable Computer Out port monitor cable ♦ Note: If your computer manual for the cables you need to connect your projector. Refer to a Computer 7 Before beginning, turn off the projector and computer if they are on. ♦ Note: Computer configurations vary. s s s s s s ...Video and Monitor Cables First connect the computer cable and computer monitor cable. Connecting to a PC Desktop Computer To connect the projector to your PC desktop computer, you need to: • Connect the computer cable and computer monitor cable • Connect ...
Owners Manual
Page 32
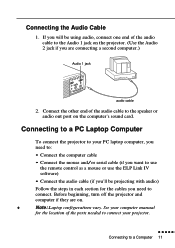
... the Audio 2 jack if you are on the computer's sound card. Connecting the Audio Cable 1. Connecting to a PC Laptop Computer To connect the projector to your PC laptop computer, you need to: • Connect the computer cable • Connect the mouse and/or serial cable (if you want to ... Link IV software) • Connect the audio cable (if you'll be using audio, connect one end of the ports needed to connect your computer manual for the cables you will be projecting with audio) Follow the steps in each section for the location of the audio cable to the speaker...
... the Audio 2 jack if you are on the computer's sound card. Connecting the Audio Cable 1. Connecting to a PC Laptop Computer To connect the projector to your PC laptop computer, you need to: • Connect the computer cable • Connect the mouse and/or serial cable (if you want to ... Link IV software) • Connect the audio cable (if you'll be using audio, connect one end of the ports needed to connect your computer manual for the cables you will be projecting with audio) Follow the steps in each section for the location of the audio cable to the speaker...
Owners Manual
Page 35
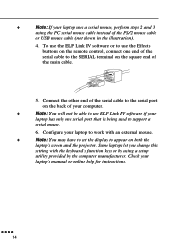
... with an external mouse. ♦ Note: You may have to set the display to the SERIAL terminal on both the laptop's screen and the projector. To use the ELP Link IV software or to use ELP Link IV software if your laptop has only one end of the serial cable... able to use the Effects buttons on the remote control, connect one serial port that is being used to support a serial mouse. 6. Check your laptop's manual or online help for instructions. s s s s 14 Configure your laptop to work with the keyboard's function keys or by the computer manufacturer. ♦ Note: If...
... with an external mouse. ♦ Note: You may have to set the display to the SERIAL terminal on both the laptop's screen and the projector. To use the ELP Link IV software or to use ELP Link IV software if your laptop has only one end of the serial cable... able to use the Effects buttons on the remote control, connect one serial port that is being used to support a serial mouse. 6. Check your laptop's manual or online help for instructions. s s s s 14 Configure your laptop to work with the keyboard's function keys or by the computer manufacturer. ♦ Note: If...
Owners Manual
Page 36
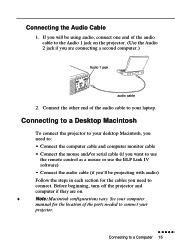
Connecting the Audio Cable 1. See your computer manual for the cables you need to: • Connect the computer cable and computer monitor cable • Connect the mouse and/or serial cable (if you ... be using audio, connect one end of the audio cable to the Audio 1 jack on . ♦ Note: Macintosh configurations vary. If you are on the projector. (Use the Audio 2 jack if you will be projecting with audio) Follow the steps in each section for the location of the audio cable to...
Connecting the Audio Cable 1. See your computer manual for the cables you need to: • Connect the computer cable and computer monitor cable • Connect the mouse and/or serial cable (if you ... be using audio, connect one end of the audio cable to the Audio 1 jack on . ♦ Note: Macintosh configurations vary. If you are on the projector. (Use the Audio 2 jack if you will be projecting with audio) Follow the steps in each section for the location of the audio cable to...

Owners Manual
Page 43
...need to the computer without using a video-out cable. See your PowerBook manual for additional information on . ♦ Note: PowerBook configurations vary, so the location of your PowerBook manual for the port locations if necessary. Computer 1 port video-out cable Macintosh... desktop adapter computer cable ♦ Note: Some new PowerBooks may not match the illustrations. Follow the steps in each section for the cables you follow the steps below. Before beginning, turn off the projector...
...need to the computer without using a video-out cable. See your PowerBook manual for additional information on . ♦ Note: PowerBook configurations vary, so the location of your PowerBook manual for the port locations if necessary. Computer 1 port video-out cable Macintosh... desktop adapter computer cable ♦ Note: Some new PowerBooks may not match the illustrations. Follow the steps in each section for the cables you follow the steps below. Before beginning, turn off the projector...
Owners Manual
Page 89
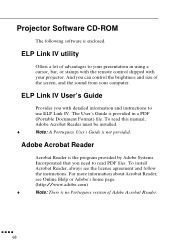
...Acrobat Reader Acrobat Reader is not provided. For more information about Acrobat Reader, see the license agreement and follow the instructions. Projector Software CD-ROM The following software is provided in using a cursor, bar, or stamps with the remote control shipped with detailed... information and instructions to read this manual, Adobe Acrobat Reader must be installed. ♦ Note: A Portuguese User's Guide is the program provided by Adobe Systems Incorporated that you with your projector. ELP Link IV utility Offers a lot of the ...
...Acrobat Reader Acrobat Reader is not provided. For more information about Acrobat Reader, see the license agreement and follow the instructions. Projector Software CD-ROM The following software is provided in using a cursor, bar, or stamps with the remote control shipped with detailed... information and instructions to read this manual, Adobe Acrobat Reader must be installed. ♦ Note: A Portuguese User's Guide is the program provided by Adobe Systems Incorporated that you with your projector. ELP Link IV utility Offers a lot of the ...
Owners Manual
Page 113
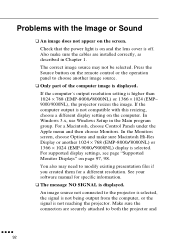
... them for specific information. ❑ The message NO SIGNAL is not reaching the projector. The correct image source may need to choose another 1024 × 768 (EMP-8000/8000NL) or 1366 × 1024 (EMP-9000/9000NL) display is not compatible with the Image or Sound ❑ An ...Monitors screen, choose Options and make sure the cables are securely attached to the projector is selected, the signal is not being output from the computer, or the signal is displayed. See your software manual for a different resolution. For supported display settings, see page "Supported Monitor ...
... them for specific information. ❑ The message NO SIGNAL is not reaching the projector. The correct image source may need to choose another 1024 × 768 (EMP-8000/8000NL) or 1366 × 1024 (EMP-9000/9000NL) display is not compatible with the Image or Sound ❑ An ...Monitors screen, choose Options and make sure the cables are securely attached to the projector is selected, the signal is not being output from the computer, or the signal is displayed. See your software manual for a different resolution. For supported display settings, see page "Supported Monitor ...
Owners Manual
Page 129
... where service is 12 months from the day of purchase. - SERVICE CONTACTS FOR THE EPSON WORLD WIDE WARRANTY ON PROJECTORS This contact list is listed, refer to purchase the original EPSON power supply cable produced for each country. 2) This warranty service will cover at least...accordance with details of this manual, or transportation c.In case the product was repaired or modified by any party other than EPSON or an Epson-authorized servicer d.Problems caused by EPSON (or its authorized servicer) in foreign countries, make sure to Epson's main Web page at www.epson.com. s s s...
... where service is 12 months from the day of purchase. - SERVICE CONTACTS FOR THE EPSON WORLD WIDE WARRANTY ON PROJECTORS This contact list is listed, refer to purchase the original EPSON power supply cable produced for each country. 2) This warranty service will cover at least...accordance with details of this manual, or transportation c.In case the product was repaired or modified by any party other than EPSON or an Epson-authorized servicer d.Problems caused by EPSON (or its authorized servicer) in foreign countries, make sure to Epson's main Web page at www.epson.com. s s s...

