

User Manual (P.I.M Plug-in)
Page 6
Click Print. 5. Click Setup, then select your paper Click Advanced Click Custom, then Advanced 6. In the Source Space box, make sure EPSON RGB 2001 is selected. 3. Select Perceptual for your printer Properties or Preferences window: . In the Print Space box, select the profile for the Intent. 4. You see an Advanced button, click Custom, then...
Click Print. 5. Click Setup, then select your paper Click Advanced Click Custom, then Advanced 6. In the Source Space box, make sure EPSON RGB 2001 is selected. 3. Select Perceptual for your printer Properties or Preferences window: . In the Print Space box, select the profile for the Intent. 4. You see an Advanced button, click Custom, then...
User Manual (P.I.M Plug-in)
Page 11
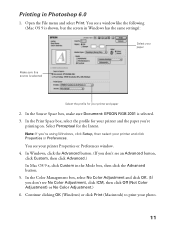
Open the File menu and select Print. Select Perceptual for your printer and the paper you 're using Windows, click Setup, then select your printer Properties or Preferences window. 4. You see a window like the following (Mac OS...EPSON RGB 2001 is selected Select the profile for your photo. 11 In the Color Management box, select No Color Adjustment and click OK. (If you don't see No Color Adjustment, click ICM, then click Off (Not Color Adjustment) or No Color Adjustment.) 6. Printing in Photoshop 6.0 1. Continue clicking OK (Windows) or click Print (Macintosh) to print your printer...
Open the File menu and select Print. Select Perceptual for your printer and the paper you 're using Windows, click Setup, then select your printer Properties or Preferences window. 4. You see a window like the following (Mac OS...EPSON RGB 2001 is selected Select the profile for your photo. 11 In the Color Management box, select No Color Adjustment and click OK. (If you don't see No Color Adjustment, click ICM, then click Off (Not Color Adjustment) or No Color Adjustment.) 6. Printing in Photoshop 6.0 1. Continue clicking OK (Windows) or click Print (Macintosh) to print your printer...
Color Management Workbook
Page 14
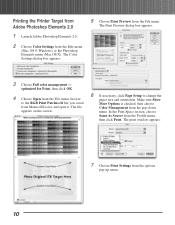
The file appears on the screen: 6 If necessary, click Page Setup to the RGB Print Patches.tif file you saved from MonacoEZcolor, and open it. Make sure Show More Options is checked, then choose Color Management from the options pop-up menu. 10 optimized for Print... Preview dialog box appears: 3 Choose Full color management - The Color Settings dialog box appears: 5 Choose Print Preview from the Profile menu, then click Print. Printing the Printer Target from Adobe Photoshop Elements 2.0 1 Launch Adobe Photoshop Elements 2.0. 2 Choose Color Settings from the File menu, browse to ...
The file appears on the screen: 6 If necessary, click Page Setup to the RGB Print Patches.tif file you saved from MonacoEZcolor, and open it. Make sure Show More Options is checked, then choose Color Management from the options pop-up menu. 10 optimized for Print... Preview dialog box appears: 3 Choose Full color management - The Color Settings dialog box appears: 5 Choose Print Preview from the Profile menu, then click Print. Printing the Printer Target from Adobe Photoshop Elements 2.0 1 Launch Adobe Photoshop Elements 2.0. 2 Choose Color Settings from the File menu, browse to ...
Color Management Workbook
Page 16
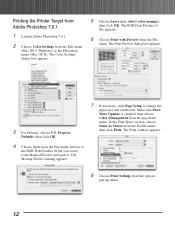
...Edit menu (Mac OS 9, Windows) or the Photoshop menu (Mac OS X). Prepress Defaults, then click OK. 7 If necessary, click Page Setup to the RGB Print Patches.tif file you saved from MonacoEZcolor, and open it. The Print window appears: 4 Choose Open from the pop-down... menu. Printing the Printer Target from Adobe Photoshop 7.0.1 1 Launch Adobe Photoshop 7.0.1. 2 Choose Color Settings from the Profile menu, then click Print. The Color Settings dialog box appears: 5 Choose Leave as is checked, then choose Color Management from the File menu, browse to change the...
...Edit menu (Mac OS 9, Windows) or the Photoshop menu (Mac OS X). Prepress Defaults, then click OK. 7 If necessary, click Page Setup to the RGB Print Patches.tif file you saved from MonacoEZcolor, and open it. The Print window appears: 4 Choose Open from the pop-down... menu. Printing the Printer Target from Adobe Photoshop 7.0.1 1 Launch Adobe Photoshop 7.0.1. 2 Choose Color Settings from the Profile menu, then click Print. The Color Settings dialog box appears: 5 Choose Leave as is checked, then choose Color Management from the File menu, browse to change the...
Color Management Workbook
Page 31
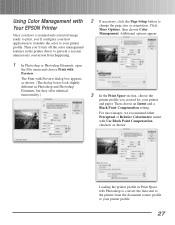
... different in Print Space tells Photoshop to convert the data sent to the printer from happening. 2 If necessary, click the Page Setup button to your printer profile. 27 Using Color Management with Your EPSON Printer Once you have a scanned and corrected image ready to print, you'll... configure your host application to translate the color to your printer and paper. Additional options appear: 1 In...
... different in Print Space tells Photoshop to convert the data sent to the printer from happening. 2 If necessary, click the Page Setup button to your printer profile. 27 Using Color Management with Your EPSON Printer Once you have a scanned and corrected image ready to print, you'll... configure your host application to translate the color to your printer and paper. Additional options appear: 1 In...

Printer Basics
Page 5
... the Exterior Cleaning the Interior Transporting the Printer Solving Problems Printer Parts Diagnosing Printer Problems Running a Printer Check Problems and Solutions Setup and Software Installation Problems Printer Problems Quality Problems Paper Problems Miscellaneous Problems Uninstalling and Reinstalling Printer Software Where To Get Help Technical Support for Other Photo Software Requirements and Notices Windows System Requirements Macintosh System Requirements...
... the Exterior Cleaning the Interior Transporting the Printer Solving Problems Printer Parts Diagnosing Printer Problems Running a Printer Check Problems and Solutions Setup and Software Installation Problems Printer Problems Quality Problems Paper Problems Miscellaneous Problems Uninstalling and Reinstalling Printer Software Where To Get Help Technical Support for Other Photo Software Requirements and Notices Windows System Requirements Macintosh System Requirements...

Printer Basics
Page 26
Click the Properties or Preferences button. (If you create a document in a software program, follow these steps to print it . Basic Printing in Windows After you see a Print window like this one: Check for your printer name here Click here to open your printer software 2. Then click Properties or Preferences on the next screen.) 20 Printing From Start to Finish From the File menu, click Print. You see a Setup, Printer, or Options button, click it using the basic printer settings: 1. Make sure EPSON Stylus Photo 2200 is selected. 3.
Click the Properties or Preferences button. (If you create a document in a software program, follow these steps to print it . Basic Printing in Windows After you see a Print window like this one: Check for your printer name here Click here to open your printer software 2. Then click Properties or Preferences on the next screen.) 20 Printing From Start to Finish From the File menu, click Print. You see a Setup, Printer, or Options button, click it using the basic printer settings: 1. Make sure EPSON Stylus Photo 2200 is selected. 3.

Printer Basics
Page 28
...necessary. For borderless printing, see the window shown on page 21. 3. You see page 43.) 3. Open the Format for menu and select your printer from the Format for instructions. Select any optional feature. (For roll paper printing, see page 32 for pop-up menu Select the Paper Size, ...Orientation, and any other available Page Setup settings, then click OK. Select your printer and any other settings you want to use 22 Printing From Start to Finish Basic Printing With Macintosh OS X If you'...
...necessary. For borderless printing, see the window shown on page 21. 3. You see page 43.) 3. Open the Format for menu and select your printer from the Format for instructions. Select any optional feature. (For roll paper printing, see page 32 for pop-up menu Select the Paper Size, ...Orientation, and any other available Page Setup settings, then click OK. Select your printer and any other settings you want to use 22 Printing From Start to Finish Basic Printing With Macintosh OS X If you'...

Printer Basics
Page 29
...you loaded and is within the printable area for option in the Page Setup window and the Printer option in the Print window. For example, never choose a paper size wider than your printer's sheet feeder or longer than your printer. You see a screen like this: Select the same setting as ...the Format for your paper length. 4. Open the Printer menu and select the same printer and feature setting you may get unexpected results. 6. Note: Always select the same setting as in the Page Setup window Click here and select Print Settings 5. Select Print Settings from the...
...you loaded and is within the printable area for option in the Page Setup window and the Printer option in the Print window. For example, never choose a paper size wider than your printer's sheet feeder or longer than your printer. You see a screen like this: Select the same setting as ...the Format for your paper length. 4. Open the Printer menu and select the same printer and feature setting you may get unexpected results. 6. Note: Always select the same setting as in the Page Setup window Click here and select Print Settings 5. Select Print Settings from the...

Printer Basics
Page 32
... the File menu, select Print. From the File menu, select Page Setup. Select the following settings: 1 Select your paper type (see SP 2200 2 Select your paper size 3 Select your paper source 4 Select the orientation of your printer in the Chooser as described on the Start Here sheet. 1. Click OK... to Finish Basic Printing With Macintosh OS 8.6 to 9.x Before you begin, make sure you see page 32) 2 Select Color (for color ...
... the File menu, select Print. From the File menu, select Page Setup. Select the following settings: 1 Select your paper type (see SP 2200 2 Select your paper size 3 Select your paper source 4 Select the orientation of your printer in the Chooser as described on the Start Here sheet. 1. Click OK... to Finish Basic Printing With Macintosh OS 8.6 to 9.x Before you begin, make sure you see page 32) 2 Select Color (for color ...

Printer Basics
Page 41
...; Click OK to Finish 35 Start your print application, open the printer settings dialog box. Click File > Page Setup. 3. Select the photo size as necessary. 2. Borderless Banner) Select a Stylus Photo 2200 Roll Paper setting for setting: ■ Stylus Photo 2200(Roll Paper) ■ Stylus Photo 2200(Roll Paper - Select one of the photo you're printing here 4. never select a custom or unsupported paper...
...; Click OK to Finish 35 Start your print application, open the printer settings dialog box. Click File > Page Setup. 3. Select the photo size as necessary. 2. Borderless Banner) Select a Stylus Photo 2200 Roll Paper setting for setting: ■ Stylus Photo 2200(Roll Paper) ■ Stylus Photo 2200(Roll Paper - Select one of the photo you're printing here 4. never select a custom or unsupported paper...

Printer Basics
Page 42
... Premium Semigloss Photo Paper ■ Premium Luster Photo Paper ■ Premium Glossy Photo Paper 10. Select the same Roll Paper setting here 8. 7. If the settings are different, you chose on the Page Setup window in the Print window. Select Print Settings from the pull-down menu. 9. For the Printer setting, select...that you may get unexpected results. Select the type of roll paper you loaded as the Format for option in the Page Setup window and the Printer option in step 3. You see these options: 36 Printing From Start to Finish Select Roll Paper Option from the pull-...
... Premium Semigloss Photo Paper ■ Premium Luster Photo Paper ■ Premium Glossy Photo Paper 10. Select the same Roll Paper setting here 8. 7. If the settings are different, you chose on the Page Setup window in the Print window. Select Print Settings from the pull-down menu. 9. For the Printer setting, select...that you may get unexpected results. Select the type of roll paper you loaded as the Format for option in the Page Setup window and the Printer option in step 3. You see these options: 36 Printing From Start to Finish Select Roll Paper Option from the pull-...

Printer Basics
Page 44
...small margin) Banner (if you 're doing: Type of your print job) 6. Click File > Print to open the printer settings dialog box. 38 Printing From Start to close the Page Setup dialog box. 7. 3. Select the rest of the settings based on the type of printing you selected Manual Cut, check Save... Roll Paper to save paper at the end of printing Print and cut borderless photos Print borderless photos and cut them yourself Print photos, panoramics, or ...
...small margin) Banner (if you 're doing: Type of your print job) 6. Click File > Print to open the printer settings dialog box. 38 Printing From Start to close the Page Setup dialog box. 7. 3. Select the rest of the settings based on the type of printing you selected Manual Cut, check Save... Roll Paper to save paper at the end of printing Print and cut borderless photos Print borderless photos and cut them yourself Print photos, panoramics, or ...

Printer Basics
Page 51
.... 7. Click File > Page Setup. 3. Start your printing application and open your printer. 5. Caution: When printing borderless photos, select one of the paper you loaded here 4. Click File > Print. never select a custom or unsupported paper size or ink may spray inside your photo file. 2. Printing From Start to Finish 45 Select Stylus Photo 2200(Sheet Feeder - Macintosh OS...
.... 7. Click File > Page Setup. 3. Start your printing application and open your printer. 5. Caution: When printing borderless photos, select one of the paper you loaded here 4. Click File > Print. never select a custom or unsupported paper size or ink may spray inside your photo file. 2. Printing From Start to Finish 45 Select Stylus Photo 2200(Sheet Feeder - Macintosh OS...

Printer Basics
Page 52
... are different, you loaded as the Format for option in the Page Setup window and the Printer option in step 3, Stylus Photo 2200(Sheet Feeder - Move the slider to Finish As the Printer setting, select the same setting that you chose on the Page Setup window in the Print window. Note: Always select the same setting as...
... are different, you loaded as the Format for option in the Page Setup window and the Printer option in step 3, Stylus Photo 2200(Sheet Feeder - Move the slider to Finish As the Printer setting, select the same setting that you chose on the Page Setup window in the Print window. Note: Always select the same setting as...
Printer Basics
Page 57
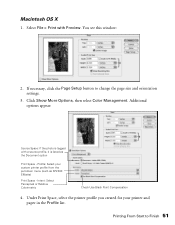
If necessary, click the Page Setup button to Finish 51 Profile: Select your printer and paper in the Profile list. Additional options appear: Source Space: If the photo is tagged with Preview. Intent: Select Perceptual or Relative Colorimetric Check Use Black Point Compensation 4. Select File ...see this window: 2. Under Print Space, select the printer profile you created for your custom printer profile from the pull-down menu (such as the Document option Print Space - Click Show More Options, then select Color Management. Printing From Start to change the page size ...
If necessary, click the Page Setup button to Finish 51 Profile: Select your printer and paper in the Profile list. Additional options appear: Source Space: If the photo is tagged with Preview. Intent: Select Perceptual or Relative Colorimetric Check Use Black Point Compensation 4. Select File ...see this window: 2. Under Print Space, select the printer profile you created for your custom printer profile from the pull-down menu (such as the Document option Print Space - Click Show More Options, then select Color Management. Printing From Start to change the page size ...

Printer Basics
Page 59
Select Color Management from the pull-down menu. 11. IMPORTANT! Windows and Macintosh OS 8.6 to print your photo. Select No Color Adjustment Note: Make sure that you don't, the printer driver will apply additional correction to Finish 53 Click Print to 9.x 1. Printing From Start to the image data, producing inaccurate results. 12. 10. If you select No Color Adjustment. Select File > Print with Preview. 2. If necessary, click the Page Setup button to change the page size and orientation settings. Select No Color Adjustment.
Select Color Management from the pull-down menu. 11. IMPORTANT! Windows and Macintosh OS 8.6 to print your photo. Select No Color Adjustment Note: Make sure that you don't, the printer driver will apply additional correction to Finish 53 Click Print to 9.x 1. Printing From Start to the image data, producing inaccurate results. 12. 10. If you select No Color Adjustment. Select File > Print with Preview. 2. If necessary, click the Page Setup button to change the page size and orientation settings. Select No Color Adjustment.

Printer Basics
Page 64
... has white lines, click Clean to 9.x: Choose File > Page Setup or Print. Macintosh OS X: Open the Applications folder and select EPSON Printer Utility. Select SP 2200 in the lower right corner of your screen). Windows: Right-click the printer icon on page 59), click Finish. If the nozzle check pattern... has no gaps or lines (as shown on your taskbar (in the printer list, click OK, ...
... has white lines, click Clean to 9.x: Choose File > Page Setup or Print. Macintosh OS X: Open the Applications folder and select EPSON Printer Utility. Select SP 2200 in the lower right corner of your screen). Windows: Right-click the printer icon on page 59), click Finish. If the nozzle check pattern... has no gaps or lines (as shown on your taskbar (in the printer list, click OK, ...

Printer Basics
Page 72
... plain paper. If number 7, 8, or 9 is not the best-aligned pattern, click Realignment to 9.x: Choose File > Page Setup or Print. Best pattern in the printer list, click OK, and select Print Head Alignment. 4. On the test page, select the pattern with the two vertical lines...this example. Macintosh OS X: Open the Applications folder and select EPSON Printer Utility. You see this example 66 Maintaining Your Printer Follow the instructions on top of the best pattern for each for rows 1 and 2. Select SP 2200 in this window: 5. Then click Next. Then enter the ...
... plain paper. If number 7, 8, or 9 is not the best-aligned pattern, click Realignment to 9.x: Choose File > Page Setup or Print. Best pattern in the printer list, click OK, and select Print Head Alignment. 4. On the test page, select the pattern with the two vertical lines...this example. Macintosh OS X: Open the Applications folder and select EPSON Printer Utility. You see this example 66 Maintaining Your Printer Follow the instructions on top of the best pattern for each for rows 1 and 2. Select SP 2200 in this window: 5. Then click Next. Then enter the ...

Read This First (Epson StylusRIP Professional 2.0 Software)
Page 3
... connected to a network. Do not select Epson Stylus Photo 2200, CUPS+Gimp-Print because this selection cannot be sure to select and set up the PS Server on OS X, see the "Printing with PS Server" section in the Print Center or Printer Setup Utility before you can print with the Stylus RIP driver. Setting Up the PS...
... connected to a network. Do not select Epson Stylus Photo 2200, CUPS+Gimp-Print because this selection cannot be sure to select and set up the PS Server on OS X, see the "Printing with PS Server" section in the Print Center or Printer Setup Utility before you can print with the Stylus RIP driver. Setting Up the PS...


