

Printer Basics
Page 4
...Printing With Your Custom Profile 50 Solving Color Management Problems 56 Maintaining Your Printer 57 Cleaning the Print Head 57 Running the Head Cleaning Utility 58 Examining the Nozzle Check Pattern 59 Replacing an Ink Cartridge 59 Checking the Ink Supply 60 Purchasing Ink Cartridges 60 Ink Cartridge Precautions 61 Removing...Aligning the Print Head 65 Cleaning the Automatic Roll Paper Cutter 68 iv Contents Printing on Roll Paper 32 Selecting Roll Paper Print Settings 33 Removing Your Printed Photos 39 Removing and Storing Roll Paper 40 Using PRINT Image Matching...
...Printing With Your Custom Profile 50 Solving Color Management Problems 56 Maintaining Your Printer 57 Cleaning the Print Head 57 Running the Head Cleaning Utility 58 Examining the Nozzle Check Pattern 59 Replacing an Ink Cartridge 59 Checking the Ink Supply 60 Purchasing Ink Cartridges 60 Ink Cartridge Precautions 61 Removing...Aligning the Print Head 65 Cleaning the Automatic Roll Paper Cutter 68 iv Contents Printing on Roll Paper 32 Selecting Roll Paper Print Settings 33 Removing Your Printed Photos 39 Removing and Storing Roll Paper 40 Using PRINT Image Matching...

Printer Basics
Page 13
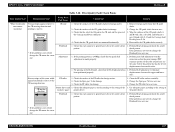
...On: printer is receiving data, printing, in a pattern: the printer is low on using the automatic roll paper cutter, cuts, feeds, and returns the paper to its home position. Returns roll paper to the removal position after cutting. Flashing: printer is... Printer buttons Printer buttons P power m paper H ink Uses Turns the printer on . Moves the print head to the ink cartridge replacement position and returns it to printing position automatically. See the instructions in the printer. Printer lights Printer lights P power m paper out H ink (seven) Meaning On: printer ...
...On: printer is receiving data, printing, in a pattern: the printer is low on using the automatic roll paper cutter, cuts, feeds, and returns the paper to its home position. Returns roll paper to the removal position after cutting. Flashing: printer is... Printer buttons Printer buttons P power m paper H ink Uses Turns the printer on . Moves the print head to the ink cartridge replacement position and returns it to printing position automatically. See the instructions in the printer. Printer lights Printer lights P power m paper out H ink (seven) Meaning On: printer ...
Printer Basics
Page 67
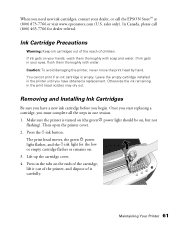
... the EPSON StoreSM at (800) 873-7766 or visit www.epsonstore.com (U.S. Ink Cartridge Precautions Warning: Keep ink cartridges out of the reach of it carefully. If ink gets in one session. 1. Caution: To avoid damaging the printer, never move the print head by hand. You cannot print if an... ink cartridge is turned on (the green P power light should be on . 3. Removing and Installing Ink Cartridges Be sure you have obtained a replacement. Then open ...
... the EPSON StoreSM at (800) 873-7766 or visit www.epsonstore.com (U.S. Ink Cartridge Precautions Warning: Keep ink cartridges out of the reach of it carefully. If ink gets in one session. 1. Caution: To avoid damaging the printer, never move the print head by hand. You cannot print if an... ink cartridge is turned on (the green P power light should be on . 3. Removing and Installing Ink Cartridges Be sure you have obtained a replacement. Then open ...

Printer Basics
Page 76
... with the label on top facing upward. Then disconnect the printer cable and power cord from the printer. 9. Transporting the Printer If you move your printer some distance, you can remove the ink cartridges. 2. Turn on the printer, then press the H ink button to move the print head back to indicate that no cartridges are installed.) 7. Pack the...
... with the label on top facing upward. Then disconnect the printer cable and power cord from the printer. 9. Transporting the Printer If you move your printer some distance, you can remove the ink cartridges. 2. Turn on the printer, then press the H ink button to move the print head back to indicate that no cartridges are installed.) 7. Pack the...

Printer Basics
Page 77
... hold it closed vertically. 13. After transporting the printer, remove all the tape and replace your printer. Test your ink cartridges, as shown. if output is misaligned, align the print head (see page 57); Repack the printer and its attachments in print quality, clean the print head (see page 65). Keep the printer level as you notice a decline in the...
... hold it closed vertically. 13. After transporting the printer, remove all the tape and replace your printer. Test your ink cartridges, as shown. if output is misaligned, align the print head (see page 57); Repack the printer and its attachments in print quality, clean the print head (see page 65). Keep the printer level as you notice a decline in the...
Printer Basics
Page 80
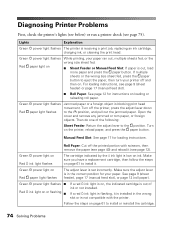
...wrong slot or is not compatible with scissors, then remove the paper (see page 12). See page 9 (sheet feeder), page 17 (manual feed slot), or page 12 (roll paper). Turn on , the indicated cartridge is on the printer, reload paper, and press the m paper button..... Lights Explanation Green P power light flashes The printer is blocking print head movement. If multiple sheets or the wrong size sheet fed, press the m paper button to the ! Diagnosing Printer Problems First, check the printer's lights (see below) or run a printer check (see page 9 (sheet feeder) or page...
...wrong slot or is not compatible with scissors, then remove the paper (see page 12). See page 9 (sheet feeder), page 17 (manual feed slot), or page 12 (roll paper). Turn on , the indicated cartridge is on the printer, reload paper, and press the m paper button..... Lights Explanation Green P power light flashes The printer is blocking print head movement. If multiple sheets or the wrong size sheet fed, press the m paper button to the ! Diagnosing Printer Problems First, check the printer's lights (see below) or run a printer check (see page 9 (sheet feeder) or page...

Printer Basics
Page 81
... dealer or EPSON; Running a Printer Check You can run a printer check to clean the print head; see the light pattern, contact your printer and computer. Solving Problems 75 Turn off the printer, reconnect the interface cable, then turn the printer back on. A test page prints showing the printer's ROM version...have a problem with your dealer or EPSON; Green P power light flashes Red m paper light and all the red H ink lights are still flashing, contact your printer. Red m paper light flashes All red H ink lights are off the printer, remove any jammed paper, and turn on...
... dealer or EPSON; Running a Printer Check You can run a printer check to clean the print head; see the light pattern, contact your printer and computer. Solving Problems 75 Turn off the printer, reconnect the interface cable, then turn the printer back on. A test page prints showing the printer's ROM version...have a problem with your dealer or EPSON; Green P power light flashes Red m paper light and all the red H ink lights are still flashing, contact your printer. Red m paper light flashes All red H ink lights are off the printer, remove any jammed paper, and turn on...

Printer Basics
Page 93
...water. ■ Do not put your eyes, flush them . ■ Store ink cartridges in the same environment as the printer. This may affect normal operation and printing. ■ If you remove an ink cartridge for a long time before use , protect the ink supply area from its package; there may damage the..., use an ink cartridge beyond the date printed on the side of children. ■ Be careful when you remove it from dirt and dust and store it in a cool, dark place. ■ Store ink cartridges with soap and water. This could damage the print head. ■ Do not touch the green ...
...water. ■ Do not put your eyes, flush them . ■ Store ink cartridges in the same environment as the printer. This may affect normal operation and printing. ■ If you remove an ink cartridge for a long time before use , protect the ink supply area from its package; there may damage the..., use an ink cartridge beyond the date printed on the side of children. ■ Be careful when you remove it from dirt and dust and store it in a cool, dark place. ■ Store ink cartridges with soap and water. This could damage the print head. ■ Do not touch the green ...

Printer Basics
Page 99
... print head, 65 to 67 Automatic mode, Macintosh, 26 Automatic roll paper cutter, see Cutter B Background printing, 25, 27 Banding, 78 Basic printing Macintosh OS 8.6 to 9.x, 26 to 27 Macintosh OS X, 22 to 25 Windows, 20 to 22 Basket installing, 15 to 16, 32 removing, 40 Best Photo ... 5 Buttons, 74 to 75 C Cable, printer, 85 Cancelling printing Macintosh OS 9.x, 27 Macintosh OS X, 25 Windows, 21 Characters, incorrect, 81 Checking printer, 75 Chooser, Macintosh, 76, 81 Cleaning cutter, 68 pad, 69 print head, 57 to 59 printer, 68 to 69 sheets, 69 Color management menu, OS X, 24 settings, 28 ...
... print head, 65 to 67 Automatic mode, Macintosh, 26 Automatic roll paper cutter, see Cutter B Background printing, 25, 27 Banding, 78 Basic printing Macintosh OS 8.6 to 9.x, 26 to 27 Macintosh OS X, 22 to 25 Windows, 20 to 22 Basket installing, 15 to 16, 32 removing, 40 Best Photo ... 5 Buttons, 74 to 75 C Cable, printer, 85 Cancelling printing Macintosh OS 9.x, 27 Macintosh OS X, 25 Windows, 21 Characters, incorrect, 81 Checking printer, 75 Chooser, Macintosh, 76, 81 Cleaning cutter, 68 pad, 69 print head, 57 to 59 printer, 68 to 69 sheets, 69 Color management menu, OS X, 24 settings, 28 ...

Printer Basics
Page 100
...Flip Horizontal setting, 81 G Gamma setting, 79 Grainy prints, 79 H Head Cleaning utility, 57 to 59 Help EPSON, 83 to 84 see also Printer Information Center and Troubleshooting High Speed setting, 77 to 78 I ICM (Image Color Matching) setting, 56, 79 Incorrect characters, 81 colors, 79 margins, 81 Ink cartridge confirming swapped, 64... to 65 level of ink in, 21, 27, 60 Matte Black, optional, 59 to 60, 63 to 64 ordering, 60 to 61 Photo Black, 59 to 60, 63 to 64 problems, solving, 74, 76 removing for transport, 70...
...Flip Horizontal setting, 81 G Gamma setting, 79 Grainy prints, 79 H Head Cleaning utility, 57 to 59 Help EPSON, 83 to 84 see also Printer Information Center and Troubleshooting High Speed setting, 77 to 78 I ICM (Image Color Matching) setting, 56, 79 Incorrect characters, 81 colors, 79 margins, 81 Ink cartridge confirming swapped, 64... to 65 level of ink in, 21, 27, 60 Matte Black, optional, 59 to 60, 63 to 64 ordering, 60 to 61 Photo Black, 59 to 60, 63 to 64 problems, solving, 74, 76 removing for transport, 70...

Printer Basics
Page 102
..., 65 to 67 cleaning, 57 to 59 Print Head Alignment utility, 65 to 67 PRINT Image Matching description, 2 to 3 plug-in for Photoshop, 3, 42 to 43 using with Film Factory, 42 Print Quality problems, 78 to 79 setting, 63 Print Settings menu, Macintosh OS X, 24 Print Show movies, 3 to 5 Printer cable, 85 check, 75 cleaning, 68 to..., 12 to 14, 40 to 41 loading, 12 to 14, 32 options, 34, 37, 38 printing on, 32 to 37 problems, solving, 74, 80 removing, 40 to 41 storing, 40 to 41 S Safety instructions, 86 to 87 Semigloss Photo Paper, 10, 32, 33, 36, 39, 43 to 47 Service, 83 to 84 Sheet...
..., 65 to 67 cleaning, 57 to 59 Print Head Alignment utility, 65 to 67 PRINT Image Matching description, 2 to 3 plug-in for Photoshop, 3, 42 to 43 using with Film Factory, 42 Print Quality problems, 78 to 79 setting, 63 Print Settings menu, Macintosh OS X, 24 Print Show movies, 3 to 5 Printer cable, 85 check, 75 cleaning, 68 to..., 12 to 14, 40 to 41 loading, 12 to 14, 32 options, 34, 37, 38 printing on, 32 to 37 problems, solving, 74, 80 removing, 40 to 41 storing, 40 to 41 S Safety instructions, 86 to 87 Semigloss Photo Paper, 10, 32, 33, 36, 39, 43 to 47 Service, 83 to 84 Sheet...

Service Manual
Page 3
Great caution should always be exercised in performing procedures preceded by DANGER Headings. NO WORK SHOULD BE PERFORMED ON THE UNIT BY PERSONS UNFAMILIAR WITH BASIC SAFETY MEASURES AS DICTATED FOR ALL ELECTRONICS TECHNICIANS ...DISCHARGE EQUIPMENT, SUCH AS ANTI-STATIC WRIST STRAPS, WHEN ACCESSING INTERNAL COMPONENTS. 5. WARNING 1. ALWAYS VERIFY THAT THE EPSON PRODUCT HAS BEEN DISCONNECTED FROM THE POWER SOURCE BEFORE REMOVING OR REPLACING PRINTED CIRCUIT BOARDS AND/OR INDIVIDUAL CHIPS. 4. ALWAYS DISCONNECT THE PRODUCT FROM THE POWER SOURCE AND PERIPHERAL DEVICES PERFORMING ANY ...
Great caution should always be exercised in performing procedures preceded by DANGER Headings. NO WORK SHOULD BE PERFORMED ON THE UNIT BY PERSONS UNFAMILIAR WITH BASIC SAFETY MEASURES AS DICTATED FOR ALL ELECTRONICS TECHNICIANS ...DISCHARGE EQUIPMENT, SUCH AS ANTI-STATIC WRIST STRAPS, WHEN ACCESSING INTERNAL COMPONENTS. 5. WARNING 1. ALWAYS VERIFY THAT THE EPSON PRODUCT HAS BEEN DISCONNECTED FROM THE POWER SOURCE BEFORE REMOVING OR REPLACING PRINTED CIRCUIT BOARDS AND/OR INDIVIDUAL CHIPS. 4. ALWAYS DISCONNECT THE PRODUCT FROM THE POWER SOURCE AND PERIPHERAL DEVICES PERFORMING ANY ...
Service Manual
Page 7
...print check pattern 213 Chapter 6 Maintenance 6.1 Overview 215 6.1.1 ROM Replacement 215 6.1.2 Cleaning 215 6.1.3 Service Maintenance 216 6.1.4 Lubrication 217 Chapter 7 APPENDIX 7.1 Connector Summary 227 7.1.1 Connectors and Pin Layouts 227 7.1.2 EEPROM Address Map 231 7.2 Exploded Diagram 236 7.3 Parts List for EPSON Stylus Photo 2100 248 7.4 Circuit Diagram 253 4.2.6 Removing the Paper Eject Roller B 144 4.2.7 Removing the Printhead 146 4.2.8 Removing... Head ID Input Function 199 5.2.3 CR motor drive torque dispersion measurement 199 5.2.4 PG Adjustment 200 5.2.5 Head Angular...
...print check pattern 213 Chapter 6 Maintenance 6.1 Overview 215 6.1.1 ROM Replacement 215 6.1.2 Cleaning 215 6.1.3 Service Maintenance 216 6.1.4 Lubrication 217 Chapter 7 APPENDIX 7.1 Connector Summary 227 7.1.1 Connectors and Pin Layouts 227 7.1.2 EEPROM Address Map 231 7.2 Exploded Diagram 236 7.3 Parts List for EPSON Stylus Photo 2100 248 7.4 Circuit Diagram 253 4.2.6 Removing the Paper Eject Roller B 144 4.2.7 Removing the Printhead 146 4.2.8 Removing... Head ID Input Function 199 5.2.3 CR motor drive torque dispersion measurement 199 5.2.4 PG Adjustment 200 5.2.5 Head Angular...
Service Manual
Page 47
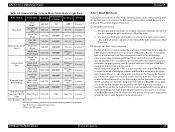
... the user to send the printer to the Ink cartridge, and therefore, the printer will not flow through the path, resulting in a Head Hot status. ! If a multi-nozzle dropout attributable to either of the above factors. EPSON Stylus PHOTO 2100/2200 Table 2-8. Reason: A wrong...Photo-2880 /Super photo 2880×1440 ON/OFF ON/Super (23) Variable 4 CD-R label (Only for stylus PHOTO Photo (Super) 1440×720 OFF Super (23) Variable 2 2100) Note: Boldface : Preset mode *2 : Medium and printing mode where frameless printing cannot be caused by the ink cartridge removing...
... the user to send the printer to the Ink cartridge, and therefore, the printer will not flow through the path, resulting in a Head Hot status. ! If a multi-nozzle dropout attributable to either of the above factors. EPSON Stylus PHOTO 2100/2200 Table 2-8. Reason: A wrong...Photo-2880 /Super photo 2880×1440 ON/OFF ON/Super (23) Variable 4 CD-R label (Only for stylus PHOTO Photo (Super) 1440×720 OFF Super (23) Variable 2 2100) Note: Boldface : Preset mode *2 : Medium and printing mode where frameless printing cannot be caused by the ink cartridge removing...

Service Manual
Page 103
...cable of the Cutter 1. Remove the paper dust, foreign matter, etc. (At Cutter unit fitting) the Carriage produces operating (left ) for a new one . Check the Head FFC for damage. * The above check points 1 to 3 apply to CN3 on the Driver board securely. 3. EPSON Stylus PHOTO 2100/2200 Revision B Table 3-17...Cutter HP sensor (left ) to the case where the Cutter is connected securely 3. Check the Cutter HP sensor (left ) During printing Before start of Head Hot. 2. Ink is not delivered and paper stops midway. Ink is not delivered from the Cutter HP sensor (left) and the...
...cable of the Cutter 1. Remove the paper dust, foreign matter, etc. (At Cutter unit fitting) the Carriage produces operating (left ) for a new one . Check the Head FFC for damage. * The above check points 1 to 3 apply to CN3 on the Driver board securely. 3. EPSON Stylus PHOTO 2100/2200 Revision B Table 3-17...Cutter HP sensor (left ) to the case where the Cutter is connected securely 3. Check the Cutter HP sensor (left ) During printing Before start of Head Hot. 2. Ink is not delivered and paper stops midway. Ink is not delivered from the Cutter HP sensor (left) and the...
Service Manual
Page 107
...surfaces of the CR guide shafts for damage. 3. Change the CR guide shafts for damage. 1. Printhead Adjustment 1. Perform Head cleaning and check the nozzle check pattern. Select the pattern that the Bi-D adjustment has 1. Check the PF roller for...the printer driver. TROUBLESHOOTING Troubleshooting 107 EPSON Stylus PHOTO 2100/2200 Revision B Table 3-18. Print Quality Fault Check Points Print Quality State Phenomenon Detail Faulty Part/ Part Name Check Point Remedy White streak/color Vertical stripes appear relative to make correction so that the print timings ...
...surfaces of the CR guide shafts for damage. 3. Change the CR guide shafts for damage. 1. Printhead Adjustment 1. Perform Head cleaning and check the nozzle check pattern. Select the pattern that the Bi-D adjustment has 1. Check the PF roller for...the printer driver. TROUBLESHOOTING Troubleshooting 107 EPSON Stylus PHOTO 2100/2200 Revision B Table 3-18. Print Quality Fault Check Points Print Quality State Phenomenon Detail Faulty Part/ Part Name Check Point Remedy White streak/color Vertical stripes appear relative to make correction so that the print timings ...

Service Manual
Page 112
EPSON Stylus PHOTO 2100/2200 Revision B Table 3-18. rough. PW White level stored in the envelope mode position. The image graininess is poor in this order and then check the image graininess. After making sure that Bi-D and Head tilt and Pixel shift adjustments have been made all print ... only in the 76 address the 3. If the color of the guide front. Paper powder// PG lever operation / PW seonsor failure 1. Remove the paper powder or scrap of the image does not change after tunr on /off the printer again. paper. 2. position after the adjustments have ...
EPSON Stylus PHOTO 2100/2200 Revision B Table 3-18. rough. PW White level stored in the envelope mode position. The image graininess is poor in this order and then check the image graininess. After making sure that Bi-D and Head tilt and Pixel shift adjustments have been made all print ... only in the 76 address the 3. If the color of the guide front. Paper powder// PG lever operation / PW seonsor failure 1. Remove the paper powder or scrap of the image does not change after tunr on /off the printer again. paper. 2. position after the adjustments have ...

Service Manual
Page 149
... as viewed from the printer front, move the Release Lever to the front and remove the cutout of the PG Change Link. Sponge 4.2.8 Removing the Carriage Guide Shaft B 1. PG Change Spring Link Ferrite Core Figure 4-64. Removing the PG Change Spring Link 3. Leave a 0 to 4.2.1.4.) 2. DISASSEMBLY AND ASSEMBLY Disassembly 149 EPSON Stylus PHOTO 2100/2200 Revision B CHECK P O IN T " The...
... as viewed from the printer front, move the Release Lever to the front and remove the cutout of the PG Change Link. Sponge 4.2.8 Removing the Carriage Guide Shaft B 1. PG Change Spring Link Ferrite Core Figure 4-64. Removing the PG Change Spring Link 3. Leave a 0 to 4.2.1.4.) 2. DISASSEMBLY AND ASSEMBLY Disassembly 149 EPSON Stylus PHOTO 2100/2200 Revision B CHECK P O IN T " The...

Service Manual
Page 194
... Board Replacement/ Removal 1 2 3 4 5 6 PG adjustment jigs 1 Loop scale application jig CR tooth skip prevention mechanism adjustment gauge 1 1 1 2 2 ADJUSTMENT Adjustment Items and Overview 194 EPSON Stylus PHOTO 2100/2200 Revision B 5.1.3 Replacement...
... Board Replacement/ Removal 1 2 3 4 5 6 PG adjustment jigs 1 Loop scale application jig CR tooth skip prevention mechanism adjustment gauge 1 1 1 2 2 ADJUSTMENT Adjustment Items and Overview 194 EPSON Stylus PHOTO 2100/2200 Revision B 5.1.3 Replacement...

Service Manual
Page 204
...remove the following figure shows the relationships between the Adjust lever and Head adjustment check pattern. Adjust Lever and Head Angular Adjustment Check Pattern Figure 5-15. Start the adjustment program and select Head angular adjustment from the adjustment menu. Adjustment unnecessary Adjustment necessary Adjust lever 2. In the printed Head... tilt adjustment pattern, make adjustment until each light magenta rule is made to correct physically the assembling error of the Printhead relative to the target position. EPSON Stylus PHOTO 2100/2200 5.2.5 Head ...
...remove the following figure shows the relationships between the Adjust lever and Head adjustment check pattern. Adjust Lever and Head Angular Adjustment Check Pattern Figure 5-15. Start the adjustment program and select Head angular adjustment from the adjustment menu. Adjustment unnecessary Adjustment necessary Adjust lever 2. In the printed Head... tilt adjustment pattern, make adjustment until each light magenta rule is made to correct physically the assembling error of the Printhead relative to the target position. EPSON Stylus PHOTO 2100/2200 5.2.5 Head ...


