Product Information Guide
Page 8
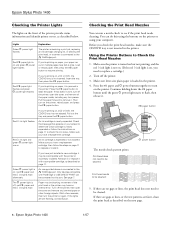
... pages have a replacement cartridge. You can run a nozzle check to be cleaned: P power button Print head needs to see if the print head needs cleaning. If there are on If you're printing on the printer, reload paper, and press the ) paper button. Epson Stylus Photo 1400 Checking the Printer Lights The lights on the front of the print head or the printer may be...
... pages have a replacement cartridge. You can run a nozzle check to be cleaned: P power button Print head needs to see if the print head needs cleaning. If there are on If you're printing on the printer, reload paper, and press the ) paper button. Epson Stylus Photo 1400 Checking the Printer Lights The lights on the front of the print head or the printer may be...
Product Information Guide
Page 9
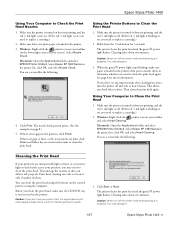
... least once a month to replace a cartridge.) 2. Windows: Right-click the printer icon on your taskbar (in the lower right corner of your taskbar and select Head Cleaning. Select Epson SP 1400 Series in the printer list, click OK, and select Nozzle Check. Print head cleaning uses ink, so clean it . 1/07 Epson Stylus Photo 1400 - 9 Make sure the printer is turned on but...
... least once a month to replace a cartridge.) 2. Windows: Right-click the printer icon on your taskbar (in the lower right corner of your taskbar and select Head Cleaning. Select Epson SP 1400 Series in the printer list, click OK, and select Nozzle Check. Print head cleaning uses ink, so clean it . 1/07 Epson Stylus Photo 1400 - 9 Make sure the printer is turned on but...
Product Information Guide
Page 11
... is low (for at www.epsonstore.com (U.S. Before printing, replace the expended cartridge. The IC chip on these Epson ink cartridges within six months of installing them and before using it . 1/07 Epson Stylus Photo 1400 - 11 Other products may be removed and reinserted freely. Do not use genuine Epson ink cartridges and do not drink the ink...
... is low (for at www.epsonstore.com (U.S. Before printing, replace the expended cartridge. The IC chip on these Epson ink cartridges within six months of installing them and before using it . 1/07 Epson Stylus Photo 1400 - 11 Other products may be removed and reinserted freely. Do not use genuine Epson ink cartridges and do not drink the ink...
Product Information Guide
Page 12
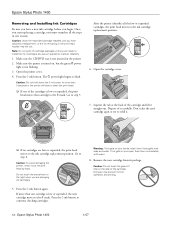
...Remove the new cartridge from its package. Epson Stylus Photo 1400 1/07 Caution: Leave the expended cartridge installed until you are vacuum packed to continue checking cartridges. Caution: To avoid damaging the printer, never move the print head by hand. Press the H ink button ...must complete all the low or expended cartridges, the print head moves to the ink cartridge replacement position. 6. Epson Stylus Photo 1400 Removing and Installing Ink Cartridges Be sure you have obtained a replacement, or the ink remaining in the printer. 2. Squeeze the tab at the back of ...
...Remove the new cartridge from its package. Epson Stylus Photo 1400 1/07 Caution: Leave the expended cartridge installed until you are vacuum packed to continue checking cartridges. Caution: To avoid damaging the printer, never move the print head by hand. Press the H ink button ...must complete all the low or expended cartridges, the print head moves to the ink cartridge replacement position. 6. Epson Stylus Photo 1400 Removing and Installing Ink Cartridges Be sure you have obtained a replacement, or the ink remaining in the printer. 2. Squeeze the tab at the back of ...

User's Guide
Page 4
Maintaining Your Printer 47 Checking the Print Head Nozzles 47 Cleaning the Print Head 48 Replacing an Ink Cartridge 50 Checking the Ink Status 50 Purchasing Ink Cartridges 51 Ink Cartridge Precautions 52 Removing and Installing Ink Cartridges 53 Aligning the Print Head 57 Cleaning the Printer 58 Transporting the Printer 59 Solving Problems 61 Diagnosing Printer Problems 61 Running a Printer Check 63...
Maintaining Your Printer 47 Checking the Print Head Nozzles 47 Cleaning the Print Head 48 Replacing an Ink Cartridge 50 Checking the Ink Status 50 Purchasing Ink Cartridges 51 Ink Cartridge Precautions 52 Removing and Installing Ink Cartridges 53 Aligning the Print Head 57 Cleaning the Printer 58 Transporting the Printer 59 Solving Problems 61 Diagnosing Printer Problems 61 Running a Printer Check 63...
User's Guide
Page 47
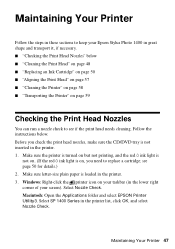
... Print Head" on page 48 ■ "Replacing an Ink Cartridge" on page 50 ■ "Aligning the Print Head" on page 57 ■ "Cleaning the Printer" on page 58 ■ "Transporting the Printer" on your taskbar (in the lower right corner of your Epson Stylus Photo 1400 in great shape and transport it, if necessary. ■ "Checking the Print Head Nozzles" below . Maintaining Your Printer...
... Print Head" on page 48 ■ "Replacing an Ink Cartridge" on page 50 ■ "Aligning the Print Head" on page 57 ■ "Cleaning the Printer" on page 58 ■ "Transporting the Printer" on your taskbar (in the lower right corner of your Epson Stylus Photo 1400 in great shape and transport it, if necessary. ■ "Checking the Print Head Nozzles" below . Maintaining Your Printer...
User's Guide
Page 49
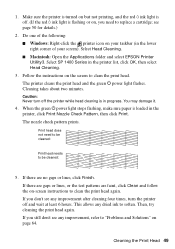
...printer, click Print Nozzle Check Pattern, then click Print. The nozzle check pattern prints. Print head does not need to soften. If you need to be cleaned: 5. Then, try cleaning the print head again. Cleaning the Print Head 49 Select Head Cleaning. ■ Macintosh: Open the Applications folder and select EPSON Printer Utility3. Select SP 1400... there are faint, click Clean and follow the on page 64. see any dried ink to replace a cartridge; The printer cleans the print head and the green P power light flashes. This allows any improvement after cleaning four times, turn off...
...printer, click Print Nozzle Check Pattern, then click Print. The nozzle check pattern prints. Print head does not need to soften. If you need to be cleaned: 5. Then, try cleaning the print head again. Cleaning the Print Head 49 Select Head Cleaning. ■ Macintosh: Open the Applications folder and select EPSON Printer Utility3. Select SP 1400... there are faint, click Clean and follow the on page 64. see any dried ink to replace a cartridge; The printer cleans the print head and the green P power light flashes. This allows any improvement after cleaning four times, turn off...
User's Guide
Page 50
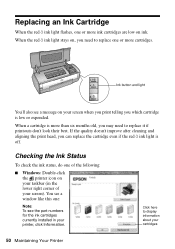
... message on your cartridges 50 Maintaining Your Printer You see the part numbers for the ink cartridges currently installed in the lower right corner of your screen). When a cartridge is off. If the quality doesn't improve after cleaning and aligning the print head, you can replace the cartridge even if the red H... ink light is more than six months old, you which cartridge is low or expended. When the red H ink light stays on, you need to display information about your screen when you print telling you may ...
... message on your cartridges 50 Maintaining Your Printer You see the part numbers for the ink cartridges currently installed in the lower right corner of your screen). When a cartridge is off. If the quality doesn't improve after cleaning and aligning the print head, you can replace the cartridge even if the red H... ink light is more than six months old, you which cartridge is low or expended. When the red H ink light stays on, you need to display information about your screen when you print telling you may ...
User's Guide
Page 52
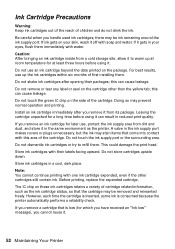
...expended, even if the other than the yellow tab; Doing so may stain items that is consumed because the printer automatically performs a reliability check. Store ink cartridges in the ink supply port makes covers or plugs unnecessary, ...printing, replace the expended cartridge. If you handle used ink cartridges; Note: You cannot continue printing with this area of cartridge related-information, such as the printer. A valve in a cool, dark place. Do not touch the green IC chip on these ink cartridges retains a variety of the cartridge. This could damage the print head...
...expended, even if the other than the yellow tab; Doing so may stain items that is consumed because the printer automatically performs a reliability check. Store ink cartridges in the ink supply port makes covers or plugs unnecessary, ...printing, replace the expended cartridge. If you handle used ink cartridges; Note: You cannot continue printing with this area of cartridge related-information, such as the printer. A valve in a cool, dark place. Do not touch the green IC chip on these ink cartridges retains a variety of the cartridge. This could damage the print head...
User's Guide
Page 53
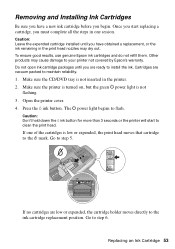
... green P power light is not inserted in the printer. 2. Press the H ink button. Removing and Installing Ink Cartridges Be sure you have a new ink cartridge before you have obtained a replacement, or the ink remaining in the print head nozzles may cause damage to flash. Go to step...or expended, the cartridge holder moves directly to clean the print head. The P power light begins to your printer not covered by Epson's warranty. Caution: Don't hold down the H ink button for more than 3 seconds or the printer will start replacing a cartridge, you are ready to the _ mark. Do...
... green P power light is not inserted in the printer. 2. Press the H ink button. Removing and Installing Ink Cartridges Be sure you have a new ink cartridge before you have obtained a replacement, or the ink remaining in the print head nozzles may cause damage to flash. Go to step...or expended, the cartridge holder moves directly to clean the print head. The P power light begins to your printer not covered by Epson's warranty. Caution: Don't hold down the H ink button for more than 3 seconds or the printer will start replacing a cartridge, you are ready to the _ mark. Do...

User's Guide
Page 54
... expended cartridge moves to continue checking the cartridges. Press the H ink button to the _ mark. After the printer identifies all the low or expended ink cartridges, the print head moves to refill it. Squeeze the tab at the back of it straight out. If ink gets in your ...carefully. Don't take the used cartridge apart or try to the ink cartridge replacement position. 6. Do not touch the area shown below when you are changing ink cartridges. 5. Press the H ink button again. Caution: To avoid damaging the printer, never move the print head by hand. Open the cartridge cover. 7.
... expended cartridge moves to continue checking the cartridges. Press the H ink button to the _ mark. After the printer identifies all the low or expended ink cartridges, the print head moves to refill it. Squeeze the tab at the back of it straight out. If ink gets in your ...carefully. Don't take the used cartridge apart or try to the ink cartridge replacement position. 6. Do not touch the area shown below when you are changing ink cartridges. 5. Press the H ink button again. Caution: To avoid damaging the printer, never move the print head by hand. Open the cartridge cover. 7.
User's Guide
Page 61
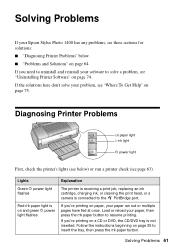
... P power light flashes Explanation The printer is receiving a print job, replacing an ink cartridge, charging ink, or cleaning the print head, or a camera is not inserted. Load or reload your paper, then press the ) paper button to solve a problem, see "Uninstalling Printer Software" on page 74. Solving Problems If your Epson Stylus Photo 1400 has any problems, see these sections...
... P power light flashes Explanation The printer is receiving a print job, replacing an ink cartridge, charging ink, or cleaning the print head, or a camera is not inserted. Load or reload your paper, then press the ) paper button to solve a problem, see "Uninstalling Printer Software" on page 74. Solving Problems If your Epson Stylus Photo 1400 has any problems, see these sections...
User's Guide
Page 62
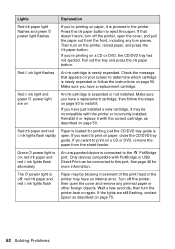
...print head or the printer may have just installed a new cartridge, it may be connected to the PictBridge port. Lights Explanation Red ) paper light flashes and green P power light flashes If you're printing on paper, it is expended or not installed. Reinstall it or replace it with the printer... or incorrectly installed. Red H ink light and green P power light are still flashing, contact Epson as described on An ink cartridge is jammed in the printer. red ) paper and red H ink lights...
...print head or the printer may have just installed a new cartridge, it may be connected to the PictBridge port. Lights Explanation Red ) paper light flashes and green P power light flashes If you're printing on paper, it is expended or not installed. Reinstall it or replace it with the printer... or incorrectly installed. Red H ink light and green P power light are still flashing, contact Epson as described on An ink cartridge is jammed in the printer. red ) paper and red H ink lights...
User's Guide
Page 67
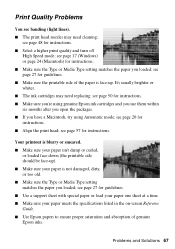
...try using genuine Epson ink cartridges and you use them within six months after you open the packages. ■ If you loaded; see page 50 for instructions. ■ Make sure you're using Automatic mode; see page 27 for instructions. ■ Align the print head; Problems and ...Solutions 67 It's usually brighter or whiter. ■ The ink cartridges may need replacing; see page 20 for guidelines. ■ Use a support sheet with special paper or load ...
...try using genuine Epson ink cartridges and you use them within six months after you open the packages. ■ If you loaded; see page 50 for instructions. ■ Make sure you're using Automatic mode; see page 27 for instructions. ■ Align the print head; Problems and ...Solutions 67 It's usually brighter or whiter. ■ The ink cartridges may need replacing; see page 20 for guidelines. ■ Use a support sheet with special paper or load ...
User's Guide
Page 68
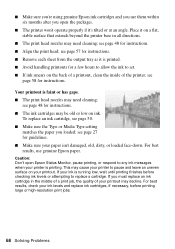
... For best results, use them within six months after you open Epson Status Monitor, pause printing, or respond to set. ■ If ink smears on ink. Caution: Don't open the packages. ■ The printer won't operate properly if it's tilted or at an angle. If... messages when your printer is printed. ■ Avoid handling printouts for instructions. ■ Align the print head; To replace an ink cartridge, see page 58 for instructions. Place it is printing. Your printout is running low, wait until printing finishes before printing large or high-resolution print jobs. 68 Solving...
... For best results, use them within six months after you open Epson Status Monitor, pause printing, or respond to set. ■ If ink smears on ink. Caution: Don't open the packages. ■ The printer won't operate properly if it's tilted or at an angle. If... messages when your printer is printed. ■ Avoid handling printouts for instructions. ■ Align the print head; To replace an ink cartridge, see page 58 for instructions. Place it is printing. Your printout is running low, wait until printing finishes before printing large or high-resolution print jobs. 68 Solving...
User's Guide
Page 86
G Grainy prints, 69 H Head Cleaning utility, 48 to 49 Help, Epson, 75 to 76 I Incorrect characters, 73 Incorrect colors, 69 Incorrect margins, 72 Ink cartridge ordering, 51 replacing, 50 to 56 safety instructions, 52, 79 to 80 status, 50 to 51 Ink status, checking, 50 to 51 Inverted image, 72... requirements, 77 uninstalling software, 74 to 75 Maintaining printer, 47 to 59 Marginless printing, 28 to 33 Margins, incorrect, 72 Media Type setting, 27 Mirror image, 72 Monitoring ink status, 50 to 51 Monitoring print job, 23 Moving printer, 59 N Noise, printer, 66 Nozzle check, 47 to 48 O Orientation ...
G Grainy prints, 69 H Head Cleaning utility, 48 to 49 Help, Epson, 75 to 76 I Incorrect characters, 73 Incorrect colors, 69 Incorrect margins, 72 Ink cartridge ordering, 51 replacing, 50 to 56 safety instructions, 52, 79 to 80 status, 50 to 51 Ink status, checking, 50 to 51 Inverted image, 72... requirements, 77 uninstalling software, 74 to 75 Maintaining printer, 47 to 59 Marginless printing, 28 to 33 Margins, incorrect, 72 Media Type setting, 27 Mirror image, 72 Monitoring ink status, 50 to 51 Monitoring print job, 23 Moving printer, 59 N Noise, printer, 66 Nozzle check, 47 to 48 O Orientation ...


