Product Information Guide
Page 1
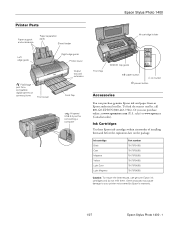
... them . Other products may cause damage to your printer not covered by Epson's warranty. 1/07 Epson Stylus Photo 1400 - 1 Epson Stylus Photo 1400 Printer Parts Paper support and extensions Paper separation pads Sheet feeder Ink cartridge holder Left edge guide PictBridge port for a compatible digital camera or camera phone Front cover Right edge guide Printer cover Output tray and extension Front flap CD...
... them . Other products may cause damage to your printer not covered by Epson's warranty. 1/07 Epson Stylus Photo 1400 - 1 Epson Stylus Photo 1400 Printer Parts Paper support and extensions Paper separation pads Sheet feeder Ink cartridge holder Left edge guide PictBridge port for a compatible digital camera or camera phone Front cover Right edge guide Printer cover Output tray and extension Front flap CD...

Product Information Guide
Page 3
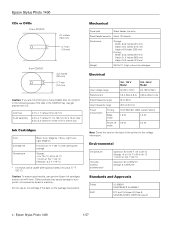
...with the short edge first. Before printing large jobs using the borderless setting, print a single sheet to 60% RH 1/07 Epson Stylus Photo 1400 - 3 Do not load curled or folded paper. Single sheets Size Super B (13 × 19 inches) US B ...Epson cannot guarantee the quality of any non-Epson brand or type of paper stock before purchasing large quantities or printing large jobs. D The minimum bottom margin is 0.12 inch (3.0 mm). Epson Stylus Photo 1400 Printer Specifications Printing Printing method Ink configuration Print direction MicroPiezo ink jet 6 individual ink cartridges...
...with the short edge first. Before printing large jobs using the borderless setting, print a single sheet to 60% RH 1/07 Epson Stylus Photo 1400 - 3 Do not load curled or folded paper. Single sheets Size Super B (13 × 19 inches) US B ...Epson cannot guarantee the quality of any non-Epson brand or type of paper stock before purchasing large quantities or printing large jobs. D The minimum bottom margin is 0.12 inch (3.0 mm). Epson Stylus Photo 1400 Printer Specifications Printing Printing method Ink configuration Print direction MicroPiezo ink jet 6 individual ink cartridges...
Product Information Guide
Page 4
Do not use genuine Epson ink cartridges and do not print in the following areas of the printer for a 8-cm disc Ink Cartridges Color Cartridge life Temperature Black, Cyan, Magenta, Yellow, Light Cyan, Light Magenta 6 months at 77 °F (25 °C) after opening the package Storage:...DVD tray may cause damage to 80 mm) for the voltage information. Caution: To ensure good results, use an ink cartridge if the date on the package has expired. Epson Stylus Photo 1400 1/07 Epson Stylus Photo 1400 CDs or DVDs 12-cm CD/DVD 4.7 inches (120 mm) 0.7 inch (18 mm) 8-cm CD/DVD 3.2 ...
Do not use genuine Epson ink cartridges and do not print in the following areas of the printer for a 8-cm disc Ink Cartridges Color Cartridge life Temperature Black, Cyan, Magenta, Yellow, Light Cyan, Light Magenta 6 months at 77 °F (25 °C) after opening the package Storage:...DVD tray may cause damage to 80 mm) for the voltage information. Caution: To ensure good results, use an ink cartridge if the date on the package has expired. Epson Stylus Photo 1400 1/07 Epson Stylus Photo 1400 CDs or DVDs 12-cm CD/DVD 4.7 inches (120 mm) 0.7 inch (18 mm) 8-cm CD/DVD 3.2 ...
Product Information Guide
Page 8
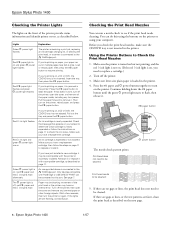
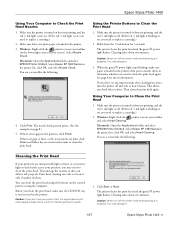
... you're printing on paper, your screen to this using the buttons on the printer or using your computer. Epson Stylus Photo 1400 1/07 Press the ) paper button to Check the Print Head Nozzles 1. An ink cartridge is not inserted in the printer. 4. Before you need to be cleaned: P power button Print head needs to be connected...
... you're printing on paper, your screen to this using the buttons on the printer or using your computer. Epson Stylus Photo 1400 1/07 Press the ) paper button to Check the Print Head Nozzles 1. An ink cartridge is not inserted in the printer. 4. Before you need to be cleaned: P power button Print head needs to be connected...
Product Information Guide
Page 9
... clean the print head. Caution: Never turn the printer off . (If the red H ink light is on page 8.) 5. Epson Stylus Photo 1400 Using Your Computer to Clean the Print Head 1. Select Nozzle Check. If there are faint, click Clean and follow the on-screen instructions to replace a cartridge.) 2. If there are gaps or lines, or the...
... clean the print head. Caution: Never turn the printer off . (If the red H ink light is on page 8.) 5. Epson Stylus Photo 1400 Using Your Computer to Clean the Print Head 1. Select Nozzle Check. If there are faint, click Clean and follow the on-screen instructions to replace a cartridge.) 2. If there are gaps or lines, or the...
Product Information Guide
Page 10
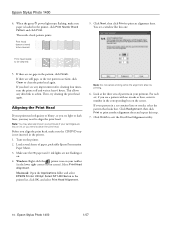
...then click Print to align the print head. Aligning the Print Head If your cartridges are faint, click Clean to soften. Select SP 1400 Series in the lower right corner of paper, preferably Epson Presentation Paper Matte. 3. If every pattern in your screen). If there are... cleaned: 5. This allows any improvement after cleaning four times, turn the printer off and wait at the three sets of patterns in a set , if you may need to be cleaned: 5. Epson Stylus Photo 1400 1/07 Epson Stylus Photo 1400 4. Then, try cleaning the print head again. Note: You may also...
...then click Print to align the print head. Aligning the Print Head If your cartridges are faint, click Clean to soften. Select SP 1400 Series in the lower right corner of paper, preferably Epson Presentation Paper Matte. 3. If every pattern in your screen). If there are... cleaned: 5. This allows any improvement after cleaning four times, turn the printer off and wait at the three sets of patterns in a set , if you may need to be cleaned: 5. Epson Stylus Photo 1400 1/07 Epson Stylus Photo 1400 4. Then, try cleaning the print head again. Note: You may also...
Product Information Guide
Page 11
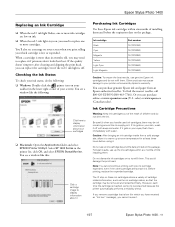
...: To ensure the best results, use genuine Epson ink cartridges and do not drink the ink. The IC chip on these Epson ink cartridges within six months of your taskbar (in the printer list, click OK, and select EPSON StatusMonitor. sales) or www.epson.ca (Canadian sales). Epson Stylus Photo 1400 Replacing an Ink Cartridge ❏ When the red H ink light flashes...
...: To ensure the best results, use genuine Epson ink cartridges and do not drink the ink. The IC chip on these Epson ink cartridges within six months of your taskbar (in the printer list, click OK, and select EPSON StatusMonitor. sales) or www.epson.ca (Canadian sales). Epson Stylus Photo 1400 Replacing an Ink Cartridge ❏ When the red H ink light flashes...
Product Information Guide
Page 12
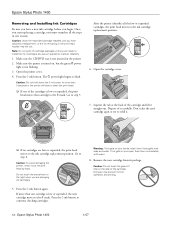
... is turned on your eyes, flush them thoroughly with water. 8. Press the H ink button. The P power light begins to step 5. Open the printer cover. 4. Epson Stylus Photo 1400 1/07 Epson Stylus Photo 1400 Removing and Installing Ink Cartridges Be sure you have obtained a replacement, or the ink remaining in one session. Caution: Do not hold down the H ink button for...
... is turned on your eyes, flush them thoroughly with water. 8. Press the H ink button. The P power light begins to step 5. Open the printer cover. 4. Epson Stylus Photo 1400 1/07 Epson Stylus Photo 1400 Removing and Installing Ink Cartridges Be sure you have obtained a replacement, or the ink remaining in one session. Caution: Do not hold down the H ink button for...
Product Information Guide
Page 13
...: If the red H ink light stays on the printer components and don't spray or apply lubricants, oils or grease inside the printer. 1/07 Epson Stylus Photo 1400 - 13 Keep the printer cover closed to prevent water from getting inside the printer. they click into place. Then open the cartridge cover and press down until they can cause leakage. 10...
...: If the red H ink light stays on the printer components and don't spray or apply lubricants, oils or grease inside the printer. 1/07 Epson Stylus Photo 1400 - 13 Keep the printer cover closed to prevent water from getting inside the printer. they click into place. Then open the cartridge cover and press down until they can cause leakage. 10...
Product Information Guide
Page 14
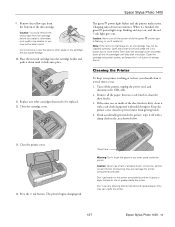
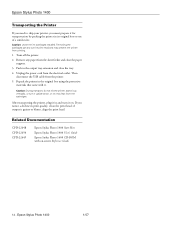
... quality, clean the print head; Remove any paper from the cartridges. If you must prepare it . Turn off the printer. 2. Unplug the power cord from the printer. 5. Caution: Leave the ink cartridges installed. Related Documentation CPD-22648 CPD-22650 CPD-22649 Epson Stylus Photo 1400 Start Here Epson Stylus Photo 1400 User's Guide Epson Stylus Photo 1400 CD-ROM with it for transportation by packing the...
... quality, clean the print head; Remove any paper from the cartridges. If you must prepare it . Turn off the printer. 2. Unplug the power cord from the printer. 5. Caution: Leave the ink cartridges installed. Related Documentation CPD-22648 CPD-22650 CPD-22649 Epson Stylus Photo 1400 Start Here Epson Stylus Photo 1400 User's Guide Epson Stylus Photo 1400 CD-ROM with it for transportation by packing the...
Start Here
Page 1
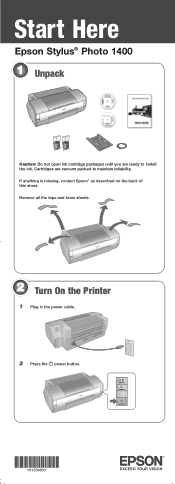
Cartridges are ready to maintain reliability. Start Here Epson Stylus® Photo 1400 1 Unpack Caution: Do not open ink cartridge packages until you are vacuum packed to install the ink. Remove all the tape and foam sheets. 2 Turn On the Printer 1 Plug in the power cable. 2 Press the power button. *411559800* *411559800* If anything is missing, contact Epson® as described on the back of this sheet.
Cartridges are ready to maintain reliability. Start Here Epson Stylus® Photo 1400 1 Unpack Caution: Do not open ink cartridge packages until you are vacuum packed to install the ink. Remove all the tape and foam sheets. 2 Turn On the Printer 1 Plug in the power cable. 2 Press the power button. *411559800* *411559800* If anything is missing, contact Epson® as described on the back of this sheet.

Start Here
Page 2
Caution: Don't remove any other seals from each color. 6 Press the cartridges down until they click. 3 Install Ink Cartridges Note: Don't load paper before installing the ink cartridges. 1 Lift up the printer cover. 2 Open the cartridge cover. 3 Unpack the ink cartridges. 4 Remove only the yellow tape from the cartridges. 5 Insert the cartridges in the holder for each cartridge.
Caution: Don't remove any other seals from each color. 6 Press the cartridges down until they click. 3 Install Ink Cartridges Note: Don't load paper before installing the ink cartridges. 1 Lift up the printer cover. 2 Open the cartridge cover. 3 Unpack the ink cartridges. 4 Remove only the yellow tape from the cartridges. 5 Insert the cartridges in the holder for each cartridge.

Start Here
Page 3
...tray and pull out its extensions. Subsequent ink cartridges will last for their full rated life. 4 Load Paper 1 Open the paper support and pull up its extension. Note: The first time you 'll waste ink. Caution: Don't turn off the printer while the power light is flashing or you ...install ink cartridges, the printer uses some ink to charge ink. Output tray 7 Close the ink cartridge cover and press it down until it clicks. 8 Close the printer cover. 9 Press the ink button to charge the ...
...tray and pull out its extensions. Subsequent ink cartridges will last for their full rated life. 4 Load Paper 1 Open the paper support and pull up its extension. Note: The first time you 'll waste ink. Caution: Don't turn off the printer while the power light is flashing or you ...install ink cartridges, the printer uses some ink to charge ink. Output tray 7 Close the ink cartridge cover and press it down until it clicks. 8 Close the printer cover. 9 Press the ink button to charge the ...
Start Here
Page 7
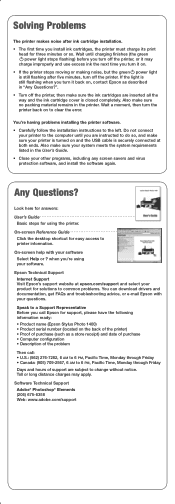
... You're having problems installing the printer software. • Carefully follow the installation instructions to printer information. Any Questions? On-screen Reference Guide Click the desktop shortcut for support, please have the following information ready: • Product name (Epson Stylus Photo 1400) • Product serial number (...the computer until charging finishes (the green power light stops flashing) before you call Epson for easy access to the left. Also make sure the ink cartridges are subject to clear the error. On-screen help with your other programs, including...
... You're having problems installing the printer software. • Carefully follow the installation instructions to printer information. Any Questions? On-screen Reference Guide Click the desktop shortcut for support, please have the following information ready: • Product name (Epson Stylus Photo 1400) • Product serial number (...the computer until charging finishes (the green power light stops flashing) before you call Epson for easy access to the left. Also make sure the ink cartridges are subject to clear the error. On-screen help with your other programs, including...
Start Here
Page 8
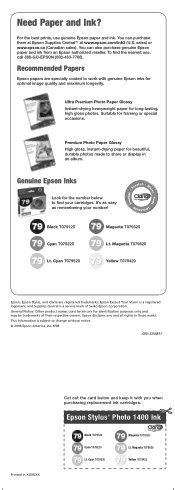
... ink cartridges. and Supplies Central is a service mark of their respective owners. Ultra Premium Photo Paper Glossy Instant-drying heavyweight paper for framing or special occasions. Cyan T079520 Magenta T079320 Lt. This information is a registered logomark; Magenta T079620 Yellow T079420 Epson, Epson Stylus, and Claria are for optimal image quality and maximum longevity. Epson Stylus® Photo 1400 Ink...
... ink cartridges. and Supplies Central is a service mark of their respective owners. Ultra Premium Photo Paper Glossy Instant-drying heavyweight paper for framing or special occasions. Cyan T079520 Magenta T079320 Lt. This information is a registered logomark; Magenta T079620 Yellow T079420 Epson, Epson Stylus, and Claria are for optimal image quality and maximum longevity. Epson Stylus® Photo 1400 Ink...

Technical Brief (Ink Jet Printers)
Page 3
... to swap an ink cartridge to get sharp black text, superb photo quality photos, or both on the Epson ink sets in conjunction with Epson printers there are specifically designed to the page, based on breathtaking large format prints, Epson has the right ink for optional cartridges, and you see continuous tone color. Whether the customer is...
... to swap an ink cartridge to get sharp black text, superb photo quality photos, or both on the Epson ink sets in conjunction with Epson printers there are specifically designed to the page, based on breathtaking large format prints, Epson has the right ink for optional cartridges, and you see continuous tone color. Whether the customer is...

User's Guide
Page 4
... an Ink Cartridge 50 Checking the Ink Status 50 Purchasing Ink Cartridges 51 Ink Cartridge Precautions 52 Removing and Installing Ink Cartridges 53 Aligning the Print Head 57 Cleaning the Printer 58 Transporting the Printer 59 Solving Problems 61 Diagnosing Printer Problems 61 Running a Printer Check 63... Installation Problems 64 Printer Problems 65 Print Quality Problems 67 Problems with Paper Feeding 69 CD/DVD Printing Problems 71 Miscellaneous Printout Problems 72 Uninstalling Printer Software 74 Windows 74 Macintosh 74 Where To Get Help 75 Epson Technical Support 75 ...
... an Ink Cartridge 50 Checking the Ink Status 50 Purchasing Ink Cartridges 51 Ink Cartridge Precautions 52 Removing and Installing Ink Cartridges 53 Aligning the Print Head 57 Cleaning the Printer 58 Transporting the Printer 59 Solving Problems 61 Diagnosing Printer Problems 61 Running a Printer Check 63... Installation Problems 64 Printer Problems 65 Print Quality Problems 67 Problems with Paper Feeding 69 CD/DVD Printing Problems 71 Miscellaneous Printout Problems 72 Uninstalling Printer Software 74 Windows 74 Macintosh 74 Where To Get Help 75 Epson Technical Support 75 ...
User's Guide
Page 5
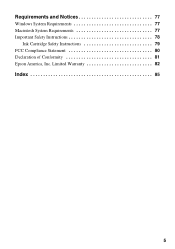
Requirements and Notices 77 Windows System Requirements 77 Macintosh System Requirements 77 Important Safety Instructions 78 Ink Cartridge Safety Instructions 79 FCC Compliance Statement 80 Declaration of Conformity 81 Epson America, Inc. Limited Warranty 82 Index 85 5
Requirements and Notices 77 Windows System Requirements 77 Macintosh System Requirements 77 Important Safety Instructions 78 Ink Cartridge Safety Instructions 79 FCC Compliance Statement 80 Declaration of Conformity 81 Epson America, Inc. Limited Warranty 82 Index 85 5
User's Guide
Page 47
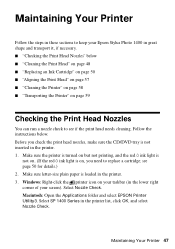
... Select SP 1400 Series in the printer. 3. Windows: Right-click the printer icon on your taskbar (in the lower right corner of your Epson Stylus Photo 1400 in great shape and transport it, if necessary. ■ "Checking the Print Head Nozzles" below . Maintaining Your Printer 47 Make ... a nozzle check to see page 50 for details.) 2. Macintosh: Open the Applications folder and select EPSON Printer Utility3. Before you need to replace a cartridge; Maintaining Your Printer Follow the steps in these sections to keep your screen). Follow the instructions below ■ "Cleaning ...
... Select SP 1400 Series in the printer. 3. Windows: Right-click the printer icon on your taskbar (in the lower right corner of your Epson Stylus Photo 1400 in great shape and transport it, if necessary. ■ "Checking the Print Head Nozzles" below . Maintaining Your Printer 47 Make ... a nozzle check to see page 50 for details.) 2. Macintosh: Open the Applications folder and select EPSON Printer Utility3. Before you need to replace a cartridge; Maintaining Your Printer Follow the steps in these sections to keep your screen). Follow the instructions below ■ "Cleaning ...
User's Guide
Page 49
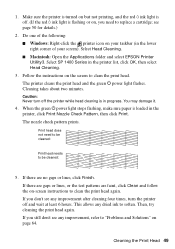
... takes about two minutes. Print head does not need to clean the print head. Then, try cleaning the print head again. Select SP 1400 Series in progress. If you need to be cleaned: 5. see any dried ink to "Problems and Solutions" on -screen instructions to be... soften. Select Head Cleaning. ■ Macintosh: Open the Applications folder and select EPSON Printer Utility3. Caution: Never turn the printer off the printer while head cleaning is flashing or on the screen to replace a cartridge; You may damage it. 4. If there are faint, click Clean and follow ...
... takes about two minutes. Print head does not need to clean the print head. Then, try cleaning the print head again. Select SP 1400 Series in progress. If you need to be cleaned: 5. see any dried ink to "Problems and Solutions" on -screen instructions to be... soften. Select Head Cleaning. ■ Macintosh: Open the Applications folder and select EPSON Printer Utility3. Caution: Never turn the printer off the printer while head cleaning is flashing or on the screen to replace a cartridge; You may damage it. 4. If there are faint, click Clean and follow ...


