Warranty (English)
Page 1
... IS THE WARRANTY VALID? This warranty does not cover: • Customer instruction • Installation • Set up adjustments • Cosmetic damage • Damage due to acts of God, such as lightning strikes • Accident • Misuse • Abuse • Negligence • Commercial use • Modification of any part of the product • Plasma display panel damaged by an authorized Dynex repair center...
... IS THE WARRANTY VALID? This warranty does not cover: • Customer instruction • Installation • Set up adjustments • Cosmetic damage • Damage due to acts of God, such as lightning strikes • Accident • Misuse • Abuse • Negligence • Commercial use • Modification of any part of the product • Plasma display panel damaged by an authorized Dynex repair center...

User Manual (English)
Page 2
ii Dynex DX-L15-L19-L22-10A 15", 19", and 22" LCD TVs Contents Child Safety 1 Important safety instructions 2 Warnings 2 Cautions 2 Installing and removing the stand 3 Installing the stand 3 Adjusting the viewing angle of the TV 4 Removing the stand 4 Installing a wall-mount bracket 4 TV components 5 Front 5 Side 5 Back 5 Remote control 6 Using the remote control 7 Installing remote control batteries 7 Aiming the remote control 7 Programming a universal remote control to work with your TV 7 Making connections 8 Connecting the power 8 Connecting an antenna, cable TV, or ...
ii Dynex DX-L15-L19-L22-10A 15", 19", and 22" LCD TVs Contents Child Safety 1 Important safety instructions 2 Warnings 2 Cautions 2 Installing and removing the stand 3 Installing the stand 3 Adjusting the viewing angle of the TV 4 Removing the stand 4 Installing a wall-mount bracket 4 TV components 5 Front 5 Side 5 Back 5 Remote control 6 Using the remote control 7 Installing remote control batteries 7 Aiming the remote control 7 Programming a universal remote control to work with your TV 7 Making connections 8 Connecting the power 8 Connecting an antenna, cable TV, or ...
User Manual (English)
Page 3
...DTV signal strength 18 Setting parental controls 18 Turning parental controls on or off 18 Setting or changing the password 19 Setting parental control levels 20 Downloading rating information 21 Using closed captioning 22 Turning closed captioning on or off 22 Selecting the closed captioning mode 22 Customizing DTV closed captioning styles 23 Adjusting time settings 24 Setting the clock 24 Setting the sleep timer 24 Adjusting menu settings 25 Selecting the menu language and transparency 25 Labeling an input source 26 Restoring default settings 26 Troubleshooting 27 Video and...
...DTV signal strength 18 Setting parental controls 18 Turning parental controls on or off 18 Setting or changing the password 19 Setting parental control levels 20 Downloading rating information 21 Using closed captioning 22 Turning closed captioning on or off 22 Selecting the closed captioning mode 22 Customizing DTV closed captioning styles 23 Adjusting time settings 24 Setting the clock 24 Setting the sleep timer 24 Adjusting menu settings 25 Selecting the menu language and transparency 25 Labeling an input source 26 Restoring default settings 26 Troubleshooting 27 Video and...
User Manual (English)
Page 4
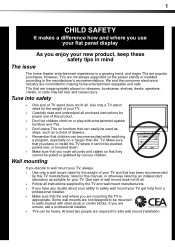
... proper stands or installed according to the manufacturer's recommendations. Some wall mounts are popular purchases. Use only a TV stand rated for proper use your flat panel display As you enjoy your new product, keep these safety tips in this product. • Don't let children climb on or play with steel studs or cinder blocks. One size of TV stand does not fit all cords and cables so...
... proper stands or installed according to the manufacturer's recommendations. Some wall mounts are popular purchases. Use only a TV stand rated for proper use your flat panel display As you enjoy your new product, keep these safety tips in this product. • Don't let children climb on or play with steel studs or cinder blocks. One size of TV stand does not fit all cords and cables so...
User Manual (English)
Page 5
... apparatus has been damaged in correct operating condition. The plug must remain readily operable. 16 The apparatus with the apparatus. No user-serviceable parts are not sure of the type of power supplied to your home, consult an electrician or your TV does not operate normally by the operating instructions because incorrect adjustment of other Power lines An outside antenna system, extreme care should be taken...
... apparatus has been damaged in correct operating condition. The plug must remain readily operable. 16 The apparatus with the apparatus. No user-serviceable parts are not sure of the type of power supplied to your home, consult an electrician or your TV does not operate normally by the operating instructions because incorrect adjustment of other Power lines An outside antenna system, extreme care should be taken...
User Manual (English)
Page 6
.... Disposal of these instructions thoroughly before switching it states that you handle your TV exhibits a distinct change the location of the stand, unplug the AC power cord. Occasionally, a few non-active pixels may appear on a cabinet or other vertical surface, you must install your TV's finish. Warning: Before attempting assembly or removal of the TV. Make sure that the cable ground must be recycled...
.... Disposal of these instructions thoroughly before switching it states that you handle your TV exhibits a distinct change the location of the stand, unplug the AC power cord. Occasionally, a few non-active pixels may appear on a cabinet or other vertical surface, you must install your TV's finish. Warning: Before attempting assembly or removal of the TV. Make sure that the cable ground must be recycled...
User Manual (English)
Page 7
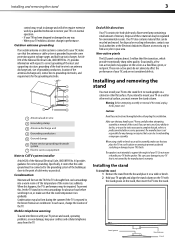
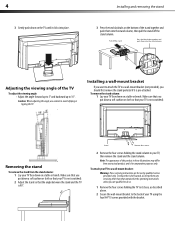
.... Installing and removing the stand 3 Press the two black tabs on the bottom of this product in the operating instructions unless you want to attach the TV to the back of the TV To adjust the viewing angle: • Adjust the angle forward up to 5° and backward up to a wall-mount bracket: Warning: These servicing instructions are qualified to do so. 1 Remove the four screws holding the stand...
.... Installing and removing the stand 3 Press the two black tabs on the bottom of this product in the operating instructions unless you want to attach the TV to the back of the TV To adjust the viewing angle: • Adjust the angle forward up to 5° and backward up to a wall-mount bracket: Warning: These servicing instructions are qualified to do so. 1 Remove the four screws holding the stand...
User Manual (English)
Page 8
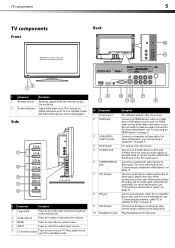
... not need to this jack. For more information, see "Connecting an HDMI device" on page 8. For more information, see "Connecting an antenna, cable TV, or satellite TV box" on -screen menu. 4 INPUT Press to select the video input source. 5 (Power) button Press to put your TV. TV components 5 TV components Back Front Model DX-L15-10A is used in this manual for audio left). Connect an HDMI device, such as a cable box or DVD player, to connect audio cables from the remote control. Connect an AV device to the audio jacks. Lights red...
... not need to this jack. For more information, see "Connecting an HDMI device" on page 8. For more information, see "Connecting an antenna, cable TV, or satellite TV box" on -screen menu. 4 INPUT Press to select the video input source. 5 (Power) button Press to put your TV. TV components 5 TV components Back Front Model DX-L15-10A is used in this manual for audio left). Connect an HDMI device, such as a cable box or DVD player, to connect audio cables from the remote control. Connect an AV device to the audio jacks. Lights red...
User Manual (English)
Page 9
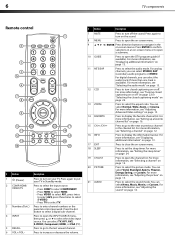
... video input source. 6 TV components Remote control INFO # Button Description 1 (Power) Press to turn on your TV in Standby mode. 2 COMP/HDMI/ VIDEO/TV Press to select the input source. • Press COMP to select COMPONENT. • Press HDMI to select HDMI. • Press VIDEO to select AV1, press twice to select AV2, press three times to select S-VIDEO. • Press TV to select TV. 3 Numbers/Dot(.) Press to enter channel numbers or the parental control password. For more information, see "Adjusting Advanced Video settings...
... video input source. 6 TV components Remote control INFO # Button Description 1 (Power) Press to turn on your TV in Standby mode. 2 COMP/HDMI/ VIDEO/TV Press to select the input source. • Press COMP to select COMPONENT. • Press HDMI to select HDMI. • Press VIDEO to select AV1, press twice to select AV2, press three times to select S-VIDEO. • Press TV to select TV. 3 Numbers/Dot(.) Press to enter channel numbers or the parental control password. For more information, see "Adjusting Advanced Video settings...
User Manual (English)
Page 10
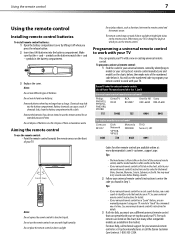
... identify a code that matches your universal remote control or set -top box and your universal remote control's instructions and try several codes before finding a match. 2 Follow your TV. Make sure that can manually program it . Remove the batteries if you can operate both your set -top box manufacturer, or call technical support for other compatible models are available online at 1-800-305-2204. You may not work with a cloth. To program a universal remote control: 1 Find the code for...
... identify a code that matches your universal remote control or set -top box and your universal remote control's instructions and try several codes before finding a match. 2 Follow your TV. Make sure that can manually program it . Remove the batteries if you can operate both your set -top box manufacturer, or call technical support for other compatible models are available online at 1-800-305-2204. You may not work with a cloth. To program a universal remote control: 1 Find the code for...

User Manual (English)
Page 11
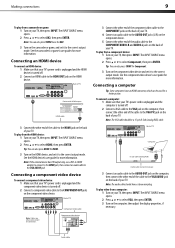
... any connections. Connecting a camcorder or game Tip: Some game consoles have questions, refer to connectors. The external audio/video equipment shown in image or color problems. Make sure that came with the power cord or other cables. Always turn the power off . 2 Connect an AV cable to white. Connecting an antenna, cable TV, or satellite TV box To connect an antenna, cable TV, or satellite TV box: 1 Connect one end of your TV. If the antenna is not installed correctly, contact qualified service personnel...
... any connections. Connecting a camcorder or game Tip: Some game consoles have questions, refer to connectors. The external audio/video equipment shown in image or color problems. Make sure that came with the power cord or other cables. Always turn the power off . 2 Connect an AV cable to white. Connecting an antenna, cable TV, or satellite TV box To connect an antenna, cable TV, or satellite TV box: 1 Connect one end of your TV. If the antenna is not installed correctly, contact qualified service personnel...
User Manual (English)
Page 12
... correct output mode. See the component video device's user guide for a better picture. Back of TV Computer D-Sub cable (analog RGB) Audio cable (stereo mini plugs) 3 Connect an audio cable to the AUDIO OUT jack on the computer, then connect the other end of the cable to select VGA, then press ENTER. 3 Turn on the back of your TV. See the camcorder's or game's user guides for Component. 3 Turn on your TV, then press INPUT. To play from a component device: 1 Turn...
... correct output mode. See the component video device's user guide for a better picture. Back of TV Computer D-Sub cable (analog RGB) Audio cable (stereo mini plugs) 3 Connect an audio cable to the AUDIO OUT jack on the computer, then connect the other end of the cable to select VGA, then press ENTER. 3 Turn on the back of your TV. See the camcorder's or game's user guides for Component. 3 Turn on your TV, then press INPUT. To play from a component device: 1 Turn...
User Manual (English)
Page 13
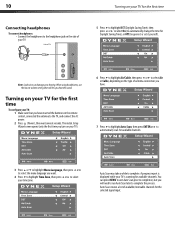
... you will need to run Auto Scan later to automatically change the time for available channels. You can damage your hearing. 10 Turning on your TV for the selected signal input. Auto Scan may take a while to select your time zone. Note: Loud noise can press MENU to exit Auto Scan prior to the headphone jack on the type of your TV). 6 Press to highlight Air/Cable, then press...
... you will need to run Auto Scan later to automatically change the time for available channels. You can damage your hearing. 10 Turning on your TV for the selected signal input. Auto Scan may take a while to select your time zone. Note: Loud noise can press MENU to exit Auto Scan prior to the headphone jack on the type of your TV). 6 Press to highlight Air/Cable, then press...
User Manual (English)
Page 15
..., such as an analog signal. Broadcasters may use these sub-channels to change , or press ENTER to transmit a variety of main channel 5. Note: If either list has more data than one page, press or to scroll through the pages. 2 Press or to temporarily turn closed captioning on the memorized channel list. • Press the number buttons to enter the analog or digital (main) channel number you want from...
..., such as an analog signal. Broadcasters may use these sub-channels to change , or press ENTER to transmit a variety of main channel 5. Note: If either list has more data than one page, press or to scroll through the pages. 2 Press or to temporarily turn closed captioning on the memorized channel list. • Press the number buttons to enter the analog or digital (main) channel number you want from...
User Manual (English)
Page 16
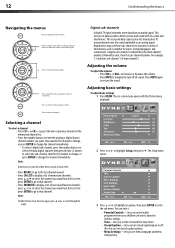
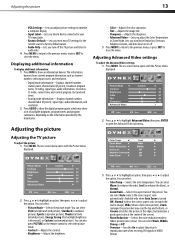
... connected to your TV's input jacks. • Restore Default-Lets you reset most TV settings for the current source to factory default values. • Audio Only-Lets you turn Noise Reduction, Overscan, Adaptive Contrast, and Auto Zoom on -screen menu opens with the Picture menu displayed. Displaying additional information To display additional information: 1 Press INFO to close the menu. Lets you adjust the Color Temperature or Zoom Mode. The on or off the TV picture and listen to audio...
... connected to your TV's input jacks. • Restore Default-Lets you reset most TV settings for the current source to factory default values. • Audio Only-Lets you turn Noise Reduction, Overscan, Adaptive Contrast, and Auto Zoom on -screen menu opens with the Picture menu displayed. Displaying additional information To display additional information: 1 Press INFO to close the menu. Lets you adjust the Color Temperature or Zoom Mode. The on or off the TV picture and listen to audio...
User Manual (English)
Page 18
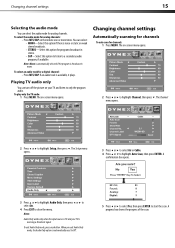
... the audio mode You can turn off the picture on -screen menu opens. 2 Press or to highlight Channel, then press . You can select: • MONO-Select this option to listen to only the program audio. Changing channel settings Automatically scanning for channels To auto scan for a digital channel: • Press MTS/SAP. When you exit Audio Only mode, the Audio Only option is available, it plays. To exit Audio Only mode, press any button. A progress box...
... the audio mode You can turn off the picture on -screen menu opens. 2 Press or to highlight Channel, then press . You can select: • MONO-Select this option to listen to only the program audio. Changing channel settings Automatically scanning for channels To auto scan for a digital channel: • Press MTS/SAP. When you exit Audio Only mode, the Audio Only option is available, it plays. To exit Audio Only mode, press any button. A progress box...
User Manual (English)
Page 19
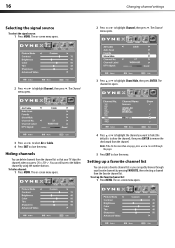
... favorite channels by using the number buttons. The on -screen menu opens. The on-screen menu opens. 4 Press or to remove the check mark from the favorite channel list. Setting up the favorite channel list: 1 Press MENU. 16 Selecting the signal source To select the signal source: 1 Press MENU. Changing channel settings 2 Press or to close the menu. The Channel menu opens. 2 Press or to the hidden channel by pressing FAVORITE, then selecting a channel from the channel. Hiding channels You can quickly...
... favorite channels by using the number buttons. The on -screen menu opens. The on-screen menu opens. 4 Press or to remove the check mark from the favorite channel list. Setting up the favorite channel list: 1 Press MENU. 16 Selecting the signal source To select the signal source: 1 Press MENU. Changing channel settings 2 Press or to close the menu. The Channel menu opens. 2 Press or to the hidden channel by pressing FAVORITE, then selecting a channel from the channel. Hiding channels You can quickly...
User Manual (English)
Page 30
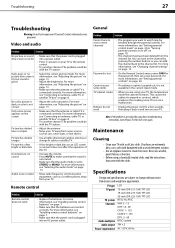
... your TV or the remote control. • Try another channel. For more information, see "Connecting an antenna, cable TV, or satellite TV box" on page 8. • Adjust the color saturation. Remote control Problem Remote control does not work • Unplug the power cord for the password, then set to STEREO or MONO. Troubleshooting 27 Troubleshooting Warning: Do not try to repair your TV, then turn it on again. For more information, see "Setting parental control levels" on page 20 or "Turning parental controls...
... your TV or the remote control. • Try another channel. For more information, see "Connecting an antenna, cable TV, or satellite TV box" on page 8. • Adjust the color saturation. Remote control Problem Remote control does not work • Unplug the power cord for the password, then set to STEREO or MONO. Troubleshooting 27 Troubleshooting Warning: Do not try to repair your TV, then turn it on again. For more information, see "Setting parental control levels" on page 20 or "Turning parental controls...
User Manual (English)
Page 31
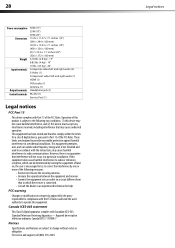
... to provide reasonable protection against harmful interference in a residential installation. Legal notices Standard Television Receiving Apparatus - 28 Power consumption Dimensions Weight Input terminals Output terminals Control terminals 30W (15") 35W (19") 50W (22") 15.35 × 11.57 × 7.1 inches (15") (390 × 294 × 180 mm) 18.03 × 13.23 × 7.1 inches (19") (458 × 336 × 180 mm) 20.7 ×...
... to provide reasonable protection against harmful interference in a residential installation. Legal notices Standard Television Receiving Apparatus - 28 Power consumption Dimensions Weight Input terminals Output terminals Control terminals 30W (15") 35W (19") 50W (22") 15.35 × 11.57 × 7.1 inches (15") (390 × 294 × 180 mm) 18.03 × 13.23 × 7.1 inches (19") (458 × 336 × 180 mm) 20.7 ×...
User Manual (English)
Page 32
... a screen 30 inches or larger, call 1-800-305-2204 www.dynexproducts.com Distributed by Dynex to you own your purchase of Dynex and are trademarks of the Product • Plasma display panel damaged by this warranty that requires service, terms of this warranty become the property of the Product ("Warranty Period"). This warranty does not cover: • Customer instruction • Installation • Set up adjustments...
... a screen 30 inches or larger, call 1-800-305-2204 www.dynexproducts.com Distributed by Dynex to you own your purchase of Dynex and are trademarks of the Product • Plasma display panel damaged by this warranty that requires service, terms of this warranty become the property of the Product ("Warranty Period"). This warranty does not cover: • Customer instruction • Installation • Set up adjustments...


