User Manual (English)
Page 4
... your new product, keep these safety tips in this manual, or otherwise listed by curious children. We and the consumer electronics industry are popular purchases. Make sure that you place or install the TV where it cannot be mounted to safely wall mount your TV, get help from a professional installer. • Make sure...
... your new product, keep these safety tips in this manual, or otherwise listed by curious children. We and the consumer electronics industry are popular purchases. Make sure that you place or install the TV where it cannot be mounted to safely wall mount your TV, get help from a professional installer. • Make sure...
User Manual (English)
Page 8
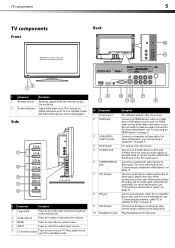
...on . Do not use . Match the color of the connectors to the next or previous channel in the channel list. TV components 5 TV components Back Front Model DX-L15-10A is used in this manual for audio left). For more information, see "Connecting a computer" on page 8. For more information, see "Connecting a... Receives signals from the device to the AV1 audio jacks. Press to increase or decrease the volume. 3 MENU Press to open the on your TV is unplugged. Connect a component video device to turn on -screen menu. 4 INPUT Press to select the video input source. 5 (Power) ...
...on . Do not use . Match the color of the connectors to the next or previous channel in the channel list. TV components 5 TV components Back Front Model DX-L15-10A is used in this manual for audio left). For more information, see "Connecting a computer" on page 8. For more information, see "Connecting a... Receives signals from the device to the AV1 audio jacks. Press to increase or decrease the volume. 3 MENU Press to open the on your TV is unplugged. Connect a component video device to turn on -screen menu. 4 INPUT Press to select the video input source. 5 (Power) ...
User Manual (English)
Page 10
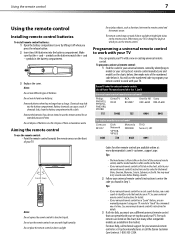
Make sure that matches your TV. symbols on the remote sensor. Do not mix old and new batteries. Remove batteries when they no longer have a charge. Battery chemicals can manually program it off when you press the release button. 2 Insert two AAA batteries into the battery compartment. The...the commands one at a time. Aiming the remote control To use the remote control in the market. Either move your TV or change the angle at 1-800-305-2204. Dynex TV codes for universal remote controls (for the brands Orion, Emerson, Memorex, Sansui, Sylvania, or Zenith. Five such remotes are...
Make sure that matches your TV. symbols on the remote sensor. Do not mix old and new batteries. Remove batteries when they no longer have a charge. Battery chemicals can manually program it off when you press the release button. 2 Insert two AAA batteries into the battery compartment. The...the commands one at a time. Aiming the remote control To use the remote control in the market. Either move your TV or change the angle at 1-800-305-2204. Dynex TV codes for universal remote controls (for the brands Orion, Emerson, Memorex, Sansui, Sylvania, or Zenith. Five such remotes are...

User Manual (English)
Page 11
... camcorder or game. To play from the AC power outlet when you can result in these illustrations may be using an AV cable with your TV, then press INPUT. To connect a camcorder or game: 1 Make sure that all connections are tight and secure. The external audio/video equipment ... to connectors. Connecting a camcorder or game Tip: Some game consoles have questions, refer to the user manual that your TV. Connecting an antenna, cable TV, or satellite TV box To connect an antenna, cable TV, or satellite TV box: 1 Connect one end of a 75 ohm cable (not included) to the RF OUT jack ...
... camcorder or game. To play from the AC power outlet when you can result in these illustrations may be using an AV cable with your TV, then press INPUT. To connect a camcorder or game: 1 Make sure that all connections are tight and secure. The external audio/video equipment ... to connectors. Connecting a camcorder or game Tip: Some game consoles have questions, refer to the user manual that your TV. Connecting an antenna, cable TV, or satellite TV box To connect an antenna, cable TV, or satellite TV box: 1 Connect one end of a 75 ohm cable (not included) to the RF OUT jack ...
User Manual (English)
Page 14
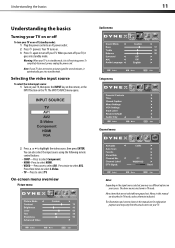
...Depending on the signal source selected, you turn off your TV, it goes into an AC power outlet. 2 Press (power). The illustrations and screens shown in the manual are described in standby mode, it automatically goes into standby mode. Your TV turns on. 3 Press again to select AV2. When ...1 Plug the power cord into standby mode. Menu items that are not selectable are shown in this manual are for several minutes, it is in TV mode, unless otherwise indicated. Menus in TV mode. Audio menu Setup menu Parental Controls Channel menu 2 Press or to highlight the video source, ...
...Depending on the signal source selected, you turn off your TV, it goes into an AC power outlet. 2 Press (power). The illustrations and screens shown in the manual are described in standby mode, it automatically goes into standby mode. Your TV turns on. 3 Press again to select AV2. When ...1 Plug the power cord into standby mode. Menu items that are not selectable are shown in this manual are for several minutes, it is in TV mode, unless otherwise indicated. Menus in TV mode. Audio menu Setup menu Parental Controls Channel menu 2 Press or to highlight the video source, ...
User Manual (English)
Page 27
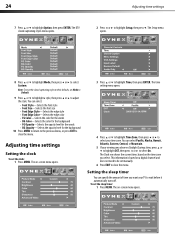
... EXIT to highlight Setup, then press . The on -screen menu opens. 3 Press or to close the menu. Adjusting time settings Setting the clock To set manually. 6 Press EXIT to highlight Time, then press ENTER. The Clock row shows the current time, based on a digital channel and does not need to wait.... The on -screen menu opens. You can specify the amount of time you select. This information is based on the time zone you want your TV to be set the clock: 1 Press MENU.
... EXIT to highlight Setup, then press . The on -screen menu opens. 3 Press or to close the menu. Adjusting time settings Setting the clock To set manually. 6 Press EXIT to highlight Time, then press ENTER. The Clock row shows the current time, based on a digital channel and does not need to wait.... The on -screen menu opens. You can specify the amount of time you select. This information is based on the time zone you want your TV to be set the clock: 1 Press MENU.


