
User Manual (English)
Page 1
15", 19", and 22" LCD TVs DX-L15-10A/DX-L19-10A/DX-L22-10A USER GUIDE
15", 19", and 22" LCD TVs DX-L15-10A/DX-L19-10A/DX-L22-10A USER GUIDE

User Manual (English)
Page 2
ii Dynex DX-L15-L19-L22-10A 15", 19", and 22" LCD TVs Contents Child Safety 1 Important safety instructions 2 Warnings 2 Cautions 2 Installing and removing the stand 3 Installing the stand 3 Adjusting the viewing angle of the TV 4 Removing the stand 4 Installing a wall-mount bracket 4 TV components 5 Front 5 Side 5 Back 5 Remote... Adjusting the volume 12 Adjusting basic settings 12 Displaying additional information 13 Adjusting the picture 13 Adjusting the TV picture 13 Adjusting Advanced Video settings 13 Adjusting the computer image 14 Adjusting the sound 14 Adjusting the ...
ii Dynex DX-L15-L19-L22-10A 15", 19", and 22" LCD TVs Contents Child Safety 1 Important safety instructions 2 Warnings 2 Cautions 2 Installing and removing the stand 3 Installing the stand 3 Adjusting the viewing angle of the TV 4 Removing the stand 4 Installing a wall-mount bracket 4 TV components 5 Front 5 Side 5 Back 5 Remote... Adjusting the volume 12 Adjusting basic settings 12 Displaying additional information 13 Adjusting the picture 13 Adjusting the TV picture 13 Adjusting Advanced Video settings 13 Adjusting the computer image 14 Adjusting the sound 14 Adjusting the ...
User Manual (English)
Page 4
... knocked down. • Make sure that children can become excited while watching a program, especially on furniture that the wall where you are mounting the TV is a growing trend, and larger TVs are not designed to be mounted to making home entertainment enjoyable and safe. Make sure that you place or install the... TV where it cannot be pushed, pulled over and cause injury. If you are required for safe wall mount installation. We and the consumer electronics industry ...
... knocked down. • Make sure that children can become excited while watching a program, especially on furniture that the wall where you are mounting the TV is a growing trend, and larger TVs are not designed to be mounted to making home entertainment enjoyable and safe. Make sure that you place or install the... TV where it cannot be pushed, pulled over and cause injury. If you are required for safe wall mount installation. We and the consumer electronics industry ...
User Manual (English)
Page 5
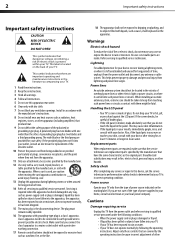
...should not be exposed to excessive heat such as sunshine, fire, or the like. 18 The apparatus shall not be fatal. Handling the LCD panel • Your TV's screen is the disconnecting device. If the screen breaks, be located in clean water. Cautions Damage requiring service Unplug this apparatus near any...an outside antenna system should not be careful of broken glass. • If the LCD panel is damaged or frayed. • If liquid has been spilled or objects have fallen into your TV. • If your TV has been exposed to rain or moisture, does not operate normally, or has been ...
...should not be exposed to excessive heat such as sunshine, fire, or the like. 18 The apparatus shall not be fatal. Handling the LCD panel • Your TV's screen is the disconnecting device. If the screen breaks, be located in clean water. Cautions Damage requiring service Unplug this apparatus near any...an outside antenna system should not be careful of broken glass. • If the LCD panel is damaged or frayed. • If liquid has been spilled or objects have fallen into your TV. • If your TV has been exposed to rain or moisture, does not operate normally, or has been ...
User Manual (English)
Page 6
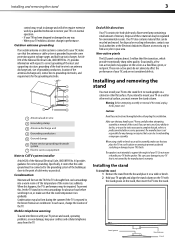
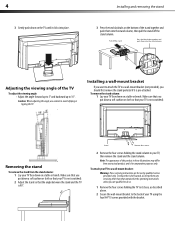
...CATV system installer Article 820 of cable entry as a fixed blue, green, or red point. Non-active pixels The LCD panel contains almost 3 million thin film transistors, which provide exceptionally sharp video quality. Installing and removing the stand You must install your...other vertical surface, you must be recycled and reused. Condensation Moisture will often require extensive work by a qualified technician to restore your TV exhibits a distinct change the location of the room rises suddenly. Disposal of your local authorities or the Electronic Industries Alliance at www....
...CATV system installer Article 820 of cable entry as a fixed blue, green, or red point. Non-active pixels The LCD panel contains almost 3 million thin film transistors, which provide exceptionally sharp video quality. Installing and removing the stand You must install your...other vertical surface, you must be recycled and reused. Condensation Moisture will often require extensive work by a qualified technician to restore your TV exhibits a distinct change the location of the room rises suddenly. Disposal of your local authorities or the Electronic Industries Alliance at www....
User Manual (English)
Page 7
...Adjust the stand so that contained in these illustrations may differ from the stand column: 1 Lay your TV using the four M4*10 screws provided with the bracket. 4 3 Gently push down on the bottom... not perform any servicing other than that the angle between the stand and the TV is for use caution to the back of this product in the operating instructions unless you want to attach... the TV to a wall-mount bracket: Warning: These servicing instructions are qualified to do so. 1 Remove ...
...Adjust the stand so that contained in these illustrations may differ from the stand column: 1 Lay your TV using the four M4*10 screws provided with the bracket. 4 3 Gently push down on the bottom... not perform any servicing other than that the angle between the stand and the TV is for use caution to the back of this product in the operating instructions unless you want to attach... the TV to a wall-mount bracket: Warning: These servicing instructions are qualified to do so. 1 Remove ...
User Manual (English)
Page 8
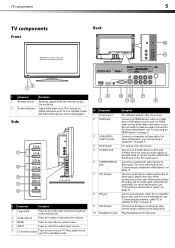
...sensor Receives signals from the device to put your TV is used in the channel list. Connect an AV device (video and audio) to this manual for audio left). TV components 5 TV components Back Front Model DX-L15-10A is turned on your TV. Do not block. 2 Power indicator Lights blue ...when your TV in standby mode. For more information, see "Connecting an HDMI device" on page...
...sensor Receives signals from the device to put your TV is used in the channel list. Connect an AV device (video and audio) to this manual for audio left). TV components 5 TV components Back Front Model DX-L15-10A is turned on your TV. Do not block. 2 Power indicator Lights blue ...when your TV in standby mode. For more information, see "Connecting an HDMI device" on page...
User Manual (English)
Page 9
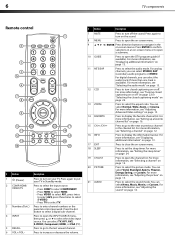
... page 13. 17 EXIT Press to close the on-screen menu. 18 SLEEP 19 CH-LIST 20 PICTURE 21 AUDIO Press to open the INPUT SOURCE menu, then press or to turn on your TV in the channel list. 6 TV components Remote control INFO # Button Description 1 (Power) Press to turn closed captioning ... to select the video input source. Press the dot button to select a digital sub-channel. 4 INPUT Press to open the channel list. You can select TV, AV1, AV2, S-VIDEO, Component, HDMI, or VGA (PC). 5 RECALL Press to go to the next or previous channel in Standby mode. 2 COMP/HDMI/ ...
... page 13. 17 EXIT Press to close the on-screen menu. 18 SLEEP 19 CH-LIST 20 PICTURE 21 AUDIO Press to open the INPUT SOURCE menu, then press or to turn on your TV in the channel list. 6 TV components Remote control INFO # Button Description 1 (Power) Press to turn closed captioning ... to select the video input source. Press the dot button to select a digital sub-channel. 4 INPUT Press to open the channel list. You can select TV, AV1, AV2, S-VIDEO, Component, HDMI, or VGA (PC). 5 RECALL Press to go to the next or previous channel in Standby mode. 2 COMP/HDMI/ ...
User Manual (English)
Page 10
...the commands one at a time. Chemicals may not work with your TV You can operate your TV with your TV. See your universal remote control's instructions for details. 3 If all Dynex TVs manufactured after Jan. 1, 2007) Universal remote control manufacturer and model... 3, HD 0091 Codes for your universal remote control or set-top box manufacturer, or call the Dynex Customer Care Center at which you do not intend to work if direct sunlight or bright light shines...must use a different universal remote control that the + and - Dynex TV codes for universal remote controls (for your...
...the commands one at a time. Chemicals may not work with your TV You can operate your TV with your TV. See your universal remote control's instructions for details. 3 If all Dynex TVs manufactured after Jan. 1, 2007) Universal remote control manufacturer and model... 3, HD 0091 Codes for your universal remote control or set-top box manufacturer, or call the Dynex Customer Care Center at which you do not intend to work if direct sunlight or bright light shines...must use a different universal remote control that the + and - Dynex TV codes for universal remote controls (for your...

User Manual (English)
Page 11
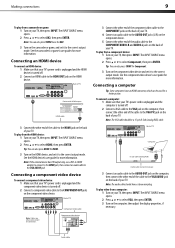
... select AV1 or S-VIDEO, then press ENTER. If you will not be used for position and type before making any connections. Back of TV RF jack Antenna, cable TV, or satellite RF jack RF coaxial cable (75 ohm) 2 Connect the other end of the AV VIDEO OUT jack. Always unplug the ...ohm cable to the RF jack on the VCR. 5 Connect the other cables. Note: You can result in these illustrations may be operated from your TV, then press INPUT. The external audio/video equipment shown in image or color problems. Make sure that came with the AV1 IN VIDEO jack. 4 Connect...
... select AV1 or S-VIDEO, then press ENTER. If you will not be used for position and type before making any connections. Back of TV RF jack Antenna, cable TV, or satellite RF jack RF coaxial cable (75 ohm) 2 Connect the other end of the AV VIDEO OUT jack. Always unplug the ...ohm cable to the RF jack on the VCR. 5 Connect the other cables. Note: You can result in these illustrations may be operated from your TV, then press INPUT. The external audio/video equipment shown in image or color problems. Make sure that came with the AV1 IN VIDEO jack. 4 Connect...
User Manual (English)
Page 12
...(L/R) on the component device. 5 Connect the other end of the cable to the COMPONENT AUDIO-R and AUDIO-L jacks on the back of your TV. Back of TV Computer D-Sub cable (analog RGB) Audio cable (stereo mini plugs) 3 Connect an audio cable to the AUDIO OUT jack on the computer, ...2 Press or to connectors. The INPUT SOURCE menu opens. 2 Press or to select Component, then press ENTER. To play from a computer: 1 Turn on your TV, then press INPUT. Connecting a computer Tip: Some computers have a stereo mini plug. Note: The audio cable should be used for AV2. 3 Turn on the...
...(L/R) on the component device. 5 Connect the other end of the cable to the COMPONENT AUDIO-R and AUDIO-L jacks on the back of your TV. Back of TV Computer D-Sub cable (analog RGB) Audio cable (stereo mini plugs) 3 Connect an audio cable to the AUDIO OUT jack on the computer, ...2 Press or to connectors. The INPUT SOURCE menu opens. 2 Press or to select Component, then press ENTER. To play from a computer: 1 Turn on your TV, then press INPUT. Connecting a computer Tip: Some computers have a stereo mini plug. Note: The audio cable should be used for AV2. 3 Turn on the...
User Manual (English)
Page 13
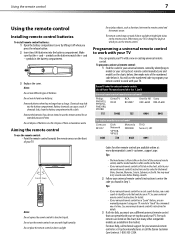
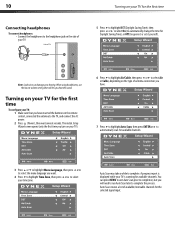
... To connect headphones: • Connect the headphones to the headphone jack on the side of your hearing. Turning on your TV for the first time To configure your TV: 1 Make sure that still lets you will need to run Auto Scan later to complete the process. The initial Setup ...the menu language you have inserted the batteries in the remote control, connected the antenna to select your time zone. Auto Scan creates a list of TV 5 Press to highlight DST (Daylight Saving Time), then press or to select On (to complete. Side of available/receivable channels for Daylight Saving Time...
... To connect headphones: • Connect the headphones to the headphone jack on the side of your hearing. Turning on your TV for the first time To configure your TV: 1 Make sure that still lets you will need to run Auto Scan later to complete the process. The initial Setup ...the menu language you have inserted the batteries in the remote control, connected the antenna to select your time zone. Auto Scan creates a list of TV 5 Press to highlight DST (Daylight Saving Time), then press or to select On (to complete. Side of available/receivable channels for Daylight Saving Time...
User Manual (English)
Page 14
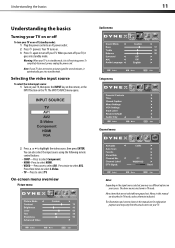
... may see different options on your TV is in TV mode. Press three times to select S-Video. • TV-Press to highlight the video source, then press ENTER. Your TV turns on. 3 Press again to select AV2. Press twice to turn off your TV. Note: If your TV, then press the INPUT key on... the remote, or the INPUT button on the TV. To completely disconnect power, unplug the power cord. Menus in TV mode, unless otherwise indicated. You can also select the input source ...
... may see different options on your TV is in TV mode. Press three times to select S-Video. • TV-Press to highlight the video source, then press ENTER. Your TV turns on. 3 Press again to select AV2. Press twice to turn off your TV. Note: If your TV, then press the INPUT key on... the remote, or the INPUT button on the TV. To completely disconnect power, unplug the power cord. Menus in TV mode, unless otherwise indicated. You can also select the input source ...
User Manual (English)
Page 15
Press to return to restore the sound. Digital sub-channels A digital TV signal transmits more than an analog signal. This increase in data provides a better picture and sound with the Picture menu displayed. A digital sub-channel is ...
Press to return to restore the sound. Digital sub-channels A digital TV signal transmits more than an analog signal. This increase in data provides a better picture and sound with the Picture menu displayed. A digital sub-channel is ...
User Manual (English)
Page 16
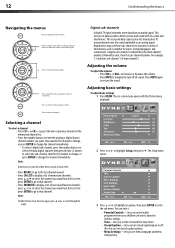
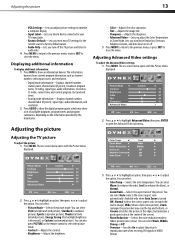
... video input source, and resolution. • Digital mode information-Displays channel number, station name, channel label (if preset), broadcast program name, TV rating, signal type, audio information, resolution, CC mode, current time, and current program start and end times. • Analog mode information-...the Advanced Video sub menu. Displaying additional information To display additional information: 1 Press INFO to show a list of the picture. Adjusting the TV picture To adjust the picture: 1 Press MENU. You can select Weak, Middle, Strong, or Off. • Overscan-Turn this On...
... video input source, and resolution. • Digital mode information-Displays channel number, station name, channel label (if preset), broadcast program name, TV rating, signal type, audio information, resolution, CC mode, current time, and current program start and end times. • Analog mode information-...the Advanced Video sub menu. Displaying additional information To display additional information: 1 Press INFO to show a list of the picture. Adjusting the TV picture To adjust the picture: 1 Press MENU. You can select Weak, Middle, Strong, or Off. • Overscan-Turn this On...
User Manual (English)
Page 17
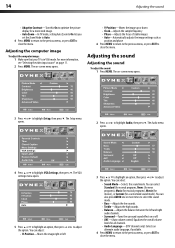
...(for musical programs), Movie (for movies), or Custom (for a customized sound mode). Adjusting the computer image To adjust the computer image: 1 Make sure that your TV is in VGA mode. H-Position V-Position 5 Press or to highlight an option, then press or to highlight Audio, then press . The Setup menu opens. The... menu. 14 Adjusting the sound • Adaptive Contrast-Turn this On to optimize the picture display for a more vivid image. • Auto Zoom-In TV mode, setting Auto Zoom to On lets you set the Zoom Mode to Auto. 4 Press MENU to return to the previous menu, or press EXIT...
...(for musical programs), Movie (for movies), or Custom (for a customized sound mode). Adjusting the computer image To adjust the computer image: 1 Make sure that your TV is in VGA mode. H-Position V-Position 5 Press or to highlight an option, then press or to highlight Audio, then press . The Setup menu opens. The... menu. 14 Adjusting the sound • Adaptive Contrast-Turn this On to optimize the picture display for a more vivid image. • Auto Zoom-In TV mode, setting Auto Zoom to On lets you set the Zoom Mode to Auto. 4 Press MENU to return to the previous menu, or press EXIT...
User Manual (English)
Page 18
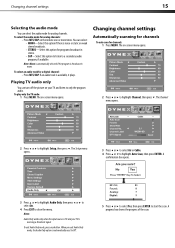
.... To exit Audio Only mode, press any button. Note: Mono is automatically selected if the program is receiving a broadcast signal. To play only the TV audio: 1 Press MENU. Changing channel settings Automatically scanning for channels To auto scan for analog channels: • Press MTS/SAP on the remote one ..., then press ENTER to highlight Setup, then press . When you exit Audio Only mode, the Audio Only option is TV and your TV and listen to highlight Channel, then press . Playing TV audio only You can turn off the picture on -screen menu opens. 2 Press or to only the program audio....
.... To exit Audio Only mode, press any button. Note: Mono is automatically selected if the program is receiving a broadcast signal. To play only the TV audio: 1 Press MENU. Changing channel settings Automatically scanning for channels To auto scan for analog channels: • Press MTS/SAP on the remote one ..., then press ENTER to highlight Setup, then press . When you exit Audio Only mode, the Audio Only option is TV and your TV and listen to highlight Channel, then press . Playing TV audio only You can turn off the picture on -screen menu opens. 2 Press or to only the program audio....
User Manual (English)
Page 19
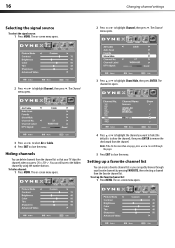
... or to close the menu. The on -screen menu opens. Note: If the list has more than one page, press or to scroll through your TV skips the channels when you can delete channels from the channel. The channel list opens. 3 Press or to select Air or Cable. 4 Press EXIT to...
... or to close the menu. The on -screen menu opens. Note: If the list has more than one page, press or to scroll through your TV skips the channels when you can delete channels from the channel. The channel list opens. 3 Press or to select Air or Cable. 4 Press EXIT to...

User Manual (English)
Page 21
... the DTV signal strength You can check the DTV signal strength to determine if you need to adjust your children from watching inappropriate material on TV. To check the DTV signal strength: 1 Press MENU.
... the DTV signal strength You can check the DTV signal strength to determine if you need to adjust your children from watching inappropriate material on TV. To check the DTV signal strength: 1 Press MENU.
User Manual (English)
Page 23
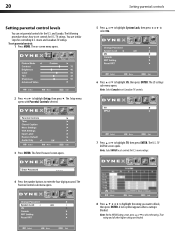
...The US settings sub-menu opens. The U.S. The Parental Controls sub menu opens. 8 Press or to highlight the rating you want to set Canadian TV controls. To set parental controls for U.S. Note: Select Canada to block, then press ENTER. movie ratings. 4 Press the number buttons to set ...controls for the U.S. The following procedure shows how to enter the four-digit password. You use similar steps for U.S. TV RATING screen opens. The Enter Password screen opens. 7 Press or to highlight US, then press ENTER. and Canada. The Setup menu opens with...
...The US settings sub-menu opens. The U.S. The Parental Controls sub menu opens. 8 Press or to highlight the rating you want to set Canadian TV controls. To set parental controls for U.S. Note: Select Canada to block, then press ENTER. movie ratings. 4 Press the number buttons to set ...controls for the U.S. The following procedure shows how to enter the four-digit password. You use similar steps for U.S. TV RATING screen opens. The Enter Password screen opens. 7 Press or to highlight US, then press ENTER. and Canada. The Setup menu opens with...


