
User Manual (English)
Page 2
ii Dynex DX-L15-L19-L22-10A 15", 19", and 22" LCD TVs Contents Child Safety 1 Important safety instructions 2 Warnings 2 Cautions 2 Installing and removing the stand 3 Installing the stand 3 Adjusting the viewing angle of the TV 4 Removing the stand 4 Installing a wall-mount bracket 4 TV components 5 Front 5 Side 5 Back 5 ...menu overview 11 Navigating the menus 12 Selecting a channel 12 Adjusting the volume 12 Adjusting basic settings 12 Displaying additional information 13 Adjusting the picture 13 Adjusting the TV picture 13 Adjusting Advanced Video settings 13 Adjusting ...
ii Dynex DX-L15-L19-L22-10A 15", 19", and 22" LCD TVs Contents Child Safety 1 Important safety instructions 2 Warnings 2 Cautions 2 Installing and removing the stand 3 Installing the stand 3 Adjusting the viewing angle of the TV 4 Removing the stand 4 Installing a wall-mount bracket 4 TV components 5 Front 5 Side 5 Back 5 ...menu overview 11 Navigating the menus 12 Selecting a channel 12 Adjusting the volume 12 Adjusting basic settings 12 Displaying additional information 13 Adjusting the picture 13 Adjusting the TV picture 13 Adjusting Advanced Video settings 13 Adjusting ...
User Manual (English)
Page 3
iii Selecting the signal source 16 Hiding channels 16 Setting up a favorite channel list 16 Adding or changing a channel label 17 Checking the DTV signal strength 18 Setting parental controls 18 Turning parental controls on or off 18 Setting or changing the password 19 Setting parental control levels 20 Downloading rating information 21 Using closed...
iii Selecting the signal source 16 Hiding channels 16 Setting up a favorite channel list 16 Adding or changing a channel label 17 Checking the DTV signal strength 18 Setting parental controls 18 Turning parental controls on or off 18 Setting or changing the password 19 Setting parental control levels 20 Downloading rating information 21 Using closed...
User Manual (English)
Page 8
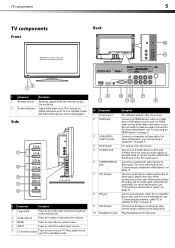
... audio jacks. Connect an AV device to this manual for audio left). Match the color of the connectors to these jacks. TV components 5 TV components Back Front Model DX-L15-10A is used in this jack, then connect audio cables to the audio jacks. Side # Component Description 1 CH /CH 2 ...VOL /VOL Press to go to the next or previous channel in standby mode. Press to increase or decrease the volume. 3 MENU Press ...
... audio jacks. Connect an AV device to this manual for audio left). Match the color of the connectors to these jacks. TV components 5 TV components Back Front Model DX-L15-10A is used in this jack, then connect audio cables to the audio jacks. Side # Component Description 1 CH /CH 2 ...VOL /VOL Press to go to the next or previous channel in standby mode. Press to increase or decrease the volume. 3 MENU Press ...
User Manual (English)
Page 9
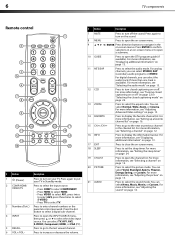
...14 FAVORITE Press to display the favorite channel list. For more information, see "Displaying additional information" on page 13. 17 EXIT Press to close the on page 24. For more information, see "Setting the sleep timer" on -screen menu. 18 SLEEP 19 CH-LIST 20 PICTURE 21 AUDIO Press...select Normal, Wide, Zoom, or Cinema. You can select the audio track (if more information, see "Selecting the audio mode" on your TV in the channel list. Press to select the picture mode. You can select STEREO, SAP (secondary audio program), or MONO. Press again to turn closed ...
...14 FAVORITE Press to display the favorite channel list. For more information, see "Displaying additional information" on page 13. 17 EXIT Press to close the on page 24. For more information, see "Setting the sleep timer" on -screen menu. 18 SLEEP 19 CH-LIST 20 PICTURE 21 AUDIO Press...select Normal, Wide, Zoom, or Cinema. You can select the audio track (if more information, see "Selecting the audio mode" on your TV in the channel list. Press to select the picture mode. You can select STEREO, SAP (secondary audio program), or MONO. Press again to turn closed ...
User Manual (English)
Page 13
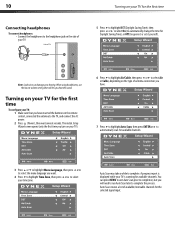
... sure that still lets you want. 4 Press to highlight Time Zone, then press or to select your time zone. Turning on your TV for available channels. 3 Press or to highlight Menu Language, then press or to select the menu language you hear the sound. The initial Setup Wizard screen opens (only ...the first time you turn on your TV). 6 Press to highlight Air/Cable, then press or to select Air or Cable, depending on the ...
... sure that still lets you want. 4 Press to highlight Time Zone, then press or to select your time zone. Turning on your TV for available channels. 3 Press or to highlight Menu Language, then press or to select the menu language you hear the sound. The initial Setup Wizard screen opens (only ...the first time you turn on your TV). 6 Press to highlight Air/Cable, then press or to select Air or Cable, depending on the ...
User Manual (English)
Page 14
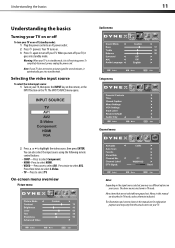
...Press once to highlight the video source, then press ENTER. To completely disconnect power, unplug the power cord. Audio menu Setup menu Parental Controls Channel menu 2 Press or to select AV1. The above menus are grayed out. Menu items that are not selectable are shown in standby mode, it... different options on or off (standby mode): 1 Plug the power cord into an AC power outlet. 2 Press (power). Note: If your TV on your TV is in TV mode. Warning: When your screen. On-screen menu overview Picture menu Notes: Depending on the signal source selected, you turn off your...
...Press once to highlight the video source, then press ENTER. To completely disconnect power, unplug the power cord. Audio menu Setup menu Parental Controls Channel menu 2 Press or to select AV1. The above menus are grayed out. Menu items that are not selectable are shown in standby mode, it... different options on or off (standby mode): 1 Plug the power cord into an AC power outlet. 2 Press (power). Note: If your TV on your TV is in TV mode. Warning: When your screen. On-screen menu overview Picture menu Notes: Depending on the signal source selected, you turn off your...
User Manual (English)
Page 15
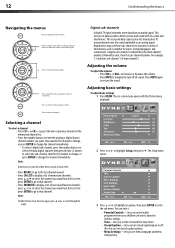
... as weather forecasts, foreign languages, and commercials. Broadcasters may use these sub-channels to transmit a variety of main channel 5. A digital sub-channel is indicated by the main channel number, followed by a dot, then the sub-channel number. Adjusting the volume To adjust the volume: • Press VOL+ or.... • Press RECALL to go to the next or previous channel on -screen cursor left or right. 12 Understanding the basics Navigating the menus Press to the previous screen. Digital sub-channels A digital TV signal transmits more than an analog signal. Press MUTE again to ...
... as weather forecasts, foreign languages, and commercials. Broadcasters may use these sub-channels to transmit a variety of main channel 5. A digital sub-channel is indicated by the main channel number, followed by a dot, then the sub-channel number. Adjusting the volume To adjust the volume: • Press VOL+ or.... • Press RECALL to go to the next or previous channel on -screen cursor left or right. 12 Understanding the basics Navigating the menus Press to the previous screen. Digital sub-channels A digital TV signal transmits more than an analog signal. Press MUTE again to ...
User Manual (English)
Page 16
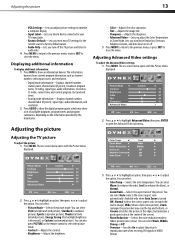
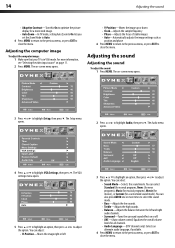
... picture). The information banner shows current program information such as channel number, video input source, and resolution. • Digital mode information-Displays channel number, station name, channel label (if preset), broadcast program name, TV rating, signal type, audio information, resolution, CC mode, ... start and end times. • Analog mode information-Displays channel number, channel label (if preset), signal type, audio information, and resolution. 2 Press GUIDE to open the Advanced Video sub menu. Adjusting the TV picture To adjust the picture: 1 Press MENU. You can...
... picture). The information banner shows current program information such as channel number, video input source, and resolution. • Digital mode information-Displays channel number, station name, channel label (if preset), broadcast program name, TV rating, signal type, audio information, resolution, CC mode, ... start and end times. • Analog mode information-Displays channel number, channel label (if preset), signal type, audio information, and resolution. 2 Press GUIDE to open the Advanced Video sub menu. Adjusting the TV picture To adjust the picture: 1 Press MENU. You can...
User Manual (English)
Page 17
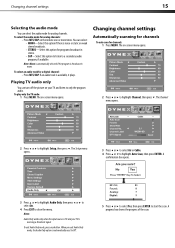
... information, see "Selecting the video input source" on or off. • AVC-(Auto volume control) Equalizes the overall volume levels for all channels. • Audio Language-(DTV channels only) Selects an alternate audio language, if available. 4 Press MENU to return to the previous menu, or press EXIT to highlight Setup, .... 14 Adjusting the sound • Adaptive Contrast-Turn this On to optimize the picture display for a more vivid image. • Auto Zoom-In TV mode, setting Auto Zoom to On lets you set the Zoom Mode to Auto. 4 Press MENU to return to the previous menu, or press EXIT...
... information, see "Selecting the video input source" on or off. • AVC-(Auto volume control) Equalizes the overall volume levels for all channels. • Audio Language-(DTV channels only) Selects an alternate audio language, if available. 4 Press MENU to return to the previous menu, or press EXIT to highlight Setup, .... 14 Adjusting the sound • Adaptive Contrast-Turn this On to optimize the picture display for a more vivid image. • Auto Zoom-In TV mode, setting Auto Zoom to On lets you set the Zoom Mode to Auto. 4 Press MENU to return to the previous menu, or press EXIT...
User Manual (English)
Page 18
... • SAP-Select this option if there is receiving a broadcast signal. Changing channel settings Automatically scanning for channels To auto scan for analog channels. Notes: Audio Only works only when the input source is TV and your TV and listen to only the program audio. To select the audio mode for a ... this option to listen to start the scan. To select an audio track for analog channels: • Press MTS/SAP on -screen menu opens. To exit Audio Only mode, press any button. To play only the TV audio: 1 Press MENU. Parental Controls 3 Press or to select Air or Cable....
... • SAP-Select this option if there is receiving a broadcast signal. Changing channel settings Automatically scanning for channels To auto scan for analog channels. Notes: Audio Only works only when the input source is TV and your TV and listen to only the program audio. To select the audio mode for a ... this option to listen to start the scan. To select an audio track for analog channels: • Press MTS/SAP on -screen menu opens. To exit Audio Only mode, press any button. To play only the TV audio: 1 Press MENU. Parental Controls 3 Press or to select Air or Cable....
User Manual (English)
Page 19
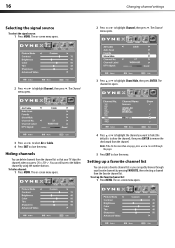
... want to hide (the default is to show the channel), then press ENTER to close the menu. Setting up the favorite channel list: 1 Press MENU. Note: If the list has more than one page, press or to scroll through your TV skips the channels when you can quickly browse through the pages. 5... Press EXIT to remove the check mark from the favorite channel list. The Channel menu opens. 2 Press or to close the menu. The channel list opens. 3 Press or to select Air or...
... want to hide (the default is to show the channel), then press ENTER to close the menu. Setting up the favorite channel list: 1 Press MENU. Note: If the list has more than one page, press or to scroll through your TV skips the channels when you can quickly browse through the pages. 5... Press EXIT to remove the check mark from the favorite channel list. The Channel menu opens. 2 Press or to close the menu. The channel list opens. 3 Press or to select Air or...

User Manual (English)
Page 20
...want to add to the favorite list, then press ENTER to highlight Channel, then press . The favorite channel list opens. 2 Press or to the list. A check mark appears if the channel is added to highlight Channel, then press . The Channel Label screen opens. 7 Press or to select a character, then ... through the pages. 6 Press EXIT to close the menu. 7 To select a channel in the favorite channel list, press FAVORITE, press or to highlight the channel, then press ENTER. 3 Select the signal source of the channel you want to set up on the favorites list. 4 Press or to identify. You...
...want to add to the favorite list, then press ENTER to highlight Channel, then press . The favorite channel list opens. 2 Press or to the list. A check mark appears if the channel is added to highlight Channel, then press . The Channel Label screen opens. 7 Press or to select a character, then ... through the pages. 6 Press EXIT to close the menu. 7 To select a channel in the favorite channel list, press FAVORITE, press or to highlight the channel, then press ENTER. 3 Select the signal source of the channel you want to set up on the favorites list. 4 Press or to identify. You...

User Manual (English)
Page 21
...2 Press or to highlight Setup, then press . Turning parental controls on or off To turn parental controls on -screen menu opens. The Channel menu opens. The Enter Password screen opens. To watch programs that exceed the ratings level you prevent your antenna or digital cable input. The... enter a password. The higher the signal strength, the less likely you are to highlight Channel, then press . Parental Controls 3 Press ENTER. To check the DTV signal strength: 1 Press MENU. The on TV. The DTV signal strength is shown at the bottom of the program (with Parental Controls ...
...2 Press or to highlight Setup, then press . Turning parental controls on or off To turn parental controls on -screen menu opens. The Channel menu opens. The Enter Password screen opens. To watch programs that exceed the ratings level you prevent your antenna or digital cable input. The... enter a password. The higher the signal strength, the less likely you are to highlight Channel, then press . Parental Controls 3 Press ENTER. To check the DTV signal strength: 1 Press MENU. The on TV. The DTV signal strength is shown at the bottom of the program (with Parental Controls ...
User Manual (English)
Page 27
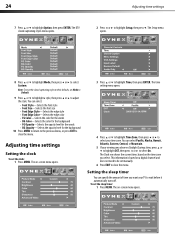
..., set manually. 6 Press EXIT to close the menu. The time setting menu opens. 4 Press or to highlight Time Zone, then press or to select your TV to highlight Setup, then press . Setting the sleep timer You can specify the amount of time you select. To set the clock: 1 Press MENU. Parental... the background 10 Press MENU to return to the previous menu, or press EXIT to adjust the style. The Setup menu opens. The on a digital channel and does not need to be set Mode to Default. 9 Press or to highlight a style, then press or to close the menu. This information is...
..., set manually. 6 Press EXIT to close the menu. The time setting menu opens. 4 Press or to highlight Time Zone, then press or to select your TV to highlight Setup, then press . Setting the sleep timer You can specify the amount of time you select. To set the clock: 1 Press MENU. Parental... the background 10 Press MENU to return to the previous menu, or press EXIT to adjust the style. The Setup menu opens. The on a digital channel and does not need to be set Mode to Default. 9 Press or to highlight a style, then press or to close the menu. This information is...
User Manual (English)
Page 30
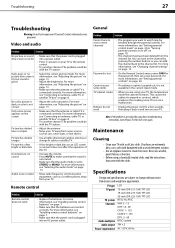
... not available in and turn off " on page 13. • Make sure that the batteries are using your TV. TV type LCD TV panel 15-inch (DX-L15-10A) TFT LCD 19-inch (DX-L19-10A) TFT LCD TV system Channels 22-inch (DX-L22-10A) TFT LCD NTSC-M, ATSC VHF: 2 - 13 UHF: 14 - 69 CATV: 1 - 125 CADTV: 1-135 DTV: 2 - 69 Audio multiplex BTSC system Audio output...
... not available in and turn off " on page 13. • Make sure that the batteries are using your TV. TV type LCD TV panel 15-inch (DX-L15-10A) TFT LCD 19-inch (DX-L19-10A) TFT LCD TV system Channels 22-inch (DX-L22-10A) TFT LCD NTSC-M, ATSC VHF: 2 - 13 UHF: 14 - 69 CATV: 1 - 125 CADTV: 1-135 DTV: 2 - 69 Audio multiplex BTSC system Audio output...


