User Manual (English)
Page 8
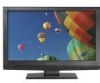
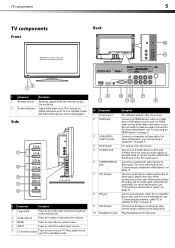
... or decrease the volume. 3 MENU Press to open the on-screen menu. 4 INPUT Press to select the video input source. 5 (Power) button Press to connect audio cables from the remote control. An HDMI cable carries both video and audio, so you will need to these jacks....# Component Description 1 Remote sensor Receives signals from the device to these jacks. Do not use . TV components 5 TV components Back Front Model DX-L15-10A is used in this manual for audio left). Lights red when your TV in standby mode. ## Component 1 Service port 2 HDMI jack 3 VGA AUDIO/ VGA PIC jacks...
... or decrease the volume. 3 MENU Press to open the on-screen menu. 4 INPUT Press to select the video input source. 5 (Power) button Press to connect audio cables from the remote control. An HDMI cable carries both video and audio, so you will need to these jacks....# Component Description 1 Remote sensor Receives signals from the device to these jacks. Do not use . TV components 5 TV components Back Front Model DX-L15-10A is used in this manual for audio left). Lights red when your TV in standby mode. ## Component 1 Service port 2 HDMI jack 3 VGA AUDIO/ VGA PIC jacks...
User Manual (English)
Page 9
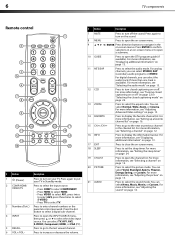
...24. For more information, see "Displaying additional information" on page 13. 17 EXIT Press to close the on-screen menu. 18 SLEEP 19 CH-LIST 20 PICTURE 21 AUDIO Press to turn on the sound. 8 MENU Press to open the INPUT SOURCE menu, then press or ... up a favorite channel list" on -screen menu. 9 / ENTER Press direction buttons to display the favorite channel list. For more information, see "Adjusting the sound" on page 15. 6 TV components Remote control INFO # Button Description 1 (Power) Press to set the sleep timer. Press again to turn on page 22. ...
...24. For more information, see "Displaying additional information" on page 13. 17 EXIT Press to close the on-screen menu. 18 SLEEP 19 CH-LIST 20 PICTURE 21 AUDIO Press to turn on the sound. 8 MENU Press to open the INPUT SOURCE menu, then press or ... up a favorite channel list" on -screen menu. 9 / ENTER Press direction buttons to display the favorite channel list. For more information, see "Adjusting the sound" on page 15. 6 TV components Remote control INFO # Button Description 1 (Power) Press to set the sleep timer. Press again to turn on page 22. ...
User Manual (English)
Page 14
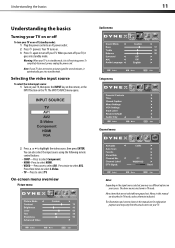
... press the INPUT key on the remote, or the INPUT button on your TV. Audio menu Setup menu Parental Controls Channel menu 2 Press or to select AV2. Your TV turns on. 3 Press again to select TV. To completely disconnect power, unplug the power cord. The above menus are shown in standby mode, it automatically goes into...
... press the INPUT key on the remote, or the INPUT button on your TV. Audio menu Setup menu Parental Controls Channel menu 2 Press or to select AV2. Your TV turns on. 3 Press again to select TV. To completely disconnect power, unplug the power cord. The above menus are shown in standby mode, it automatically goes into...
User Manual (English)
Page 30
... • When you are using your TV. Remote control Problem Remote control does not work • Unplug the power cord for the password, then set to change to the channel list. Buttons do not work Solution • Replace the...TV. Maintenance Cleaning • Clean your TV away from the channel list. TV type LCD TV panel 15-inch (DX-L15-10A) TFT LCD 19-inch (DX-L19-10A) TFT LCD TV system Channels 22-inch (DX-L22-10A) TFT LCD NTSC-M, ATSC VHF: 2 - 13 UHF: 14 - 69 CATV: 1 - 125 CADTV: 1-135 DTV: 2 - 69 Audio multiplex BTSC system Audio output 3W × 2 Power...
... • When you are using your TV. Remote control Problem Remote control does not work • Unplug the power cord for the password, then set to change to the channel list. Buttons do not work Solution • Replace the...TV. Maintenance Cleaning • Clean your TV away from the channel list. TV type LCD TV panel 15-inch (DX-L15-10A) TFT LCD 19-inch (DX-L19-10A) TFT LCD TV system Channels 22-inch (DX-L22-10A) TFT LCD NTSC-M, ATSC VHF: 2 - 13 UHF: 14 - 69 CATV: 1 - 125 CADTV: 1-135 DTV: 2 - 69 Audio multiplex BTSC system Audio output 3W × 2 Power...


