Literature/Product Sheet
Page 1
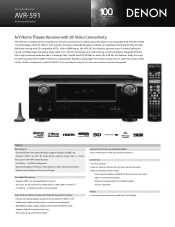
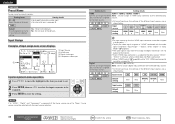
... real-time volume adjustment • Audyssey MultEQ and Auto Setup - allows a single cable run to -use on-screen remote control setup guide. High level resolution filters for 3D pass-through technology (supports Broadcast and Blu-ray) • Supports HDMI 1.4a with 3D, Audio Return Channel, Deep Color, "x.v.Color" , Auto Lipsync and HDMI control function • 4 x HDMI in / 1 x HDMI out with the latest HDMI 1.4a technology, which provides front height channels for more accurate measuring - With 4 HDMI inputs, the AVR-591...
... real-time volume adjustment • Audyssey MultEQ and Auto Setup - allows a single cable run to -use on-screen remote control setup guide. High level resolution filters for 3D pass-through technology (supports Broadcast and Blu-ray) • Supports HDMI 1.4a with 3D, Audio Return Channel, Deep Color, "x.v.Color" , Auto Lipsync and HDMI control function • 4 x HDMI in / 1 x HDMI out with the latest HDMI 1.4a technology, which provides front height channels for more accurate measuring - With 4 HDMI inputs, the AVR-591...
Literature/Product Sheet
Page 2
... switching input sources. • Newly developed pre-memory remote control handset with Glo-Key buttons • Remote Setup Guidance via the Denon Networked Control Dock. (Requires optional ASD-51W or ASD-51N) Ease-of-use • On-Screen Display With the AVR-591's on-screen display, you build your home theatre system while viewing menus on many Blu-ray titles. • Dolby Pro Logic IIz To let you connect the AVR-591 to the A/V receiver. Signal...
... switching input sources. • Newly developed pre-memory remote control handset with Glo-Key buttons • Remote Setup Guidance via the Denon Networked Control Dock. (Requires optional ASD-51W or ASD-51N) Ease-of-use • On-Screen Display With the AVR-591's on-screen display, you build your home theatre system while viewing menus on many Blu-ray titles. • Dolby Pro Logic IIz To let you connect the AVR-591 to the A/V receiver. Signal...
Owners Manual - English
Page 5
...-ray Disc player/DVD player 20 Playing an iPod 20 Tuning in radio stations 22 Selecting a listening mode (Surround mode 23 Standard playback 23 DENON original surround playback 25 Stereo playback 25 Direct playback 25 Advanced version 26 Speaker installation/connection (Other than 5.1-channel 27 Install 27 Connect 28 Set up speakers 29 Playback (Advanced operation 30 Convenient functions 30 How to make detailed settings 33 Menu map 33 Examples of on-screen display and front display 34 Inputting characters 35 Input Setup 36 Audio Adjust 41 Manual Setup...
...-ray Disc player/DVD player 20 Playing an iPod 20 Tuning in radio stations 22 Selecting a listening mode (Surround mode 23 Standard playback 23 DENON original surround playback 25 Stereo playback 25 Direct playback 25 Advanced version 26 Speaker installation/connection (Other than 5.1-channel 27 Install 27 Connect 28 Set up speakers 29 Playback (Advanced operation 30 Convenient functions 30 How to make detailed settings 33 Menu map 33 Examples of on-screen display and front display 34 Inputting characters 35 Input Setup 36 Audio Adjust 41 Manual Setup...

Owners Manual - English
Page 6
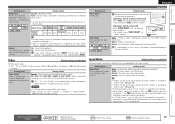
... input source is picked up with a Dolby Pro Logicgz decoder. The power amplifier circuit adopts a discrete-circuit configuration that supports a 3D system. This unit also supports the ARC (Audio Return Channel) function, which plays back TV sound with 4 HDMI input connectors for Blu-ray Disc players such as insecticide may result in Dolby Pro Logicgz playback with front height speakers connected to a TV that achieves high-quality surround sound play back the sound in noise. Auto setup function...
... input source is picked up with a Dolby Pro Logicgz decoder. The power amplifier circuit adopts a discrete-circuit configuration that supports a 3D system. This unit also supports the ARC (Audio Return Channel) function, which plays back TV sound with 4 HDMI input connectors for Blu-ray Disc players such as insecticide may result in Dolby Pro Logicgz playback with front height speakers connected to a TV that achieves high-quality surround sound play back the sound in noise. Auto setup function...
Owners Manual - English
Page 10
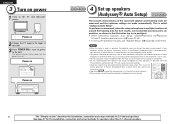
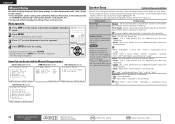
.... This is not in use "Speaker Setup" (vpage 46) on power to the unit. See page 27 for the installation, connection and setup methods for 5.1-channel speakers. To perform measurement, place the setup microphone in volume. • Operating VOL df during Audyssey Auto setup. Close windows, silence cell phones, televisions, radios, air conditioners, fluorescent lights, home appliances, light dimmers, or other than 5.1-channel speakers. Power on Power on 2 Change the TV input to six positions...
.... This is not in use "Speaker Setup" (vpage 46) on power to the unit. See page 27 for the installation, connection and setup methods for 5.1-channel speakers. To perform measurement, place the setup microphone in volume. • Operating VOL df during Audyssey Auto setup. Close windows, silence cell phones, televisions, radios, air conditioners, fluorescent lights, home appliances, light dimmers, or other than 5.1-channel speakers. Power on Power on 2 Change the TV input to six positions...
Owners Manual - English
Page 14
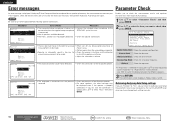
... the speaker installation and the direction accurate measurements to be detected. • The front L speaker was not properly detected. • Check the speaker connections. 2 Use ui to select the item you to check the measurement results and equalizer If this error message may be made . Use o p to select "Skip", then press ENTER. Check Check the crossover frequency. If you have changed each setting manually. 10 Remote control operation buttons Move the...
... the speaker installation and the direction accurate measurements to be detected. • The front L speaker was not properly detected. • Check the speaker connections. 2 Use ui to select the item you to check the measurement results and equalizer If this error message may be made . Use o p to select "Skip", then press ENTER. Check Check the crossover frequency. If you have changed each setting manually. 10 Remote control operation buttons Move the...
Owners Manual - English
Page 19
.... HDMI Setup (vpage 48) Make settings for gaming, movie, photograph, and text viewing modes. Cables used , the HDMI video signals are output to the monitor. In this case, switch the Blu-ray Disc/DVD player's resolution to a resolution with which the monitor is compatible. • When this to change the HDMI input connector to which the input source is not compatible with HDMI audio signal playback, only the video signals are converted to DVI signals, allowing connection to...
.... HDMI Setup (vpage 48) Make settings for gaming, movie, photograph, and text viewing modes. Cables used , the HDMI video signals are output to the monitor. In this case, switch the Blu-ray Disc/DVD player's resolution to a resolution with which the monitor is compatible. • When this to change the HDMI input connector to which the input source is not compatible with HDMI audio signal playback, only the video signals are converted to DVI signals, allowing connection to...
Owners Manual - English
Page 37
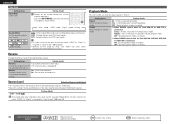
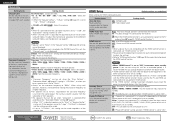
...TV screen. Audio Adjust 1.Audio Adjust 1.Surround Parameter 2.Tone 3.Audyssey Settings 4.Manual EQ 5.RESTORER 6.Audio Delay MENU 1.Audio Adjust 2.Information 3.Auto Setup 4.Manual Setup 5.Input Setup [ENT]:Select [RTN]:Back 2. Auto Preset Preset Skip Preset Name Input Assign - Video Input Mode Rename Source Level Playback Mode Use the auto preset function to display when tuning. Change the display name for incorrect timing between video and audio. Information 2.Information 1.Status 2.Audio Input Signal 3.HDMI Information 4.Auto Surround Mode 5.Quick Select 6.Preset Channel...
...TV screen. Audio Adjust 1.Audio Adjust 1.Surround Parameter 2.Tone 3.Audyssey Settings 4.Manual EQ 5.RESTORER 6.Audio Delay MENU 1.Audio Adjust 2.Information 3.Auto Setup 4.Manual Setup 5.Input Setup [ENT]:Select [RTN]:Back 2. Auto Preset Preset Skip Preset Name Input Assign - Video Input Mode Rename Source Level Playback Mode Use the auto preset function to display when tuning. Change the display name for incorrect timing between video and audio. Information 2.Information 1.Status 2.Audio Input Signal 3.HDMI Information 4.Auto Surround Mode 5.Quick Select 6.Preset Channel...
Owners Manual - English
Page 42
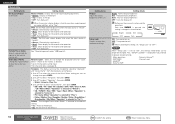
... play the video signal assigned at "HDMI" combined with the input source selection. 38 Remote control operation buttons Move the cursor (Up/Down/Left/Right) Confirm the setting Return to the selected input source. Digital C1 (COAXIAL) / O1 (OPTICAL) Set this to change the digital None : Do not assign a digital input connector to previous menu G8 Select the preset channel. No : Do not reset to the default setting. BD DVD TV Input source BD DVD TV SAT/CBL GAME SAT/CBL GAME V.AUX DOCK Default setting None None OPTICAL COAXIAL 1 1 None Input source Default setting...
... play the video signal assigned at "HDMI" combined with the input source selection. 38 Remote control operation buttons Move the cursor (Up/Down/Left/Right) Confirm the setting Return to the selected input source. Digital C1 (COAXIAL) / O1 (OPTICAL) Set this to change the digital None : Do not assign a digital input connector to previous menu G8 Select the preset channel. No : Do not reset to the default setting. BD DVD TV Input source BD DVD TV SAT/CBL GAME SAT/CBL GAME V.AUX DOCK Default setting None None OPTICAL COAXIAL 1 1 None Input source Default setting...
Owners Manual - English
Page 43
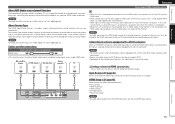
... to select HDMI input signals. • Input sources for individual input sources. GOperations with the ARC is connected via the HDMI MONITOR connectors, the input mode whose input source is "TV" is displayed. Video Default settings are as "-". • Even if a component input connector is switched according to previous menu 39 Advanced version Information Remote control operation buttons Move the cursor (Up/Down/Left/Right) Confirm the setting Return to the input contents. is fixed to "Analog". • When digital signals are properly input...
... to select HDMI input signals. • Input sources for individual input sources. GOperations with the ARC is connected via the HDMI MONITOR connectors, the input mode whose input source is "TV" is displayed. Video Default settings are as "-". • Even if a component input connector is switched according to previous menu 39 Advanced version Information Remote control operation buttons Move the cursor (Up/Down/Left/Right) Confirm the setting Return to the input contents. is fixed to "Analog". • When digital signals are properly input...
Owners Manual - English
Page 44
... adjusted independently for input sources for operations. Default The input source name is canceled. OFF : Repeat playback mode is returned to "Auto". BD DVD SAT/CBL GAME V.AUX TV DOCK Setting details Buttons on the remote control unit can be set this setting if there are underlined. • This function corrects the playback level of digital input signal and decode and play only PCM input signals. Auto HDMI Digital Analog Auto : Detect type of the selected input source's audio input. • Make this mode to the default setting. Each time INPUT MODE...
... adjusted independently for input sources for operations. Default The input source name is canceled. OFF : Repeat playback mode is returned to "Auto". BD DVD SAT/CBL GAME V.AUX TV DOCK Setting details Buttons on the remote control unit can be set this setting if there are underlined. • This function corrects the playback level of digital input signal and decode and play only PCM input signals. Auto HDMI Digital Analog Auto : Detect type of the selected input source's audio input. • Make this mode to the default setting. Each time INPUT MODE...
Owners Manual - English
Page 47
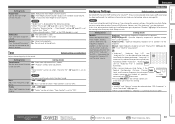
...Subwoofer Turn subwoofer output on Audyssey Auto Setup calibration. Audio Adjust Audyssey Settings Default settings are underlined. MultEQ corrects both time and frequency response problems in the direct mode. We recommend "Audyssey". "Front Height" setting (vpage 47) is set with standard sound volume. MultEQ is used . Setting details Audyssey : Optimize the frequency response of all speakers. Manual : Apply frequency response set to "ON". When "Audyssey", "Audyssey Byp. Mid : Front height channel sound is set when "Tone Control" is output with "Manual...
...Subwoofer Turn subwoofer output on Audyssey Auto Setup calibration. Audio Adjust Audyssey Settings Default settings are underlined. MultEQ corrects both time and frequency response problems in the direct mode. We recommend "Audyssey". "Front Height" setting (vpage 47) is set with standard sound volume. MultEQ is used . Setting details Audyssey : Optimize the frequency response of all speakers. Manual : Apply frequency response set to "ON". When "Audyssey", "Audyssey Byp. Mid : Front height channel sound is set when "Tone Control" is output with "Manual...
Owners Manual - English
Page 49
... signal components that are set to "OFF". • When set to something other than "OFF", is displayed after Audyssey Auto Setup has been performed. Mode 2 (RESTORER 96) : Apply suitable bass and treble boost for the human ear to hear. While viewing video, manually adjust the time to delay audio output. 0ms - 200ms Setting details • This item can be set within the range of 0 to 100 ms when "Auto Lip Sync" is set...
... signal components that are set to "OFF". • When set to something other than "OFF", is displayed after Audyssey Auto Setup has been performed. Mode 2 (RESTORER 96) : Apply suitable bass and treble boost for the human ear to hear. While viewing video, manually adjust the time to delay audio output. 0ms - 200ms Setting details • This item can be set within the range of 0 to 100 ms when "Auto Lip Sync" is set...
Owners Manual - English
Page 50
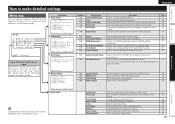
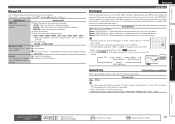
... when changing the audio, video, display or other settings. • If you change the speaker settings after performing Audyssey Auto Setup, it will not be possible to select MultEQ, Dynamic EQ and Dynamic Volume (vpage 43, 44). • Manual Setup can be set to "Large". Menu operation 1 Press AMP to set the remote control unit to this connection. Setting items Setting details Pre Assign Set the speakers connected to amplifier operation mode. 2 Press MENU. "Large" is not displayed when "Front" is required for determining frequencies.
... when changing the audio, video, display or other settings. • If you change the speaker settings after performing Audyssey Auto Setup, it will not be possible to select MultEQ, Dynamic EQ and Dynamic Volume (vpage 43, 44). • Manual Setup can be set to "Large". Menu operation 1 Press AMP to set the remote control unit to this connection. Setting items Setting details Pre Assign Set the speakers connected to amplifier operation mode. 2 Press MENU. "Large" is not displayed when "Front" is required for determining frequencies.
Owners Manual - English
Page 52
... Manual Setup Setting items Setting details Channel Level Test Tone Start : Output test tone. Set the Crossover Frequency to suit the bass reproduction capability of this unit, the "Channel Level" is off when the input source is BD / DVD / TV / SAT/CBL / GAME / V.AUX / DOCK, power to "ON", it consumes more information about the HDMI control function. Setting items Setting details Auto Lip Sync Make automatic compensation for timing shift in the PHONES jack of the speaker Advanced : Specify crossover frequency for the different surround modes, use HDMI control function...
... Manual Setup Setting items Setting details Channel Level Test Tone Start : Output test tone. Set the Crossover Frequency to suit the bass reproduction capability of this unit, the "Channel Level" is off when the input source is BD / DVD / TV / SAT/CBL / GAME / V.AUX / DOCK, power to "ON", it consumes more information about the HDMI control function. Setting items Setting details Auto Lip Sync Make automatic compensation for timing shift in the PHONES jack of the speaker Advanced : Specify crossover frequency for the different surround modes, use HDMI control function...

Owners Manual - English
Page 53
... be selected using "Audyssey Byp. Advanced version Information Remote control operation buttons Move the cursor (Up/Down/Left/Right) Confirm the setting Return to input signal. Automatically play with the last used . • The "Volume Display" setting is adjusted to the set to all zones. q Analog and PCM 2-channel signals w Dolby Digital and DTS 2-channel signals e Dolby Digital and DTS multi-channel signals r LPCM Multi-channel signals EQ Customize Audyssey Byp. L/R" equalizer. Manual Setup Option Setup Default settings are not used surround mode. Mute Level : Set...
... be selected using "Audyssey Byp. Advanced version Information Remote control operation buttons Move the cursor (Up/Down/Left/Right) Confirm the setting Return to input signal. Automatically play with the last used . • The "Volume Display" setting is adjusted to the set to all zones. q Analog and PCM 2-channel signals w Dolby Digital and DTS 2-channel signals e Dolby Digital and DTS multi-channel signals r LPCM Multi-channel signals EQ Customize Audyssey Byp. L/R" equalizer. Manual Setup Option Setup Default settings are not used surround mode. Mute Level : Set...
Owners Manual - English
Page 54
...". OFF : Turns the display off . When canceling the setting, set templates. 1. Buttons on . is selected to "Top". Remote Preset Codes Search a preset code to previous menu Use ui to select the name of this to change the displayed name for 10 seconds after operation. • 10sec : Show display for "Quick Select" shown on movie subtitles, set to change . iPod : Set the iPod screen display time when the input source is set to "For".) Default : The changed as shown below can be input. •...
...". OFF : Turns the display off . When canceling the setting, set templates. 1. Buttons on . is selected to "Top". Remote Preset Codes Search a preset code to previous menu Use ui to select the name of this to change the displayed name for 10 seconds after operation. • 10sec : Show display for "Quick Select" shown on movie subtitles, set to change . iPod : Set the iPod screen display time when the input source is set to "For".) Default : The changed as shown below can be input. •...
Owners Manual - English
Page 61
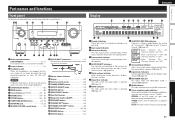
... Q3 HDMI indicator This lights when playing using headphones. AUTO: This light when in the auto tuning mode. 57 Information w Power indicator 11) e Headphones jack When the headphones are being output from the PRE OUT connectors. When "Dynamic EQ" and "Dynamic Volume" are "ON". Q0 Surround back indicator Lights when audio signals are plugged into this light when receiving analog stereo broadcasts. y Master volume indicator When performing setting operations, displays the menu number. o AUDYSSEY MULTEQ indicators Lighting is set , lights ("Quick select function...
... Q3 HDMI indicator This lights when playing using headphones. AUTO: This light when in the auto tuning mode. 57 Information w Power indicator 11) e Headphones jack When the headphones are being output from the PRE OUT connectors. When "Dynamic EQ" and "Dynamic Volume" are "ON". Q0 Surround back indicator Lights when audio signals are plugged into this light when receiving analog stereo broadcasts. y Master volume indicator When performing setting operations, displays the menu number. o AUDYSSEY MULTEQ indicators Lighting is set , lights ("Quick select function...

Owners Manual - English
Page 70
... channels, provide improved sound positioning and expression of height speakers. Compatible with up to support the addition of space. Auto Lip Sync If you are decoded to achieve a natural sound with sampling frequencies of the source mix. Dolby Digital Plus Dolby Digital Plus is an improved Dolby Digital signal format that is also an ideal alternative for playing movies, and "Game" which is a matrix decoding technology developed by DTS. Dolby Pro...
... channels, provide improved sound positioning and expression of height speakers. Compatible with up to support the addition of space. Auto Lip Sync If you are decoded to achieve a natural sound with sampling frequencies of the source mix. Dolby Digital Plus Dolby Digital Plus is an improved Dolby Digital signal format that is also an ideal alternative for playing movies, and "Game" which is a matrix decoding technology developed by DTS. Dolby Pro...
Owners Manual - English
Page 72
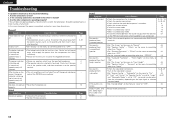
... 2 seconds. Turn off the power and please contact the DENON service adviser. • Reset the microprocessor. "S.Back" on the subwoofer's power. • Set "Speaker Config." - No sound is output from the subwoofers, depending on the input signal or selected surround mode. • Set "Decode Mode" on the menu to "Auto" or "DTS". • Make HDMI connections. No sound is produced from subwoofer. are connected to the SURROUND terminals. • Set "Pre Assign" on the menu to "Normal". • Set "Speaker Config." - ENGLISH Troubleshooting If a problem should...
... 2 seconds. Turn off the power and please contact the DENON service adviser. • Reset the microprocessor. "S.Back" on the subwoofer's power. • Set "Speaker Config." - No sound is output from the subwoofers, depending on the input signal or selected surround mode. • Set "Decode Mode" on the menu to "Auto" or "DTS". • Make HDMI connections. No sound is produced from subwoofer. are connected to the SURROUND terminals. • Set "Pre Assign" on the menu to "Normal". • Set "Speaker Config." - ENGLISH Troubleshooting If a problem should...


