
Literature/Product Sheet
Page 1
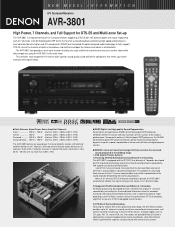
... professional DTS ES decoding algorithm as CD, tape, FM, TV, stereo VCR, etc. The AVR-3801 also provides a multi-zone function that lets you enjoy a different entertainment source in all channels. s DENON's latest surround technology faithfully recreates the surround sound produced at 105 watts, into 8 ohms, from the encoded Surround Left and Surround Right...
... professional DTS ES decoding algorithm as CD, tape, FM, TV, stereo VCR, etc. The AVR-3801 also provides a multi-zone function that lets you enjoy a different entertainment source in all channels. s DENON's latest surround technology faithfully recreates the surround sound produced at 105 watts, into 8 ohms, from the encoded Surround Left and Surround Right...

Literature/Product Sheet
Page 2
..., audio, digital, and video, display circuits. This construction reduces noise interference among the circuits and ensures a clean, transparent sound. OPTICAL X 3 1 Set Digital (Coaxial) Input COAXIAL Audio Outputs 8-ch Analog PRE Output FRONT L/R, CENTER, SURROUND L/R,.... 3. Widescreen 7.1 Channel Playback of conventional stereo, matrix encoded, and discrete 5.1 program sources. DENON ELECTRONICS DIVISION OF DENON CORPORATION (USA) 19 CHAPIN ROAD, P.O. NEW MODEL I N F O R M AT I O N AVR-3801 2. s 96 kHz, 24-bit Audio D/A Converters s Wide-Range Play Capability for DVD-Audio...
..., audio, digital, and video, display circuits. This construction reduces noise interference among the circuits and ensures a clean, transparent sound. OPTICAL X 3 1 Set Digital (Coaxial) Input COAXIAL Audio Outputs 8-ch Analog PRE Output FRONT L/R, CENTER, SURROUND L/R,.... 3. Widescreen 7.1 Channel Playback of conventional stereo, matrix encoded, and discrete 5.1 program sources. DENON ELECTRONICS DIVISION OF DENON CORPORATION (USA) 19 CHAPIN ROAD, P.O. NEW MODEL I N F O R M AT I O N AVR-3801 2. s 96 kHz, 24-bit Audio D/A Converters s Wide-Range Play Capability for DVD-Audio...

Owners Manual
Page 5
... in this instructions may be generated if this unit's power cord and input/output connection cords. • Noise or disturbance tends to provide superb surround sound listening with an immense array of features, we recommend that before proceeding. For heat dispersal, leave at least 10 cm/4 inch of space between all... as possible from the tuner or TV. • Set the antenna wires from the tuner or TV away from the actual set for choosing the DENON AVR-3801 Digital Surround A / V receiver.
... in this instructions may be generated if this unit's power cord and input/output connection cords. • Noise or disturbance tends to provide superb surround sound listening with an immense array of features, we recommend that before proceeding. For heat dispersal, leave at least 10 cm/4 inch of space between all... as possible from the tuner or TV. • Set the antenna wires from the tuner or TV away from the actual set for choosing the DENON AVR-3801 Digital Surround A / V receiver.
Owners Manual
Page 6
... room, so that is how they want the audience to connect two different sets of wide-range, high fidelity surround sound. The AVR-3801 is also compatible with optimum results and no compromise. 8. The DENON AVR-3801 provides the ability to realize. DTS (Digital Theater Systems) DTS provides up is changed. This assures future upgrade possibilities...
... room, so that is how they want the audience to connect two different sets of wide-range, high fidelity surround sound. The AVR-3801 is also compatible with optimum results and no compromise. 8. The DENON AVR-3801 provides the ability to realize. DTS (Digital Theater Systems) DTS provides up is changed. This assures future upgrade possibilities...

Owners Manual
Page 7
... result in generating hum or other noise. • Noise or humming may be used independently without turning the power of the front, center and surround sound channels, or for connections to audio equipment with one speaker, connect the speaker to these outlets when this unit. NOTE: Only use Surround back with...
... result in generating hum or other noise. • Noise or humming may be used independently without turning the power of the front, center and surround sound channels, or for connections to audio equipment with one speaker, connect the speaker to these outlets when this unit. NOTE: Only use Surround back with...

Owners Manual
Page 12
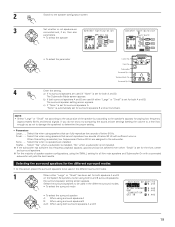
... jacks are for inputting multi-channel audio signals from an outboard decoder, or a component with 8- Decoder with a different type of the other future multi-channel sound format decoder. • When making connections, also refer to play a different program source in another room at the same time. Connecting the MULTI ZONE jacks...
... jacks are for inputting multi-channel audio signals from an outboard decoder, or a component with 8- Decoder with a different type of the other future multi-channel sound format decoder. • When making connections, also refer to play a different program source in another room at the same time. Connecting the MULTI ZONE jacks...

Owners Manual
Page 13
... careful when using two pairs of surround speakers (A + B) at high volumes when speakers with an impedance lower than 8 Ω/ohms will result in weak central sound, unclear orientation of the various instruments, and the sense of direction of the stereo being impaired. • When making connections, take care that like polarities...
... careful when using two pairs of surround speakers (A + B) at high volumes when speakers with an impedance lower than 8 Ω/ohms will result in weak central sound, unclear orientation of the various instruments, and the sense of direction of the stereo being impaired. • When making connections, take care that like polarities...

Owners Manual
Page 17
...H: Use these to move the cursors (D and H) to switch the surround back channel's power amplifier for use this function when using the AVR-3801's on the screen. Front Sp. This adjusts the volume of the signals output from the speakers and subwoofer for optimizing the timing with which ... are required to set up the listening room's AV system centered around the AVR-3801. • Use the following buttons to set the composition of playing the surround back channel for more ideal surround sound. Surround mode Surround speaker (Subwoofer mode) This selects the subwoofer speaker for ...
...H: Use these to move the cursors (D and H) to switch the surround back channel's power amplifier for use this function when using the AVR-3801's on the screen. Front Sp. This adjusts the volume of the signals output from the speakers and subwoofer for optimizing the timing with which ... are required to set up the listening room's AV system centered around the AVR-3801. • Use the following buttons to set the composition of playing the surround back channel for more ideal surround sound. Surround mode Surround speaker (Subwoofer mode) This selects the subwoofer speaker for ...

Owners Manual
Page 18
... systems Front speaker systems Set these at the sides of the TV or screen with their front surfaces as possible. Surround speaker systems With the AVR-3801 it possible to select surround speakers A+B, but we recommend using the more effective multi surround speaker system with the surround back speakers. A A BAAB Using A ... layout for a variety of sources and surround modes. • Surround speaker selector function This function makes it is also possible to achieve the optimum sound fields for different sources by switching between two systems of surround speakers (A and B).
... systems Front speaker systems Set these at the sides of the TV or screen with their front surfaces as possible. Surround speaker systems With the AVR-3801 it possible to select surround speakers A+B, but we recommend using the more effective multi surround speaker system with the surround back speakers. A A BAAB Using A ... layout for a variety of sources and surround modes. • Surround speaker selector function This function makes it is also possible to achieve the optimum sound fields for different sources by switching between two systems of surround speakers (A and B).
Owners Manual
Page 20
.... b) If both A and B surround speakers), BAND MODE the surround speaker setting screen appears. Select this when using speakers that cannot reproduce low sounds of the speaker but according to the subwoofer. Select "Yes" when a subwoofer is installed, "No" when a subwoofer is set for both A...below 80 Hz are used (if "None" is not installed. If the subwoofer has sufficient low frequency playback capacity, good sound can fully reproduce low sounds of below 80 Hz with a connected subwoofer will yield the best results. Subwoofer Surround Sp. a) If no speakers are ...
.... b) If both A and B surround speakers), BAND MODE the surround speaker setting screen appears. Select this when using speakers that cannot reproduce low sounds of the speaker but according to the subwoofer. Select "Yes" when a subwoofer is installed, "No" when a subwoofer is set for both A...below 80 Hz are used (if "None" is not installed. If the subwoofer has sufficient low frequency playback capacity, good sound can fully reproduce low sounds of below 80 Hz with a connected subwoofer will yield the best results. Subwoofer Surround Sp. a) If no speakers are ...

Owners Manual
Page 21
... selected with body. • When the subwoofer is output from those channels. - When "Front" is set to "Large" and "Subwoofer" is set to "Yes", bass sound is set for the digital signals when playing in surround modes other than Dolby/DTS.
... selected with body. • When the subwoofer is output from those channels. - When "Front" is set to "Large" and "Subwoofer" is set to "Yes", bass sound is set for the digital signals when playing in surround modes other than Dolby/DTS.

Owners Manual
Page 25
...from the different speakers in units of the test tones from the different speakers. To cancel the settings, select "Level Clear" and "Yes" on a sound level meter at 4-second intervals the first time and second time around, 2-second intervals the third time around and on: 1spkr SB FL C FR ... -12 dB and +12 dB in the following order, at the listening position. Because adjusting the subwoofer level test tone by ear so the sound levels are automatically emitted from the various speakers is difficult, use the CURSOR up and down to adjust so that the volume of 1 dB. ...
...from the different speakers in units of the test tones from the different speakers. To cancel the settings, select "Level Clear" and "Yes" on a sound level meter at 4-second intervals the first time and second time around, 2-second intervals the third time around and on: 1spkr SB FL C FR ... -12 dB and +12 dB in the following order, at the listening position. Because adjusting the subwoofer level test tone by ear so the sound levels are automatically emitted from the various speakers is difficult, use the CURSOR up and down to adjust so that the volume of 1 dB. ...

Owners Manual
Page 26
... between a digital audio source (stereo - 2 channel) and a digital audio recorder. • Do not connect the output of the AVR-3801 for just that will affect ALL surround modes. Use this mode a Master Channel Level adjustment mode. TUNING • To select the input...sound mode, your preferred channel level adjustments for the different input sources. 1 At the System Setup Menu select "Digital In Assignment". Setting the Digital In Assignment • This setting assigns the digital input jacks of the component connected to the OPTICAL 3 OUT jack on the AVR-3801...
... between a digital audio source (stereo - 2 channel) and a digital audio recorder. • Do not connect the output of the AVR-3801 for just that will affect ALL surround modes. Use this mode a Master Channel Level adjustment mode. TUNING • To select the input...sound mode, your preferred channel level adjustments for the different input sources. 1 At the System Setup Menu select "Digital In Assignment". Setting the Digital In Assignment • This setting assigns the digital input jacks of the component connected to the OPTICAL 3 OUT jack on the AVR-3801...

Owners Manual
Page 42
..., a vacation. POWER OFF ON / SOURCE RC-883 REMOTE CONTROL UNIT 3 TV CD CDR/MD/ TAPE RECEIVER VCR DBS/CABLE VDP DVD DISPLAY MENU 2 41 The sound is set and the display turns off. Please be sure to 13) and check that all connections are correct. 2 Select "AMP" using the RECEIVER button...
..., a vacation. POWER OFF ON / SOURCE RC-883 REMOTE CONTROL UNIT 3 TV CD CDR/MD/ TAPE RECEIVER VCR DBS/CABLE VDP DVD DISPLAY MENU 2 41 The sound is set and the display turns off. Please be sure to 13) and check that all connections are correct. 2 Select "AMP" using the RECEIVER button...

Owners Manual
Page 44
... connections are being input properly. NOTE: • The digital input indicator will light when playing CD-ROMs containing data other than audio signals, but no sound will be heard. 43 DIGITAL ANALOG DIGITAL DIGITAL ANALOG Input signal display • DOLBY DIGITAL SIGNAL LOCK DIGITAL • DTS LOCK SIGNAL DIGITAL • PCM...
... connections are being input properly. NOTE: • The digital input indicator will light when playing CD-ROMs containing data other than audio signals, but no sound will be heard. 43 DIGITAL ANALOG DIGITAL DIGITAL ANALOG Input signal display • DOLBY DIGITAL SIGNAL LOCK DIGITAL • DTS LOCK SIGNAL DIGITAL • PCM...

Owners Manual
Page 45
...in steps of 2 dB.) • To decrease the bass or treble: Turn the control clockwise. (The bass or treble sound can be adjusted selected, turn off and no sound is pressed. SELECT (Main unit) • To increase the bass or treble: Turn the control clockwise. (The bass or ...to up to -12 dB in steps of 2 dB.) [2] Listening over headphones 1 Connect the headphones to play the sound over the headphones only. After starting playback [1] Adjusting the sound quality (TONE) The tone control function will cancel the settings. Caution: Switching off the power of the front panel. ...
...in steps of 2 dB.) • To decrease the bass or treble: Turn the control clockwise. (The bass or treble sound can be adjusted selected, turn off and no sound is pressed. SELECT (Main unit) • To increase the bass or treble: Turn the control clockwise. (The bass or ...to up to -12 dB in steps of 2 dB.) [2] Listening over headphones 1 Connect the headphones to play the sound over the headphones only. After starting playback [1] Adjusting the sound quality (TONE) The tone control function will cancel the settings. Caution: Switching off the power of the front panel. ...
Owners Manual
Page 46
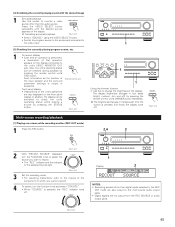
... button. DIMMER (Main unit) Multi-source recording/playback [1] Playing one source while recording another (REC OUT mode) 1 Press the REC button. [4] Combining the currently playing sound with the desired image 1 Simulcast playback Use this to the manual of that operation appears on the display. Such information as the position of the...
... button. DIMMER (Main unit) Multi-source recording/playback [1] Playing one source while recording another (REC OUT mode) 1 Press the REC button. [4] Combining the currently playing sound with the desired image 1 Simulcast playback Use this to the manual of that operation appears on the display. Such information as the position of the...

Owners Manual
Page 48
... (Main unit) (Remote control unit) • When the input mode is connected, then set to the external input (EXT. To watch video while listening to sound, select the input source to which the video signal is set this is output to the FL (front left), FR (front right), C (center), SL (surround...
... (Main unit) (Remote control unit) • When the input mode is connected, then set to the external input (EXT. To watch video while listening to sound, select the input source to which the video signal is set this is output to the FL (front left), FR (front right), C (center), SL (surround...

Owners Manual
Page 50
... 4 5 VCR-1 VCR-2 / V.AUX 7 8 - CD 3 DVD 6 TV/DBS 9 TV/ VCR TEST TONE 0 +10 SPEAKER OUTPUT (Remote control unit) • After adjusting using the DIRECT mode, the sound from the subwoofer can be cut by lowering the SW (subwoofer) setting one step from the different speakers. SKIP SHIFT MUTING - The adjusted levels for...
... 4 5 VCR-1 VCR-2 / V.AUX 7 8 - CD 3 DVD 6 TV/DBS 9 TV/ VCR TEST TONE 0 +10 SPEAKER OUTPUT (Remote control unit) • After adjusting using the DIRECT mode, the sound from the subwoofer can be cut by lowering the SW (subwoofer) setting one step from the different speakers. SKIP SHIFT MUTING - The adjusted levels for...

Owners Manual
Page 51
... together. SELECT TUNING BAND MODE TUNING 2 SETUP TUNING RETURN A/B BAND MODE MEMORY CHANNEL VOLUME TUNING + + SKIP ENTER 1 - The AVR-3801 sets the mode automatically according to reduce the volume of the rear channels. The fader function does not affect the SW channel. LOGIC). ...are cleared, so adjust the fader again. Fader function • This function makes it for example to adjust the balance of the sound from the different positions when playing multi-channel music sources. 1 Select "FADER". When EXT. Dolby Surround Pro Logic mode 1 ...
... together. SELECT TUNING BAND MODE TUNING 2 SETUP TUNING RETURN A/B BAND MODE MEMORY CHANNEL VOLUME TUNING + + SKIP ENTER 1 - The AVR-3801 sets the mode automatically according to reduce the volume of the rear channels. The fader function does not affect the SW channel. LOGIC). ...are cleared, so adjust the fader again. Fader function • This function makes it for example to adjust the balance of the sound from the different positions when playing multi-channel music sources. 1 Select "FADER". When EXT. Dolby Surround Pro Logic mode 1 ...


