

Owners Manual
Page 2
...chaleur suffisante lors de l'installation sur une étagère. • Keep the set free from that may be determined by turning the product OFF and ON, the user is no guarantee that may void your authority, granted by one or more of product or...benzene, and thinner come in any interference received, including interference that interference will not occur in a residential installation. Modification not expressly approved by DENON may cause undesired operation. 2. ENGLISH FRANCAIS 2 SAFETY PRECAUTIONS CAUTION RISK OF ELECTRIC SHOCK DO NOT OPEN CAUTION: TO REDUCE THE RISK OF ...
...chaleur suffisante lors de l'installation sur une étagère. • Keep the set free from that may be determined by turning the product OFF and ON, the user is no guarantee that may void your authority, granted by one or more of product or...benzene, and thinner come in any interference received, including interference that interference will not occur in a residential installation. Modification not expressly approved by DENON may cause undesired operation. 2. ENGLISH FRANCAIS 2 SAFETY PRECAUTIONS CAUTION RISK OF ELECTRIC SHOCK DO NOT OPEN CAUTION: TO REDUCE THE RISK OF ...
Owners Manual
Page 5
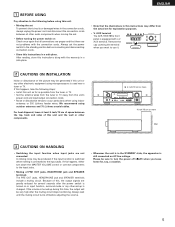
...; Store this instructions in the STANDBY state, the apparatus is still connected on AC line voltage. AUX terminal The AVR-1905/785's front panel is changed. If this happens, either turn the power off (£off before adjusting the volume. • Whenever the unit is used near a tuner or...Because of this, the output signals are not connected A clicking noise may be produced if the input function is switched when nothing is turned on Check once again that all connections are proper and that the illustrations in the connection cords, always unplug the power cord and disconnect ...
...; Store this instructions in the STANDBY state, the apparatus is still connected on AC line voltage. AUX terminal The AVR-1905/785's front panel is changed. If this happens, either turn the power off (£off before adjusting the volume. • Whenever the unit is used near a tuner or...Because of this, the output signals are not connected A clicking noise may be produced if the input function is switched when nothing is turned on Check once again that all connections are proper and that the illustrations in the connection cords, always unplug the power cord and disconnect ...

Owners Manual
Page 7
.... ENGLISH 5 CONNECTIONS • Do not plug in the AC cord until all connections have been completed. • Be sure to these outlets is turned on and off in conjunction with the POWER operation switch on the main unit, and when the power is switched between on and standby from...or other electrical appliances. 7 BACK L CH. No power is supplied from the remote control unit. Refer to this unit's power is used independently without turning the power of the front, center and surround sound channels, or for playback: Connect the tape deck's playback output jacks (LINE OUT or PB) to...
.... ENGLISH 5 CONNECTIONS • Do not plug in the AC cord until all connections have been completed. • Be sure to these outlets is turned on and off in conjunction with the POWER operation switch on the main unit, and when the power is switched between on and standby from...or other electrical appliances. 7 BACK L CH. No power is supplied from the remote control unit. Refer to this unit's power is used independently without turning the power of the front, center and surround sound channels, or for playback: Connect the tape deck's playback output jacks (LINE OUT or PB) to...
Owners Manual
Page 10
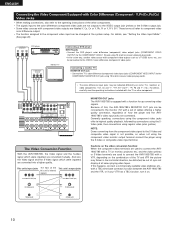
...the AVR1905/785's video input jacks are labeled Y, CB, CR or Y, Pb, Pr or Y, R-Y, B-Y. The Video Conversion Function With the AVR-1905/785, the Video signal and the S-video signal which were inputted are converted mutually. ENGLISH Connecting the Video Component Equipped with a TBC (time base... corrector) function between the AVR-1905/785 and the VTR, or if your VTR has a TBC function, turn it on. (S-Video jack) (S-Video jack) (Video jack) (Video jack) 10 Cautions on the video conversion...
...the AVR1905/785's video input jacks are labeled Y, CB, CR or Y, Pb, Pr or Y, R-Y, B-Y. The Video Conversion Function With the AVR-1905/785, the Video signal and the S-video signal which were inputted are converted mutually. ENGLISH Connecting the Video Component Equipped with a TBC (time base... corrector) function between the AVR-1905/785 and the VTR, or if your VTR has a TBC function, turn it on. (S-Video jack) (S-Video jack) (Video jack) (Video jack) 10 Cautions on the video conversion...
Owners Manual
Page 14
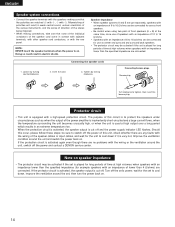
...for long periods of time at high volumes when speakers with an impedance lower than 4 Ω/ohms) are connected. 1. Turn off the power and contact a DENON service center. NOTE: NEVER touch the speaker terminals when the power is on speaker impedance • The protector circuit may... being impaired. • When making sure that none of the individual conductors of the speaker cord come in electric shocks. Loosen by turning clockwise. If the protection circuit is played for example speakers with a high-speed protection circuit. ENGLISH Speaker system connections • Connect...
...for long periods of time at high volumes when speakers with an impedance lower than 4 Ω/ohms) are connected. 1. Turn off the power and contact a DENON service center. NOTE: NEVER touch the speaker terminals when the power is on speaker impedance • The protector circuit may... being impaired. • When making sure that none of the individual conductors of the speaker cord come in electric shocks. Loosen by turning clockwise. If the protection circuit is played for example speakers with a high-speed protection circuit. ENGLISH Speaker system connections • Connect...

Owners Manual
Page 21
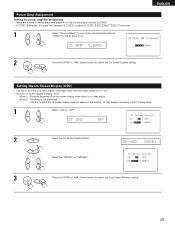
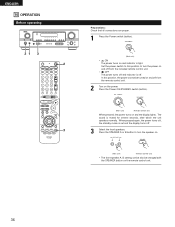
... to this position, the power cannot be finished at any time. NOTE: Press the SYSTEM SETUP button again to finish system set up can be turned on and off . The changes to the settings made up . ENGLISH Before setting up the system 1 Refer to "CONNECTIONS" (pages 7 to 15) and ...check that point are correct. 2 ON OFF Press the Power switch (button) . • ¢ ON The power turns on and off from the remote control unit. 3 ON / STANDBY Turn on the remote control unit. 5 Press the ENTER or (down) button to switch to the Speaker Configuration set up.
... to this position, the power cannot be finished at any time. NOTE: Press the SYSTEM SETUP button again to finish system set up can be turned on and off . The changes to the settings made up . ENGLISH Before setting up the system 1 Refer to "CONNECTIONS" (pages 7 to 15) and ...check that point are correct. 2 ON OFF Press the Power switch (button) . • ¢ ON The power turns on and off from the remote control unit. 3 ON / STANDBY Turn on the remote control unit. 5 Press the ENTER or (down) button to switch to the Speaker Configuration set up.
Owners Manual
Page 29
.... Use this mode if the on -screen display when there is no video signal. ENGLISH Setting the On Screen Display (OSD) • Use this to turn the on-screen display (messages other than the menu screens) on or off. • Sets the on-screen display's display mode. BACK/ZONE2" PREOUT terminals...
.... Use this mode if the on -screen display when there is no video signal. ENGLISH Setting the On Screen Display (OSD) • Use this to turn the on-screen display (messages other than the menu screens) on or off. • Sets the on-screen display's display mode. BACK/ZONE2" PREOUT terminals...
Owners Manual
Page 31
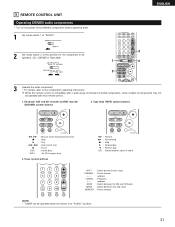
... 3 2 3 Operate the audio component. • For details, refer to the position for CD changers only) 3. up /down TUNING : Frequency +, - 9 REMOTE CONTROL UNIT Operating DENON audio components • Turn on the power of components may not be operated when the switch is compatible with a wide range of infrared controlled components, some models of...
... 3 2 3 Operate the audio component. • For details, refer to the position for CD changers only) 3. up /down TUNING : Frequency +, - 9 REMOTE CONTROL UNIT Operating DENON audio components • Turn on the power of components may not be operated when the switch is compatible with a wide range of infrared controlled components, some models of...
Owners Manual
Page 36
Press the Power ON/STANDBY switch (button). The sound is set and the display turns off. 3 Select the front speakers. When pressed again, the power turns off . ON OFF (Main unit) • ¢ ON The power turns on and off and indicator is light. SPEAKER A B (Main unit) (Remote control unit) &#...8226; The front speaker A, B setting can be also be turned on and indicator is off , the standby mode is muted for several seconds, after which the unit operates normally. Set the power switch to ...
Press the Power ON/STANDBY switch (button). The sound is set and the display turns off. 3 Select the front speakers. When pressed again, the power turns off . ON OFF (Main unit) • ¢ ON The power turns on and off and indicator is light. SPEAKER A B (Main unit) (Remote control unit) &#...8226; The front speaker A, B setting can be also be turned on and indicator is off , the standby mode is muted for several seconds, after which the unit operates normally. Set the power switch to ...

Owners Manual
Page 38
Press the SURROUND MODE button, then turn the SELECT knob. MASTER VOLUME The volume level is set as described on . However, when the channel level is displayed on the master volume level ... SIGNAL DIGITAL One of 1 dB. DIGITAL ANALOG DIGITAL DIGITAL ANALOG The DIGITAL indicator lights when digital signals are correct and whether the component's power is turned on page 45, if the volume for any channel is adjusted to "18 dB - (Maximum value of channel level)".) Input mode when playing DTS sources...
Press the SURROUND MODE button, then turn the SELECT knob. MASTER VOLUME The volume level is set as described on . However, when the channel level is displayed on the master volume level ... SIGNAL DIGITAL One of 1 dB. DIGITAL ANALOG DIGITAL DIGITAL ANALOG The DIGITAL indicator lights when digital signals are correct and whether the component's power is turned on page 45, if the volume for any channel is adjusted to "18 dB - (Maximum value of channel level)".) Input mode when playing DTS sources...
Owners Manual
Page 40
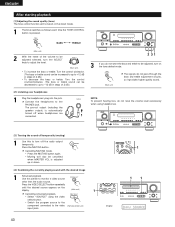
...or treble sound can be decreased to up or down. [4] Combining the currently playing sound with the desired image 1 Simulcast playback Use this to turn off the audio output temporarily. ENGLISH After starting playback [1] Adjusting the sound quality (tone) The tone control function will also be cancelled when MASTER... VOL is adjusted up to -12 dB in steps of 2 dB.) • To decrease the bass or treble: Turn the control counterclockwise. (The bass or treble sound can be increased to up to +12 dB in steps of 2 dB.) [2] Listening over headphones 1...
...or treble sound can be decreased to up or down. [4] Combining the currently playing sound with the desired image 1 Simulcast playback Use this to turn off the audio output temporarily. ENGLISH After starting playback [1] Adjusting the sound quality (tone) The tone control function will also be cancelled when MASTER... VOL is adjusted up to -12 dB in steps of 2 dB.) • To decrease the bass or treble: Turn the control counterclockwise. (The bass or treble sound can be increased to up to +12 dB in steps of 2 dB.) [2] Listening over headphones 1...

Owners Manual
Page 41
.... • The DIGITAL IN's signal selected with the function selector knob are also displayed on which you wish to record. 4 To cancel, turn the function knob and select "SOURCE". Such information as follows each time the button is pressed. DIMMER (Main unit) BRIGHT MEDIUM OFF DIM ... can be switched to the DIGITAL OUT (OPTICAL) jack. 41 ZONE 2 / REC SELECT ZONE2 REC (Main unit) 2 With "RECOUT SOURCE" displayed, turn the FUNCTION knob to select the source you want to record. Also, the unit's operating status can be checked during playback by pressing the remote...
.... • The DIGITAL IN's signal selected with the function selector knob are also displayed on which you wish to record. 4 To cancel, turn the function knob and select "SOURCE". Such information as follows each time the button is pressed. DIMMER (Main unit) BRIGHT MEDIUM OFF DIM ... can be switched to the DIGITAL OUT (OPTICAL) jack. 41 ZONE 2 / REC SELECT ZONE2 REC (Main unit) 2 With "RECOUT SOURCE" displayed, turn the FUNCTION knob to select the source you want to record. Also, the unit's operating status can be checked during playback by pressing the remote...
Owners Manual
Page 42
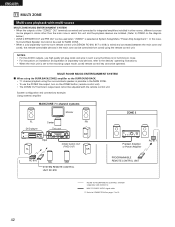
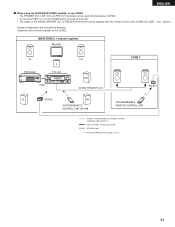
NOTES: • For the AUDIO outputs, use the ZONE2 line output, turn on pages 7 to 15. 42 System configuration and connections example. In this unit and the playback devices are installed. (Refer to ZONE2 on installation and ... for MAIN ZONE. • When a sold devices, refer to the devices' operating instructions. • When the main unit is set to -room remote control unit (DENON RC-616, 617 or 618) is wired and connected between the main zone and zone2, the remote-controllable devices in the main zone can be...
NOTES: • For the AUDIO outputs, use the ZONE2 line output, turn on pages 7 to 15. 42 System configuration and connections example. In this unit and the playback devices are installed. (Refer to ZONE2 on installation and ... for MAIN ZONE. • When a sold devices, refer to the devices' operating instructions. • When the main unit is set to -room remote control unit (DENON RC-616, 617 or 618) is wired and connected between the main zone and zone2, the remote-controllable devices in the main zone can be...
Owners Manual
Page 43
... control unit). • The output of the ZONE2 SPEAKER OUT & SRB/Z2 RCA terminals can be used simultaneously in ZONE2. • To use the ZONE2, turn on pages 7 to 15. 43 buttons. Using this unit's internal amplifier as the ZONE2. • The SPEAKER OUT, LINE OUT and PRE OUT terminals can...
... control unit). • The output of the ZONE2 SPEAKER OUT & SRB/Z2 RCA terminals can be used simultaneously in ZONE2. • To use the ZONE2, turn on pages 7 to 15. 43 buttons. Using this unit's internal amplifier as the ZONE2. • The SPEAKER OUT, LINE OUT and PRE OUT terminals can...

Owners Manual
Page 44
...The main zone output can be selected using the VOLUME + and - ZONE 2 / REC SELECT (Main unit) 2, 4 1 2 2 With "ZONE2 SOURCE" displayed, turn the function knob and select "SOURCE". Press the ZONE2 "OFF" button. 2 (Remote control unit) 3 Press the input source button. • The ZONE2 source switches directly.... 3 4 The output level of the respective components. 4 To cancel, turn the FUNCTION knob and select the source you wish to the manuals of the ZONE 2 SPEAKER OUT terminals can be...
...The main zone output can be selected using the VOLUME + and - ZONE 2 / REC SELECT (Main unit) 2, 4 1 2 2 With "ZONE2 SOURCE" displayed, turn the function knob and select "SOURCE". Press the ZONE2 "OFF" button. 2 (Remote control unit) 3 Press the input source button. • The ZONE2 source switches directly.... 3 4 The output level of the respective components. 4 To cancel, turn the FUNCTION knob and select the source you wish to the manuals of the ZONE 2 SPEAKER OUT terminals can be...

Owners Manual
Page 46
Default setting of channel level is SURR. BACK mode. SW channel level can be turned off by decreasing one step from -12 dB. FL C FR SR SBR SBL SW SL When the surround back speaker setting is set to "1sp" ...
Default setting of channel level is SURR. BACK mode. SW channel level can be turned off by decreasing one step from -12 dB. FL C FR SR SBR SBL SW SL When the surround back speaker setting is set to "1sp" ...

Owners Manual
Page 51
... Back CH ON/OFF. STANDARD (Main unit) (Remote control unit) When performing this operation from the main unit's panel, press the SURROUND MODE button, then turn the SELECT knob and select Dolby Pro Logic IIx or DTS NEO:6. SURROUND MODE SELECT (Main unit) (Main unit) 3 Operate the SURROUND BACK button to...
... Back CH ON/OFF. STANDARD (Main unit) (Remote control unit) When performing this operation from the main unit's panel, press the SURROUND MODE button, then turn the SELECT knob and select Dolby Pro Logic IIx or DTS NEO:6. SURROUND MODE SELECT (Main unit) (Main unit) 3 Operate the SURROUND BACK button to...

Owners Manual
Page 53
... level is recommended that the LFE LEVEL be set to the LFE signals when playing Dolby Digital or DTS sources when the peak limiter is turned off " "SURROUND" is reproduced. DTS Surround: -10 dB to 0 dB When DTS encoded movie software is played, it is recommended that the LFE LEVEL be...
... level is recommended that the LFE LEVEL be set to the LFE signals when playing Dolby Digital or DTS sources when the peak limiter is turned off " "SURROUND" is reproduced. DTS Surround: -10 dB to 0 dB When DTS encoded movie software is played, it is recommended that the LFE LEVEL be...

Owners Manual
Page 56
... modes. (Refer to "Surround Modes and Parameters" on page 57.) SURROUND PARAMETER (Main unit) 3 Display the parameter you want to adjust, then turn the SELECT knob to set within the range of 0 to the regular condition several seconds after the last button was pressed and the setting will... be set it. Press and hold in 15 steps from the main unit's panel. 1 Turn the SELECT knob to 15. Lower the level if the sound seems distorted. SURROUND MODE (Main unit) 2 Press the SURROUND PARAMETER button. ENGLISH ...
... modes. (Refer to "Surround Modes and Parameters" on page 57.) SURROUND PARAMETER (Main unit) 3 Display the parameter you want to adjust, then turn the SELECT knob to set within the range of 0 to the regular condition several seconds after the last button was pressed and the setting will... be set it. Press and hold in 15 steps from the main unit's panel. 1 Turn the SELECT knob to 15. Lower the level if the sound seems distorted. SURROUND MODE (Main unit) 2 Press the SURROUND PARAMETER button. ENGLISH ...

Owners Manual
Page 57
... Signals and adjustability in the different modes Channel output FRONT L/R C C C C C C C C C C C C C C C CENTER E E B B B B B B B B B B B B E SURROUND L/R E E B B B B B B B B B B B B E SURROUND BACK L/R E E B B B B B B B B B B B B E SUBWOOFER B B B B B B B B B B B B B B B When playing Dolby Digital signals C C E C * C * C * C E C C C C C C C C : Signal / Adjustable E : No signal B : Turned on or off by speaker configuration setting C : Able E : Unable * Only for 2 ch contents When playing DTS signals C C E C * C C * E C C C C C C C C When playing When playing PCM signals ANALOG...
... Signals and adjustability in the different modes Channel output FRONT L/R C C C C C C C C C C C C C C C CENTER E E B B B B B B B B B B B B E SURROUND L/R E E B B B B B B B B B B B B E SURROUND BACK L/R E E B B B B B B B B B B B B E SUBWOOFER B B B B B B B B B B B B B B B When playing Dolby Digital signals C C E C * C * C * C E C C C C C C C C : Signal / Adjustable E : No signal B : Turned on or off by speaker configuration setting C : Able E : Unable * Only for 2 ch contents When playing DTS signals C C E C * C C * E C C C C C C C C When playing When playing PCM signals ANALOG...


