
Owners Manual
Page 4
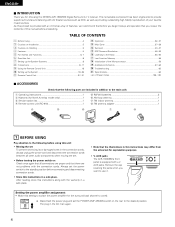
...instructions along with an immense array of features, we recommend that before you begin hookup and operation that you review the contents of this manual before connecting and disconnecting connection cords. • Store this first 8 m Setting up the System 19~26 ⁄1 Remote Control ...the connection cords, always unplug the power cord and disconnect the connection cords between all other audio components when moving the set for choosing the DENON AVR-1803/883 Digital Surround A / V receiver. The plug in this setting to switch the power amplifier for North America model only 1 e ...
...instructions along with an immense array of features, we recommend that before you begin hookup and operation that you review the contents of this manual before connecting and disconnecting connection cords. • Store this first 8 m Setting up the System 19~26 ⁄1 Remote Control ...the connection cords, always unplug the power cord and disconnect the connection cords between all other audio components when moving the set for choosing the DENON AVR-1803/883 Digital Surround A / V receiver. The plug in this setting to switch the power amplifier for North America model only 1 e ...

Owners Manual
Page 11
... using an S-Video connection cord. • It is equipped with S-jacks, keep the above point in mind and make connections according to the equipment's instruction manuals.
... using an S-Video connection cord. • It is equipped with S-jacks, keep the above point in mind and make connections according to the equipment's instruction manuals.
Owners Manual
Page 27
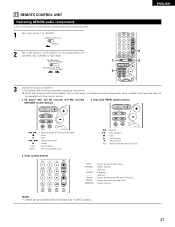
...and FM bands MODE : Switch between decks A and B SHIFT : Switch preset channel range CHANNEL : Preset channel +, - 11 REMOTE CONTROL UNIT Operating DENON audio components • Turn on the power of components may not be operated. (CD, CDR/MD or Tape deck) 1 3 ENGLISH 3 2 ...'s operating instructions. While this remote control is at "AUDIO" position. 27 Tape deck (TAPE) system buttons 6, 7 2 1 8, 9 3 DISC SKIP+ : Manual search (forward and reverse) : Stop : Play : Auto search (cue) : Pause : Switch discs (for the component to be operated with a wide range of...
...and FM bands MODE : Switch between decks A and B SHIFT : Switch preset channel range CHANNEL : Preset channel +, - 11 REMOTE CONTROL UNIT Operating DENON audio components • Turn on the power of components may not be operated. (CD, CDR/MD or Tape deck) 1 3 ENGLISH 3 2 ...'s operating instructions. While this remote control is at "AUDIO" position. 27 Tape deck (TAPE) system buttons 6, 7 2 1 8, 9 3 DISC SKIP+ : Manual search (forward and reverse) : Stop : Play : Auto search (cue) : Pause : Switch discs (for the component to be operated with a wide range of...
Owners Manual
Page 29
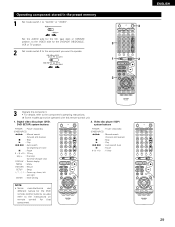
Video disc player (VDP) system buttons POWER : Power on/standby (ON/SOURCE) 6,7 : Manual search (forward and reverse) 2 : Stop 1 : Play 8,9 : Auto search (to beginning of track) 3 : Pause 0 ~ 9, +10 : 10 key skip + : Disc skip (for DVD changer only)... : Power on remote control for that component. 29 Operating component stored in the preset memory 1 Set mode switch 1 to the instructions on /standby (ON/SOURCE) 6,7 : Manual search (forward and reverse) 2 : Stop 1 : Play 8,9 : Auto search (cue) 3 : Pause 0~9, +10 : 10 key NOTE: • Some manufacturers use different names for ...
Video disc player (VDP) system buttons POWER : Power on/standby (ON/SOURCE) 6,7 : Manual search (forward and reverse) 2 : Stop 1 : Play 8,9 : Auto search (to beginning of track) 3 : Pause 0 ~ 9, +10 : 10 key skip + : Disc skip (for DVD changer only)... : Power on remote control for that component. 29 Operating component stored in the preset memory 1 Set mode switch 1 to the instructions on /standby (ON/SOURCE) 6,7 : Manual search (forward and reverse) 2 : Stop 1 : Play 8,9 : Auto search (cue) 3 : Pause 0~9, +10 : 10 key NOTE: • Some manufacturers use different names for ...

Owners Manual
Page 30
... display VOL +, - : Volume up /down 5. NOTES: • For this CD, CDR, MD and TAPE components, buttons can be operated in the same way as for Denon audio components (page 27). • The TV can be operated when the switch is at DVD/VDP, VCR, TV position. 30 ENGLISH 3. Monitor TV (TV... display TV/VCR : Switch between TV and video player TV VOL : Volume up /down +, - Video deck (VCR) system buttons POWER : Power on/standby (ON/SOURCE) 6,7 : Manual search (forward and reverse) 2 : Stop 1 : Play 3 : Pause Channel +, - : Channels 4.
... display VOL +, - : Volume up /down 5. NOTES: • For this CD, CDR, MD and TAPE components, buttons can be operated in the same way as for Denon audio components (page 27). • The TV can be operated when the switch is at DVD/VDP, VCR, TV position. 30 ENGLISH 3. Monitor TV (TV... display TV/VCR : Switch between TV and video player TV VOL : Volume up /down +, - Video deck (VCR) system buttons POWER : Power on/standby (ON/SOURCE) 6,7 : Manual search (forward and reverse) 2 : Stop 1 : Play 3 : Pause Channel +, - : Channels 4.

Owners Manual
Page 31
... the number of the component you to set. (See Table 1) Table 1 No. By default, nothing is a function allowing you want to operate the PLAY, STOP, MANUAL SEARCH and AUTO SEARCH buttons on the CD, TAPE, CDR/MD, DVD/VDP or VCR components when in the DBS/CABLE or TV mode.
... the number of the component you to set. (See Table 1) Table 1 No. By default, nothing is a function allowing you want to operate the PLAY, STOP, MANUAL SEARCH and AUTO SEARCH buttons on the CD, TAPE, CDR/MD, DVD/VDP or VCR components when in the DBS/CABLE or TV mode.

Owners Manual
Page 34
... the source component to the digital input jacks (OPTICAL/COAXIAL) and set at +1 dB or greater, the volume cannot be adjusted up to the component's manual. 5 Adjust the volume. Press the SURROUND MODE button, then turn the SELECT knob. The volume level is displayed on the master volume level display. (Main...
... the source component to the digital input jacks (OPTICAL/COAXIAL) and set at +1 dB or greater, the volume cannot be adjusted up to the component's manual. 5 Adjust the volume. Press the SURROUND MODE button, then turn the SELECT knob. The volume level is displayed on the master volume level display. (Main...

Owners Manual
Page 37
... signals are not output from the REC SOURCE or audio output jacks. 13 MULTI ZONE Multi-source playback [1] Outputting a program source to the manuals of the respective components. 5 To cancel, turn the FUNCTION knob to select the source you wish to record. • The "REC" indicator... and the indicator of the selected source light. (Main unit) 3 Set the recording mode. • For operating instructions, refer to the manual of the component on which you wish to record. • The "MULTI" indicator and the indicator of the source selected in a different room (...
... signals are not output from the REC SOURCE or audio output jacks. 13 MULTI ZONE Multi-source playback [1] Outputting a program source to the manuals of the respective components. 5 To cancel, turn the FUNCTION knob to select the source you wish to record. • The "REC" indicator... and the indicator of the selected source light. (Main unit) 3 Set the recording mode. • For operating instructions, refer to the manual of the component on which you wish to record. • The "MULTI" indicator and the indicator of the source selected in a different room (...

Owners Manual
Page 42
... DEFAULT DEFAULT DIMENSION CENTER WIDTH DEFAULT 42 ENGLISH Dolby Surround Pro Logic II mode 1 Select the function to which the component you want to the manuals of the respective components. 4 Select the surround parameter mode. Display Light 1 2 1 2 4, 6 5, 7 The Dolby Surround Pro Logic II Cinema or Music mode can be chosen directly...
... DEFAULT DEFAULT DIMENSION CENTER WIDTH DEFAULT 42 ENGLISH Dolby Surround Pro Logic II mode 1 Select the function to which the component you want to the manuals of the respective components. 4 Select the surround parameter mode. Display Light 1 2 1 2 4, 6 5, 7 The Dolby Surround Pro Logic II Cinema or Music mode can be chosen directly...

Owners Manual
Page 53
... stations are automatically stored in order at channel A1. NOTES: • If an FM station cannot be preset automatically due to poor reception, use the "Manual tuning" operation to E8, for FM broadcast stations. 1 2 DEFAULT VALUE AUTO TUNER PRESETS A1 ~ A8 B1 ~ B8 C1 ~ C8 D1 ~ D8 E1 ~ E8 2 When the... channels A2 to A8, B1 to B8, C1 to C8, D1 to D8 and E1 to tune in the station, then preset it using the manual "Preset memory" operation. • To interrupt this function, press the power operation button. 87.5/89.1/98.1/107.9/90.1/90.1/90.1/90.1 MHz 520/600/1000...
... stations are automatically stored in order at channel A1. NOTES: • If an FM station cannot be preset automatically due to poor reception, use the "Manual tuning" operation to E8, for FM broadcast stations. 1 2 DEFAULT VALUE AUTO TUNER PRESETS A1 ~ A8 B1 ~ B8 C1 ~ C8 D1 ~ D8 E1 ~ E8 2 When the... channels A2 to A8, B1 to B8, C1 to C8, D1 to D8 and E1 to tune in the station, then preset it using the manual "Preset memory" operation. • To interrupt this function, press the power operation button. 87.5/89.1/98.1/107.9/90.1/90.1/90.1/90.1 MHz 520/600/1000...
Owners Manual
Page 54
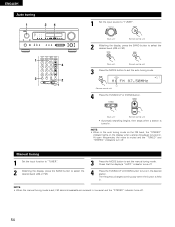
At open frequencies, the noise is held in the desired station. Manual tuning 1 Set the input function to "TUNER". 2 Watching the display, press the BAND button to select the desired band (AM or FM). 3 Press the MODE ... BAND button to select the desired band (AM or FM). (Main unit) (Remote control unit) 3 Press the MODE button to set the manual tuning mode. NOTE: • When the manual tuning mode is tuned in . Lit (Remote control unit) 4 Press the TUNING UP or DOWN button. (Main unit) (Remote control unit) •...
At open frequencies, the noise is held in the desired station. Manual tuning 1 Set the input function to "TUNER". 2 Watching the display, press the BAND button to select the desired band (AM or FM). 3 Press the MODE ... BAND button to select the desired band (AM or FM). (Main unit) (Remote control unit) 3 Press the MODE button to set the manual tuning mode. NOTE: • When the manual tuning mode is tuned in . Lit (Remote control unit) 4 Press the TUNING UP or DOWN button. (Main unit) (Remote control unit) •...

Owners Manual
Page 55
.... 2 Watching the display, press the PRESET UP or DOWN button to 4. Preset stations 23 3 1, 4 2 Recalling preset stations 12 2 1 ENGLISH Preparations: Use the "Auto tuning" or "Manual tuning" operation to tune in the station to be preset - 8 stations (channels 1 to 8) in the preset memory. (Remote control unit) To preset other channels, repeat...
.... 2 Watching the display, press the PRESET UP or DOWN button to 4. Preset stations 23 3 1, 4 2 Recalling preset stations 12 2 1 ENGLISH Preparations: Use the "Auto tuning" or "Manual tuning" operation to tune in the station to be preset - 8 stations (channels 1 to 8) in the preset memory. (Remote control unit) To preset other channels, repeat...

Owners Manual
Page 59
...back front left and right speakers and no further from the listening position than the front speakers. • Consult the owner's manual for your subwoofer for different purposes. When using surround back speakers) (1) Basic setting for advice on the diagram at the front ... speakers. • We recommend installing the surround back speaker(s) at a narrower distance than the front speakers. • Consult the owner's manual for your system according to create a coherent 360 degree surround sound field. Connect another pair of direct radiating speakers as possible. Use these...
...back front left and right speakers and no further from the listening position than the front speakers. • Consult the owner's manual for your subwoofer for different purposes. When using surround back speakers) (1) Basic setting for advice on the diagram at the front ... speakers. • We recommend installing the surround back speaker(s) at a narrower distance than the front speakers. • Consult the owner's manual for your system according to create a coherent 360 degree surround sound field. Connect another pair of direct radiating speakers as possible. Use these...
Owners Manual
Page 60
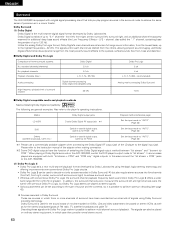
...quietest, softest sounds, free from the most powerful sound effects to achieve multi-channel surround playback. Please refer to the instruction manual of the adapter when making connection. 2 Some DVD digital outputs have been recorded as two channels of signals using feedback logic...channels (elements) No. recommended) Analog matrix processing Dolby Surround High frequency playback limit of home surround systems No. ENGLISH Surround The AVR-1803/883 is equipped with a digital signal processing circuit that lets you play program sources in the surround mode to achieve the same...
...quietest, softest sounds, free from the most powerful sound effects to achieve multi-channel surround playback. Please refer to the instruction manual of the adapter when making connection. 2 Some DVD digital outputs have been recorded as two channels of signals using feedback logic...channels (elements) No. recommended) Analog matrix processing Dolby Surround High frequency playback limit of home surround systems No. ENGLISH Surround The AVR-1803/883 is equipped with a digital signal processing circuit that lets you play program sources in the surround mode to achieve the same...
Owners Manual
Page 61
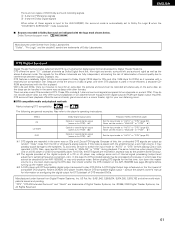
...are fully independent, eliminating the risk of deterioration of these signals is input to the AVR-1803/883, the surround mode is automatically set at the digital outputs of a CD or..., Inc. To avoid this the amount of DTS-encoded DVDs. consult the player's owner's manual for information on the same disc, so the discs can be recorded simultaneously on configuring the... signals are recorded in Dolby Surround are indicated with the amplifier set to the speakers. Recent DENON DVD player models feature DTS-compatible digital output - The following are general examples. "Dolby",...
...are fully independent, eliminating the risk of deterioration of these signals is input to the AVR-1803/883, the surround mode is automatically set at the digital outputs of a CD or..., Inc. To avoid this the amount of DTS-encoded DVDs. consult the player's owner's manual for information on the same disc, so the discs can be recorded simultaneously on configuring the... signals are recorded in Dolby Surround are indicated with the amplifier set to the speakers. Recent DENON DVD player models feature DTS-compatible digital output - The following are general examples. "Dolby",...

Owners Manual
Page 62
... separation between the different channels is that of a digital discrete system. The performance of the encoder used at the time of recording can be set manually to the SL and SR channels beforehand. Of course it is assigned mainly to the center channel (C) and the reversed phase component to the SL...
... separation between the different channels is that of a digital discrete system. The performance of the encoder used at the time of recording can be set manually to the SL and SR channels beforehand. Of course it is assigned mainly to the center channel (C) and the reversed phase component to the SL...


