
Owners Manual
Page 7
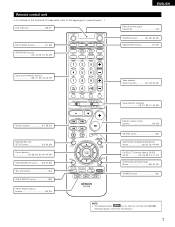
...source selector buttons 28~31, 33, 42, 43, 45) System buttons 27. 29. 30) SYSTEM SET UP/ SETUP button 19, 26, 29) Cursor buttons 19~26, 29, 30, 40~44, 46) STATUS/DISPLAY button .......(...30, 36) Test tone button 40) VIDEO SELECT button 36) INPUT MODE selector buttons 33, 35) Tuner system/ System buttons 27, 38, 54, 55) Mode selector switches 19, 27~29, 31, 32, 38) Master volume ... 29, 30, 45) DIMMER button 36) NOTE: • The shaded buttons do not function with the AVR-1803/883. (Nothing happens when they are pressed.) 7 Remote control unit • For details on the functions...
...source selector buttons 28~31, 33, 42, 43, 45) System buttons 27. 29. 30) SYSTEM SET UP/ SETUP button 19, 26, 29) Cursor buttons 19~26, 29, 30, 40~44, 46) STATUS/DISPLAY button .......(...30, 36) Test tone button 40) VIDEO SELECT button 36) INPUT MODE selector buttons 33, 35) Tuner system/ System buttons 27, 38, 54, 55) Mode selector switches 19, 27~29, 31, 32, 38) Master volume ... 29, 30, 45) DIMMER button 36) NOTE: • The shaded buttons do not function with the AVR-1803/883. (Nothing happens when they are pressed.) 7 Remote control unit • For details on the functions...

Owners Manual
Page 19
... OFF VCR-2 V. Ext. ENTER button Press this button to complete the setting. • System setup items and default values (set upon shipment from the factory) Speaker Configuration Subwoofer mode System setup Input the combination of the signals output from the speakers and the frequency response. OPTICAL 3 -... - - Large Center Sp. AUX OFF OFF Auto surround mode function setting. In SW Level = +15 dB NOTE: • The system setup is not displayed when "HEADPHONE ONLY" is for optimizing the timing with other AV components ...
... OFF VCR-2 V. Ext. ENTER button Press this button to complete the setting. • System setup items and default values (set upon shipment from the factory) Speaker Configuration Subwoofer mode System setup Input the combination of the signals output from the speakers and the frequency response. OPTICAL 3 -... - - Large Center Sp. AUX OFF OFF Auto surround mode function setting. In SW Level = +15 dB NOTE: • The system setup is not displayed when "HEADPHONE ONLY" is for optimizing the timing with other AV components ...

Owners Manual
Page 22
... the frequency (Hz) below the crossover frequency is cut, and the cut bass sound is output from those channels. ENGLISH Setting the Subwoofer mode and Crossover Frequency This screen is not displayed when not using small speakers, however, setting the crossover frequency to a high frequency may result in...If "SMALL" is set for the front speakers or "NO" is selected, the low frequency signal range of channels set to "SMALL" in the setup. Assignment of channels set to "LARGE" are LFE signals (during playback of Dolby Digital or DTS signals) and the low frequency signal range of ...
... the frequency (Hz) below the crossover frequency is cut, and the cut bass sound is output from those channels. ENGLISH Setting the Subwoofer mode and Crossover Frequency This screen is not displayed when not using small speakers, however, setting the crossover frequency to a high frequency may result in...If "SMALL" is set for the front speakers or "NO" is selected, the low frequency signal range of channels set to "SMALL" in the setup. Assignment of channels set to "LARGE" are LFE signals (during playback of Dolby Digital or DTS signals) and the low frequency signal range of ...

Owners Manual
Page 26
... are connected to switch the Ext. Setting the Ext. This completes the system setup operations. ENGLISH Setting the Auto Surround Mode For the three kinds of input signals as shown below, the surround mode played the last is also stored separately for the different input function. Also refer... (0, +5, 10 and +15 can be selected.) After setting up the system 1 Press the SYSTEM SETUP button to finish system set up . At next time it the same signal inputs, the memorized surround mode is automatically selected and the signal is changed. 26 ON Press the ENTER or (left ) button...
... are connected to switch the Ext. Setting the Ext. This completes the system setup operations. ENGLISH Setting the Auto Surround Mode For the three kinds of input signals as shown below, the surround mode played the last is also stored separately for the different input function. Also refer... (0, +5, 10 and +15 can be selected.) After setting up the system 1 Press the SYSTEM SETUP button to finish system set up . At next time it the same signal inputs, the memorized surround mode is automatically selected and the signal is changed. 26 ON Press the ENTER or (left ) button...
Owners Manual
Page 29
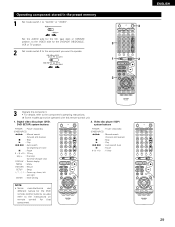
...Auto search (to beginning of track) 3 : Pause 0 ~ 9, +10 : 10 key skip + : Disc skip (for DVD changer only) DISPLAY : Switch display MENU : Menu RETURN : Return SETUP : Setup D, H, F, G : Cursor up, down, left and right ENTER : Enter setting POWER : Power on/standby (ON/SOURCE) 6,7 : Manual search (forward and reverse) 2 : Stop 1 :...control buttons, so also refer to the instructions on remote control for the DVD/VDP, DBS/CABLE, VCR or TV position. 3 2 Set mode switch 2 to the component you want to operate. 1 3 ENGLISH 3 2 3 Operate the component. • For details, refer to "...
...Auto search (to beginning of track) 3 : Pause 0 ~ 9, +10 : 10 key skip + : Disc skip (for DVD changer only) DISPLAY : Switch display MENU : Menu RETURN : Return SETUP : Setup D, H, F, G : Cursor up, down, left and right ENTER : Enter setting POWER : Power on/standby (ON/SOURCE) 6,7 : Manual search (forward and reverse) 2 : Stop 1 :...control buttons, so also refer to the instructions on remote control for the DVD/VDP, DBS/CABLE, VCR or TV position. 3 2 Set mode switch 2 to the component you want to operate. 1 3 ENGLISH 3 2 3 Operate the component. • For details, refer to "...

Owners Manual
Page 34
... DTS • In the ANALOG mode AUTO INPUT PCM DTS One of channel level)".) Input mode when playing DTS sources • Noise will be adjusted within the range of 1 dB. If the DIGITAL indicator does not light, check whether the digital input component setup (page 24) and connections are... be output if DTS-compatible CDs or LDs are played in steps of -70 to 0 to "DTS". ENGLISH 3 Select the play mode. Press the SURROUND MODE button, then turn the SELECT knob. The volume level is turned on the input signal. DIGITAL ANALOG DIGITAL DIGITAL ANALOG Input signal display...
... DTS • In the ANALOG mode AUTO INPUT PCM DTS One of channel level)".) Input mode when playing DTS sources • Noise will be adjusted within the range of 1 dB. If the DIGITAL indicator does not light, check whether the digital input component setup (page 24) and connections are... be output if DTS-compatible CDs or LDs are played in steps of -70 to 0 to "DTS". ENGLISH 3 Select the play mode. Press the SURROUND MODE button, then turn the SELECT knob. The volume level is turned on the input signal. DIGITAL ANALOG DIGITAL DIGITAL ANALOG Input signal display...

Owners Manual
Page 47
...Range Compression allows you to -10 dB for all of the sounds in the soundtrack (but with the subwoofer peak limit level setting (system setup menu), adjust the level as necessary. If the sound produced from the front speakers is recommended that the LFE LEVEL be set to 0... range). (This only works when playing program sources recorded in the Dolby Pro Logic, Dolby Digital and DTS Surround modes. (The same contents are set to hear all operating modes.) D.COMP. (Dynamic Range Compression): Motion picture soundtracks have tremendous dynamic range (the contrast between very soft and very...
...Range Compression allows you to -10 dB for all of the sounds in the soundtrack (but with the subwoofer peak limit level setting (system setup menu), adjust the level as necessary. If the sound produced from the front speakers is recommended that the LFE LEVEL be set to 0... range). (This only works when playing program sources recorded in the Dolby Pro Logic, Dolby Digital and DTS Surround modes. (The same contents are set to hear all operating modes.) D.COMP. (Dynamic Range Compression): Motion picture soundtracks have tremendous dynamic range (the contrast between very soft and very...

