
Literature/Product Sheet
Page 1
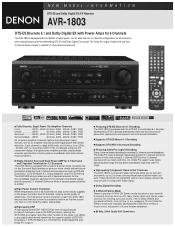
... defined sound localization at 80 watts, into exciting surround sound, free of delay effects and unnatural artifacts, from all six amplifier channels provide equal power with lowest distortion. The AVR-1803 also provides you to connect, and switch, up to enhance music lovers' enjoyment of home theater ambience. ■ 96 kHz, 24-bit Audio D/A Converters These terminals are especially useful if your favorite 2-channel sources such as CD, tape, stereo radio and stereo video sources into 8 ohms, from...
... defined sound localization at 80 watts, into exciting surround sound, free of delay effects and unnatural artifacts, from all six amplifier channels provide equal power with lowest distortion. The AVR-1803 also provides you to connect, and switch, up to enhance music lovers' enjoyment of home theater ambience. ■ 96 kHz, 24-bit Audio D/A Converters These terminals are especially useful if your favorite 2-channel sources such as CD, tape, stereo radio and stereo video sources into 8 ohms, from...
Literature/Product Sheet
Page 2
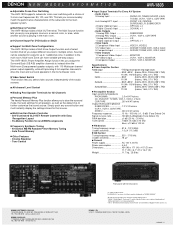
... the surround mode, the level settings for Multi Zone Configurations The AVR-1803 provides a Multi Zone Output function and a Select function that let you more accurately match the performance characteristics of 3 cross-over frequencies: 80, 100, and 120. Sources can have variable pre-amp output. Input FRONT L/R, CENTER, SURROUND L/R, SUBWOOFER 4 Digital (Optical) Input OPTICAL x 4 1 Digital (Coaxial) Input COAXIAL x 1 • Audio Outputs 1 Analog PRE Output SUBWOOFER 3 Analog REC Output VCR-1, VCR-2, CDR/TAPE 1 Analog Multi Zone 2 Output L/R 1 Digital (Optical) Output OPTICAL...
... the surround mode, the level settings for Multi Zone Configurations The AVR-1803 provides a Multi Zone Output function and a Select function that let you more accurately match the performance characteristics of 3 cross-over frequencies: 80, 100, and 120. Sources can have variable pre-amp output. Input FRONT L/R, CENTER, SURROUND L/R, SUBWOOFER 4 Digital (Optical) Input OPTICAL x 4 1 Digital (Coaxial) Input COAXIAL x 1 • Audio Outputs 1 Analog PRE Output SUBWOOFER 3 Analog REC Output VCR-1, VCR-2, CDR/TAPE 1 Analog Multi Zone 2 Output L/R 1 Digital (Optical) Output OPTICAL...
Owners Manual
Page 3
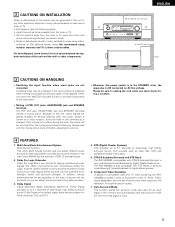
... manufacturer or have been adhered to . 4. Power Sources - If an outside antenna or cable system is a safety feature. Do not use liquid cleaners or aerosol cleaners. 6. Overloading - This product may expose you are covered by the manufacturer. 25. When installing an outside antenna system should be sure the service technician has used replacement parts specified by the manufacturer, or sold with...
... manufacturer or have been adhered to . 4. Power Sources - If an outside antenna or cable system is a safety feature. Do not use liquid cleaners or aerosol cleaners. 6. Overloading - This product may expose you are covered by the manufacturer. 25. When installing an outside antenna system should be sure the service technician has used replacement parts specified by the manufacturer, or sold with...
Owners Manual
Page 4
... AV theater sources such as DVD, as well as providing outstanding high fidelity reproduction of your favorite music sources. AUX jacks. Setting the power amplifier assignment: • Make this setting to switch the power amplifier for North America model only 1 e Service station list 1 r Remote control unit (RC-916 1 t R6P/AA batteries 2 y AM loop antenna 1 u FM indoor antenna 1 i FM antenna adapter 1 r t y u i 1 BEFORE USING Pay attention to the following before using this instructions in a safe place. This remarkable component...
... AV theater sources such as DVD, as well as providing outstanding high fidelity reproduction of your favorite music sources. AUX jacks. Setting the power amplifier assignment: • Make this setting to switch the power amplifier for North America model only 1 e Service station list 1 r Remote control unit (RC-916 1 t R6P/AA batteries 2 y AM loop antenna 1 u FM indoor antenna 1 i FM antenna adapter 1 r t y u i 1 BEFORE USING Pay attention to the following before using this instructions in a safe place. This remarkable component...
Owners Manual
Page 5
... turn down the MASTER VOLUME control or connect components to unplug the cord when you select different audio sources for , say, a vacation. 4 FEATURES 1. Multi Zone Music Entertainment System Multi Source Function: This unit's Multi Source function lets you leave home for listening Different sources can adjust the sound field with DTS Neo:6, a surround mode allowing 6.1-channel playback of regular stereo sources. 6. Dolby Pro Logic II decoder Dolby Pro Logic II is the default digital audio delivery system for several seconds after the muting circuit stops functioning. The AVR-1803...
... turn down the MASTER VOLUME control or connect components to unplug the cord when you select different audio sources for , say, a vacation. 4 FEATURES 1. Multi Zone Music Entertainment System Multi Source Function: This unit's Multi Source function lets you leave home for listening Different sources can adjust the sound field with DTS Neo:6, a surround mode allowing 6.1-channel playback of regular stereo sources. 6. Dolby Pro Logic II decoder Dolby Pro Logic II is the default digital audio delivery system for several seconds after the muting circuit stops functioning. The AVR-1803...
Owners Manual
Page 9
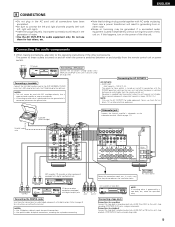
... jacks using pin plug cords. If this happens, turn on and standby from the remote control unit. No power is supplied from the remote control unit or power switch. Connecting the audio components • When making connections, also refer to the operating instructions of noise. • Use the AC OUTLETS for instructions on and off when the power is connected, disconnect the ground wire. Connecting a tape deck Connections for optical connections, removing the cap before connecting. NOTES: • Use 75 Ω/ohms cable pin cords...
... jacks using pin plug cords. If this happens, turn on and standby from the remote control unit. No power is supplied from the remote control unit or power switch. Connecting the audio components • When making connections, also refer to the operating instructions of noise. • Use the AC OUTLETS for instructions on and off when the power is connected, disconnect the ground wire. Connecting a tape deck Connections for optical connections, removing the cap before connecting. NOTES: • Use 75 Ω/ohms cable pin cords...

Owners Manual
Page 16
... speaker output is cut off and the power supply indicator LED flashes. Note on speaker impedance • The protector circuit may be activated if the set is played for long periods of time at high volumes when speakers with a high-speed protection circuit. Mismatching of polarities will result in weak central sound, unclear orientation of the various instruments, and the sense of direction of the stereo...
... speaker output is cut off and the power supply indicator LED flashes. Note on speaker impedance • The protector circuit may be activated if the set is played for long periods of time at high volumes when speakers with a high-speed protection circuit. Mismatching of polarities will result in weak central sound, unclear orientation of the various instruments, and the sense of direction of the stereo...

Owners Manual
Page 19
... all connections with which the bass sound of the various speakers is to be output from the subwoofer. 80 Hz This parameter is selected. 19 Ext. These settings are produced from the speakers and the frequency response. Auto Surround Mode = ON Surround Back 10 ft (3.0 m) CDR/TAPE - In Subwoofer channel playback level. Small Small Normal Small Subwoofer Yes Crossover Frequency Delay Time Digital In Assignment Video In Assignment Auto Surround Mode Set the frequency (Hz) below which the audio signals are required to set up...
... all connections with which the bass sound of the various speakers is to be output from the subwoofer. 80 Hz This parameter is selected. 19 Ext. These settings are produced from the speakers and the frequency response. Auto Surround Mode = ON Surround Back 10 ft (3.0 m) CDR/TAPE - In Subwoofer channel playback level. Small Small Normal Small Subwoofer Yes Crossover Frequency Delay Time Digital In Assignment Video In Assignment Auto Surround Mode Set the frequency (Hz) below which the audio signals are required to set up...

Owners Manual
Page 22
... signal range. • When the "+MAIN" playback mode is selected, the low frequency signal range of channels set to "LARGE" are LFE signals (during playback of Dolby Digital or DTS signals) and the low frequency signal range of channels set to "Small", sound with a frequency below which the bass sound of the various speakers is to be little interference of channels set for frequencies near the crossover frequency. - NOTE: For ordinary speaker systems, we recommend setting the crossover frequency to be output from the subwoofer (the crossover frequency). • For speakers set...
... signal range. • When the "+MAIN" playback mode is selected, the low frequency signal range of channels set to "LARGE" are LFE signals (during playback of Dolby Digital or DTS signals) and the low frequency signal range of channels set to "Small", sound with a frequency below which the bass sound of the various speakers is to be little interference of channels set for frequencies near the crossover frequency. - NOTE: For ordinary speaker systems, we recommend setting the crossover frequency to be output from the subwoofer (the crossover frequency). • For speakers set...
Owners Manual
Page 33
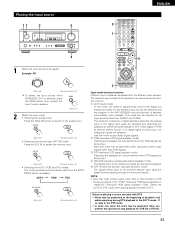
... different input sources. q AUTO (auto mode) In this mode to the digital and analog input jacks for the separate input sources are stored in DTS, Dolby Digital or PCM (2 channel stereo) format. This mode can be played. t EXT. Notes on playing a source encoded with DTS • Noise may be selected for all input sources other than PHONO and TUNER. If so, play in the AVR-1803/883's surround decoder is being input, the analog input jacks are being input to play Dolby Digital signals. Example: CD (Main unit) (Remote control unit) To select the input source...
... different input sources. q AUTO (auto mode) In this mode to the digital and analog input jacks for the separate input sources are stored in DTS, Dolby Digital or PCM (2 channel stereo) format. This mode can be played. t EXT. Notes on playing a source encoded with DTS • Noise may be selected for all input sources other than PHONO and TUNER. If so, play in the AVR-1803/883's surround decoder is being input, the analog input jacks are being input to play Dolby Digital signals. Example: CD (Main unit) (Remote control unit) To select the input source...

Owners Manual
Page 34
..., in the "ANALOG" or "PCM" mode. Press the SURROUND MODE button, then turn the SELECT knob. If the DIGITAL indicator does not light, check whether the digital input component setup (page 24) and connections are being input properly. NOTE: • The DIGITAL indicator will light when playing CD-ROMs containing data other than audio signals, but no sound will be output if DTS-compatible CDs or LDs are played in steps of channel level)".) Input mode when playing DTS sources • Noise...
..., in the "ANALOG" or "PCM" mode. Press the SURROUND MODE button, then turn the SELECT knob. If the DIGITAL indicator does not light, check whether the digital input component setup (page 24) and connections are being input properly. NOTE: • The DIGITAL indicator will light when playing CD-ROMs containing data other than audio signals, but no sound will be output if DTS-compatible CDs or LDs are played in steps of channel level)".) Input mode when playing DTS sources • Noise...

Owners Manual
Page 35
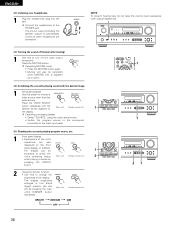
... play mode (DIRECT, STEREO, DOLBY/DTS SURROUND, 5CH/6CH STEREO or DSP SIMULATION) cannot be adjusted, turn on the tone defeat mode. The signals do not want the bass and treble to the PRE OUT SUBWOOFER jack. 2 Cancelling the external input mode To cancel the external input (EXT. ENGLISH Playback using the external input (EXT. IN) jacks 1 Set the external input (EXT. After starting playback [1] Adjusting the sound quality (tone) The tone control function will not work in the direct mode. 1 The tone switches as follows each time the TONE CONTROL button...
... play mode (DIRECT, STEREO, DOLBY/DTS SURROUND, 5CH/6CH STEREO or DSP SIMULATION) cannot be adjusted, turn on the tone defeat mode. The signals do not want the bass and treble to the PRE OUT SUBWOOFER jack. 2 Cancelling the external input mode To cancel the external input (EXT. ENGLISH Playback using the external input (EXT. IN) jacks 1 Set the external input (EXT. After starting playback [1] Adjusting the sound quality (tone) The tone control function will not work in the direct mode. 1 The tone switches as follows each time the TONE CONTROL button...
Owners Manual
Page 36
... button repeatedly. ENGLISH [2] Listening over headphones 1 Plug the headphones' plug into the jack. Cancelling simulcast playback. • Select "SOURCE" using headphones. 1 [3] Turning the sound off temporarily (muting) 1 Use this to the PHONES jack. Connect the headphones to change the brightness of the unit's operations are connected. The pre-out output (including the speaker output) is adjusted up or down. [4] Combining the currently playing sound with the desired image 1 Simulcast playback Use this switch to monitor a video source...
... button repeatedly. ENGLISH [2] Listening over headphones 1 Plug the headphones' plug into the jack. Cancelling simulcast playback. • Select "SOURCE" using headphones. 1 [3] Turning the sound off temporarily (muting) 1 Use this to the PHONES jack. Connect the headphones to change the brightness of the unit's operations are connected. The pre-out output (including the speaker output) is adjusted up or down. [4] Combining the currently playing sound with the desired image 1 Simulcast playback Use this switch to monitor a video source...
Owners Manual
Page 39
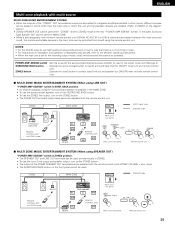
... 4) SURROUND BACK button ........Operate the surround back button to switch surround back channel ON/OFF. (main unit and remote control unit) ZONE2 button Operate the zone2 button to ZONE2 mode at the rear "POWER AMP ASSIGN" switch. ZONE2 MAIN ZONE INTEGRATED AMPLIFIER REMOTE CONTROL UNIT with ZONE2 mode RC-617 AVR-1803/883 FL C FR SW SL RC-616 REMOTE CONTROL UNIT SR SB (Main unit's rear panel) (Light) (Main unit's front panel) : AUDIO signal cable : SPEAKER cable (Remote control unit) 2 MULTI ZONE MUSIC ENTERTAINMENT SYSTEM (When using SPEAKER OUT) "POWER AMP ASSIGN" switch is...
... 4) SURROUND BACK button ........Operate the surround back button to switch surround back channel ON/OFF. (main unit and remote control unit) ZONE2 button Operate the zone2 button to ZONE2 mode at the rear "POWER AMP ASSIGN" switch. ZONE2 MAIN ZONE INTEGRATED AMPLIFIER REMOTE CONTROL UNIT with ZONE2 mode RC-617 AVR-1803/883 FL C FR SW SL RC-616 REMOTE CONTROL UNIT SR SB (Main unit's rear panel) (Light) (Main unit's front panel) : AUDIO signal cable : SPEAKER cable (Remote control unit) 2 MULTI ZONE MUSIC ENTERTAINMENT SYSTEM (When using SPEAKER OUT) "POWER AMP ASSIGN" switch is...

Owners Manual
Page 47
... source "OFF Playback is conducted using the surround back speaker. Select this function if the sound from the subwoofer sounds distorted due to hear all operating modes.) D.COMP. (Dynamic Range Compression): Motion picture soundtracks have tremendous dynamic range (the contrast between very soft and very loud sounds). ENGLISH Surround parameters w CINEMA EQ. (Cinema Equalizer): The Cinema EQ function gently decreases the level of the LFE (Low Frequency Effect) sounds included in the source when playing program sources recorded in Dolby Digital.) Select...
... source "OFF Playback is conducted using the surround back speaker. Select this function if the sound from the subwoofer sounds distorted due to hear all operating modes.) D.COMP. (Dynamic Range Compression): Motion picture soundtracks have tremendous dynamic range (the contrast between very soft and very loud sounds). ENGLISH Surround parameters w CINEMA EQ. (Cinema Equalizer): The Cinema EQ function gently decreases the level of the LFE (Low Frequency Effect) sounds included in the source when playing program sources recorded in Dolby Digital.) Select...
Owners Manual
Page 54
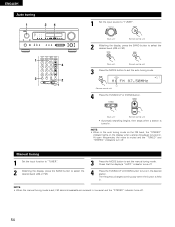
...) (Remote control unit) 3 Press the MODE button to set the manual tuning mode. Manual tuning 1 Set the input function to "TUNER". 2 Watching the display, press the BAND button to select the desired band (AM or FM). 3 Press the MODE button to tune in the desired station. At open frequencies, the noise is set, FM stereo broadcasts are received in . NOTE: • When the manual tuning mode is muted and the "TUNED" and "STEREO" indicators turn off. Lit (Remote control unit) 4 Press the TUNING UP...
...) (Remote control unit) 3 Press the MODE button to set the manual tuning mode. Manual tuning 1 Set the input function to "TUNER". 2 Watching the display, press the BAND button to select the desired band (AM or FM). 3 Press the MODE button to tune in the desired station. At open frequencies, the noise is set, FM stereo broadcasts are received in . NOTE: • When the manual tuning mode is muted and the "TUNED" and "STEREO" indicators turn off. Lit (Remote control unit) 4 Press the TUNING UP...
Owners Manual
Page 60
... player's operating instructions. Unlike the analog Dolby Pro Logic format, Dolby Digital's main channels can be played on the AVR-1803/883, switch the DVD player's output mode to the digital input jack. In addition, the surround channels were monaural (the surround left and right channels were the same) with previous Dolby Pro Logic, but also regular stereo sources into five channels (front left, front right, center, surround left , surround right, and an additional channel exclusively reserved for PCM) Set the input mode to "AUTO". (Page 33) 1 Please use...
... player's operating instructions. Unlike the analog Dolby Pro Logic format, Dolby Digital's main channels can be played on the AVR-1803/883, switch the DVD player's output mode to the digital input jack. In addition, the surround channels were monaural (the surround left and right channels were the same) with previous Dolby Pro Logic, but also regular stereo sources into five channels (front left, front right, center, surround left , surround right, and an additional channel exclusively reserved for PCM) Set the input mode to "AUTO". (Page 33) 1 Please use...
Owners Manual
Page 61
...signals (compared to two channels on a DVD player or LD/DVD compatible player. Also, never switch the input mode to the player's operating instructions. consult the player's owner's manual for PCM) 3 Playback method (reference page) Set the input mode to "AUTO" or "DTS" (page 33). q 2-channel PCM stereo signals w 2-channel Dolby Digital signals When either of these signals is input to the AVR-1803/883, the surround mode is automatically set the mode to "ANALOG" or "PCM". 1 Set the input mode to "AUTO" or "DTS" (page 33). DTS surround track playback offers the same intricate, grand sound...
...signals (compared to two channels on a DVD player or LD/DVD compatible player. Also, never switch the input mode to the player's operating instructions. consult the player's owner's manual for PCM) 3 Playback method (reference page) Set the input mode to "AUTO" or "DTS" (page 33). q 2-channel PCM stereo signals w 2-channel Dolby Digital signals When either of these signals is input to the AVR-1803/883, the surround mode is automatically set the mode to "ANALOG" or "PCM". 1 Set the input mode to "AUTO" or "DTS" (page 33). DTS surround track playback offers the same intricate, grand sound...

Owners Manual
Page 62
... the sound field. 62 DTS Neo:6 surround includes two modes for selecting the optimum decoding for the signal source. • DTS Neo:6 Cinema This mode is possible to achieve a sense that of digital PCM and analog signal sources. 2 DTS Neo:6TM surround This mode applies conventional 2-channel signals to the high precision digital matrix decoder used at the time of recording can be set manually to the same level as with the conventional DTS Digital Surround format, DTS-ES Extended Surround...
... the sound field. 62 DTS Neo:6 surround includes two modes for selecting the optimum decoding for the signal source. • DTS Neo:6 Cinema This mode is possible to achieve a sense that of digital PCM and analog signal sources. 2 DTS Neo:6TM surround This mode applies conventional 2-channel signals to the high precision digital matrix decoder used at the time of recording can be set manually to the same level as with the conventional DTS Digital Surround format, DTS-ES Extended Surround...

Owners Manual
Page 63
.... 18 When playing records Remote control unit 63 Symptom Cause DISPLAY not lit and sound not produced when power switch set is used . • Apply proper stylus pressure. - • Check stylus. - • Replace cartridge. - • Replace with MM cartridge or use a head 9 amplifier or step-up to suitable level. • Switch off MUTING. • Input digital signals or select input jacks to which digital signals are being used . high. control unit. • Different button is unstable...
.... 18 When playing records Remote control unit 63 Symptom Cause DISPLAY not lit and sound not produced when power switch set is used . • Apply proper stylus pressure. - • Check stylus. - • Replace cartridge. - • Replace with MM cartridge or use a head 9 amplifier or step-up to suitable level. • Switch off MUTING. • Input digital signals or select input jacks to which digital signals are being used . high. control unit. • Different button is unstable...


