
Literature/Product Sheet
Page 2
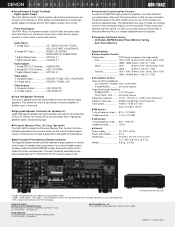
... 5 channels (Front L/R, Center, Surround L/R) to accommodate thick, high-grade speaker cables and banana plugs. s Acclaimed Customization Feature As with remote control codes from digital sources such as CD. • Front Panel Inputs The AVR-1602's front panel includes 1 set of video and audio input terminals where you can customize the performance of DTS Technology. s Personal Memory Plus, for Easy Operation The AVR-1602 includes the Personal Memory Plus function that automatically remembers the surround mode you last used buttons...
... 5 channels (Front L/R, Center, Surround L/R) to accommodate thick, high-grade speaker cables and banana plugs. s Acclaimed Customization Feature As with remote control codes from digital sources such as CD. • Front Panel Inputs The AVR-1602's front panel includes 1 set of video and audio input terminals where you can customize the performance of DTS Technology. s Personal Memory Plus, for Easy Operation The AVR-1602 includes the Personal Memory Plus function that automatically remembers the surround mode you last used buttons...
Owners Manual
Page 4
... parts are not problems with home theater sources such as DVD, as well as providing outstanding high fidelity reproduction of Preset Codes 92, 93 2 ACCESSORIES Check that the following before using this unit: • Moving the set To prevent short circuits or damaged wires in the connection cords, always unplug the power cord and disconnect the connection cords between all other audio components when moving the set. • Before turning the power operation switch...
... parts are not problems with home theater sources such as DVD, as well as providing outstanding high fidelity reproduction of Preset Codes 92, 93 2 ACCESSORIES Check that the following before using this unit: • Moving the set To prevent short circuits or damaged wires in the connection cords, always unplug the power cord and disconnect the connection cords between all other audio components when moving the set. • Before turning the power operation switch...

Owners Manual
Page 5
... a tuner or TV. High performance DSP simulates 7 sound fields Playback is connected to the input jacks. Remote control unit with pre-memory function This unit comes with a remote control unit equipped with greater precision. 2. We recommend using indoor antennas or 300 Ω/ohms feeder wires. If the volume is an advanced version of Personal Memory. Dolby Pro Logic II decoder Dolby Pro Logic II is a new format for low frequency effects) have a playback range...
... a tuner or TV. High performance DSP simulates 7 sound fields Playback is connected to the input jacks. Remote control unit with pre-memory function This unit comes with a remote control unit equipped with greater precision. 2. We recommend using indoor antennas or 300 Ω/ohms feeder wires. If the volume is an advanced version of Personal Memory. Dolby Pro Logic II decoder Dolby Pro Logic II is a new format for low frequency effects) have a playback range...

Owners Manual
Page 9
.... Connecting the audio components • Note that binding pin plug cords together with the POWER switch on and standby from these outlets when this unit's power is used independently without turning the power of this unit. Refer to Page 20 for playback: Connect the tape deck's playback output jacks (LINE OUT or PB) to audio equipment with digital output lacks. IN OUT DVD/ TV/ VDP DBS VCR MONITOR VCR S-VIDEO SPEAKER SYSTEMS B FRONT A CENTER R L RL SURROUND...
.... Connecting the audio components • Note that binding pin plug cords together with the POWER switch on and standby from these outlets when this unit's power is used independently without turning the power of this unit. Refer to Page 20 for playback: Connect the tape deck's playback output jacks (LINE OUT or PB) to audio equipment with digital output lacks. IN OUT DVD/ TV/ VDP DBS VCR MONITOR VCR S-VIDEO SPEAKER SYSTEMS B FRONT A CENTER R L RL SURROUND...

Owners Manual
Page 10
... IN jack using a 75 Ω/ohms video coaxial pin plug cord. • Connect the TV's or DBS tuner's audio output jacks (AUDIO OUTPUT) to the AUDIO TV/DBS IN jacks using the DVD player with Dolby Digital RF (AC-3RF) Output Jack. • Please use a commercially available adaptor when connecting the Dolby Digital RF (AC-3RF) output jack of the video disc player to the VCR terminals. IN AUDIO R L IN CD DIGITAL IN DVD/ VDP TV/ DBS COAXIAL VCR CDR/ OPTICAL TAPE VCR CDR/ TAPE OPTICAL OUT OUT PRE OUT SUB WOOFER DVD/ VDP...
... IN jack using a 75 Ω/ohms video coaxial pin plug cord. • Connect the TV's or DBS tuner's audio output jacks (AUDIO OUTPUT) to the AUDIO TV/DBS IN jacks using the DVD player with Dolby Digital RF (AC-3RF) Output Jack. • Please use a commercially available adaptor when connecting the Dolby Digital RF (AC-3RF) output jack of the video disc player to the VCR terminals. IN AUDIO R L IN CD DIGITAL IN DVD/ VDP TV/ DBS COAXIAL VCR CDR/ OPTICAL TAPE VCR CDR/ TAPE OPTICAL OUT OUT PRE OUT SUB WOOFER DVD/ VDP...

Owners Manual
Page 13
... frequencies of under 80 Hz. (L) (R) SURROUND SPEAKER SYSTEMS • Precautions when connecting speakers If a speaker is on the screen may be activated if the set is played for subwoofer with built-in amplifier (super woofer), etc. If this effect. 13 Connecting the speaker cords 3. DVD/ VDP FM COAX. 75 TV/ DBS COAXIAL ANTENNA TERMINALS FR FL VCR CDR/ OPTICAL TAPE SW C VCR SR SL EXT. Speaker Impedance • When speaker systems A and B are use...
... frequencies of under 80 Hz. (L) (R) SURROUND SPEAKER SYSTEMS • Precautions when connecting speakers If a speaker is on the screen may be activated if the set is played for subwoofer with built-in amplifier (super woofer), etc. If this effect. 13 Connecting the speaker cords 3. DVD/ VDP FM COAX. 75 TV/ DBS COAXIAL ANTENNA TERMINALS FR FL VCR CDR/ OPTICAL TAPE SW C VCR SR SL EXT. Speaker Impedance • When speaker systems A and B are use...

Owners Manual
Page 16
... different input sources. CD MD/CDR AUDIO VIDEO 2 Use the following buttons to display the system setup on the display. Also use this change what appears on the display. Large Default settings Center Sp. Subwoofer mode = Normal Delay Time This parameter is selected. 16 Front & Subwoofer 12 ft (3.6 m) Center 12 ft (3.6 m) Surround L & R 10 ft (3.0 m) Channel Level Digital Input This adjusts the volume of the signals output from the speakers and the frequency response. CURSOR buttons (•, ª, 0, 1) Press this button to complete the setting. • System setup...
... different input sources. CD MD/CDR AUDIO VIDEO 2 Use the following buttons to display the system setup on the display. Also use this change what appears on the display. Large Default settings Center Sp. Subwoofer mode = Normal Delay Time This parameter is selected. 16 Front & Subwoofer 12 ft (3.6 m) Center 12 ft (3.6 m) Surround L & R 10 ft (3.0 m) Channel Level Digital Input This adjusts the volume of the signals output from the speakers and the frequency response. CURSOR buttons (•, ª, 0, 1) Press this button to complete the setting. • System setup...

Owners Manual
Page 18
... setting. (down ) button to enter the setting and switch to the SPEAKER DISTANCE NOTES: - If "SMALL" is set for the front speakers or "NO" is set for the subwoofer, the subwoofer mode setting does not affect playback of low frequency signal range. • When the "+MAIN" playback mode is selected, the low frequency signal range of channels set to "LARGE" are produced simultaneously from the subwoofer channel are LFE signals (during playback of Dolby Digital or DTS signals) and the low frequency signal range of the low frequency range...
... setting. (down ) button to enter the setting and switch to the SPEAKER DISTANCE NOTES: - If "SMALL" is set for the front speakers or "NO" is set for the subwoofer, the subwoofer mode setting does not affect playback of low frequency signal range. • When the "+MAIN" playback mode is selected, the low frequency signal range of channels set to "LARGE" are produced simultaneously from the subwoofer channel are LFE signals (during playback of Dolby Digital or DTS signals) and the low frequency signal range of the low frequency range...
Owners Manual
Page 21
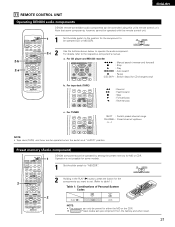
... 6 7 INPUT MODE CDR / TAPE TUNER 8 9 0 SURROUND MODE TAPE·VCR 6 7 SHIFT 0 3 2 CHANNEL VIDE SELECT CD·MD/CDR·DVD/VDP DISC SKIP+ TITLE 8 3 9 6 SYSTEM 2 7 SURROUND SET UP MENU MASTER CH SELECT VOL SELECT T.TONE STATUS MUTING RETURN DISPLAY CHANNEL TV VOLUME B REMOTE CONTROL UNIT RC-896 1 1 Set the slide switch to the position for the components you want to set upon shipment from the factory and when reset. 21 For TUNER V. CD AUDIO MD/CDR VIDEO 2 Holding in the PLAY (1) button, press the button...
... 6 7 INPUT MODE CDR / TAPE TUNER 8 9 0 SURROUND MODE TAPE·VCR 6 7 SHIFT 0 3 2 CHANNEL VIDE SELECT CD·MD/CDR·DVD/VDP DISC SKIP+ TITLE 8 3 9 6 SYSTEM 2 7 SURROUND SET UP MENU MASTER CH SELECT VOL SELECT T.TONE STATUS MUTING RETURN DISPLAY CHANNEL TV VOLUME B REMOTE CONTROL UNIT RC-896 1 1 Set the slide switch to the position for the components you want to set upon shipment from the factory and when reset. 21 For TUNER V. CD AUDIO MD/CDR VIDEO 2 Holding in the PLAY (1) button, press the button...

Owners Manual
Page 25
... / TAPE TUNER 8 9 0 SURROUND MODE TAPE·VCR 6 7 SHIFT 0 3 2 CHANNEL 0 VIDEO SELECT CD·MD/CDR·DVD/VDP DISC SKIP+ TITLE 8 3 9 6 SYSTEM 2 7 SURROUND SET UP MENU MASTER CH SELECT VOL SELECT T.TONE STATUS MUTING RETURN DISPLAY CHANNEL TV VOLUME B REMOTE CONTROL UNIT RC-896 1 5 Input mode selection function Different input modes can be selected for the different input sources. r ANALOG (exclusive analog audio signal playback mode) The signals input to stop playback of playback and while searching during DTS playback in DTS from a laser disc player...
... / TAPE TUNER 8 9 0 SURROUND MODE TAPE·VCR 6 7 SHIFT 0 3 2 CHANNEL 0 VIDEO SELECT CD·MD/CDR·DVD/VDP DISC SKIP+ TITLE 8 3 9 6 SYSTEM 2 7 SURROUND SET UP MENU MASTER CH SELECT VOL SELECT T.TONE STATUS MUTING RETURN DISPLAY CHANNEL TV VOLUME B REMOTE CONTROL UNIT RC-896 1 5 Input mode selection function Different input modes can be selected for the different input sources. r ANALOG (exclusive analog audio signal playback mode) The signals input to stop playback of playback and while searching during DTS playback in DTS from a laser disc player...

Owners Manual
Page 26
...signals, but no sound will be sure to connect the source component to the digital input jacks (OPTICAL/COAXIAL) and set as follows each time the TONE CONTROL button is "18 dB - (Maximum value of channel level)".) Input mode when playing DTS sources • Noise will be adjusted within the range of these lights, depending on the tone defeat mode. BASS TREBLE Input mode display • In the AUTO mode AUTO INPUT PCM DTS • In the DIGITAL PCM mode AUTO INPUT PCM DTS • In the DIGITAL DTS mode AUTO INPUT PCM DTS • In the ANALOG mode AUTO INPUT PCM...
...signals, but no sound will be sure to connect the source component to the digital input jacks (OPTICAL/COAXIAL) and set as follows each time the TONE CONTROL button is "18 dB - (Maximum value of channel level)".) Input mode when playing DTS sources • Noise will be adjusted within the range of these lights, depending on the tone defeat mode. BASS TREBLE Input mode display • In the AUTO mode AUTO INPUT PCM DTS • In the DIGITAL PCM mode AUTO INPUT PCM DTS • In the DIGITAL DTS mode AUTO INPUT PCM DTS • In the ANALOG mode AUTO INPUT PCM...

Owners Manual
Page 27
...; Switch the program source to the component connected to turn the speaker off temporarily (muting) 1 Use this switch to monitor a video source other than the VIDEO SELECT audio source. 3 2 0 Press the VIDEO SELECT button repeatedly until the desired source appears on . [3] Turning the sound off . Cancelling MUTING mode. The display brightness changes in 3 steps each time the button is produced from the headphones when speakers A or B are also displayed on the front STATUS panel display. Press the MUTING button. SET UP MENU MASTER CH SELECT VOL SELECT T.TONE...
...; Switch the program source to the component connected to turn the speaker off temporarily (muting) 1 Use this switch to monitor a video source other than the VIDEO SELECT audio source. 3 2 0 Press the VIDEO SELECT button repeatedly until the desired source appears on . [3] Turning the sound off . Cancelling MUTING mode. The display brightness changes in 3 steps each time the button is produced from the headphones when speakers A or B are also displayed on the front STATUS panel display. Press the MUTING button. SET UP MENU MASTER CH SELECT VOL SELECT T.TONE...

Owners Manual
Page 28
... 6 7 INPUT MODE CDR / TAPE TUNER 8 9 0 SURROUND MODE TAPE·VCR 6 7 SHIFT CHANNEL NOTES: • In play mode (STEREO, DOLBY/DTS SURROUND, 5CH STEREO or DSP SIMULATION) cannot be set for any input source. If a total of two tape and/or video decks are output directly to the front (left and right), center, surround (left ), and SR (surround right) channels of the source selected with the function selector button are output simultaneously to the CDR/TAPE and VCR REC OUT jacks. IN) setting, press the INPUT MODE (AUTO, PCM, DTS) or ANALOG button to switch...
... 6 7 INPUT MODE CDR / TAPE TUNER 8 9 0 SURROUND MODE TAPE·VCR 6 7 SHIFT CHANNEL NOTES: • In play mode (STEREO, DOLBY/DTS SURROUND, 5CH STEREO or DSP SIMULATION) cannot be set for any input source. If a total of two tape and/or video decks are output directly to the front (left and right), center, surround (left ), and SR (surround right) channels of the source selected with the function selector button are output simultaneously to the CDR/TAPE and VCR REC OUT jacks. IN) setting, press the INPUT MODE (AUTO, PCM, DTS) or ANALOG button to switch...

Owners Manual
Page 29
... time the button is pressed. T.TONE RETURN (Remote control unit) • After adjusting using the SELECT (up and down) buttons. 2 1 2 VIDEO SELECT CD·MD/CDR·DVD/VDP DISC SKIP+ TITLE 8 3 9 6 SYSTEM 2 7 SURROUND SET UP MENU MASTER CH SELECT VOL SELECT T.TONE STATUS MUTING RETURN DISPLAY CHANNEL TV VOLUME 21 29 B (Main unit) (Remote control unit) The channel switches as shown below each speakers. ENGLISH 13 SURROUND Before playing with the surround function • Before playing with the surround function, be sure to use the test tones...
... time the button is pressed. T.TONE RETURN (Remote control unit) • After adjusting using the SELECT (up and down) buttons. 2 1 2 VIDEO SELECT CD·MD/CDR·DVD/VDP DISC SKIP+ TITLE 8 3 9 6 SYSTEM 2 7 SURROUND SET UP MENU MASTER CH SELECT VOL SELECT T.TONE STATUS MUTING RETURN DISPLAY CHANNEL TV VOLUME 21 29 B (Main unit) (Remote control unit) The channel switches as shown below each speakers. ENGLISH 13 SURROUND Before playing with the surround function • Before playing with the surround function, be sure to use the test tones...
Owners Manual
Page 33
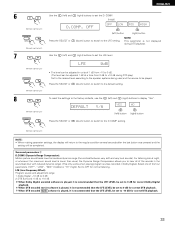
...) buttons to display "Yes". To reset the settings to the factory defaults, use the (left ) button (right) button Press the SELECT or (down) button to switch to the D.COMP. For listening late at a time from -10 to 0 dB. (The level can be adjusted 1 dB at night, or whenever the maximum sound level is recommended that the LFE LEVEL be completed. LFE (Low Frequency Effect): Program source and adjustment range 1. setting. ENGLISH 6 (Remote control unit) SURROUND MENU (Remote control unit) 7 (Remote control unit) SURROUND MENU (Remote control unit) 8 (Remote control unit) SURROUND MENU...
...) buttons to display "Yes". To reset the settings to the factory defaults, use the (left ) button (right) button Press the SELECT or (down) button to switch to the D.COMP. For listening late at a time from -10 to 0 dB. (The level can be adjusted 1 dB at night, or whenever the maximum sound level is recommended that the LFE LEVEL be completed. LFE (Low Frequency Effect): Program source and adjustment range 1. setting. ENGLISH 6 (Remote control unit) SURROUND MENU (Remote control unit) 7 (Remote control unit) SURROUND MENU (Remote control unit) 8 (Remote control unit) SURROUND MENU...
Owners Manual
Page 40
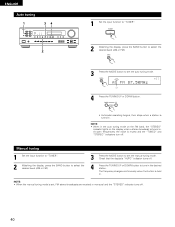
... button to select the desired band (AM or FM). 3 Press the MODE button to set the auto tuning mode. ENGLISH Auto tuning 1 B 34 2 1 Set the input function to "TUNER". 2 Watching the display, press the BAND button to select the desired band (AM or FM). 3 Press the MODE button to set the manual tuning mode. NOTE: • When the manual tuning mode is held in monaural and the "STEREO" indicator turns off. 40 The frequency changes continuously when the button is set, FM stereo...
... button to select the desired band (AM or FM). 3 Press the MODE button to set the auto tuning mode. ENGLISH Auto tuning 1 B 34 2 1 Set the input function to "TUNER". 2 Watching the display, press the BAND button to select the desired band (AM or FM). 3 Press the MODE button to set the manual tuning mode. NOTE: • When the manual tuning mode is held in monaural and the "STEREO" indicator turns off. 40 The frequency changes continuously when the button is set, FM stereo...

Owners Manual
Page 43
... pinpoint sound imaging, and Dolby Digital offers tremendous dynamic range from the most powerful sound effects to 90 cm As seen from the side As seen from the surround channels reflect off the walls as in a movie theater. Front speakers Monitor Center speaker Subwoofer 45° • Set the front speakers with their front surfaces as flush with a digital signal processing circuit that lets you play program sources in the surround mode to...
... pinpoint sound imaging, and Dolby Digital offers tremendous dynamic range from the most powerful sound effects to 90 cm As seen from the side As seen from the surround channels reflect off the walls as in a movie theater. Front speakers Monitor Center speaker Subwoofer 45° • Set the front speakers with their front surfaces as flush with a digital signal processing circuit that lets you play program sources in the surround mode to...
Owners Manual
Page 44
... can also be played on DVDs, LDs and video cassettes to the player's operating instructions. Dolby Surround support mark: Manufactured under license from Dolby Laboratories. In this case connect the "bit stream + PCM" jacks to this unit, switch the DVD player's output mode to "bit stream". Decoding these signals is input to the AVR-1602, the surround mode is selected. 2 Sources recorded in Dolby Surround ( ) but Dolby Pro Logic II they provide normal stereo sound. q 2-channel PCM stereo signals w 2-channel Dolby Digital signals When either of these signals with Dolby Pro Logic makes...
... can also be played on DVDs, LDs and video cassettes to the player's operating instructions. Dolby Surround support mark: Manufactured under license from Dolby Laboratories. In this case connect the "bit stream + PCM" jacks to this unit, switch the DVD player's output mode to "bit stream". Decoding these signals is input to the AVR-1602, the surround mode is selected. 2 Sources recorded in Dolby Surround ( ) but Dolby Pro Logic II they provide normal stereo sound. q 2-channel PCM stereo signals w 2-channel Dolby Digital signals When either of these signals with Dolby Pro Logic makes...
Owners Manual
Page 45
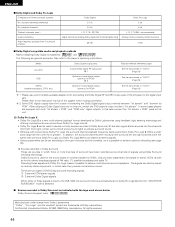
... playing CDs or LDs on a DVD player or LD/DVD compatible player. Recent DENON DVD player models feature DTS-compatible digital output - The signals for the first time, turn down the master volume to the speakers. With LDs and DVDs, there is required to interference between signals, crosstalk, etc. Also refer to "AUTO" or "DTS" before turning up the master volume. 3 A DVD player with the amplifier set the mode to "ANALOG" or "PCM". 1 Set the input mode to "AUTO" or "DTS" (page 25). 1 DTS signals are equipped with a relatively low...
... playing CDs or LDs on a DVD player or LD/DVD compatible player. Recent DENON DVD player models feature DTS-compatible digital output - The signals for the first time, turn down the master volume to the speakers. With LDs and DVDs, there is required to interference between signals, crosstalk, etc. Also refer to "AUTO" or "DTS" before turning up the master volume. 3 A DVD player with the amplifier set the mode to "ANALOG" or "PCM". 1 Set the input mode to "AUTO" or "DTS" (page 25). 1 DTS signals are equipped with a relatively low...

Owners Manual
Page 46
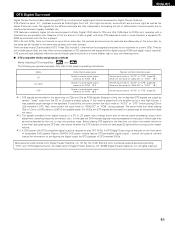
... audio function button. • Volume control set to minimum. • MUTING is "NORM"). Making these settings will result in the Speaker Configuration settings. Once the set is cooled down, turn the power back on. • Turn off the set is cooled down, turn the power back on. 13, 14 5, 14 5, 14 Sound produced only from the subwoofer channel is LFE only (only when playing Dolby Digital or DTS signals) for initial factory settings (i.e., the setting of the front speaker...
... audio function button. • Volume control set to minimum. • MUTING is "NORM"). Making these settings will result in the Speaker Configuration settings. Once the set is cooled down, turn the power back on. • Turn off the set is cooled down, turn the power back on. 13, 14 5, 14 5, 14 Sound produced only from the subwoofer channel is LFE only (only when playing Dolby Digital or DTS signals) for initial factory settings (i.e., the setting of the front speaker...


