
Dell™ Technology Guide
Page 6
... Keyboard 66 Backlit Keyboard 66 Changing the Input Language of Your Keyboard 67 Using the Numeric Keypad on a Laptop Computer 68 General Keyboard Shortcuts 69 5 Printers-Settings and Drivers 71 Accessing Printer Information 71 Changing Printer Settings 72 For Windows Vista 72 For Windows® XP 72 Setting up Printers 73 Adding a Printer 73 Setting the Default Printer 74 Sharing Printers on a Network 74 Installing a Printer Driver 75 6 Drives and Media 77 Freeing up Hard Drive...
... Keyboard 66 Backlit Keyboard 66 Changing the Input Language of Your Keyboard 67 Using the Numeric Keypad on a Laptop Computer 68 General Keyboard Shortcuts 69 5 Printers-Settings and Drivers 71 Accessing Printer Information 71 Changing Printer Settings 72 For Windows Vista 72 For Windows® XP 72 Setting up Printers 73 Adding a Printer 73 Setting the Default Printer 74 Sharing Printers on a Network 74 Installing a Printer Driver 75 6 Drives and Media 77 Freeing up Hard Drive...
Dell™ Technology Guide
Page 7
...-State Drive (SSD 78 Installing Drivers for Media Drives 79 Determining Whether a Device Driver is the Source of a Device Problem 79 Replacing a Driver With a Previous Version of the Driver 79 Using the Drivers and Utilities Media to Reinstall a Driver 80 Manually Reinstalling a Driver 80 Drive Problems 81 Optical Drive Problems 82 Hard Drive Problems 82 Working with RAID 83 RAID Level 0 83 RAID Level 1 84 RAID Level 0+1 Configuration 86 RAID Level 5 Configuration 87 Setting Your Computer to RAID-Enabled Mode 87 Configuring RAID...
...-State Drive (SSD 78 Installing Drivers for Media Drives 79 Determining Whether a Device Driver is the Source of a Device Problem 79 Replacing a Driver With a Previous Version of the Driver 79 Using the Drivers and Utilities Media to Reinstall a Driver 80 Manually Reinstalling a Driver 80 Drive Problems 81 Optical Drive Problems 82 Hard Drive Problems 82 Working with RAID 83 RAID Level 0 83 RAID Level 1 84 RAID Level 0+1 Configuration 86 RAID Level 5 Configuration 87 Setting Your Computer to RAID-Enabled Mode 87 Configuring RAID...
Dell™ Technology Guide
Page 20
... 1394 Device Problems 291 Keyboard Problems for External Keyboards . . . 292 Lockups and Software Problems 292 Memory Problems 294 Mouse Problems 295 Network Problems 296 Power Problems 296 Printer Problems 298 Scanner Problems 299 Sound and Speaker Problems 299 Touch Pad or Mouse Problems for Laptop Computers 301 Video and Monitor Problems 302 Power Lights 304 Dell Technical Update Service 305 21 System Setup 307 Viewing System Settings With the System Setup Program 307 Entering the System Setup Program 308 Working With Options on the System Setup Program Screen 308 Changing...
... 1394 Device Problems 291 Keyboard Problems for External Keyboards . . . 292 Lockups and Software Problems 292 Memory Problems 294 Mouse Problems 295 Network Problems 296 Power Problems 296 Printer Problems 298 Scanner Problems 299 Sound and Speaker Problems 299 Touch Pad or Mouse Problems for Laptop Computers 301 Video and Monitor Problems 302 Power Lights 304 Dell Technical Update Service 305 21 System Setup 307 Viewing System Settings With the System Setup Program 307 Entering the System Setup Program 308 Working With Options on the System Setup Program Screen 308 Changing...
Dell™ Technology Guide
Page 28
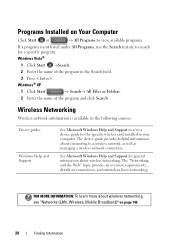
... for general information about wireless networking, see "Networks (LAN, Wireless, Mobile Broadband)" on Your Computer Click Start or → All Programs to view available programs. If a program is available in the following sources: Device guides Windows Help and Support See Microsoft Windows Help and Support to access device guide for the specific wireless card installed in basic networking. FOR MORE INFORMATION: To learn more about wireless networking. The "Networking and the Web" topic...
... for general information about wireless networking, see "Networks (LAN, Wireless, Mobile Broadband)" on Your Computer Click Start or → All Programs to view available programs. If a program is available in the following sources: Device guides Windows Help and Support See Microsoft Windows Help and Support to access device guide for the specific wireless card installed in basic networking. FOR MORE INFORMATION: To learn more about wireless networking. The "Networking and the Web" topic...
Dell™ Technology Guide
Page 64
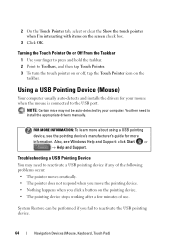
... taskbar. 2 Point to reactivate the USB pointing device. 64 Navigation Devices (Mouse, Keyboard, Touch Pad) Troubleshooting a USB Pointing Device You may not be performed if you click a button on the screen check box. 3 Click OK. NOTE: Certain mice may need to the USB port. Turning the Touch Pointer On or Off From the Taskbar 1 Use your mouse when the mouse is connected to install the appropriate drivers manually. FOR MORE INFORMATION: To learn more...
... taskbar. 2 Point to reactivate the USB pointing device. 64 Navigation Devices (Mouse, Keyboard, Touch Pad) Troubleshooting a USB Pointing Device You may not be performed if you click a button on the screen check box. 3 Click OK. NOTE: Certain mice may need to the USB port. Turning the Touch Pointer On or Off From the Taskbar 1 Use your mouse when the mouse is connected to install the appropriate drivers manually. FOR MORE INFORMATION: To learn more...
Dell™ Technology Guide
Page 75
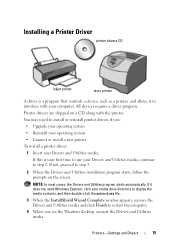
... your first time to use your Drivers and Utilities media, continue to restart the computer. 4 When you : • Upgrade your operating system • Reinstall your operating system • Connect or install a new printer To install a printer driver: 1 Insert your computer. If this is a program that controls a device, such as a printer, and allows it does not, start Windows Explorer, click your media drive directory to display the media contents, and then...
... your first time to use your Drivers and Utilities media, continue to restart the computer. 4 When you : • Upgrade your operating system • Reinstall your operating system • Connect or install a new printer To install a printer driver: 1 Insert your computer. If this is a program that controls a device, such as a printer, and allows it does not, start Windows Explorer, click your media drive directory to display the media contents, and then...
Dell™ Technology Guide
Page 79
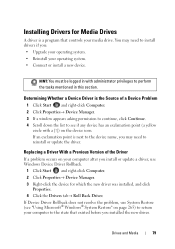
... device name, you install or update a driver, use System Restore (see if any device has an exclamation point (a yellow circle with administrator privileges to install drivers if you installed the new driver. Replacing a Driver With a Previous Version of a Device Problem 1 Click Start and right-click Computer. 2 Click Properties→ Device Manager. 3 If a window appears asking permission to continue, click Continue. 4 Scroll down the list to the state that controls your operating system. • Connect or install a new device...
... device name, you install or update a driver, use System Restore (see if any device has an exclamation point (a yellow circle with administrator privileges to install drivers if you installed the new driver. Replacing a Driver With a Previous Version of a Device Problem 1 Click Start and right-click Computer. 2 Click Properties→ Device Manager. 3 If a window appears asking permission to continue, click Continue. 4 Scroll down the list to the state that controls your operating system. • Connect or install a new device...
Dell™ Technology Guide
Page 81
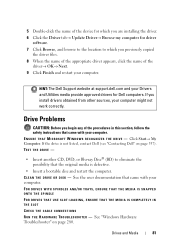
... device for which you are installing the driver. 6 Click the Driver tab→ Update Driver→ Browse my computer for Dell computers. CLEAN THE DRIVE OR DISK - FOR DRIVES WITH SPINDLES AND/OR TRAYS, ENSURE THAT THE MEDIA IS SNAPPED ONTO THE SPINDLE FOR DRIVES THAT USE SLOT-LOADING, ENSURE THAT THE MEDIA IS COMPLETELY IN THE SLOT CHECK THE CABLE CONNECTIONS R U N T H E H A R D W A R E TR O U B L E S H O O T E R - E N S U R E T H A T M I C R O S O F T W I N D O W S R E C O G N I Z E S T H E D R I V E - Click Start→ My Computer. See "Windows Hardware Troubleshooter...
... device for which you are installing the driver. 6 Click the Driver tab→ Update Driver→ Browse my computer for Dell computers. CLEAN THE DRIVE OR DISK - FOR DRIVES WITH SPINDLES AND/OR TRAYS, ENSURE THAT THE MEDIA IS SNAPPED ONTO THE SPINDLE FOR DRIVES THAT USE SLOT-LOADING, ENSURE THAT THE MEDIA IS COMPLETELY IN THE SLOT CHECK THE CABLE CONNECTIONS R U N T H E H A R D W A R E TR O U B L E S H O O T E R - E N S U R E T H A T M I C R O S O F T W I N D O W S R E C O G N I Z E S T H E D R I V E - Click Start→ My Computer. See "Windows Hardware Troubleshooter...
Dell™ Technology Guide
Page 94
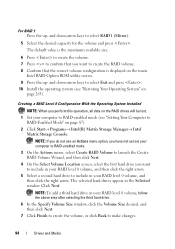
... first hard drive you want to create the RAID volume. 8 Confirm that you do not see "Restoring Your Operating System" on the main Intel RAID Option ROM utility screen. 9 Press the up - and down -arrow keys to include in the Selected window. NOTE: If you want to include in your computer to RAID-enabled mode (see "Setting Your Computer to confirm that the correct volume configuration is displayed...
... first hard drive you want to create the RAID volume. 8 Confirm that you do not see "Restoring Your Operating System" on the main Intel RAID Option ROM utility screen. 9 Press the up - and down -arrow keys to include in the Selected window. NOTE: If you want to include in your computer to RAID-enabled mode (see "Setting Your Computer to confirm that the correct volume configuration is displayed...

Dell™ Technology Guide
Page 95
... do not see an Actions menu option, you have replaced the failed hard drive (see "Setting Your Computer to make changes. 10 Follow the Microsoft Windows procedures for your computer). 1 Turn on or restart your computer to RAID-enabled mode. 3 On the Actions menu, select Create RAID Volume to launch the Create RAID Volume Wizard. 4 Click Next at the first screen. 5 Confirm the volume name, select RAID 1 as the...
... do not see an Actions menu option, you have replaced the failed hard drive (see "Setting Your Computer to make changes. 10 Follow the Microsoft Windows procedures for your computer). 1 Turn on or restart your computer to RAID-enabled mode. 3 On the Actions menu, select Create RAID Volume to launch the Create RAID Volume Wizard. 4 Click Next at the first screen. 5 Confirm the volume name, select RAID 1 as the...
Dell™ Technology Guide
Page 245
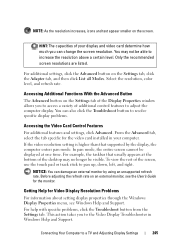
... specific problems, click the Troubleshoot button from the Settings tab. If the video resolution setting is higher than that usually appears at one time. NOTICE: You can damage an external monitor by the display, the computer enters pan mode. Only the recommended screen resolutions are listed. This action takes you to the Video Display Troubleshooter in your display and video card determine how much you to access a variety of the screen, use the touch pad...
... specific problems, click the Troubleshoot button from the Settings tab. If the video resolution setting is higher than that usually appears at one time. NOTICE: You can damage an external monitor by the display, the computer enters pan mode. Only the recommended screen resolutions are listed. This action takes you to the Video Display Troubleshooter in your display and video card determine how much you to access a variety of the screen, use the touch pad...
Dell™ Technology Guide
Page 249
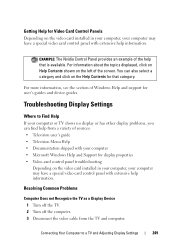
... Control Panel provides an example of Windows Help and support for user's guides and device guides. For information about the topics displayed, click on Help Contents shown on the video card installed in your computer, your computer may have a special video card control panel with extensive help from the TV and computer. Troubleshooting Display Settings Where to a TV and Adjusting Display Settings 249 Resolving Common Problems Computer Does not Recognize the TV as a Display Device 1 Turn...
... Control Panel provides an example of Windows Help and support for user's guides and device guides. For information about the topics displayed, click on Help Contents shown on the video card installed in your computer, your computer may have a special video card control panel with extensive help from the TV and computer. Troubleshooting Display Settings Where to a TV and Adjusting Display Settings 249 Resolving Common Problems Computer Does not Recognize the TV as a Display Device 1 Turn...
Dell™ Technology Guide
Page 276
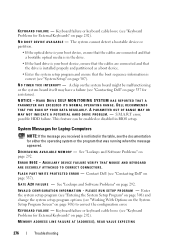
... drive is your boot device, ensure that the cables are connected and that a bootable optical media is in BIOS setup. DELL RECOMMENDS THAT YOU BACK UP YOUR DATA REGULARLY. See "Lockups and Software Problems" on page 292. MEMORY ADDRESS LINE FAILURE AT (ADDRESS), READ VALUE EXPECTING 276 Troubleshooting S.M.A.R.T error, possible HDD failure. G A T E A 2 0 F A I T E P R O T E C T E D E R R O R - This feature can be malfunctioning or the system board itself may have a failure (see "Keyboard Problems...
... drive is your boot device, ensure that the cables are connected and that a bootable optical media is in BIOS setup. DELL RECOMMENDS THAT YOU BACK UP YOUR DATA REGULARLY. See "Lockups and Software Problems" on page 292. MEMORY ADDRESS LINE FAILURE AT (ADDRESS), READ VALUE EXPECTING 276 Troubleshooting S.M.A.R.T error, possible HDD failure. G A T E A 2 0 F A I T E P R O T E C T E D E R R O R - This feature can be malfunctioning or the system board itself may have a failure (see "Keyboard Problems...

Dell™ Technology Guide
Page 295
... Compliance Homepage at www.dell.com/regulatory_compliance. TE S T T H E M O U S E - CHECK THE MOUSE SETTINGS - IF YOU EXPERIENCE OTHER MEMORY PROBLEMS - • Reseat the memory modules (see the documentation shipped with your computer) to the computer. • Verify that the cable is supported by your computer. CHECK THE MOUSE CABLE - • Ensure that the mouse cable is connected as shown on the setup diagram. 4 Turn on the setup diagram for your computer...
... Compliance Homepage at www.dell.com/regulatory_compliance. TE S T T H E M O U S E - CHECK THE MOUSE SETTINGS - IF YOU EXPERIENCE OTHER MEMORY PROBLEMS - • Reseat the memory modules (see the documentation shipped with your computer) to the computer. • Verify that the cable is supported by your computer. CHECK THE MOUSE CABLE - • Ensure that the mouse cable is connected as shown on the setup diagram. 4 Turn on the setup diagram for your computer...
Dell™ Technology Guide
Page 348
... - O optical drive - PC Card - PCI Express - A modification to 4 GB/sec. programmed input/output - nonvolatile random access memory - Diagnostics programs, loaded automatically by the number of the computer to create an image. Plug and Play provides automatic installation, configuration, and compatibility with existing hardware if the BIOS, operating system, and all devices are arranged in rows and columns to automatically configure devices. A drive that supports 32-and...
... - O optical drive - PC Card - PCI Express - A modification to 4 GB/sec. programmed input/output - nonvolatile random access memory - Diagnostics programs, loaded automatically by the number of the computer to create an image. Plug and Play provides automatic installation, configuration, and compatibility with existing hardware if the BIOS, operating system, and all devices are arranged in rows and columns to automatically configure devices. A drive that supports 32-and...
Dell™ Technology Guide
Page 352
... reduce the weight of cable used in combination with security software enhances network and computer security by enabling features such as a USB-compatible keyboard, mouse, joystick, scanner, set of time when there is turned on the system board (in computers with an integrated video controller) that contain only text; trusted platform module - UPS - A UPS keeps a computer running for your computer. Devices are twisted to protect...
... reduce the weight of cable used in combination with security software enhances network and computer security by enabling features such as a USB-compatible keyboard, mouse, joystick, scanner, set of time when there is turned on the system board (in computers with an integrated video controller) that contain only text; trusted platform module - UPS - A UPS keeps a computer running for your computer. Devices are twisted to protect...
Setup Guide
Page 5
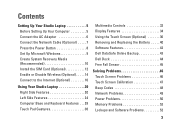
...AC Adapter 6 Connect the Network Cable (Optional 7 Press the Power Button 8 Set Up Microsoft Windows 9 Create System Recovery Media (Recommended 10 Install the SIM Card (Optional 12 Enable or Disable Wireless (Optional 14 Connect to the Internet (Optional 16 Using Your Studio Laptop 20 Right Side Features 20 Left Side Features 24 Computer Base and Keyboard Features 28 Touch Pad Gestures 30 Multimedia Controls 32 Display Features 34 Using the Touch Screen (Optional 36 Removing and Replacing the Battery 40 Software Features 42 Dell DataSafe Online Backup 43 Dell Dock 44 Free...
...AC Adapter 6 Connect the Network Cable (Optional 7 Press the Power Button 8 Set Up Microsoft Windows 9 Create System Recovery Media (Recommended 10 Install the SIM Card (Optional 12 Enable or Disable Wireless (Optional 14 Connect to the Internet (Optional 16 Using Your Studio Laptop 20 Right Side Features 20 Left Side Features 24 Computer Base and Keyboard Features 28 Touch Pad Gestures 30 Multimedia Controls 32 Display Features 34 Using the Touch Screen (Optional 36 Removing and Replacing the Battery 40 Software Features 42 Dell DataSafe Online Backup 43 Dell Dock 44 Free...
Setup Guide
Page 28
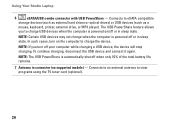
... powered off when only 10% of the total battery life remains. 7 Antenna in sleep state. NOTE: If you to charge the device. In such cases, turn off or in sleep state. Connects to an external antenna to eSATA compatible storage devices (such as external hard drives or optical drives) or USB devices (such as a mouse, keyboard, printer, external drive, or MP3 player). To continue charging, disconnect the USB device and connect it again. Using Your Studio Laptop...
... powered off when only 10% of the total battery life remains. 7 Antenna in sleep state. NOTE: If you to charge the device. In such cases, turn off or in sleep state. Connects to an external antenna to eSATA compatible storage devices (such as external hard drives or optical drives) or USB devices (such as a mouse, keyboard, printer, external drive, or MP3 player). To continue charging, disconnect the USB device and connect it again. Using Your Studio Laptop...
Setup Guide
Page 31
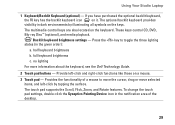
... multimedia control keys are also located on a mouse. 3 Touch pad - half keyboard brightness b. Provides the functionality of the desktop. 29 These keys control CD, DVD, Blu-ray Disc™ (optional), and media playback. full keyboard brightness c. no lighting For more information about the keyboard, see the Dell Technology Guide. 2 Touch pad buttons - Provide left -click by illuminating all symbols on it. To change the touch pad settings, double-click the Synaptics Pointing Device icon in the notification area of a mouse...
... multimedia control keys are also located on a mouse. 3 Touch pad - half keyboard brightness b. Provides the functionality of the desktop. 29 These keys control CD, DVD, Blu-ray Disc™ (optional), and media playback. full keyboard brightness c. no lighting For more information about the keyboard, see the Dell Technology Guide. 2 Touch pad buttons - Provide left -click by illuminating all symbols on it. To change the touch pad settings, double-click the Synaptics Pointing Device icon in the notification area of a mouse...
Setup Guide
Page 82
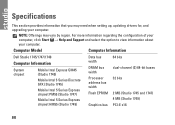
... the configuration of your computer, click Start → Help and Support and select the option to view information about your computer. NOTE: Offerings may need when setting up, updating drivers for, and upgrading your computer. Computer Model Computer Information Dell Studio 1745/1747/1749 Computer Information System chipset Mobile Intel Express GM45 (Studio 1745) Mobile Intel 5 Series Discrete GFX (Studio 1745) Mobile Intel 5 Series Express chipset PM55 (Studio 1747...
... the configuration of your computer, click Start → Help and Support and select the option to view information about your computer. NOTE: Offerings may need when setting up, updating drivers for, and upgrading your computer. Computer Model Computer Information Dell Studio 1745/1747/1749 Computer Information System chipset Mobile Intel Express GM45 (Studio 1745) Mobile Intel 5 Series Discrete GFX (Studio 1745) Mobile Intel 5 Series Express chipset PM55 (Studio 1747...


