

Getting Started Guide
Page 6
... not purchased with your system. For customers outside the United States, visit support.dell.com and select your country or region from the top of the software installed on the system. Press the power button on your system's hard drive. The power indicator should light. For customers in the United States, call the...
... not purchased with your system. For customers outside the United States, visit support.dell.com and select your country or region from the top of the software installed on the system. Press the power button on your system's hard drive. The power indicator should light. For customers in the United States, call the...
Getting Started Guide
Page 9
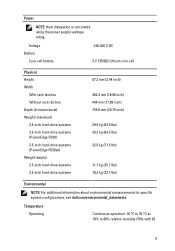
... Height Width With rack latches Without rack latches Depth (includes bezel) Weight (maximum) 2.5-inch hard-drive systems 3.5-inch hard-drive systems (PowerEdge R720) 3.5-inch hard-drive systems (PowerEdge R720xd) Weight (empty) 2.5-inch hard-drive systems 3.5-inch hard-drive systems 87.3 mm (3.44 inch) 482.4 mm (18.98 inch) 444 mm (17.08...kg (22.7 lbs) Environmental NOTE: For additional information about environmental measurements for specific system configurations, see dell.com/environmental_datasheets. Power NOTE: Heat dissipation is calculated using the power supply wattage rating.
... Height Width With rack latches Without rack latches Depth (includes bezel) Weight (maximum) 2.5-inch hard-drive systems 3.5-inch hard-drive systems (PowerEdge R720) 3.5-inch hard-drive systems (PowerEdge R720xd) Weight (empty) 2.5-inch hard-drive systems 3.5-inch hard-drive systems 87.3 mm (3.44 inch) 482.4 mm (18.98 inch) 444 mm (17.08...kg (22.7 lbs) Environmental NOTE: For additional information about environmental measurements for specific system configurations, see dell.com/environmental_datasheets. Power NOTE: Heat dissipation is calculated using the power supply wattage rating.
Owner's Manual
Page 3
... Warnings 2 1 About Your System...9 Front-Panel Features And Indicators...9 LCD Panel Features...12 Home Screen...13 Setup Menu...13 View Menu...13 Diagnostic Indicators...14 Hard-Drive Indicator Patterns...16 Back-Panel Features And Indicators...16 NIC Indicator Codes...18 Power Indicator Codes...18 Other Information You May Need...20 2 Using The...
... Warnings 2 1 About Your System...9 Front-Panel Features And Indicators...9 LCD Panel Features...12 Home Screen...13 Setup Menu...13 View Menu...13 Diagnostic Indicators...14 Hard-Drive Indicator Patterns...16 Back-Panel Features And Indicators...16 NIC Indicator Codes...18 Power Indicator Codes...18 Other Information You May Need...20 2 Using The...
Owner's Manual
Page 4
... Memory Modules...48 Hard Drives...49 Removing A 2.5 Inch Hard-Drive Blank...49 Installing A 2.5 Inch Hard-Drive Blank...50 Removing A 2.5 Inch Hard-Drive Blank (Back 50 Installing A 2.5 Inch Hard-Drive Blank (Back 51 Removing A 3.5 Inch Hard-Drive Blank...51 Installing A 3.5 Inch Hard-Drive Blank...51 Removing A Hot-Swap Hard Drive...51 Installing A Hot-Swap Hard Drive...52 Removing A Hard Drive From A Hard-Drive Carrier 53 Installing A Hard Drive Into A Hard-Drive Carrier 53 Optical Drive (Optional)...54 Removing...
... Memory Modules...48 Hard Drives...49 Removing A 2.5 Inch Hard-Drive Blank...49 Installing A 2.5 Inch Hard-Drive Blank...50 Removing A 2.5 Inch Hard-Drive Blank (Back 50 Installing A 2.5 Inch Hard-Drive Blank (Back 51 Removing A 3.5 Inch Hard-Drive Blank...51 Installing A 3.5 Inch Hard-Drive Blank...51 Removing A Hot-Swap Hard Drive...51 Installing A Hot-Swap Hard Drive...52 Removing A Hard Drive From A Hard-Drive Carrier 53 Installing A Hard Drive Into A Hard-Drive Carrier 53 Optical Drive (Optional)...54 Removing...
Owner's Manual
Page 6
......91 Replacing The System Battery...91 Hard-Drive Backplane...92 Removing The Hard-Drive Backplane...93 Installing The Hard-Drive Backplane...105 Removing The Optional Hard-Drive Backplane (Back 106 Installing The Optional Hard-Drive Backplane (Back 108 Control Panel...109 Removing The Control Panel (PowerEdge R720 109 Installing The Control Panel (PowerEdge R720 111 Removing The Control Panel (PowerEdge R720xd 111 Installing The Control...
......91 Replacing The System Battery...91 Hard-Drive Backplane...92 Removing The Hard-Drive Backplane...93 Installing The Hard-Drive Backplane...105 Removing The Optional Hard-Drive Backplane (Back 106 Installing The Optional Hard-Drive Backplane (Back 108 Control Panel...109 Removing The Control Panel (PowerEdge R720 109 Installing The Control Panel (PowerEdge R720 111 Removing The Control Panel (PowerEdge R720xd 111 Installing The Control...
Owner's Manual
Page 7
... Troubleshooting A Tape Backup Unit...125 Troubleshooting A Hard Drive...126 Troubleshooting A Storage Controller...126 Troubleshooting Expansion Cards...127 Troubleshooting Processors...128 5 Using System Diagnostics...129 Dell Online Diagnostics...129 Dell Embedded System Diagnostics...129 When To Use The Embedded System Diagnostics 129 Running The Embedded System Diagnostics 129 System Diagnostic Controls...130 6 ......141 Removing LCD Messages...141 System Error Messages...141 Warning Messages...155 Diagnostic Messages...155 Alert Messages...155 9 Getting Help...157 Contacting Dell...157
... Troubleshooting A Tape Backup Unit...125 Troubleshooting A Hard Drive...126 Troubleshooting A Storage Controller...126 Troubleshooting Expansion Cards...127 Troubleshooting Processors...128 5 Using System Diagnostics...129 Dell Online Diagnostics...129 Dell Embedded System Diagnostics...129 When To Use The Embedded System Diagnostics 129 Running The Embedded System Diagnostics 129 System Diagnostic Controls...130 6 ......141 Removing LCD Messages...141 System Error Messages...141 Warning Messages...155 Diagnostic Messages...155 Alert Messages...155 9 Getting Help...157 Contacting Dell...157
Owner's Manual
Page 10
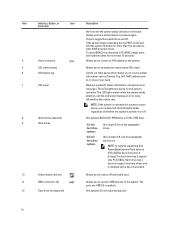
...button for more than five seconds to toggle the system ID on as per your need. NOTE: In systems supporting Dell PowerEdge Express Flash devices (PCIe SSDs), hard-drive slots 0 through 3 in F2 iDRAC setup) press and hold the system ID button for more than 15 seconds...the system status indicator on or off . One optional SATA DVD-ROM drive or DVD+/-RW drive. 3.5 inch hard drive systems 2.5 inch hard drive systems Up to sixteen 2.5 inch hot-swappable hard drives. Hard-drive bay 3 does not support any hard drives and is connected to record system information such as Service Tag, NIC...
...button for more than five seconds to toggle the system ID on as per your need. NOTE: In systems supporting Dell PowerEdge Express Flash devices (PCIe SSDs), hard-drive slots 0 through 3 in F2 iDRAC setup) press and hold the system ID button for more than 15 seconds...the system status indicator on or off . One optional SATA DVD-ROM drive or DVD+/-RW drive. 3.5 inch hard drive systems 2.5 inch hard drive systems Up to sixteen 2.5 inch hot-swappable hard drives. Hard-drive bay 3 does not support any hard drives and is connected to record system information such as Service Tag, NIC...
Owner's Manual
Page 12
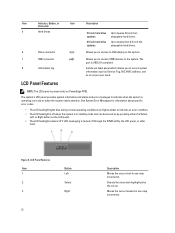
... 5 Hard drives 3.5 inch hard drive systems Up to twelve 3.5 inch hotswappable hard drives. 2.5 inch hard drive systems Up to twenty-four 2.5 inch hotswappable hard drives. 6 Video connector Allows you to connect a VGA display to the system. 7 USB connector 8 Information tag Allows you to indicate an error condition. • The LCD backlight is off when the system is present only on PowerEdge R720.
... 5 Hard drives 3.5 inch hard drive systems Up to twelve 3.5 inch hotswappable hard drives. 2.5 inch hard drive systems Up to twenty-four 2.5 inch hotswappable hard drives. 6 Video connector Allows you to connect a VGA display to the system. 7 USB connector 8 Information tag Allows you to indicate an error condition. • The LCD backlight is off when the system is present only on PowerEdge R720.

Owner's Manual
Page 14
... The diagnostic indicators are present only on the system front panel display error status during system startup. Hard-drive indicator Condition The indicator blinks amber if a hard drive experiences an error. The display format can be configured in standby, and any video output. The ...cause the system to halt at startup without any error exists (for example, a failed fan or hard drive) Corrective Action None required. The diagnostic indicators on PowerEdge R720xd. Restart system and run embedded diagnostics (ePSA). Power Displays the power output of the system in...
... The diagnostic indicators are present only on the system front panel display error status during system startup. Hard-drive indicator Condition The indicator blinks amber if a hard drive experiences an error. The display format can be configured in standby, and any video output. The ...cause the system to halt at startup without any error exists (for example, a failed fan or hard drive) Corrective Action None required. The diagnostic indicators on PowerEdge R720xd. Restart system and run embedded diagnostics (ePSA). Power Displays the power output of the system in...

Owner's Manual
Page 16
Back-Panel Features and Indicators-PowerEdge R720 16 Drive-Status Indicator Pattern (RAID Only) Blinks green two times per second Blinks green slowly Steady green Blinks green three seconds, amber three seconds, and off Blinks amber four times per second Off Condition Identifying drive or preparing for removal Drive ready for insertion or removal during this...
Back-Panel Features and Indicators-PowerEdge R720 16 Drive-Status Indicator Pattern (RAID Only) Blinks green two times per second Blinks green slowly Steady green Blinks green three seconds, amber three seconds, and off Blinks amber four times per second Off Condition Identifying drive or preparing for removal Drive ready for insertion or removal during this...
Owner's Manual
Page 18
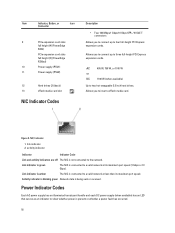
... Item Indicator, Button, or Icon Connector 9 PCIe expansion card slots full height (4) (PowerEdge R720) PCIe expansion card slots full height (3) (PowerEdge R720xd) 10 Power supply (PSU1) 11 Power supply (PSU2) 12 Hard drives (2) (back) 13 vFlash media card slot NIC Indicator Codes Description • Two 100... is not connected to the network. link indicator 2. Activity indicator is blinking green Network data is connected to two hot-swappable 2.5 inch hard drives. AC 495 W, 750 W, or 1100 W or DC 1100 W (when available) Up to a valid network at less than its ...
... Item Indicator, Button, or Icon Connector 9 PCIe expansion card slots full height (4) (PowerEdge R720) PCIe expansion card slots full height (3) (PowerEdge R720xd) 10 Power supply (PSU1) 11 Power supply (PSU2) 12 Hard drives (2) (back) 13 vFlash media card slot NIC Indicator Codes Description • Two 100... is not connected to the network. link indicator 2. Activity indicator is blinking green Network data is connected to two hot-swappable 2.5 inch hard drives. AC 495 W, 750 W, or 1100 W or DC 1100 W (when available) Up to a valid network at less than its ...

Owner's Manual
Page 38
PCIe card holder 4. expansion-card riser 2 8. cooling shroud 5. heat sink for processor 1 10. heat sink for processor 2 11. Inside the System-PowerEdge R720 1. hard-drive backplane 38 cable securing bracket 3. cooling-fan assembly 2. network daughter card 7. expansion-card riser 3 6. DIMMs (24) 12. cooling fans (6) 13. Figure 14. expansion-card riser 1 9.
PCIe card holder 4. expansion-card riser 2 8. cooling shroud 5. heat sink for processor 1 10. heat sink for processor 2 11. Inside the System-PowerEdge R720 1. hard-drive backplane 38 cable securing bracket 3. cooling-fan assembly 2. network daughter card 7. expansion-card riser 3 6. DIMMs (24) 12. cooling fans (6) 13. Figure 14. expansion-card riser 1 9.

Owner's Manual
Page 39
... media slot 6. network daughter card Cooling Shroud 9. Figure 15. cooling-fan assembly 2. hard-drive backplane (back) 5. expansion-card riser 1 11. CAUTION: Never operate your warranty. Inside the System-PowerEdge R720xd 1. cooling shroud 4. heat sink for processor 2 13. You should only perform ...by Dell is not covered by the online or telephone service and support team. cable securing bracket 3. heat sink for processor 1 12. The system may only be done by a certified service technician. Damage due to servicing that came with the cooling shroud removed. hard drives ...
... media slot 6. network daughter card Cooling Shroud 9. Figure 15. cooling-fan assembly 2. hard-drive backplane (back) 5. expansion-card riser 1 11. CAUTION: Never operate your warranty. Inside the System-PowerEdge R720xd 1. cooling shroud 4. heat sink for processor 2 13. You should only perform ...by Dell is not covered by the online or telephone service and support team. cable securing bracket 3. heat sink for processor 1 12. The system may only be done by a certified service technician. Damage due to servicing that came with the cooling shroud removed. hard drives ...
Owner's Manual
Page 41
... operating frequency can be 1600 MT/s, 1333 MT/s, 1066 MT/s, or 800 MT/s depending on: • DIMM type (UDIMM, RDIMM, or LRDIMM) NOTE: PowerEdge R720xd with 3.5 inch hard-drive configuration does not support LRDIMMs due to processor 2. 41 In each channel, the release levers of 12 sockets, one set is organized into two...
... operating frequency can be 1600 MT/s, 1333 MT/s, 1066 MT/s, or 800 MT/s depending on: • DIMM type (UDIMM, RDIMM, or LRDIMM) NOTE: PowerEdge R720xd with 3.5 inch hard-drive configuration does not support LRDIMMs due to processor 2. 41 In each channel, the release levers of 12 sockets, one set is organized into two...
Owner's Manual
Page 49
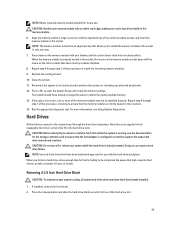
... card edge, making sure not to format. Close the system. 11. Hard Drives All hard drives connect to the system board through step 7 of this procedure, checking to support hot-swap hard drive removal and insertion. If the value is incorrect, one way. 7. Press.... Repeat step 4 through step 7 of this procedure to be installed properly. The system should have hard-drive blanks installed. 1. Hard drives are firmly seated in hotswappable hard-drive carriers that have been tested and approved for the formatting to install the remaining memory modules. 9. Press...
... card edge, making sure not to format. Close the system. 11. Hard Drives All hard drives connect to the system board through step 7 of this procedure, checking to support hot-swap hard drive removal and insertion. If the value is incorrect, one way. 7. Press.... Repeat step 4 through step 7 of this procedure to be installed properly. The system should have hard-drive blanks installed. 1. Hard drives are firmly seated in hotswappable hard-drive carriers that have been tested and approved for the formatting to install the remaining memory modules. 9. Press...
Owner's Manual
Page 50
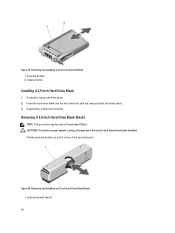
hard-drive blank 2. Removing and Installing a 2.5 Inch Hard-Drive Blank (Back) 1. Removing A 2.5 Inch Hard-Drive Blank (Back) NOTE: This procedure applies only to PowerEdge R720xd. CAUTION: To maintain proper system cooling, all empty hard-drive slots must have drive blanks installed. Pull the hard-drive blank out until the release button clicks into place. 3. hard-drive blank (back) 50 release button Installing A 2.5 Inch Hard-Drive Blank 1. Figure...
hard-drive blank 2. Removing and Installing a 2.5 Inch Hard-Drive Blank (Back) 1. Removing A 2.5 Inch Hard-Drive Blank (Back) NOTE: This procedure applies only to PowerEdge R720xd. CAUTION: To maintain proper system cooling, all empty hard-drive slots must have drive blanks installed. Pull the hard-drive blank out until the release button clicks into place. 3. hard-drive blank (back) 50 release button Installing A 2.5 Inch Hard-Drive Blank 1. Figure...
Owner's Manual
Page 51
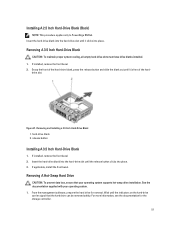
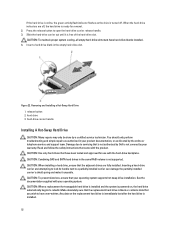
... information, see the documentation for removal. Installing A 2.5 Inch Hard-Drive Blank (Back) NOTE: This procedure applies only to PowerEdge R720xd. Insert the hard-drive blank into place. Removing A 3.5 Inch Hard-Drive Blank CAUTION: To maintain proper system cooling, all empty hard-drive slots must have drive blanks installed. 1. drive slot. Removing A Hot-Swap Hard Drive CAUTION: To prevent data loss, ensure that the...
... information, see the documentation for removal. Installing A 2.5 Inch Hard-Drive Blank (Back) NOTE: This procedure applies only to PowerEdge R720xd. Insert the hard-drive blank into place. Removing A 3.5 Inch Hard-Drive Blank CAUTION: To maintain proper system cooling, all empty hard-drive slots must have drive blanks installed. 1. drive slot. Removing A Hot-Swap Hard Drive CAUTION: To prevent data loss, ensure that the...
Owner's Manual
Page 52
... authorized by Dell is installed. 52 Press the release button to have hard-drive blanks installed. 4. CAUTION: To maintain proper system cooling, all empty hard-drive slots must have over-written. release button 2. Damage due to servicing that you wish to open the hard-drive carrier release handle. 3. Figure 22. When the hard-drive indicators are fully installed. hard drive 3. hard-drive carrier...
... authorized by Dell is installed. 52 Press the release button to have hard-drive blanks installed. 4. CAUTION: To maintain proper system cooling, all empty hard-drive slots must have over-written. release button 2. Damage due to servicing that you wish to open the hard-drive carrier release handle. 3. Figure 22. When the hard-drive indicators are fully installed. hard drive 3. hard-drive carrier...
Owner's Manual
Page 53
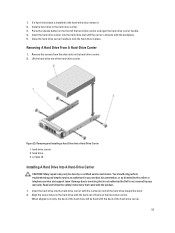
... and follow the safety instructions that is not authorized by Dell is installed in your warranty. Align the screw holes on the hard drive with the product. 1. When aligned correctly, the back of the hard-drive carrier. 53 Removing A Hard Drive From A Hard-Drive Carrier 1. hard-drive carrier 2. Figure 23. hard drive 3. If a hard-drive blank is not covered by your product documentation, or as...
... and follow the safety instructions that is not authorized by Dell is installed in your warranty. Align the screw holes on the hard drive with the product. 1. When aligned correctly, the back of the hard-drive carrier. 53 Removing A Hard Drive From A Hard-Drive Carrier 1. hard-drive carrier 2. Figure 23. hard drive 3. If a hard-drive blank is not covered by your product documentation, or as...
Owner's Manual
Page 54
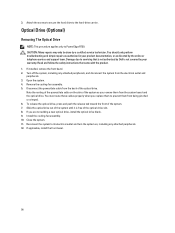
...peripherals, and disconnect the system from being pinched or crimped. 6. Slide the optical drive out of the system until it is not covered by Dell is free of the optical drive. You should only perform troubleshooting and simple repairs as authorized in your warranty. Open...system board and the optical drive. 3. Attach the screws to secure the hard drive to PowerEdge R720. Optical Drive (Optional) Removing The Optical Drive NOTE: This procedure applies only to the hard-drive carrier. If installed, remove the front bezel. 2. To release the optical drive, press and push the ...
...peripherals, and disconnect the system from being pinched or crimped. 6. Slide the optical drive out of the system until it is not covered by Dell is free of the optical drive. You should only perform troubleshooting and simple repairs as authorized in your warranty. Open...system board and the optical drive. 3. Attach the screws to secure the hard drive to PowerEdge R720. Optical Drive (Optional) Removing The Optical Drive NOTE: This procedure applies only to the hard-drive carrier. If installed, remove the front bezel. 2. To release the optical drive, press and push the ...


