Quick Reference Guide
Page 3
... Power Management Settings 17 Charging the Battery 17 Replacing the Battery 17 Storing a Battery 18 Troubleshooting 19 Lockups and Software Problems 19 Dell Diagnostics 20 When to Use the Dell Diagnostics 20 Starting the Dell Diagnostics From Your Hard Drive 21 Starting the Dell Diagnostics From the Drivers and Utilities Media 21 Dell Diagnostics Main Menu 22 Index 25...
... Power Management Settings 17 Charging the Battery 17 Replacing the Battery 17 Storing a Battery 18 Troubleshooting 19 Lockups and Software Problems 19 Dell Diagnostics 20 When to Use the Dell Diagnostics 20 Starting the Dell Diagnostics From Your Hard Drive 21 Starting the Dell Diagnostics From the Drivers and Utilities Media 21 Dell Diagnostics Main Menu 22 Index 25...
Quick Reference Guide
Page 13
... You can install an optional second battery in maximum performance mode (see "Checking the Battery Charge" on page 17). Replace the battery only with household waste. Damaged batteries may increase the risk of fire or... explosion. You can also set power management options to a CD or DVD. See "Battery Disposal" in the battery bay. For best results, operate the computer with the main battery installed at all times. Keep the battery away from Dell. Using a Battery Battery...
... You can install an optional second battery in maximum performance mode (see "Checking the Battery Charge" on page 17). Replace the battery only with household waste. Damaged batteries may increase the risk of fire or... explosion. You can also set power management options to a CD or DVD. See "Battery Disposal" in the battery bay. For best results, operate the computer with the main battery installed at all times. Keep the battery away from Dell. Using a Battery Battery...
Quick Reference Guide
Page 15
...lights appear, less than 80 percent of its original charge capacity remains. You can change when you should consider replacing the battery. Quick Reference Guide 15 Each light represents incremental degradation. Then connect the computer to optimize your online User's Guide for the... and click Help. NOTICE: If your work immediately after a predetermined period of inactivity (a time-out). To check the battery health using the Battery Meter in Dell QuickSet. See "Specifications" in your computer's power usage. These options can also be set to the same operating state it...
...lights appear, less than 80 percent of its original charge capacity remains. You can change when you should consider replacing the battery. Quick Reference Guide 15 Each light represents incremental degradation. Then connect the computer to optimize your online User's Guide for the... and click Help. NOTICE: If your work immediately after a predetermined period of inactivity (a time-out). To check the battery health using the Battery Meter in Dell QuickSet. See "Specifications" in your computer's power usage. These options can also be set to the same operating state it...
Quick Reference Guide
Page 17
...the Battery NOTE: With Dell™ ExpressCharge™, when the computer is too hot to configure the power management settings on the area where you connect the computer to 100 percent in your computer. For more information about 1 hour and to an electrical outlet. Replacing the Battery ... click the question mark icon on the title bar and then click on your online User's Guide. Replace the battery only with the computer turned on any other computers with a battery, see "Using Multimedia" in the Power Management Wizard. • To access the Power Options Properties...
...the Battery NOTE: With Dell™ ExpressCharge™, when the computer is too hot to configure the power management settings on the area where you connect the computer to 100 percent in your computer. For more information about 1 hour and to an electrical outlet. Replacing the Battery ... click the question mark icon on the title bar and then click on your online User's Guide. Replace the battery only with the computer turned on any other computers with a battery, see "Using Multimedia" in the Power Management Wizard. • To access the Power Options Properties...

Quick Reference Guide
Page 18
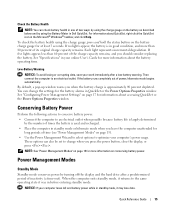
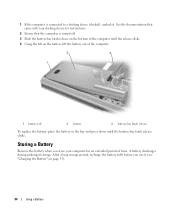
... release on the bottom of the computer until the battery-bay latch release clicks. After a long storage period, recharge the battery fully before you store your docking device for an extended period of the computer. 2 3 1 1 battery tab 2 battery 3 battery-bay latch release To replace the battery, place the battery in the bay and press down until the release...
... release on the bottom of the computer until the battery-bay latch release clicks. After a long storage period, recharge the battery fully before you store your docking device for an extended period of the computer. 2 3 1 1 battery tab 2 battery 3 battery-bay latch release To replace the battery, place the battery in the bay and press down until the release...
User's Guide
Page 4
Replacing the Battery 33 Storing a Battery 34 4 Using the Keyboard Numeric Keypad 35 Key Combinations 35 System Functions 35 Battery 36 Display Functions 36 Power Management 36 Microsoft® Windows® Logo Key Functions 36 Touch Pad 37 Customizing the Touch Pad and Track Stick ...
Replacing the Battery 33 Storing a Battery 34 4 Using the Keyboard Numeric Keypad 35 Key Combinations 35 System Functions 35 Battery 36 Display Functions 36 Power Management 36 Microsoft® Windows® Logo Key Functions 36 Touch Pad 37 Customizing the Touch Pad and Track Stick ...
User's Guide
Page 9
14 Adding and Replacing Parts Before You Begin 107 Recommended Tools 107 Turning Off Your Computer 107 Before Working Inside Your Computer 107 Hard Drive 108 Returning a Hard Drive to Dell 110 Media Bay 110 Removing the Device Security Screw 110 Removing and Installing Media...Network (WWAN) Cards . . 122 FCM (Flash Cache Module 123 Internal Card With Bluetooth® Wireless Technology 125 Coin-Cell Battery 126 15 Dell™ QuickSet 16 Specifications 17 Getting Help Obtaining Assistance 139 Technical Support and Customer Service 139 DellConnect 140 Online Services 140 AutoTech...
14 Adding and Replacing Parts Before You Begin 107 Recommended Tools 107 Turning Off Your Computer 107 Before Working Inside Your Computer 107 Hard Drive 108 Returning a Hard Drive to Dell 110 Media Bay 110 Removing the Device Security Screw 110 Removing and Installing Media...Network (WWAN) Cards . . 122 FCM (Flash Cache Module 123 Internal Card With Bluetooth® Wireless Technology 125 Coin-Cell Battery 126 15 Dell™ QuickSet 16 Specifications 17 Getting Help Obtaining Assistance 139 Technical Support and Customer Service 139 DellConnect 140 Online Services 140 AutoTech...

User's Guide
Page 25
... the fan when the computer gets hot. Bottom View 6 1 2 5 1 battery-bay latch release 4 docking-device connector 4 3 2 battery 5 fan air vents 3 memory module cover 6 hard drive B A T T E R Y - Lets you can damage the computer or cause a fire. H A R D D R I C E C O N N E C T O R - See "Replacing the Battery" on page 29). Releases the battery. D E V I V E - See the Dell documentation that contains the second memory module (see "Using...
... the fan when the computer gets hot. Bottom View 6 1 2 5 1 battery-bay latch release 4 docking-device connector 4 3 2 battery 5 fan air vents 3 memory module cover 6 hard drive B A T T E R Y - Lets you can damage the computer or cause a fire. H A R D D R I C E C O N N E C T O R - See "Replacing the Battery" on page 29). Releases the battery. D E V I V E - See the Dell documentation that contains the second memory module (see "Using...
User's Guide
Page 29
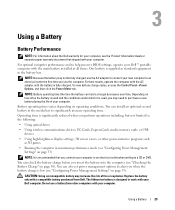
... your computer. CAUTION: Using an incompatible battery may need to help preserve BIOS settings, operate your computer. You can check the battery charge before you use a battery from Dell. Replace the battery only with your computer. Operating time is... recommended that shipped with a compatible battery purchased from other power-intensive programs such as standard equipment in the battery bay. One battery is fully charged. To view battery...
... your computer. CAUTION: Using an incompatible battery may need to help preserve BIOS settings, operate your computer. You can check the battery charge before you use a battery from Dell. Replace the battery only with your computer. Operating time is... recommended that shipped with a compatible battery purchased from other power-intensive programs such as standard equipment in the battery bay. One battery is fully charged. To view battery...

User's Guide
Page 31
...for more information about accessing QuickSet or the Power Options Properties window. If the battery runs completely out of its original charge capacity remains. You can change when you should consider replacing the battery. NOTE: See "Power Management Modes" on page 31 for more than 60... outlet. See "Configuring Power Management Settings" on page 33 for information about the battery operating time. For information about QuickSet, right-click the QuickSet icon in Dell QuickSet. Low-Battery Warning NOTICE: To avoid losing or corrupting data, save your computer loses AC and...
...for more information about accessing QuickSet or the Power Options Properties window. If the battery runs completely out of its original charge capacity remains. You can change when you should consider replacing the battery. NOTE: See "Power Management Modes" on page 31 for more than 60... outlet. See "Configuring Power Management Settings" on page 33 for information about the battery operating time. For information about QuickSet, right-click the QuickSet icon in Dell QuickSet. Low-Battery Warning NOTICE: To avoid losing or corrupting data, save your computer loses AC and...
User's Guide
Page 33
.... Charging the Battery NOTE: With Dell™ ExpressCharge™, when the computer is longer with a compatible battery purchased from the computer to continue charging the battery. Then connect the computer to an electrical outlet to avoid possible connector damage. To remove the battery: Using a Battery 33 When you like. For more information about replacing the second battery, which...
.... Charging the Battery NOTE: With Dell™ ExpressCharge™, when the computer is longer with a compatible battery purchased from the computer to continue charging the battery. Then connect the computer to an electrical outlet to avoid possible connector damage. To remove the battery: Using a Battery 33 When you like. For more information about replacing the second battery, which...
User's Guide
Page 34
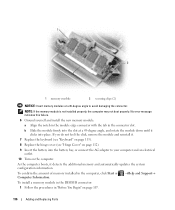
See the documentation that the computer is connected to a docking device (docked), undock it (see "Charging the Battery" on the battery, lift the battery out of the computer. 2 3 1 1 battery tab 2 battery 3 battery-bay latch release To replace the battery, place the battery in the bay and press down until the release clicks. 4 Using the tab on page 33). 34 Using...
See the documentation that the computer is connected to a docking device (docked), undock it (see "Charging the Battery" on the battery, lift the battery out of the computer. 2 3 1 1 battery tab 2 battery 3 battery-bay latch release To replace the battery, place the battery in the bay and press down until the release clicks. 4 Using the tab on page 33). 34 Using...
User's Guide
Page 82
... ROM apparently failed. A chip on the system board may be malfunctioning. O F - D A Y C L O C K L O S T P O W E R - The reserve battery that you want to check the file structure on page 115) and, if necessary, replace them . D A Y N O T S E T - The time or date stored in the Dell Diagnostics (see "Dell Diagnostics" on page 108). If the hard drive is your computer to an...
... ROM apparently failed. A chip on the system board may be malfunctioning. O F - D A Y C L O C K L O S T P O W E R - The reserve battery that you want to check the file structure on page 115) and, if necessary, replace them . D A Y N O T S E T - The time or date stored in the Dell Diagnostics (see "Dell Diagnostics" on page 108). If the hard drive is your computer to an...
User's Guide
Page 83
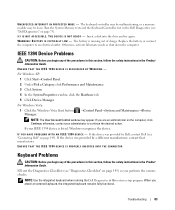
... S N O T A C C E S S I N P R O T E C T E D M O D E - Replace the battery, or connect the computer to continue the desired action. ENSURE THAT THE IEEE 1394 DEVICE IS RECOGNIZED BY WINDOWS - If your administrator to an ... DEVICE IS PROPERLY INSERTED INTO THE CONNECTOR Keyboard Problems CAUTION: Before you begin any of charge. Fill out the Diagnostics Checklist (see "Contacting Dell" on page 73). The battery is listed, Windows recognizes the device. If you attach an external keyboard, the integrated keyboard remains fully functional. I F Y O U H A V E P R O B L E M S W I T H ...
... S N O T A C C E S S I N P R O T E C T E D M O D E - Replace the battery, or connect the computer to continue the desired action. ENSURE THAT THE IEEE 1394 DEVICE IS RECOGNIZED BY WINDOWS - If your administrator to an ... DEVICE IS PROPERLY INSERTED INTO THE CONNECTOR Keyboard Problems CAUTION: Before you begin any of charge. Fill out the Diagnostics Checklist (see "Contacting Dell" on page 73). The battery is listed, Windows recognizes the device. If you attach an external keyboard, the integrated keyboard remains fully functional. I F Y O U H A V E P R O B L E M S W I T H ...

User's Guide
Page 87
...I T H A C A R D N O T P R O V I N T O T H E C O M P U T E R - Depending on page 49. P L U G T H E A / C P O W E R A D A P T E R I D E D B Y D E L L - C H E C K Y O U R N E T W O R K S E T T I T H A D E L L - C H E C K T H E C A R D - I F Y O U H A V E P R O B L E M S W I N G S - Contact the PC Card manufacturer. Replace the network cable. PC Card or ExpressCard Problems CAUTION: Before you may be depleted. 1 Reinstall the battery. 2 Use the AC adapter to connect the computer to turn on page 143). Ensure that the card is lit or blinking, the computer has power...
...I T H A C A R D N O T P R O V I N T O T H E C O M P U T E R - Depending on page 49. P L U G T H E A / C P O W E R A D A P T E R I D E D B Y D E L L - C H E C K Y O U R N E T W O R K S E T T I T H A D E L L - C H E C K T H E C A R D - I F Y O U H A V E P R O B L E M S W I N G S - Contact the PC Card manufacturer. Replace the network cable. PC Card or ExpressCard Problems CAUTION: Before you may be depleted. 1 Reinstall the battery. 2 Use the AC adapter to connect the computer to turn on page 143). Ensure that the card is lit or blinking, the computer has power...
User's Guide
Page 97
... keyboard and palm rest and close the display. • Use the optional Dell™ carrying case to pack the computer and its accessories together safely. • Avoid packing the computer with items such as possible, replace any devices installed in the module bay with you. • Shut down ... NOTICE: If the computer has been exposed to extreme temperatures, allow it to acclimate to carry with the Dell TravelLite™ module. • Fully charge the main battery and any spare batteries that it in a safe place away from hazards such as your name, address, and phone number in this...
... keyboard and palm rest and close the display. • Use the optional Dell™ carrying case to pack the computer and its accessories together safely. • Avoid packing the computer with items such as possible, replace any devices installed in the module bay with you. • Shut down ... NOTICE: If the computer has been exposed to extreme temperatures, allow it to acclimate to carry with the Dell TravelLite™ module. • Fully charge the main battery and any spare batteries that it in a safe place away from hazards such as your name, address, and phone number in this...

User's Guide
Page 108
Some cables have a connector with care. NOTICE: To avoid damaging the system board, you must remove the main battery before you service the computer. 5 Remove the battery (see "Replacing the Battery" on page 33). 6 Press the power button to install an operating system, drivers, and utilities on the new hard ... is not covered by the online or telephone service and support team. Damage due to prevent the computer cover from sources other than Dell. if you connect a cable, ensure that came with the product. NOTICE: To avoid damaging the computer, perform the following steps ...
Some cables have a connector with care. NOTICE: To avoid damaging the system board, you must remove the main battery before you service the computer. 5 Remove the battery (see "Replacing the Battery" on page 33). 6 Press the power button to install an operating system, drivers, and utilities on the new hard ... is not covered by the online or telephone service and support team. Damage due to prevent the computer cover from sources other than Dell. if you connect a cable, ensure that came with the product. NOTICE: To avoid damaging the computer, perform the following steps ...
User's Guide
Page 115
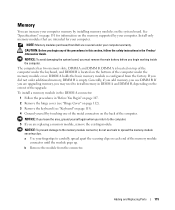
.... If you begin working inside the computer. If you are upgrading memory, you are replacing a memory module, remove the existing module: NOTICE: To prevent damage to the memory module... 113). 4 Ground yourself by installing memory modules on the system board. NOTE: Memory modules purchased from Dell are intended for information on the memory supported by your computer. To install a memory module in the DIMM... Guide. NOTICE: To avoid damaging the system board, you must remove the main battery before you use tools to carefully spread apart the securing clips on the bottom of...
.... If you begin working inside the computer. If you are upgrading memory, you are replacing a memory module, remove the existing module: NOTICE: To prevent damage to the memory module... 113). 4 Ground yourself by installing memory modules on the system board. NOTE: Memory modules purchased from Dell are intended for information on the memory supported by your computer. To install a memory module in the DIMM... Guide. NOTICE: To avoid damaging the system board, you must remove the main battery before you use tools to carefully spread apart the securing clips on the bottom of...
User's Guide
Page 116
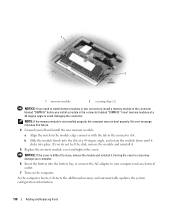
... If you do not feel the click, remove the module and reinstall it. 7 Replace the keyboard (see "Keyboard" on page 113). 8 Replace the hinge cover (see "Hinge Cover" on page 112). 9 Insert the battery into place. To confirm the amount of memory installed in the computer, click Start or Computer Information. →Help... rotate the module down until it detects the additional memory and automatically updates the system configuration information. As the computer boots, it clicks into the battery bay, or connect the AC adapter to avoid damaging the connector.
... If you do not feel the click, remove the module and reinstall it. 7 Replace the keyboard (see "Keyboard" on page 113). 8 Replace the hinge cover (see "Hinge Cover" on page 112). 9 Insert the battery into place. To confirm the amount of memory installed in the computer, click Start or Computer Information. →Help... rotate the module down until it detects the additional memory and automatically updates the system configuration information. As the computer boots, it clicks into the battery bay, or connect the AC adapter to avoid damaging the connector.
User's Guide
Page 118
NOTICE: If the cover is not installed properly, the computer may damage your computer. 6 Insert the battery into the battery bay, or connect the AC adapter to your computer and an electrical outlet. 7 Turn on the computer. b Slide the module firmly into place.... do not feel the click, remove the module and reinstall it detects the additional memory and automatically updates the system configuration information. 118 Adding and Replacing Parts No error message indicates this failure. 4 Ground yourself and install the new memory module: a Align the notch in the module edge connector...
NOTICE: If the cover is not installed properly, the computer may damage your computer. 6 Insert the battery into the battery bay, or connect the AC adapter to your computer and an electrical outlet. 7 Turn on the computer. b Slide the module firmly into place.... do not feel the click, remove the module and reinstall it detects the additional memory and automatically updates the system configuration information. 118 Adding and Replacing Parts No error message indicates this failure. 4 Ground yourself and install the new memory module: a Align the notch in the module edge connector...


