
Specifications (SWF/PDF)
Page 3
... Stand Cover 16 5 Stand 17 Removing the Stand 17 Replacing the Stand 18 6 Back Cover 19 Removing the Back Cover 19 Replacing the Back Cover 20 7 Hard Drive 21 Removing the Hard Drive 21 Replacing the Hard Drive 23 8 Optical Drive 25 Removing the Optical Drive 25 Replacing the Optical Drive 26 9 B-CAS Card (Japan Only 27 Removing the B-CAS Card 27 Replacing the...
... Stand Cover 16 5 Stand 17 Removing the Stand 17 Replacing the Stand 18 6 Back Cover 19 Removing the Back Cover 19 Replacing the Back Cover 20 7 Hard Drive 21 Removing the Hard Drive 21 Replacing the Hard Drive 23 8 Optical Drive 25 Removing the Optical Drive 25 Replacing the Optical Drive 26 9 B-CAS Card (Japan Only 27 Removing the B-CAS Card 27 Replacing the...
Specifications (SWF/PDF)
Page 21
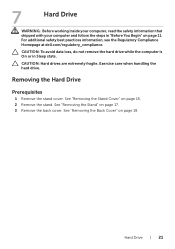
... not remove the hard drive while the computer is On or in "Before You Begin" on page 15. 2 Remove the stand. Hard Drive | 21 For additional safety best practices information, see the Regulatory Compliance Homepage at dell.com/regulatory_compliance. See "Removing the Stand" on page 19. Exercise care when handling the hard drive. Removing the Hard Drive Prerequisites 1 Remove the stand cover. See "Removing the...
... not remove the hard drive while the computer is On or in "Before You Begin" on page 15. 2 Remove the stand. Hard Drive | 21 For additional safety best practices information, see the Regulatory Compliance Homepage at dell.com/regulatory_compliance. See "Removing the Stand" on page 19. Exercise care when handling the hard drive. Removing the Hard Drive Prerequisites 1 Remove the stand cover. See "Removing the...

Specifications (SWF/PDF)
Page 22
Procedure 1 Remove the screws that secure the hard-drive assembly to the chassis. 2 Slide and lift the hard-drive assembly and then disconnect the power and data cable from the connector on the hard drive. 2 3 4 1 1 chassis 3 hard-drive assembly 2 screw (3) 4 power and data cable 3 Remove the screws that secure the hard-drive cage to the hard drive. 4 Lift the hard-drive cage off the hard drive. 1 hard-drive cage 3 screws (4) 1 23 2 hard drive 22 | Hard Drive
Procedure 1 Remove the screws that secure the hard-drive assembly to the chassis. 2 Slide and lift the hard-drive assembly and then disconnect the power and data cable from the connector on the hard drive. 2 3 4 1 1 chassis 3 hard-drive assembly 2 screw (3) 4 power and data cable 3 Remove the screws that secure the hard-drive cage to the hard drive. 4 Lift the hard-drive cage off the hard drive. 1 hard-drive cage 3 screws (4) 1 23 2 hard drive 22 | Hard Drive
Specifications (SWF/PDF)
Page 58
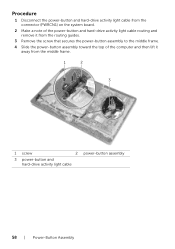
Procedure 1 Disconnect the power-button and hard-drive activity light cable from the connector (PWRCN1) on the system board. 2 Make a note of the power-button and hard-drive activity light cable routing and remove it from the routing guides. 3 Remove the screw that secures the power-button assembly to the middle frame. 4 Slide the power-button assembly toward the top of the computer and then lift it away from the middle frame. 1 2 3 1 screw 2 power-button assembly 3 power-button and hard-drive activity light cable 58 | Power-Button Assembly
Procedure 1 Disconnect the power-button and hard-drive activity light cable from the connector (PWRCN1) on the system board. 2 Make a note of the power-button and hard-drive activity light cable routing and remove it from the routing guides. 3 Remove the screw that secures the power-button assembly to the middle frame. 4 Slide the power-button assembly toward the top of the computer and then lift it away from the middle frame. 1 2 3 1 screw 2 power-button assembly 3 power-button and hard-drive activity light cable 58 | Power-Button Assembly

Specifications (SWF/PDF)
Page 73
... that shipped with your computer and follow the steps in "Removing the Hard Drive" on page 21. 6 Remove the converter board. See "Removing the Back Cover" on page 19. 4 Follow the instructions from step 1 to step 3 in "Removing the Optical Drive" on page 25. 5 Follow the instructions from step 1... to step 2 in "Before You Begin" on page 11. See "Removing the Fan" on page 29. 7 Remove the fan. Display Panel | 73 For additional safety best practices information, see the Regulatory Compliance Homepage at dell.com...
... that shipped with your computer and follow the steps in "Removing the Hard Drive" on page 21. 6 Remove the converter board. See "Removing the Back Cover" on page 19. 4 Follow the instructions from step 1 to step 3 in "Removing the Optical Drive" on page 25. 5 Follow the instructions from step 1... to step 2 in "Before You Begin" on page 11. See "Removing the Fan" on page 29. 7 Remove the fan. Display Panel | 73 For additional safety best practices information, see the Regulatory Compliance Homepage at dell.com...

Specifications (SWF/PDF)
Page 79
... 3 in "Removing the Optical Drive" on page 25. 5 Follow the instructions from step 1 to step 2 in "Before You Begin" on page 21. 6 Remove the converter board. 25 Infrared (IR) Receiver WARNING: Before working inside your computer, read the safety information that shipped with your computer and follow the steps in "Removing the Hard Drive" on page...
... 3 in "Removing the Optical Drive" on page 25. 5 Follow the instructions from step 1 to step 2 in "Before You Begin" on page 21. 6 Remove the converter board. 25 Infrared (IR) Receiver WARNING: Before working inside your computer, read the safety information that shipped with your computer and follow the steps in "Removing the Hard Drive" on page...

Specifications (SWF/PDF)
Page 83
... Frame Prerequisites 1 Remove the stand cover. 26 Middle Frame WARNING: Before working inside your computer, read the safety information that shipped with your computer and follow the steps in "Removing the Hard Drive" on page 35. 11 Remove the system board. For additional safety best practices information, see the Regulatory Compliance Homepage at dell.com/regulatory_compliance.
... Frame Prerequisites 1 Remove the stand cover. 26 Middle Frame WARNING: Before working inside your computer, read the safety information that shipped with your computer and follow the steps in "Removing the Hard Drive" on page 35. 11 Remove the system board. For additional safety best practices information, see the Regulatory Compliance Homepage at dell.com/regulatory_compliance.

Specifications (SWF/PDF)
Page 87
... "Removing the Hard Drive" on page 21. 6 Remove the converter board. See "Removing the Fan" on page 73. 11 Remove the middle frame. See "Removing the Converter Board" on page 15. 2 Remove the stand. See "Removing the Stand Cover" on page 29. 7 Remove the fan. For additional safety best practices information, see the Regulatory Compliance Homepage at dell.com/regulatory_compliance. Removing the...
... "Removing the Hard Drive" on page 21. 6 Remove the converter board. See "Removing the Fan" on page 73. 11 Remove the middle frame. See "Removing the Converter Board" on page 15. 2 Remove the stand. See "Removing the Stand Cover" on page 29. 7 Remove the fan. For additional safety best practices information, see the Regulatory Compliance Homepage at dell.com/regulatory_compliance. Removing the...

Specifications (SWF/PDF)
Page 91
... the Regulatory Compliance Homepage at dell.com/regulatory_compliance. See "Removing the Stand Cover" on page 55. 8 Remove the system-board shield. See "Removing the Display Panel" on page 83. 12 Remove the infrared receiver. Removing the Display Bezel Prerequisites 1 Remove the stand cover. 28 Display...shipped with your computer and follow the steps in "Removing the Hard Drive" on page 21. 6 Remove the converter board. See "Removing the Back Cover" on page 19. 4 Follow the instructions from step 1 to step 3 in "Removing the Optical Drive" on page 25. 5 Follow the instructions from ...
... the Regulatory Compliance Homepage at dell.com/regulatory_compliance. See "Removing the Stand Cover" on page 55. 8 Remove the system-board shield. See "Removing the Display Panel" on page 83. 12 Remove the infrared receiver. Removing the Display Bezel Prerequisites 1 Remove the stand cover. 28 Display...shipped with your computer and follow the steps in "Removing the Hard Drive" on page 21. 6 Remove the converter board. See "Removing the Back Cover" on page 19. 4 Follow the instructions from step 1 to step 3 in "Removing the Optical Drive" on page 25. 5 Follow the instructions from ...


