Specifications (SWF/PDF)
Page 49
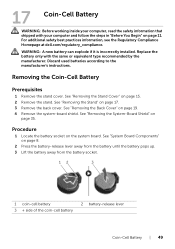
... 19. 4 Remove the system-board shield. See "Removing the Back Cover" on page 17. 3 Remove the back cover. WARNING: A new battery can explode if it is incorrectly installed. Discard used batteries according to the manufacturer's instructions. 17 Coin-Cell Battery WARNING: Before working inside...the steps in "Before You Begin" on the system board. For additional safety best practices information, see the Regulatory Compliance Homepage at dell.com/regulatory_compliance. Removing the Coin-Cell Battery Prerequisites 1 Remove the stand cover. Procedure 1 Locate the battery socket on page 11. See...
... 19. 4 Remove the system-board shield. See "Removing the Back Cover" on page 17. 3 Remove the back cover. WARNING: A new battery can explode if it is incorrectly installed. Discard used batteries according to the manufacturer's instructions. 17 Coin-Cell Battery WARNING: Before working inside...the steps in "Before You Begin" on the system board. For additional safety best practices information, see the Regulatory Compliance Homepage at dell.com/regulatory_compliance. Removing the Coin-Cell Battery Prerequisites 1 Remove the stand cover. Procedure 1 Locate the battery socket on page 11. See...
Specifications (SWF/PDF)
Page 50
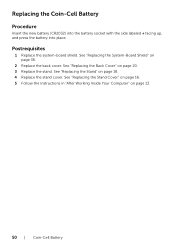
Replacing the Coin-Cell Battery Procedure Insert the new battery (CR2032) into the battery socket with the side labeled + facing up, and press the battery into place. See "Replacing the Back Cover" on page 36. 2 Replace the back cover. See "Replacing the System-Board Shield" on page 20. 3 Replace the stand. See "Replacing the Stand Cover" on page 16. 5 Follow the instructions in "After Working Inside Your Computer" on page 18. 4 Replace the stand cover. See "Replacing the Stand" on page 13. 50 | Coin-Cell Battery Postrequisites 1 Replace the system-board shield.
Replacing the Coin-Cell Battery Procedure Insert the new battery (CR2032) into the battery socket with the side labeled + facing up, and press the battery into place. See "Replacing the Back Cover" on page 36. 2 Replace the back cover. See "Replacing the System-Board Shield" on page 20. 3 Replace the stand. See "Replacing the Stand Cover" on page 16. 5 Follow the instructions in "After Working Inside Your Computer" on page 18. 4 Replace the stand cover. See "Replacing the Stand" on page 13. 50 | Coin-Cell Battery Postrequisites 1 Replace the system-board shield.

Specifications (SWF/PDF)
Page 66
Leave the release lever extended in the release position so that secures it from the tab that the socket is ready for the new processor. 3 Gently lift the processor to remove it . 2 Extend the release lever completely to open the processor cover. Procedure 1 Press the release lever down on the processor cover and then pull it outward to release it from the socket. 1 3 2 1 release lever 3 processor cover 5 processor 2 tab 4 socket 5 4 66 | Processor
Leave the release lever extended in the release position so that secures it from the tab that the socket is ready for the new processor. 3 Gently lift the processor to remove it . 2 Extend the release lever completely to open the processor cover. Procedure 1 Press the release lever down on the processor cover and then pull it outward to release it from the socket. 1 3 2 1 release lever 3 processor cover 5 processor 2 tab 4 socket 5 4 66 | Processor

Specifications (SWF/PDF)
Page 67
... correctly in the socket, close the processor cover. 6 Pivot the release lever down and place it to that position. Replacing the Processor Procedure 1 Unpack the new processor, being careful not to touch the underside of the processor and socket.
... correctly in the socket, close the processor cover. 6 Pivot the release lever down and place it to that position. Replacing the Processor Procedure 1 Unpack the new processor, being careful not to touch the underside of the processor and socket.
Specifications (SWF/PDF)
Page 68
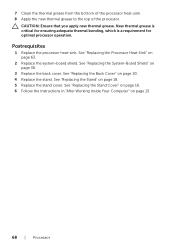
... | Processor See "Replacing the Stand Cover" on page 16. 6 Follow the instructions in "After Working Inside Your Computer" on page 18. 5 Replace the stand cover. New thermal grease is critical for ensuring adequate thermal bonding, which is a requirement for optimal processor operation. See "Replacing the Back Cover" on page 36. 3 Replace.... 2 Replace the system-board shield. Postrequisites 1 Replace the processor heat-sink. 7 Clean the thermal grease from the bottom of the processor heat-sink. 8 Apply the new thermal grease to the top of the processor. CAUTION: Ensure that you apply...
... | Processor See "Replacing the Stand Cover" on page 16. 6 Follow the instructions in "After Working Inside Your Computer" on page 18. 5 Replace the stand cover. New thermal grease is critical for ensuring adequate thermal bonding, which is a requirement for optimal processor operation. See "Replacing the Back Cover" on page 36. 3 Replace.... 2 Replace the system-board shield. Postrequisites 1 Replace the processor heat-sink. 7 Clean the thermal grease from the bottom of the processor heat-sink. 8 Apply the new thermal grease to the top of the processor. CAUTION: Ensure that you apply...


