Dell Inspiron One 2020 Support Question
Dell Inspiron One 2020 Support Question
Find answers below for this question about Dell Inspiron One 2020.Need a Dell Inspiron One 2020 manual? We have 2 online manuals for this item!
Question posted by karNRBCG on August 5th, 2014
Dell Inspiron One 2020 Wont Turn On
The person who posted this question about this Dell product did not include a detailed explanation. Please use the "Request More Information" button to the right if more details would help you to answer this question.
Current Answers
Answer #1: Posted by techyagent on August 6th, 2014 3:30 AM
techyagent

Member since:
June 17th, 2014 Points: 4,799,790

Member since:
June 17th, 2014 Points: 4,799,790
First try this
Than
- Disconnect the power cable.
- Make sure no external peripherals (keyboard and mouse) are connected.
- Press and hold the power button for 10 to 15 seconds.
- Connect the power cable and see i it makes any difference.
Than
I will recommend you to run diagnostics to check the hardware functionality:
- Turn off your system completely making sure the power light is off.
- Press and hold 'fn' key and press power button at the same time; make sure you release both simultaneously to turn on the system.
- Usually, this initiates the diagnostics.
If you find problems in hardware take it to the nearest dell service center.
Thanks
In case the diagnostics pass, check the system's functionality in 'Safe mode with Networking':
- Restart the system and keep tapping 'F8' as soon as the Dell logo appears.
- Highlight 'Safe Mode with Networking' using arrow keys and press enter.
Techygirl
Related Dell Inspiron One 2020 Manual Pages
Specifications (SWF/PDF) - Page 2

.... Information in this document to refer to change without the written permission of Dell Inc.
is a registered trademark owned by Dell under license.
Bluetooth® is strictly forbidden. disclaims any proprietary interest in this text: Dell™, the DELL logo, and Inspiron™ are trademarks of Microsoft corporation in any manner whatsoever without notice. ©...
Specifications (SWF/PDF) - Page 3

Contents
1 Technical Overview 7
Inside View of Your Computer 7 System Board Components 8
2 Before You Begin 11
Turn Off Your Computer and Connected Devices 11 Safety Instructions 11 Recommended Tools 12
3 After Working Inside Your Computer 13 4 Stand Cover 15
Removing the Stand ...
Specifications (SWF/PDF) - Page 7

... your computer and follow the steps in "Before You Begin" on page 11. For additional safety best practices information, see the Regulatory Compliance Homepage at dell.com/regulatory_compliance.
Specifications (SWF/PDF) - Page 11
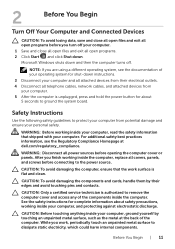
...cards, handle them by touching an unpainted metal surface, such as the metal at dell.com/regulatory_compliance.
While you are using a different operating system, see the Regulatory Compliance...: Before touching anything inside the computer, replace all covers, panels, and screws before you turn off . CAUTION: Only a certified service technician is unplugged, press and hold the power ...
Specifications (SWF/PDF) - Page 13
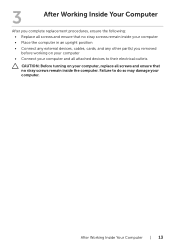
... no stray screws remain inside the computer. Failure to do so may damage your computer, replace all attached devices to their electrical outlets
CAUTION: Before turning on your computer.
Specifications (SWF/PDF) - Page 15
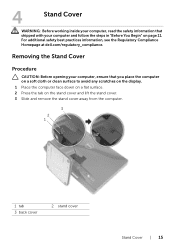
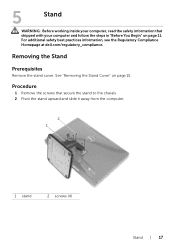
... cover away from the computer.
3 2 1
1 tab 3 back cover
2 stand cover
Stand Cover | 15 For additional safety best practices information, see the Regulatory Compliance Homepage at dell.com/regulatory_compliance.
Specifications (SWF/PDF) - Page 17
For additional safety best practices information, see the Regulatory Compliance Homepage at dell.com/regulatory_compliance. 5
Stand
WARNING: Before working inside your computer and follow the steps in "Before You Begin" on page 15. Removing the Stand
Prerequisites
Remove ...
Specifications (SWF/PDF) - Page 19
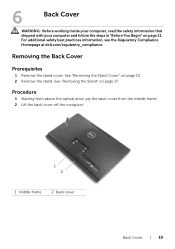
... Cover | 19 See "Removing the Stand Cover" on page 15. 2 Remove the stand.
For additional safety best practices information, see the Regulatory Compliance Homepage at dell.com/regulatory_compliance.
Specifications (SWF/PDF) - Page 21
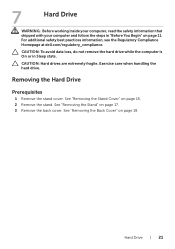
For additional safety best practices information, see the Regulatory Compliance Homepage at dell.com/regulatory_compliance. 7
Hard Drive
WARNING: Before working inside your computer, read the safety information that shipped with your computer and follow the steps in Sleep ...
Specifications (SWF/PDF) - Page 25
... You Begin" on page 19. See "Removing the Back Cover" on page 11. For additional safety best practices information, see the Regulatory Compliance Homepage at dell.com/regulatory_compliance. See "Removing the Stand" on page 17. 3 Remove the back cover.
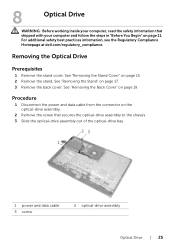
Specifications (SWF/PDF) - Page 27
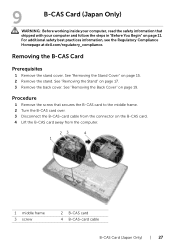
...Card (Japan Only)
WARNING: Before working inside your computer, read the safety information that secures the B-CAS card to the middle frame. 2 Turn the B-CAS card over. 3 Disconnect the B-CAS-card cable from the computer.
23
4
1
1 middle frame 3 screw
2 B-CAS ...19. For additional safety best practices information, see the Regulatory Compliance Homepage at dell.com/regulatory_compliance.
Specifications (SWF/PDF) - Page 28
Postrequisites
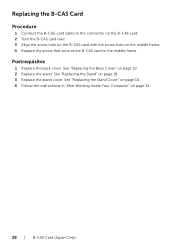
1 Replace the back cover. Replacing the B-CAS Card
Procedure
1 Connect the B-CAS-card cable to the connector on the B-CAS card. 2 Turn the B-CAS card over. 3 Align the screw hole on the B-CAS card with the screw hole on page 13.
28 | B-CAS Card (Japan Only)
See "...
Specifications (SWF/PDF) - Page 29
... You Begin" on page 19. See "Removing the Back Cover" on page 11.
For additional safety best practices information, see the Regulatory Compliance Homepage at dell.com/regulatory_compliance.
Specifications (SWF/PDF) - Page 31
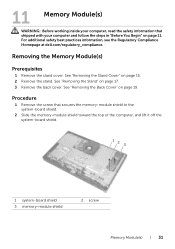
... 15. 2 Remove the stand.
Removing the Memory Module(s)
Prerequisites
1 Remove the stand cover. For additional safety best practices information, see the Regulatory Compliance Homepage at dell.com/regulatory_compliance. See "Removing the Stand Cover" on page 17. 3 Remove the back cover. See "Removing the Back Cover" on page 19.
Specifications (SWF/PDF) - Page 35
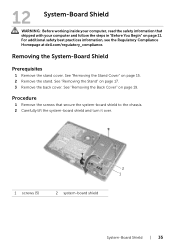
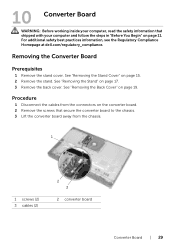
...that secure the system-board shield to the chassis. 2 Carefully lift the system-board shield and turn it over.
2 1
1 screws (5)
2 system-board shield
System-Board Shield | 35 ...on page 19. For additional safety best practices information, see the Regulatory Compliance Homepage at dell.com/regulatory_compliance.
Removing the System-Board Shield
Prerequisites
1 Remove the stand cover.
See ...
Specifications (SWF/PDF) - Page 36

... "Removing the Antenna-In Connector" on the chassis. 4 Replace the screws that secure the system-board shield to the connector on the TV-tuner card. 3 Turn the system-board shield over and align the screw holes on the
system-board shield with the screw holes on page 37.
3 2
1
1 system-board shield...
Specifications (SWF/PDF) - Page 37
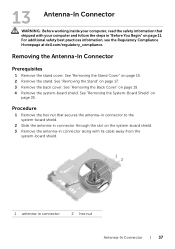
... back cover. See "Removing the Back Cover" on page 15. 2 Remove the stand. For additional safety best practices information, see the Regulatory Compliance Homepage at dell.com/regulatory_compliance. 13 Antenna-In Connector
WARNING: Before working inside your computer, read the safety information that secures the antenna-in connector to the system...
Specifications (SWF/PDF) - Page 95
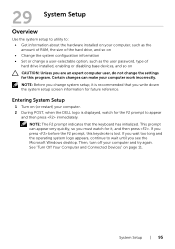
... indicates that you write down the system setup screen information for future reference. See "Turn Off Your Computer and Connected Devices" on (or restart) your computer. 2 During POST, when the DELL logo is displayed, watch for it is lost. System Setup | 95 Entering System Setup...: Unless you press before the F2 prompt, this program.
NOTE: Before you see the Microsoft Windows desktop.
Specifications (SWF/PDF) - Page 105
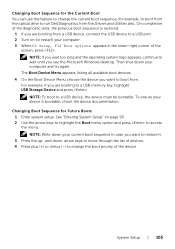
...drive to run Dell Diagnostics from a USB device, connect the USB device to a USB port. 2 Turn on page 95.... 2 Use the arrow keys to highlight the Boot menu option and press to access the menu. For example, if you are booting from the Drivers and Utilities disc. and down your computer. 3 When F2 Setup, F12 Boot Options appears in case you see the Microsoft Windows desktop...
Specifications (SWF/PDF) - Page 109
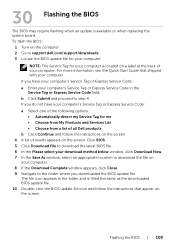
... may require flashing when an update is located on a label at the back of all Dell products b Click Continue and follow the instructions that shipped with your computer's Service Tag or...Service Tag for your computer. Flashing the BIOS | 109 To flash the BIOS:
1 Turn on the computer. 2 Go to support.dell.com/support/downloads. 3 Locate the BIOS update file for your computer:
NOTE: The Service...


