Setup Guide
Page 5
Contents Setting Up Your Inspiron Laptop 5 Before Setting Up Your Computer 5 Connect the AC Adapter 6 Connect the Network Cable (Optional 7 Press the...Enable or Disable Wireless (Optional 14 Set Up Wireless Display (Optional 16 Connect to the Internet (Optional 17 Using Your Inspiron Laptop 20 Right View Features 20 Left View Features 22 Back View Features 26 Front View Features 28 Status ... Gestures (Optional 44 Removing and Replacing the Top Cover (Optional 46 Removing and Replacing the Battery 50 Software Features 52 Dell DataSafe Online Backup 53 Dell Stage 54 3
Contents Setting Up Your Inspiron Laptop 5 Before Setting Up Your Computer 5 Connect the AC Adapter 6 Connect the Network Cable (Optional 7 Press the...Enable or Disable Wireless (Optional 14 Set Up Wireless Display (Optional 16 Connect to the Internet (Optional 17 Using Your Inspiron Laptop 20 Right View Features 20 Left View Features 22 Back View Features 26 Front View Features 28 Status ... Gestures (Optional 44 Removing and Replacing the Top Cover (Optional 46 Removing and Replacing the Battery 50 Software Features 52 Dell DataSafe Online Backup 53 Dell Stage 54 3
Setup Guide
Page 14
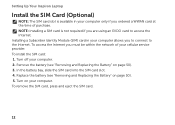
...to access the Internet. To remove the SIM card, press and eject the SIM card. 12 Turn off your computer. 2. Replace the battery (see "Removing and Replacing the Battery" on page 50). 3. To access the Internet you are using an EVDO card to the Internet. To install the SIM card: 1.... a WWAN card at the time of your cellular service provider. In the battery bay, slide the SIM card into the SIM card slot. 4. Remove the battery (see "Removing and Replacing the Battery" on your computer. Setting Up Your Inspiron Laptop Install the SIM Card (Optional) NOTE: The SIM card slot is ...
...to access the Internet. To remove the SIM card, press and eject the SIM card. 12 Turn off your computer. 2. Replace the battery (see "Removing and Replacing the Battery" on page 50). 3. To access the Internet you are using an EVDO card to the Internet. To install the SIM card: 1.... a WWAN card at the time of your cellular service provider. In the battery bay, slide the SIM card into the SIM card slot. 4. Remove the battery (see "Removing and Replacing the Battery" on your computer. Setting Up Your Inspiron Laptop Install the SIM Card (Optional) NOTE: The SIM card slot is ...
Setup Guide
Page 25
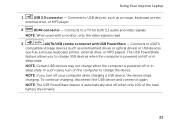
...hard drives or optical drives) or USB devices (such as a mouse, keyboard, printer, external drive, or MP3 player. 2 HDMI connector - Using Your Inspiron Laptop 1 USB 2.0 connector - Connects to USB devices, such as a mouse, keyboard, printer, external drive, or MP3 player). Connects to charge the device.... In such cases, turn off when only 10% of the total battery life remains. 23 Connects to a TV for both 5.1 audio and video signals. NOTE: Certain USB devices may not charge when the computer ...
...hard drives or optical drives) or USB devices (such as a mouse, keyboard, printer, external drive, or MP3 player. 2 HDMI connector - Using Your Inspiron Laptop 1 USB 2.0 connector - Connects to USB devices, such as a mouse, keyboard, printer, external drive, or MP3 player). Connects to charge the device.... In such cases, turn off when only 10% of the total battery life remains. 23 Connects to a TV for both 5.1 audio and video signals. NOTE: Certain USB devices may not charge when the computer ...
Setup Guide
Page 29
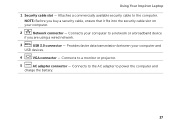
... that it fits into the security cable slot on your computer and USB devices. 4 VGA connector - Connects to power the computer and charge the battery. 27 Using Your Inspiron Laptop 1 Security cable slot - NOTE: Before you are using a wired network. 3 USB 3.0 connector - Connects to the AC adapter to a monitor or projector. 5 AC...
... that it fits into the security cable slot on your computer and USB devices. 4 VGA connector - Connects to power the computer and charge the battery. 27 Using Your Inspiron Laptop 1 Security cable slot - NOTE: Before you are using a wired network. 3 USB 3.0 connector - Connects to the AC adapter to a monitor or projector. 5 AC...

Setup Guide
Page 31
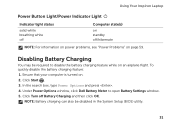
... on page 14. 29 A solid white light indicates that wireless is enabled. A solid white light indicates hard drive activity. Indicates the battery charge status. Turns on page 30. 2 Hard drive activity light - NOTE: To enable or disable wireless, see "Status Lights and Indicators"... on when wireless is enabled. Using Your Inspiron Laptop 1 Power indicator light - For more information on the battery status light, see "Status Lights and Indicators" on . 3 Battery status light - CAUTION: To avoid loss of data, never turn off the ...
... on page 14. 29 A solid white light indicates that wireless is enabled. A solid white light indicates hard drive activity. Indicates the battery charge status. Turns on page 30. 2 Hard drive activity light - NOTE: To enable or disable wireless, see "Status Lights and Indicators"... on when wireless is enabled. Using Your Inspiron Laptop 1 Power indicator light - For more information on the battery status light, see "Status Lights and Indicators" on . 3 Battery status light - CAUTION: To avoid loss of data, never turn off the ...

Setup Guide
Page 32
Using Your Inspiron Laptop Status Lights and Indicators Battery Status Light AC adapter Battery Indicator light status solid white off solid amber off Computer state(s) on/standby/off/ hibernate on/standby/off/ hibernate on/standby on/standby/off/ hibernate Battery charge status charging fully charged low battery (
Using Your Inspiron Laptop Status Lights and Indicators Battery Status Light AC adapter Battery Indicator light status solid white off solid amber off Computer state(s) on/standby/off/ hibernate on/standby/off/ hibernate on/standby on/standby/off/ hibernate Battery charge status charging fully charged low battery (
Setup Guide
Page 33
... on power problems, see "Power Problems" on . 2. NOTE: Battery charging can also be required to open Battery Settings window. 5. Click Start . 3. Under Power Options window, click Dell Battery Meter to disable the battery charging feature while on an airplane flight. In the search box, ...type Power Options and press . 4. To quickly disable the battery charging feature: 1. Ensure that your computer is turned on page 59. Using Your Inspiron Laptop Power ...
... on power problems, see "Power Problems" on . 2. NOTE: Battery charging can also be required to open Battery Settings window. 5. Click Start . 3. Under Power Options window, click Dell Battery Meter to disable the battery charging feature while on an airplane flight. In the search box, ...type Power Options and press . 4. To quickly disable the battery charging feature: 1. Ensure that your computer is turned on page 59. Using Your Inspiron Laptop Power ...
Setup Guide
Page 37
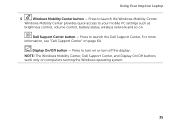
... Center. Windows Mobility Center provides quick access to launch the Windows Mobility Center. Dell Support Center button - Press to your mobile PC settings such as brightness control, volume control, battery status, wireless network and so on or turn off the display. Using Your Inspiron Laptop 5 Windows Mobility Center button - For more information, see...
... Center. Windows Mobility Center provides quick access to launch the Windows Mobility Center. Dell Support Center button - Press to your mobile PC settings such as brightness control, volume control, battery status, wireless network and so on or turn off the display. Using Your Inspiron Laptop 5 Windows Mobility Center button - For more information, see...
Setup Guide
Page 52
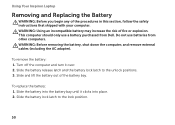
...Inspiron Laptop Removing and Replacing the Battery WARNING: Before you begin any of the battery bay. To remove the battery: 1. Do not use a battery purchased from other computers. Slide the battery release latch and the battery lock latch to the lock position. 50 Slide the battery into place. 2. WARNING: Before removing the battery...it clicks into the battery bay until it over. 2. To replace the battery: 1. WARNING: Using an incompatible battery may increase the risk of fire or explosion. This computer should only use batteries from Dell. Slide the battery lock latch to the ...
...Inspiron Laptop Removing and Replacing the Battery WARNING: Before you begin any of the battery bay. To remove the battery: 1. Do not use a battery purchased from other computers. Slide the battery release latch and the battery lock latch to the lock position. 50 Slide the battery into place. 2. WARNING: Before removing the battery...it clicks into the battery bay until it over. 2. To replace the battery: 1. WARNING: Using an incompatible battery may increase the risk of fire or explosion. This computer should only use batteries from Dell. Slide the battery lock latch to the ...

Setup Guide
Page 94
... resolution (graphics table mode) Size: Height 240 cpi 56 mm (2.20 inches) Width 100 mm (3.94 inches) Battery 6-cell "smart" lithium ion: Height 22.80 mm (0.90 inches) Width 214 mm (8.43 inches) 92 Battery Depth 57.64 mm (2.27 inches) Weight 0.34 kg (0.75 lb) 9-cell "smart" lithium ion: Height 22... 78.76 mm (3.10 inches) Weight 0.52 kg (1.15 lb) Voltage 11.1 VDC Charge time 4 hours (when the (approximate) computer is turned off) Operating time battery operating time varies depending on operating conditions Coin-cell...
... resolution (graphics table mode) Size: Height 240 cpi 56 mm (2.20 inches) Width 100 mm (3.94 inches) Battery 6-cell "smart" lithium ion: Height 22.80 mm (0.90 inches) Width 214 mm (8.43 inches) 92 Battery Depth 57.64 mm (2.27 inches) Weight 0.34 kg (0.75 lb) 9-cell "smart" lithium ion: Height 22... 78.76 mm (3.10 inches) Weight 0.52 kg (1.15 lb) Voltage 11.1 VDC Charge time 4 hours (when the (approximate) computer is turned off) Operating time battery operating time varies depending on operating conditions Coin-cell...

Setup Guide
Page 95
... 19.5 VDC Temperature range: Operating Storage 0° to 40°C (32° to 104°F) -40° to 70°C (-40° to less 6-cell battery than 2.54 kg (5.40 lb) and optical drive) AC Adapter NOTE: Use only AC adapters specified for use with your computer. Physical Height Width 30...
... 19.5 VDC Temperature range: Operating Storage 0° to 40°C (32° to 104°F) -40° to 70°C (-40° to less 6-cell battery than 2.54 kg (5.40 lb) and optical drive) AC Adapter NOTE: Use only AC adapters specified for use with your computer. Physical Height Width 30...
Setup Guide
Page 98
INSPIRON Index A airflow, allowing 5 B backup and recovery 53 battery status light 29 C calling Dell 82 CDs, playing and creating 52 computer capabilities 52 computer, setting up 5 connect(ing) to the Internet 17 Contacting Dell online 84 customer service 77 96 D DataSafe Local Backup Basic 71 Professional 72 DellConnect 77 Dell Factory Image Restore 74 Dell Stage 54 Dell Support Center 64 Diagnostic Checklist 83 drivers and downloads 87 DVDs, playing and creating 52 E E-mail addresses for technical support 78 eSATA connector 23
INSPIRON Index A airflow, allowing 5 B backup and recovery 53 battery status light 29 C calling Dell 82 CDs, playing and creating 52 computer capabilities 52 computer, setting up 5 connect(ing) to the Internet 17 Contacting Dell online 84 customer service 77 96 D DataSafe Local Backup Basic 71 Professional 72 DellConnect 77 Dell Factory Image Restore 74 Dell Stage 54 Dell Support Center 64 Diagnostic Checklist 83 drivers and downloads 87 DVDs, playing and creating 52 E E-mail addresses for technical support 78 eSATA connector 23
Service Manual
Page 3
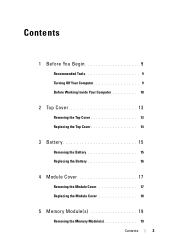
Contents 1 Before You Begin 9 Recommended Tools 9 Turning Off Your Computer 9 Before Working Inside Your Computer 10 2 Top Cover 13 Removing the Top Cover 13 Replacing the Top Cover 14 3 Battery 15 Removing the Battery 15 Replacing the Battery 16 4 Module Cover 17 Removing the Module Cover 17 Replacing the Module Cover 18 5 Memory Module(s 19 Removing the Memory Module(s 19 Contents 3
Contents 1 Before You Begin 9 Recommended Tools 9 Turning Off Your Computer 9 Before Working Inside Your Computer 10 2 Top Cover 13 Removing the Top Cover 13 Replacing the Top Cover 14 3 Battery 15 Removing the Battery 15 Replacing the Battery 16 4 Module Cover 17 Removing the Module Cover 17 Replacing the Module Cover 18 5 Memory Module(s 19 Removing the Memory Module(s 19 Contents 3
Service Manual
Page 5
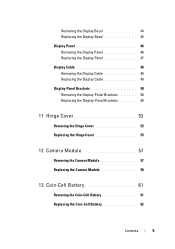
... Hinge Cover 53 Replacing the Hinge Cover 55 12 Camera Module 57 Removing the Camera Module 57 Replacing the Camera Module 58 13 Coin-Cell Battery 61 Removing the Coin-Cell Battery 61 Replacing the Coin-Cell...
... Hinge Cover 53 Replacing the Hinge Cover 55 12 Camera Module 57 Removing the Camera Module 57 Replacing the Camera Module 58 13 Coin-Cell Battery 61 Removing the Coin-Cell Battery 61 Replacing the Coin-Cell...

Service Manual
Page 11
CAUTION: To help prevent damage to the system board, remove the main battery (see "Removing the Battery" on page 15) before working inside the computer. 7 Remove the battery (see "Removing the Battery" on page 15). 8 Turn the computer top-side up, open the display, and press the power button to ground the system board. Before You Begin 11
CAUTION: To help prevent damage to the system board, remove the main battery (see "Removing the Battery" on page 15) before working inside the computer. 7 Remove the battery (see "Removing the Battery" on page 15). 8 Turn the computer top-side up, open the display, and press the power button to ground the system board. Before You Begin 11
Service Manual
Page 13
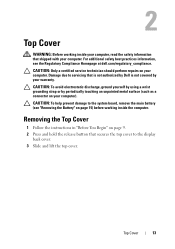
...warranty. Top Cover 13 2 Top Cover WARNING: Before working inside your computer, read the safety information that is not authorized by Dell is not covered by periodically touching an unpainted metal surface (such as a connector on page 15) before working inside the computer.... Damage due to the system board, remove the main battery (see the Regulatory Compliance Homepage at dell.com/regulatory_compliance. CAUTION: To avoid electrostatic discharge, ground yourself by using a wrist grounding strap or by your computer....
...warranty. Top Cover 13 2 Top Cover WARNING: Before working inside your computer, read the safety information that is not authorized by Dell is not covered by periodically touching an unpainted metal surface (such as a connector on page 15) before working inside the computer.... Damage due to the system board, remove the main battery (see the Regulatory Compliance Homepage at dell.com/regulatory_compliance. CAUTION: To avoid electrostatic discharge, ground yourself by using a wrist grounding strap or by your computer....
Service Manual
Page 15
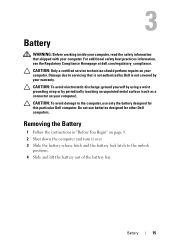
... discharge, ground yourself by using a wrist grounding strap or by your computer. Damage due to the computer, use batteries designed for this particular Dell computer. Do not use only the battery designed for other Dell computers. CAUTION: To avoid damage to servicing that shipped with your computer). For additional safety best practices information, see...
... discharge, ground yourself by using a wrist grounding strap or by your computer. Damage due to the computer, use batteries designed for this particular Dell computer. Do not use only the battery designed for other Dell computers. CAUTION: To avoid damage to servicing that shipped with your computer). For additional safety best practices information, see...

Service Manual
Page 16
3 2 1 1 battery release latch 3 battery lock latch 2 battery Replacing the Battery 1 Follow the instructions in "Before You Begin" on page 9. 2 Slide the battery into the battery bay until it clicks into place. 3 Slide the battery lock latch to the lock position. 16 Battery
3 2 1 1 battery release latch 3 battery lock latch 2 battery Replacing the Battery 1 Follow the instructions in "Before You Begin" on page 9. 2 Slide the battery into the battery bay until it clicks into place. 3 Slide the battery lock latch to the lock position. 16 Battery
Service Manual
Page 17
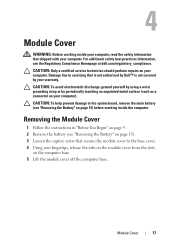
...information that shipped with your computer. For additional safety best practices information, see "Removing the Battery" on page 15). 3 Loosen the captive screw that is not authorized by Dell™ is not covered by periodically touching an unpainted metal surface (such as a connector...computer). Removing the Module Cover 1 Follow the instructions in "Before You Begin" on page 9. 2 Remove the battery (see the Regulatory Compliance Homepage at dell.com/regulatory_compliance. Module Cover 17 CAUTION: To avoid electrostatic discharge, ground yourself by using a wrist grounding strap or...
...information that shipped with your computer. For additional safety best practices information, see "Removing the Battery" on page 15). 3 Loosen the captive screw that is not authorized by Dell™ is not covered by periodically touching an unpainted metal surface (such as a connector...computer). Removing the Module Cover 1 Follow the instructions in "Before You Begin" on page 9. 2 Remove the battery (see the Regulatory Compliance Homepage at dell.com/regulatory_compliance. Module Cover 17 CAUTION: To avoid electrostatic discharge, ground yourself by using a wrist grounding strap or...
Service Manual
Page 18
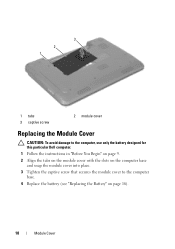
3 2 1 1 tabs 3 captive screw 2 module cover Replacing the Module Cover CAUTION: To avoid damage to the computer, use only the battery designed for this particular Dell computer. 1 Follow the instructions in "Before You Begin" on page 9. 2 Align the tabs on the module cover with the slots on the computer base and snap the module cover into place. 3 Tighten the captive screw that secures the module cover to the computer base. 4 Replace the battery (see "Replacing the Battery" on page 16). 18 Module Cover
3 2 1 1 tabs 3 captive screw 2 module cover Replacing the Module Cover CAUTION: To avoid damage to the computer, use only the battery designed for this particular Dell computer. 1 Follow the instructions in "Before You Begin" on page 9. 2 Align the tabs on the module cover with the slots on the computer base and snap the module cover into place. 3 Tighten the captive screw that secures the module cover to the computer base. 4 Replace the battery (see "Replacing the Battery" on page 16). 18 Module Cover


