Owner's Manual
Page 1
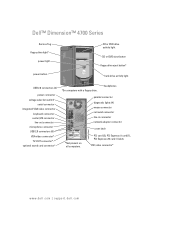
Dell™ Dimension™ 4700 Series Service Tag floppy drive light* power light power button CD or DVD drive activity light CD or DVD eject button floppy drive eject button* hard-drive activity light USB 2.0 connectors (2) power connector voltage selection switch serial connector ...OUT connector* optional sound card connector* *On computers with a floppy drive. PCI card (2), PCI Express x1 card (1), PCI Express x16 card (1) slots DVI video connector* www.dell.com | support.dell.com headphones parallel connector diagnostic lights (4) mouse connector surround connector line-in...
Dell™ Dimension™ 4700 Series Service Tag floppy drive light* power light power button CD or DVD drive activity light CD or DVD eject button floppy drive eject button* hard-drive activity light USB 2.0 connectors (2) power connector voltage selection switch serial connector ...OUT connector* optional sound card connector* *On computers with a floppy drive. PCI card (2), PCI Express x1 card (1), PCI Express x16 card (1) slots DVI video connector* www.dell.com | support.dell.com headphones parallel connector diagnostic lights (4) mouse connector surround connector line-in...
Owner's Manual
Page 4
... CD and DVD drive problems 22 Hard drive problems 23 E-Mail, Modem, and Internet Problems 23 Error Messages 24 IEEE 1394 Device Problems 25 Keyboard Problems 26 Lockups and Software Problems 26 The ... 34 Video and Monitor Problems 34 If the screen is blank 34 If the screen is difficult to read 35 3 Advanced Troubleshooting Diagnostic Lights 37 Dell Diagnostics 40 Dell Diagnostics Main Menu 41 4 Contents
... CD and DVD drive problems 22 Hard drive problems 23 E-Mail, Modem, and Internet Problems 23 Error Messages 24 IEEE 1394 Device Problems 25 Keyboard Problems 26 Lockups and Software Problems 26 The ... 34 Video and Monitor Problems 34 If the screen is blank 34 If the screen is difficult to read 35 3 Advanced Troubleshooting Diagnostic Lights 37 Dell Diagnostics 40 Dell Diagnostics Main Menu 41 4 Contents

Owner's Manual
Page 6
... Installation Guidelines 73 Connecting Drive Cables 73 Hard Drive 74 Removing a Hard Drive 75 Installing a Hard Drive 77 Adding a Second Hard Drive 78 Floppy Drive 81 Removing a Floppy Drive 81 Installing a Floppy Drive 82 CD/DVD Drive 83 Removing a CD/DVD Drive 84 Installing a CD/DVD Drive 85 Adding a Second CD or DVD Drive 85 Battery 88 Replacing the Computer Cover 89 A Appendix Specifications 91 System...
... Installation Guidelines 73 Connecting Drive Cables 73 Hard Drive 74 Removing a Hard Drive 75 Installing a Hard Drive 77 Adding a Second Hard Drive 78 Floppy Drive 81 Removing a Floppy Drive 81 Installing a Floppy Drive 82 CD/DVD Drive 83 Removing a CD/DVD Drive 84 Installing a CD/DVD Drive 85 Adding a Second CD or DVD Drive 85 Battery 88 Replacing the Computer Cover 89 A Appendix Specifications 91 System...
Owner's Manual
Page 10
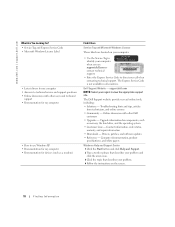
... technical support. • Enter the Express Service Code to view the appropriate support site. support.dell.com NOTE: Select your region to direct your call when contacting technical support. Upgrade information for devices (such as memory, the hard drive, and the operating system • Customer Care - Contact information, order status, warranty, and repair...
... technical support. • Enter the Express Service Code to view the appropriate support site. support.dell.com NOTE: Select your region to direct your call when contacting technical support. Upgrade information for devices (such as memory, the hard drive, and the operating system • Customer Care - Contact information, order status, warranty, and repair...
Owner's Manual
Page 18
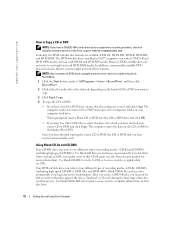
... or permanently store data files. Once you have finished copying the source CD or DVD, the CD or DVD that you have inserted your computer hard drive. After you create a DVD+R disc, you experience recording problems, check for home theater systems might not read DVD-RAM media. However, DVD-writable... drives do not write to and might not read DVD-R and DVD-RW media. www.dell.com | support.dell.com How to Copy a CD or DVD NOTE: If you have one CD or DVD...
... or permanently store data files. Once you have finished copying the source CD or DVD, the CD or DVD that you have inserted your computer hard drive. After you create a DVD+R disc, you experience recording problems, check for home theater systems might not read DVD-RAM media. However, DVD-writable... drives do not write to and might not read DVD-R and DVD-RW media. www.dell.com | support.dell.com How to Copy a CD or DVD NOTE: If you have one CD or DVD...

Owner's Manual
Page 23
... telephone line is connected to the jack on all computers.) Solving Problems 23 CHECK THE TELEPHONE LINE CONNECTION - Click the Start button, point to a telephone. Hard drive problems RUN CHECK DISK - 1 Click the Start button and click My Computer. 2 Right-click Local Disk C:. 3 Click Properties. 4 Click the Tools tab. 5 Under Error-checking...
... telephone line is connected to the jack on all computers.) Solving Problems 23 CHECK THE TELEPHONE LINE CONNECTION - Click the Start button, point to a telephone. Hard drive problems RUN CHECK DISK - 1 Click the Start button and click My Computer. 2 Right-click Local Disk C:. 3 Click Properties. 4 Click the Tools tab. 5 Under Error-checking...
Owner's Manual
Page 28
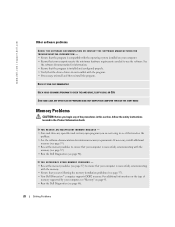
...8226; Your Dell Dimension™ computer supports DDR2 memory. For additional information on the type of the procedures in this section, follow the safety instructions located in the Product Information Guide. BACK UP YOUR FILES IMMEDIATELY USE A VIRUS-SCANNING PROGRAM TO CHECK THE HARD DRIVE, FLOPPY ... If necessary, install additional memory (see page 57). • Reseat the memory modules to run the software. www.dell.com | support.dell.com Other software problems CHECK THE SOFTWARE DOCUMENTATION OR CONTACT THE SOFTWARE MANUFACTURER FOR TROUBLESHOOTING INFORMATION - • Ensure that ...
...8226; Your Dell Dimension™ computer supports DDR2 memory. For additional information on the type of the procedures in this section, follow the safety instructions located in the Product Information Guide. BACK UP YOUR FILES IMMEDIATELY USE A VIRUS-SCANNING PROGRAM TO CHECK THE HARD DRIVE, FLOPPY ... If necessary, install additional memory (see page 57). • Reseat the memory modules to run the software. www.dell.com | support.dell.com Other software problems CHECK THE SOFTWARE DOCUMENTATION OR CONTACT THE SOFTWARE MANUFACTURER FOR TROUBLESHOOTING INFORMATION - • Ensure that ...

Owner's Manual
Page 38
...; If you know works and restart the computer. • If the problem persists or the computer has integrated graphics, contact Dell (see page 57), and then restart the computer. A possible floppy or hard drive failure has occurred. A possible USB failure has occurred. ABCD Reinstall all power and data cables and restart the computer...
...; If you know works and restart the computer. • If the problem persists or the computer has integrated graphics, contact Dell (see page 57), and then restart the computer. A possible floppy or hard drive failure has occurred. A possible USB failure has occurred. ABCD Reinstall all power and data cables and restart the computer...
Owner's Manual
Page 40
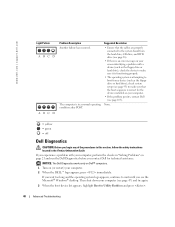
... Problems" on (or restart) your computer. • If the problem persists, contact Dell (see page 105). If you experience a problem with a device (such as the floppy drive or hard drive), check the device to make sure that the cables are properly connected to Utility Partition and... press . 40 Advanced Troubleshooting www.dell.com | support.dell.com Light Pattern ABCD ABCD Problem Description Another failure has...
... Problems" on (or restart) your computer. • If the problem persists, contact Dell (see page 105). If you experience a problem with a device (such as the floppy drive or hard drive), check the device to make sure that the cables are properly connected to Utility Partition and... press . 40 Advanced Troubleshooting www.dell.com | support.dell.com Light Pattern ABCD ABCD Problem Description Another failure has...
Owner's Manual
Page 43
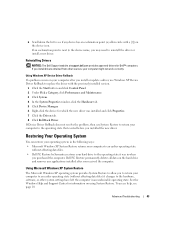
...system in the following ways: • Microsoft Windows XP System Restore returns your computer might not work correctly. Dell PC Restore permanently deletes all data on your hard drive to the operating state it was installed and click Properties. 7 Click the Drivers tab. 8 Click Roll Back... Driver. Advanced Troubleshooting 43 Reinstalling Drivers NOTICE: The Dell Support website at support.dell.com provides approved drivers for which ...
...system in the following ways: • Microsoft Windows XP System Restore returns your computer might not work correctly. Dell PC Restore permanently deletes all data on your hard drive to the operating state it was installed and click Properties. 7 Click the Drivers tab. 8 Click Roll Back... Driver. Advanced Troubleshooting 43 Reinstalling Drivers NOTICE: The Dell Support website at support.dell.com provides approved drivers for which ...

Owner's Manual
Page 45
... the operating state it was turned on the hard drive and removes any files or programs until the system restoration is restored to its original operating state, the screens that appear, such as the last method to proceed with www.dell.com appears at the top of the screen. 2 ...click Yes. Any programs or files added since you received your operating system. Using Dell PC Restore by Symantec Use Dell PC Restore by Symantec only as the End User License Agreement, are permanently deleted from the hard drive. Undoing the Last System Restore NOTICE: Before you undo the last system restore,...
... the operating state it was turned on the hard drive and removes any files or programs until the system restoration is restored to its original operating state, the screens that appear, such as the last method to proceed with www.dell.com appears at the top of the screen. 2 ...click Yes. Any programs or files added since you received your operating system. Using Dell PC Restore by Symantec Use Dell PC Restore by Symantec only as the End User License Agreement, are permanently deleted from the hard drive. Undoing the Last System Restore NOTICE: Before you undo the last system restore,...
Owner's Manual
Page 50
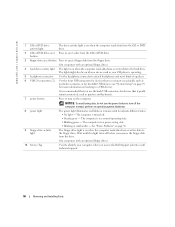
...from or writes data to the hard drive. The computer is turned off the computer. The computer is in a power-saving state. • Blinking or solid amber - The light might also be on booting to turn on the computer. www.dell.com | support.dell.com 1 CD or DVD driveactivity... Service Tag Used to identify your CD player is on when the computer reads data from the drive. (On computers with an optional floppy drive.) 4 hard-drive activity light The light is operating. 5 headphone connector Use the headphone connector to attach headphones and most kinds of speakers. 6 USB 2.0...
...from or writes data to the hard drive. The computer is turned off the computer. The computer is in a power-saving state. • Blinking or solid amber - The light might also be on booting to turn on the computer. www.dell.com | support.dell.com 1 CD or DVD driveactivity... Service Tag Used to identify your CD player is on when the computer reads data from the drive. (On computers with an optional floppy drive.) 4 hard-drive activity light The light is operating. 5 headphone connector Use the headphone connector to attach headphones and most kinds of speakers. 6 USB 2.0...
Owner's Manual
Page 55
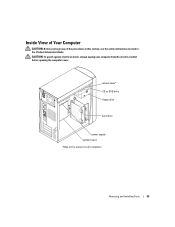
release lever* CD or DVD drive floppy drive hard drive power supply system board *May not be present on all computers. CAUTION: To guard against electrical shock, always unplug your computer from the electrical outlet before opening the computer cover. Removing and Installing Parts 55 Inside View of Your Computer CAUTION: Before you begin any of the procedures in this section, see the safety instructions located in the Product Information Guide.
release lever* CD or DVD drive floppy drive hard drive power supply system board *May not be present on all computers. CAUTION: To guard against electrical shock, always unplug your computer from the electrical outlet before opening the computer cover. Removing and Installing Parts 55 Inside View of Your Computer CAUTION: Before you begin any of the procedures in this section, see the safety instructions located in the Product Information Guide.

Owner's Manual
Page 72
side hinges (3) front panel 2 Rotate the front panel until it snaps onto the front of these devices: • Up to two hard drives • One optional floppy • Up to the side hinges. Drives Your computer supports a combination of the computer. www.dell.com | support.dell.com Reattaching the Front Panel 1 Reattach the front panel to two CD or DVD drives 72 Removing and Installing Parts
side hinges (3) front panel 2 Rotate the front panel until it snaps onto the front of these devices: • Up to two hard drives • One optional floppy • Up to the side hinges. Drives Your computer supports a combination of the computer. www.dell.com | support.dell.com Reattaching the Front Panel 1 Reattach the front panel to two CD or DVD drives 72 Removing and Installing Parts

Owner's Manual
Page 73
...a notch or a missing pin on the interface cable is primary or the boot device (drive 0), and the device attached to the connector labeled PRI IDE. General Installation Guidelines Connect serial ATA hard drives to the system board. When disconnecting an IDE cable, grasp the colored pull tab and pull... until the connector detaches. Removing and Installing Parts 73 When you align the colored stripe with the pin 1 connector. Connect CD/DVD drives to the middle ...
...a notch or a missing pin on the interface cable is primary or the boot device (drive 0), and the device attached to the connector labeled PRI IDE. General Installation Guidelines Connect serial ATA hard drives to the system board. When disconnecting an IDE cable, grasp the colored pull tab and pull... until the connector detaches. Removing and Installing Parts 73 When you align the colored stripe with the pin 1 connector. Connect CD/DVD drives to the middle ...
Owner's Manual
Page 74
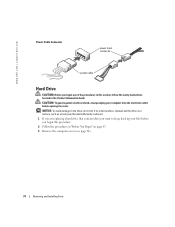
...follow the safety instructions located in "Before You Begin" on a hard surface. CAUTION: To guard against electrical shock, always unplug your files before opening the cover. Instead, set it . 1 If you are replacing a hard drive that will sufficiently cushion it on page 47. 3 Remove the computer... cover (see page 54). 74 Removing and Installing Parts www.dell.com | support.dell.com Power Cable Connector power input connector power cable Hard Drive CAUTION: Before you begin any of the procedures in this procedure. 2 Follow the procedures in the...
...follow the safety instructions located in "Before You Begin" on a hard surface. CAUTION: To guard against electrical shock, always unplug your files before opening the cover. Instead, set it . 1 If you are replacing a hard drive that will sufficiently cushion it on page 47. 3 Remove the computer... cover (see page 54). 74 Removing and Installing Parts www.dell.com | support.dell.com Power Cable Connector power input connector power cable Hard Drive CAUTION: Before you begin any of the procedures in this procedure. 2 Follow the procedures in the...

Owner's Manual
Page 75
data cable power cable 2 Remove the hard drive bracket from the computer. b Remove the bracket for the hard drive from the computer: a Remove the bracket-securing screws for the hard drive. Removing and Installing Parts 75 Removing a Hard Drive 1 Disconnect the power and data cables from the drive and from the system board.
data cable power cable 2 Remove the hard drive bracket from the computer. b Remove the bracket for the hard drive from the computer: a Remove the bracket-securing screws for the hard drive. Removing and Installing Parts 75 Removing a Hard Drive 1 Disconnect the power and data cables from the drive and from the system board.

Owner's Manual
Page 76
www.dell.com | support.dell.com hard drive bracket-securing screw hard drive-securing screws (3) drive bracket bracket-securing screw 3 If you are replacing the hard drive, remove the drive from the bracket. 76 Removing and Installing Parts b Remove the hard drive from the bracket: a Remove the hard drive-securing screws.
www.dell.com | support.dell.com hard drive bracket-securing screw hard drive-securing screws (3) drive bracket bracket-securing screw 3 If you are replacing the hard drive, remove the drive from the bracket. 76 Removing and Installing Parts b Remove the hard drive from the bracket: a Remove the hard drive-securing screws.

Owner's Manual
Page 77
... board (see page 56). 8 Close the computer cover (see page 75). 4 Attach the hard drive to the hard drive bracket: a Place the small bracket tabs into the drive slots inside the bracket for the additional hard drive. small bracket tabs (2) drive bracket drive securing screws (3) Installing a Hard Drive 1 Unpack the replacement hard drive, and prepare it for installation. 2 Check the documentation for the...
... board (see page 56). 8 Close the computer cover (see page 75). 4 Attach the hard drive to the hard drive bracket: a Place the small bracket tabs into the drive slots inside the bracket for the additional hard drive. small bracket tabs (2) drive bracket drive securing screws (3) Installing a Hard Drive 1 Unpack the replacement hard drive, and prepare it for installation. 2 Check the documentation for the...

Owner's Manual
Page 78
...47. 3 Remove the computer cover (see page 54). 4 Remove the existing hard drive (see page 75). 5 Remove the additional hard drive bracket from the computer. 78 Removing and Installing Parts www.dell.com | support.dell.com NOTICE: To connect a network cable, first plug the cable into the network...in "Before You Begin" on installing any software required for the additional drive. b Remove the bracket for instructions. 15 Test the hard drive by running the Dell Diagnostics (see page 96), and update the appropriate Drive option. 13 Exit system setup, and restart the computer. 14 Partition...
...47. 3 Remove the computer cover (see page 54). 4 Remove the existing hard drive (see page 75). 5 Remove the additional hard drive bracket from the computer. 78 Removing and Installing Parts www.dell.com | support.dell.com NOTICE: To connect a network cable, first plug the cable into the network...in "Before You Begin" on installing any software required for the additional drive. b Remove the bracket for instructions. 15 Test the hard drive by running the Dell Diagnostics (see page 96), and update the appropriate Drive option. 13 Exit system setup, and restart the computer. 14 Partition...


