Owner's Manual
Page 1
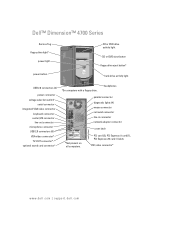
... network adapter connector cover latch *Not present on all computers. PCI card (2), PCI Express x1 card (1), PCI Express x16 card (1) slots DVI video connector* www.dell.com | support.dell.com Dell™ Dimension™ 4700 Series Service Tag floppy drive light* power light power button CD or DVD drive activity light CD or DVD eject button...
... network adapter connector cover latch *Not present on all computers. PCI card (2), PCI Express x1 card (1), PCI Express x16 card (1) slots DVI video connector* www.dell.com | support.dell.com Dell™ Dimension™ 4700 Series Service Tag floppy drive light* power light power button CD or DVD drive activity light CD or DVD eject button...
Owner's Manual
Page 52
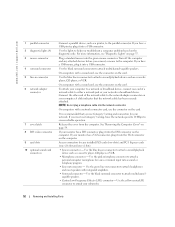
... printer, plug it into a sound or telephony program. • Line-out connector - www.dell.com | support.dell.com 1 parallel connector 2 diagnostic lights (4) 3 mouse connector 4 surround connector 5 line-in connector 6 network adapter connector 7 cover latch 8 DVI video connector 9 card slots 10 optional sound card connectors Connect a parallel device, such as a printer, to the computer...
... printer, plug it into a sound or telephony program. • Line-out connector - www.dell.com | support.dell.com 1 parallel connector 2 diagnostic lights (4) 3 mouse connector 4 surround connector 5 line-in connector 6 network adapter connector 7 cover latch 8 DVI video connector 9 card slots 10 optional sound card connectors Connect a parallel device, such as a printer, to the computer...
Owner's Manual
Page 56
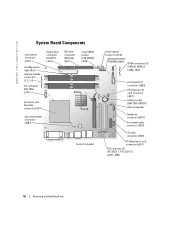
www.dell.com | support.dell.com System Board Components main power connector (J3J1) standby power light CR3J1 memory module connectors (1, 2, 3, 4) fan connector CPU FAN) (J1F1) floppy drive connector (FLOPPY) (J4J1) ... socket (BATTERY) (BT8F1) internal speaker telephony connector (J9D1) front panel audio connector (J9C2) CD audio connector (J9D1) PCI Express x1 card connector (J9C1) PCI card slots (2) (PCI SLOT 1, PCI SLOT 2) (J7B1, J8B1) 56 Removing and Installing Parts
www.dell.com | support.dell.com System Board Components main power connector (J3J1) standby power light CR3J1 memory module connectors (1, 2, 3, 4) fan connector CPU FAN) (J1F1) floppy drive connector (FLOPPY) (J4J1) ... socket (BATTERY) (BT8F1) internal speaker telephony connector (J9D1) front panel audio connector (J9C2) CD audio connector (J9D1) PCI Express x1 card connector (J9C1) PCI card slots (2) (PCI SLOT 1, PCI SLOT 2) (J7B1, J8B1) 56 Removing and Installing Parts
Owner's Manual
Page 61
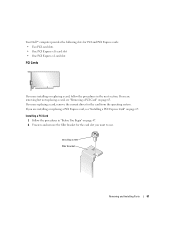
... Dell™ computer provides the following slots for the card from the operating system. If you are installing or replacing a PCI Express card, see "Removing a PCI Card" on page 63. If you are replacing a card, remove the current driver for PCI and PCI Express cards: • Two PCI card slots ...are removing but not replacing a card, see "Installing a PCI Express Card" on page 47. 2 Unscrew and remove the filler bracket for the card slot you are installing or replacing a card, follow the procedures in "Before You Begin" on page 65. Installing a PCI Card 1 Follow the procedures in...
... Dell™ computer provides the following slots for the card from the operating system. If you are installing or replacing a PCI Express card, see "Removing a PCI Card" on page 63. If you are replacing a card, remove the current driver for PCI and PCI Express cards: • Two PCI card slots ...are removing but not replacing a card, see "Installing a PCI Express Card" on page 47. 2 Unscrew and remove the filler bracket for the card slot you are installing or replacing a card, follow the procedures in "Before You Begin" on page 65. Installing a PCI Card 1 Follow the procedures in...
Owner's Manual
Page 62
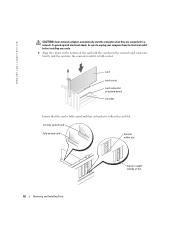
... sure to a network. Gently rock the card into the connector until it is within slot 62 Removing and Installing Parts bracket caught outside of the card with the crossbar in the system board connector. www.dell.com | support.dell.com CAUTION: Some network adapters automatically start the computer when they are connected to... board crossbar Ensure that the card is fully seated and that its electrical outlet before installing any cards. 3 Align the cutout on the bottom of slot
... sure to a network. Gently rock the card into the connector until it is within slot 62 Removing and Installing Parts bracket caught outside of the card with the crossbar in the system board connector. www.dell.com | support.dell.com CAUTION: Some network adapters automatically start the computer when they are connected to... board crossbar Ensure that the card is fully seated and that its electrical outlet before installing any cards. 3 Align the cutout on the bottom of slot

Owner's Manual
Page 63
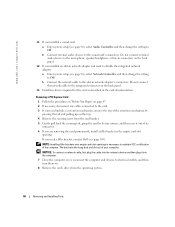
... system setup (see page 96), select Audio Controller, and then change the setting to the microphone, speaker/headphone, or line-in the empty card-slot opening. Do not connect external audio devices to Off. If you are removing the card permanently, install a filler bracket in connectors on . 7 ...Remove the card's driver from the card bracket. 4 Grasp the card by its connector. 5 If you need a filler bracket, contact Dell (see page 96), select Network Controller, and then change the setting to the add-in the card documentation. NOTICE: To connect a network cable, first ...
... system setup (see page 96), select Audio Controller, and then change the setting to the microphone, speaker/headphone, or line-in the empty card-slot opening. Do not connect external audio devices to Off. If you are removing the card permanently, install a filler bracket in connectors on . 7 ...Remove the card's driver from the card bracket. 4 Grasp the card by its connector. 5 If you need a filler bracket, contact Dell (see page 96), select Network Controller, and then change the setting to the add-in the card documentation. NOTICE: To connect a network cable, first ...
Owner's Manual
Page 64
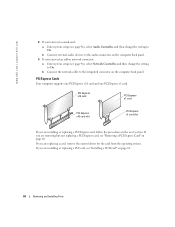
www.dell.com | support.dell.com 8 If you removed a sound card: a Enter system setup (see page 96), select Audio Controller, and then change the setting to On. If you are ... 96), select Network Controller, and then change the setting to On. PCI Express x16 card PCI Express x1 card PCI Express x16 card slot PCI Express x1 card slot If you are installing or replacing a PCI card, see "Removing a PCI Express Card" on the computer back panel. If you are replacing a card...
www.dell.com | support.dell.com 8 If you removed a sound card: a Enter system setup (see page 96), select Audio Controller, and then change the setting to On. If you are ... 96), select Network Controller, and then change the setting to On. PCI Express x16 card PCI Express x1 card PCI Express x16 card slot PCI Express x1 card slot If you are installing or replacing a PCI card, see "Removing a PCI Express Card" on the computer back panel. If you are replacing a card...
Owner's Manual
Page 65
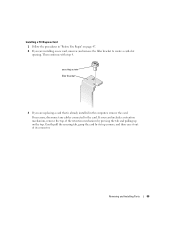
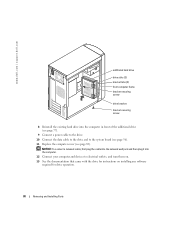
If necessary, disconnect any cables connected to create a card-slot opening. If your card includes a retention mechanism, remove the top of the retention mechanism by its top corners, and then ease it out of its ...
If necessary, disconnect any cables connected to create a card-slot opening. If your card includes a retention mechanism, remove the top of the retention mechanism by its top corners, and then ease it out of its ...

Owner's Manual
Page 66
www.dell.com | support.dell.com tab top of retention mechanism filler bracket x16 card securing slot edge connector securing tab card connector x1 card edge connector card connector 4 Prepare the card for your computer from its electrical outlet before installing any ...
www.dell.com | support.dell.com tab top of retention mechanism filler bracket x16 card securing slot edge connector securing tab card connector x1 card edge connector card connector 4 Prepare the card for your computer from its electrical outlet before installing any ...

Owner's Manual
Page 67
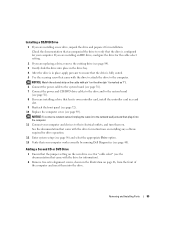
... plug the cable into the network device and then plug it into the x16 card connector, position the card so the securing slot is within slot bracket caught outside of slot 7 If you removed in the connector and press down firmly. Removing and Installing Parts 67 NOTICE: Do not route card cables over... the securing tab, and gently pull the securing tab. 6 Place the card in step 2. not fully seated card fully seated card bracket within the card slot.
... plug the cable into the network device and then plug it into the x16 card connector, position the card so the securing slot is within slot bracket caught outside of slot 7 If you removed in the connector and press down firmly. Removing and Installing Parts 67 NOTICE: Do not route card cables over... the securing tab, and gently pull the securing tab. 6 Place the card in step 2. not fully seated card fully seated card bracket within the card slot.
Owner's Manual
Page 68
... 4 Remove the securing screw from the operating system. 68 Removing and Installing Parts If you installed an add-in the empty card-slot opening. www.dell.com | support.dell.com 11 If you installed a sound card: a Enter system setup (see page 105). b Connect external audio devices to Off.... NOTE: Installing filler brackets over empty card-slot openings is necessary to the card. 3 If your computer. NOTICE: To connect a network cable, ...
... 4 Remove the securing screw from the operating system. 68 Removing and Installing Parts If you installed an add-in the empty card-slot opening. www.dell.com | support.dell.com 11 If you installed a sound card: a Enter system setup (see page 105). b Connect external audio devices to Off.... NOTE: Installing filler brackets over empty card-slot openings is necessary to the card. 3 If your computer. NOTICE: To connect a network cable, ...

Owner's Manual
Page 77
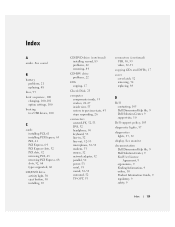
... 56). 8 Close the computer cover (see page 75). 4 Attach the hard drive to the hard drive bracket: a Place the small bracket tabs into the drive slots inside the bracket for the additional hard drive. small bracket tabs (2) drive bracket drive securing screws (3) Installing a Hard Drive 1 Unpack the replacement hard drive, and...
... 56). 8 Close the computer cover (see page 75). 4 Attach the hard drive to the hard drive bracket: a Place the small bracket tabs into the drive slots inside the bracket for the additional hard drive. small bracket tabs (2) drive bracket drive securing screws (3) Installing a Hard Drive 1 Unpack the replacement hard drive, and...

Owner's Manual
Page 79
...Swing the bracket forward so that will sufficiently cushion it. 7 Install the additional hard drive: a Place the two bracket tabs into the drive slots inside the computer's front panel. Instead, set it on a hard surface, which may damage the drive. Removing and Installing Parts 79 drive... slots (2) bracket tabs (2) front computer frame bracket-securing screw drive bracket bracket-securing screw NOTICE: Ground yourself by touching an unpainted metal surface...
...Swing the bracket forward so that will sufficiently cushion it. 7 Install the additional hard drive: a Place the two bracket tabs into the drive slots inside the computer's front panel. Instead, set it on a hard surface, which may damage the drive. Removing and Installing Parts 79 drive... slots (2) bracket tabs (2) front computer frame bracket-securing screw drive bracket bracket-securing screw NOTICE: Ground yourself by touching an unpainted metal surface...
Owner's Manual
Page 80
... documentation that came with the drive for instructions on installing any software required for drive operation. 80 Removing and Installing Parts www.dell.com | support.dell.com additional hard drive drive slots (2) bracket tabs (2) front computer frame bracket-securing screw drive bracket bracket-securing screw 8 Reinstall the existing hard drive into the computer...
... documentation that came with the drive for instructions on installing any software required for drive operation. 80 Removing and Installing Parts www.dell.com | support.dell.com additional hard drive drive slots (2) bracket tabs (2) front computer frame bracket-securing screw drive bracket bracket-securing screw 8 Reinstall the existing hard drive into the computer...

Owner's Manual
Page 82
...81). 2 If you are replacing a floppy drive, remove the drive from the bracket (see page 72). 82 Removing and Installing Parts www.dell.com | support.dell.com securing screws (4) top bracket screw drive bracket floppy drive 3 Remove the floppy drive from the bracket: a Remove all four drive-securing... screws (two on each side). NOTE: The top of the floppy drive bracket has two slots that came with your drive. 6 Reattach the...
...81). 2 If you are replacing a floppy drive, remove the drive from the bracket (see page 72). 82 Removing and Installing Parts www.dell.com | support.dell.com securing screws (4) top bracket screw drive bracket floppy drive 3 Remove the floppy drive from the bracket: a Remove all four drive-securing... screws (two on each side). NOTE: The top of the floppy drive bracket has two slots that came with your drive. 6 Reattach the...
Owner's Manual
Page 85
... came with the drive for instructions on installing any software required for your computer and devices to verify that your computer works correctly by running Dell Diagnostics (see page 89). Check the documentation that accompanied the drive to their electrical outlets, and turn them into place in the drive bay. 4 After... configured for drive operation. 12 Enter system setup (see page 96) and select the appropriate Drive option. 13 Verify that the drive is in a card slot. 9 Reattach the front panel (see page 72). 10 Replace the computer cover (see page 40).
... came with the drive for instructions on installing any software required for your computer and devices to verify that your computer works correctly by running Dell Diagnostics (see page 89). Check the documentation that accompanied the drive to their electrical outlets, and turn them into place in the drive bay. 4 After... configured for drive operation. 12 Enter system setup (see page 96) and select the appropriate Drive option. 13 Verify that the drive is in a card slot. 9 Reattach the front panel (see page 72). 10 Replace the computer cover (see page 40).

Owner's Manual
Page 92
www.dell.com | support.dell.com Computer Information (continued) NIC System Clock integrated network interface capable of 10/100 communication. 800 -MHz data rate Video Type integrated or PCI Express ... 1980 AC97 Codec Expansion Bus Bus type PCI 2.2 PCI Express x1 and PCI Express x16 Bus speed PCI: 33 MHz PCI Express: x1 slot bidirectional speed - 500 MB/s x16 slot bidirectional speed - 8 GB/s PCI connectors two connector size 120 pins connector data width (maximum) 32 bits PCI Express connector one PCI Express...
www.dell.com | support.dell.com Computer Information (continued) NIC System Clock integrated network interface capable of 10/100 communication. 800 -MHz data rate Video Type integrated or PCI Express ... 1980 AC97 Codec Expansion Bus Bus type PCI 2.2 PCI Express x1 and PCI Express x16 Bus speed PCI: 33 MHz PCI Express: x1 slot bidirectional speed - 500 MB/s x16 slot bidirectional speed - 8 GB/s PCI connectors two connector size 120 pins connector data width (maximum) 32 bits PCI Express connector one PCI Express...
Owner's Manual
Page 123
...to a USB device, 100 C cards installing PCI, 61 installing PCI Express, 65 PCI, 61 PCI Express, 64 PCI Express slots, 52 PCI slots, 52 removing PCI, 63 removing PCI Express, 68 slots, 52, 60 types supported, 60 CD/DVD drive activity light, 50 eject button, 50 installing, 85 CD/DVD drive (... TV-OUT, 53 connectors (continued) USB, 50, 53 video, 52-53 copying CDs and DVDs, 17 cover cover latch, 52 removing, 54 replacing, 89 D Dell contacting, 105 Dell Dimension Help file, 9 Dell Solution Center, 9 support site, 10 Dell support policy, 103 diagnostic lights, 37 diagnostics lights, 37, 52 display.
...to a USB device, 100 C cards installing PCI, 61 installing PCI Express, 65 PCI, 61 PCI Express, 64 PCI Express slots, 52 PCI slots, 52 removing PCI, 63 removing PCI Express, 68 slots, 52, 60 types supported, 60 CD/DVD drive activity light, 50 eject button, 50 installing, 85 CD/DVD drive (... TV-OUT, 53 connectors (continued) USB, 50, 53 video, 52-53 copying CDs and DVDs, 17 cover cover latch, 52 removing, 54 replacing, 89 D Dell contacting, 105 Dell Dimension Help file, 9 Dell Solution Center, 9 support site, 10 Dell support policy, 103 diagnostic lights, 37 diagnostics lights, 37, 52 display.


