
Product Manual
Page 11
Click Next -11- Enter in a second time for verification. Click Next Click on the drop down box arrow and select the appropriate time zone for security purposes. Using the Configuration Wizard The Setup Wizard screen will appear. Click Next It is recommended that you change the admin password for your new password. Enter it in your location. Follow the Wizard step by step to quickly configure the DI-604.
Click Next -11- Enter in a second time for verification. Click Next Click on the drop down box arrow and select the appropriate time zone for security purposes. Using the Configuration Wizard The Setup Wizard screen will appear. Click Next It is recommended that you change the admin password for your new password. Enter it in your location. Follow the Wizard step by step to quickly configure the DI-604.
Product Manual
Page 14
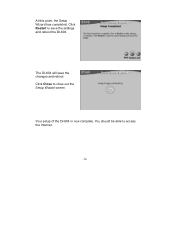
Click Restart to save the changes and reboot. Your setup of the DI-604 is now complete. The DI-604 will save the settings and reboot the DI-604. At this point, the Setup Wizard has completed. Click Close to access the Internet. -14- You should be able to close out the Setup Wizard screen.
Click Restart to save the changes and reboot. Your setup of the DI-604 is now complete. The DI-604 will save the settings and reboot the DI-604. At this point, the Setup Wizard has completed. Click Close to access the Internet. -14- You should be able to close out the Setup Wizard screen.
Product Manual
Page 15
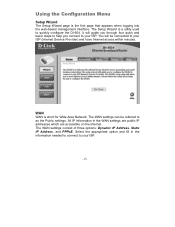
...in the information needed to connect to your ISP. The WAN settings can be connected to your ISP. -15- Using the Configuration Menu Setup Wizard The Setup Wizard page is short for Wide Area Network. The WAN settings consist of three options: Dynamic IP Address, Static IP Address, and PPPoE.... You will guide you through four quick and basic steps to help you connect to quickly configure the DI-604. Select the appropriate option and ...
...in the information needed to connect to your ISP. The WAN settings can be connected to your ISP. -15- Using the Configuration Menu Setup Wizard The Setup Wizard page is short for Wide Area Network. The WAN settings consist of three options: Dynamic IP Address, Static IP Address, and PPPoE.... You will guide you through four quick and basic steps to help you connect to quickly configure the DI-604. Select the appropriate option and ...
Product Manual
Page 46
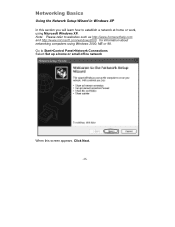
Networking Basics Using the Network Setup Wizard in Windows XP In this screen appears, Click Next. -46- Note: Please refer to Start>Control Panel>Network Connections Select Set up a home or small office network When this section you will learn how to establish a network at home or work, using Windows 2000, ME or 98. Go to websites such as http://www.homenethelp.com and http://www.microsoft.com/windows2000 for information about networking computers using Microsoft Windows XP.
Networking Basics Using the Network Setup Wizard in Windows XP In this screen appears, Click Next. -46- Note: Please refer to Start>Control Panel>Network Connections Select Set up a home or small office network When this section you will learn how to establish a network at home or work, using Windows 2000, ME or 98. Go to websites such as http://www.homenethelp.com and http://www.microsoft.com/windows2000 for information about networking computers using Microsoft Windows XP.

Product Manual
Page 49
Please wait while the Network Setup Wizard configures the computer. This may take a few minutes. -49- When the changes are complete, click Next. Networking Basics Please wait while the Network Setup Wizard applies the changes.
Please wait while the Network Setup Wizard configures the computer. This may take a few minutes. -49- When the changes are complete, click Next. Networking Basics Please wait while the Network Setup Wizard applies the changes.
Product Manual
Page 51
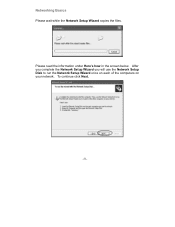
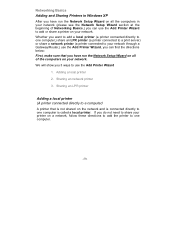
Please read the information under Here's how in the screen below. Networking Basics Please wait while the Network Setup Wizard copies the files. After you complete the Network Setup Wizard you will use the Network Setup Disk to run the Network Setup Wizard once on each of the computers on your network. To continue click Next. -51-
Please read the information under Here's how in the screen below. Networking Basics Please wait while the Network Setup Wizard copies the files. After you complete the Network Setup Wizard you will use the Network Setup Disk to run the Network Setup Wizard once on each of the computers on your network. To continue click Next. -51-

Product Manual
Page 52
The new settings will be ready to run the Network Setup Disk on this computer. After running the Network Setup Disk on all the other computers on your new wireless network will take effect when you will need to use. -52- You have completed configuring this screen, then click Finish to restart the computer. Networking Basics Please read the information on all your computers, your network. Click Yes to complete the Network Setup Wizard. Next, you restart the computer.
The new settings will be ready to run the Network Setup Disk on this computer. After running the Network Setup Disk on all the other computers on your new wireless network will take effect when you will need to use. -52- You have completed configuring this screen, then click Finish to restart the computer. Networking Basics Please read the information on all your computers, your network. Click Yes to complete the Network Setup Wizard. Next, you restart the computer.
Product Manual
Page 59
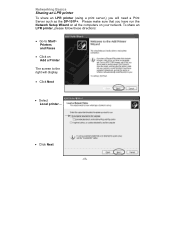
... directly to a computer) A printer that you have run the Network Setup Wizard on all the computers in Windows XP After you have run the Network Setup Wizard on all of Networking Basics,) you can use the Add Printer Wizard to one computer. -59- Adding a local printer 2. Networking Basics ...an LPR printer (a printer connected to a print server) or share a network printer (a printer connected to your network through a Gateway/Router,) use the Add Printer Wizard, you can find the directions below: First, make sure that is not shared on the network and is called a local printer....
... directly to a computer) A printer that you have run the Network Setup Wizard on all the computers in Windows XP After you have run the Network Setup Wizard on all of Networking Basics,) you can use the Add Printer Wizard to one computer. -59- Adding a local printer 2. Networking Basics ...an LPR printer (a printer connected to a print server) or share a network printer (a printer connected to your network through a Gateway/Router,) use the Add Printer Wizard, you can find the directions below: First, make sure that is not shared on the network and is called a local printer....

Product Manual
Page 64
Sharing a network printer After you have successfully added a local printer. Please follow these directions to use the Add Printer Wizard to share a printer on your network: • Go to Start> Printers and Faxes A successful installation will display the printer icon as shown at right. Networking Basics Adding a local printer • Go to Start> Printer and Faxes -64- You have run the Network Setup Wizard on all the computers on your network, you can run the Add Printer Wizard on all the computers on your network.
Sharing a network printer After you have successfully added a local printer. Please follow these directions to use the Add Printer Wizard to share a printer on your network: • Go to Start> Printers and Faxes A successful installation will display the printer icon as shown at right. Networking Basics Adding a local printer • Go to Start> Printer and Faxes -64- You have run the Network Setup Wizard on all the computers on your network, you can run the Add Printer Wizard on all the computers on your network.

Product Manual
Page 67
To share this printer on all the network computers. You have already run the Network Setup Wizard on all the computers on your network: • Remember the printer name • Run the Add Printer Wizard on your network. • Make sure you can share the printer. -67- Networking Basics Sharing a network printer To check for proper installation: • Go to Start> Printers and Faxes The printer icon will appear at right, indicating proper installation. After you run the Add Printer Wizard on all the computers in the network, you have completed adding the printer.
To share this printer on all the network computers. You have already run the Network Setup Wizard on all the computers on your network: • Remember the printer name • Run the Add Printer Wizard on your network. • Make sure you can share the printer. -67- Networking Basics Sharing a network printer To check for proper installation: • Go to Start> Printers and Faxes The printer icon will appear at right, indicating proper installation. After you run the Add Printer Wizard on all the computers in the network, you have completed adding the printer.
Product Manual
Page 68
Please make sure that you will display. • Click Next • Select Local printer... • Click Next -68- To share an LPR printer, please follow these directions: • Go to Start> Printers and Faxes • Click on your network. Networking Basics Sharing an LPR printer To share an LPR printer (using a print server,) you have run the Network Setup Wizard on all the computers on Add a Printer The screen to the right will need a Print Server such as the DP-101P+.
Please make sure that you will display. • Click Next • Select Local printer... • Click Next -68- To share an LPR printer, please follow these directions: • Go to Start> Printers and Faxes • Click on your network. Networking Basics Sharing an LPR printer To share an LPR printer (using a print server,) you have run the Network Setup Wizard on all the computers on Add a Printer The screen to the right will need a Print Server such as the DP-101P+.

Product Manual
Page 72
... all -72t-he computers on your network in order to share the printer. You will need this information when you use the Add Printer Wizard on the other computers on your network. • Click Next • Select Yes, to print a test page. • Click Next This screen will ... printer. • Click Finish to complete the addition of your printer. It is optional. you choose. Note: You must run the Network Setup Wizard on all the computers on your network before Printer Wizard. Networking Basics Sharing an LPR printer • You can rename your printer if you run the Add
... all -72t-he computers on your network in order to share the printer. You will need this information when you use the Add Printer Wizard on the other computers on your network. • Click Next • Select Yes, to print a test page. • Click Next This screen will ... printer. • Click Finish to complete the addition of your printer. It is optional. you choose. Note: You must run the Network Setup Wizard on all the computers on your network before Printer Wizard. Networking Basics Sharing an LPR printer • You can rename your printer if you run the Add


