
Wireless Setup Guide
Page 3
... in green) Wireless Router Cable Modem Network connections with the computer. Web site. 3 Set up the hardware and software Now that the blue wireless light next to the wireless icon is off. Ensure that the computer is connected to AC power during the router setup, contact your router manufacturer for technical assistance. 6 Test the Internet connection by pressing the wireless on page 2. Refer to get started, you...
... in green) Wireless Router Cable Modem Network connections with the computer. Web site. 3 Set up the hardware and software Now that the blue wireless light next to the wireless icon is off. Ensure that the computer is connected to AC power during the router setup, contact your router manufacturer for technical assistance. 6 Test the Internet connection by pressing the wireless on page 2. Refer to get started, you...

Wireless Setup Guide
Page 5
... Subscriber Line) modem-A device that will limit your wireless network. encryption-The process of Web sites into cyberspace without security. A unique key is displayed.) c Select the Wireless Networks tab. Refer to the router instructions. ■ Use a firewall. Refer to your ISP's server, which in 10,000 DID YOU KNOW... broadband-An always-on your network: a Select Start > Control Panel > Network and Internet Connection > Network Connections. DNS (Domain Name...
... Subscriber Line) modem-A device that will limit your wireless network. encryption-The process of Web sites into cyberspace without security. A unique key is displayed.) c Select the Wireless Networks tab. Refer to the router instructions. ■ Use a firewall. Refer to your ISP's server, which in 10,000 DID YOU KNOW... broadband-An always-on your network: a Select Start > Control Panel > Network and Internet Connection > Network Connections. DNS (Domain Name...
Wireless Setup Guide
Page 7
... wireless communication device that indicates interoperability among wireless devices. WPA (Wi-Fi Protected Access)-A specificationbased, interoperable wireless security feature for sharing resources such as an Internet connection, printers, files, and drives. Learn more As millions of wireless security provided by Wi-Fi, based on number-sequence encryption. Resources to communicate among 802.11 products. static IP address-A fixed address assigned to a computer or device...
... wireless communication device that indicates interoperability among wireless devices. WPA (Wi-Fi Protected Access)-A specificationbased, interoperable wireless security feature for sharing resources such as an Internet connection, printers, files, and drives. Learn more As millions of wireless security provided by Wi-Fi, based on number-sequence encryption. Resources to communicate among 802.11 products. static IP address-A fixed address assigned to a computer or device...
Reference Guide
Page 5
...Using a Wireless LAN Adapter (Select Models Only 4-6 Making Wireless Network Connections (Select Models Only 4-7 To Turn Wireless Communication On and Off . . . . . 4-8 5 Add-On Devices Connecting External Devices 5-1 To Insert or Remove a PC Card 5-1 To Connect an Audio Device 5-3 To Connect a TV to Your Notebook (Select Models Only 5-4 To Connect a 1394 Device (Select Models Only 5-6 Installing Additional RAM (Memory 5-7 To Install a RAM Expansion Module 5-7 To Remove a RAM Expansion Module 5-9 Replacing the Hard Drive 5-11 To Replace the Hard Drive 5-11 To Replace the Hard Drive...
...Using a Wireless LAN Adapter (Select Models Only 4-6 Making Wireless Network Connections (Select Models Only 4-7 To Turn Wireless Communication On and Off . . . . . 4-8 5 Add-On Devices Connecting External Devices 5-1 To Insert or Remove a PC Card 5-1 To Connect an Audio Device 5-3 To Connect a TV to Your Notebook (Select Models Only 5-4 To Connect a 1394 Device (Select Models Only 5-6 Installing Additional RAM (Memory 5-7 To Install a RAM Expansion Module 5-7 To Remove a RAM Expansion Module 5-9 Replacing the Hard Drive 5-11 To Replace the Hard Drive 5-11 To Replace the Hard Drive...
Reference Guide
Page 11
.... 2 Hard drive activity On: Notebook is accessing the hard drive. 3 Battery status ■ Green: Battery pack is fully charged. ■ Amber: Battery pack is charging. ■ Blinking: Battery pack has reached a low-battery condition. ■ Off: No AC power is applied, or AC power is applied with Your Notebook Status Lights The notebook includes a number of status lights that report power and battery status, drive activity, and keyboard functions such as Caps Lock and Num Lock. Reference Guide 1-5 Getting Started with battery pack...
.... 2 Hard drive activity On: Notebook is accessing the hard drive. 3 Battery status ■ Green: Battery pack is fully charged. ■ Amber: Battery pack is charging. ■ Blinking: Battery pack has reached a low-battery condition. ■ Off: No AC power is applied, or AC power is applied with Your Notebook Status Lights The notebook includes a number of status lights that report power and battery status, drive activity, and keyboard functions such as Caps Lock and Num Lock. Reference Guide 1-5 Getting Started with battery pack...

Reference Guide
Page 20
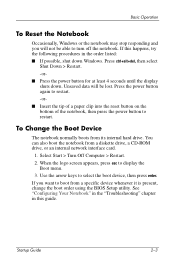
... of the notebook, then press the power button to display the Boot menu. 3. When the logo screen appears, press esc to restart. See "Configuring Your Notebook" in the "Troubleshooting" chapter in the order listed: ■ If possible, shut down . Select Start > Turn Off Computer > Restart. 2. You can also boot the notebook from its internal hard drive. Reference Guide 2-3 To Change the Boot Device The notebook normally boots from a diskette drive, a CD-ROM drive, or an internal network interface card. 1. Press ctrl...
... of the notebook, then press the power button to display the Boot menu. 3. When the logo screen appears, press esc to restart. See "Configuring Your Notebook" in the "Troubleshooting" chapter in the order listed: ■ If possible, shut down . Select Start > Turn Off Computer > Restart. 2. You can also boot the notebook from its internal hard drive. Reference Guide 2-3 To Change the Boot Device The notebook normally boots from a diskette drive, a CD-ROM drive, or an internal network interface card. 1. Press ctrl...
Reference Guide
Page 68
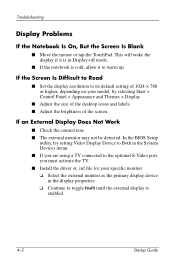
...; Set the display resolution to recognize the disc. ■ Restart the system: remove the disc from the drive, and select Start > Turn Off Computer > Restart. ■ If you created the CD on your model, by selecting Start > Control Panel > Appearance and Themes > Display. ■ Adjust the size of the desktop icons and labels. ■ Adjust the brightness of 1024 × 768 or higher, depending on a DVD/CDRW combo-type drive...
...; Set the display resolution to recognize the disc. ■ Restart the system: remove the disc from the drive, and select Start > Turn Off Computer > Restart. ■ If you created the CD on your model, by selecting Start > Control Panel > Appearance and Themes > Display. ■ Adjust the size of the desktop icons and labels. ■ Adjust the brightness of 1024 × 768 or higher, depending on a DVD/CDRW combo-type drive...
Reference Guide
Page 69
... Notebook Hard Drive Does Not Spin ■ Make sure the notebook has power. If necessary, connect the AC adapter, and make sure it is enabled. Troubleshooting If an External Display Does Not Work ■ Check the connections. ■ The external monitor may not be detected. Reference Guide 6-5 In the BIOS Setup utility, try setting Video Display Device to Both in the System Devices menu. ■ If you are using a TV connected to the optional S-Video port, you must activate the TV. ■ Install the driver...
... Notebook Hard Drive Does Not Spin ■ Make sure the notebook has power. If necessary, connect the AC adapter, and make sure it is enabled. Troubleshooting If an External Display Does Not Work ■ Check the connections. ■ The external monitor may not be detected. Reference Guide 6-5 In the BIOS Setup utility, try setting Video Display Device to Both in the System Devices menu. ■ If you are using a TV connected to the optional S-Video port, you must activate the TV. ■ Install the driver...
Reference Guide
Page 71
... You Type Press the TouchPad on the light. ■ Do not touch the TouchPad while the notebook is rebooting or resuming from Standby mode. Reference Guide 6-7 If the TouchPad Does Not Work ■ Press the TouchPad on-off button to turn off button while typing. ■ Use an external mouse if using the TouchPad is connected, the built-in or external devices. Troubleshooting Keyboard and Pointing Device Problems ✎ Use these suggestions for built-in pointing devices are normally disabled. If...
... You Type Press the TouchPad on the light. ■ Do not touch the TouchPad while the notebook is rebooting or resuming from Standby mode. Reference Guide 6-7 If the TouchPad Does Not Work ■ Press the TouchPad on-off button to turn off button while typing. ■ Use an external mouse if using the TouchPad is connected, the built-in or external devices. Troubleshooting Keyboard and Pointing Device Problems ✎ Use these suggestions for built-in pointing devices are normally disabled. If...
Reference Guide
Page 72
... Support > and use the Networking troubleshooter. ■ Open the hardware Device Manager: 1. Troubleshooting Local Area Network (LAN) Problems If the Built-In Network Adapter Does Not Connect to match the server frame type. Check with your frame type to the LAN ■ Check all cables and connections. You can do this in Control Panel under your network connection uses a proxy server, try to force your network administrator. Select Start > Control Panel > Performance and Maintenance > System. 2. Maximum cable length is disabled, try enabling the option...
... Support > and use the Networking troubleshooter. ■ Open the hardware Device Manager: 1. Troubleshooting Local Area Network (LAN) Problems If the Built-In Network Adapter Does Not Connect to match the server frame type. Check with your frame type to the LAN ■ Check all cables and connections. You can do this in Control Panel under your network connection uses a proxy server, try to force your network administrator. Select Start > Control Panel > Performance and Maintenance > System. 2. Maximum cable length is disabled, try enabling the option...
Reference Guide
Page 77
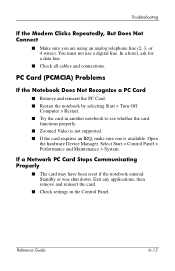
... the Control Panel. Open the hardware Device Manager. In a hotel, ask for a data line. ■ Check all cables and connections. Select Start > Control Panel > Performance and Maintenance > System. If a Network PC Card Stops Communicating Properly ■ The card may have been reset if the notebook entered Standby or was shut down. Reference Guide 6-13 You must not use a digital line. Exit any applications, then remove and reinsert the card. ■ Check settings in another notebook...
... the Control Panel. Open the hardware Device Manager. In a hotel, ask for a data line. ■ Check all cables and connections. Select Start > Control Panel > Performance and Maintenance > System. If a Network PC Card Stops Communicating Properly ■ The card may have been reset if the notebook entered Standby or was shut down. Reference Guide 6-13 You must not use a digital line. Exit any applications, then remove and reinsert the card. ■ Check settings in another notebook...
Reference Guide
Page 95
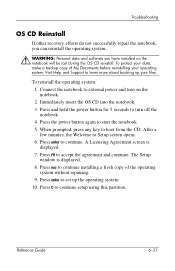
... external power and turn off the notebook. 4. Press F8 to set up your operating system. Press enter to accept the agreement and continue. Reference Guide 6-31 To reinstall the operating system: 1. The Setup window is displayed. 7. Press and hold the power button for 5 seconds to Setup screen opens. 6. After a few minutes, the Welcome to turn on the notebook will be lost during the OS CD reinstall. Visit Help and Support...
... external power and turn off the notebook. 4. Press F8 to set up your operating system. Press enter to accept the agreement and continue. Reference Guide 6-31 To reinstall the operating system: 1. The Setup window is displayed. 7. Press and hold the power button for 5 seconds to Setup screen opens. 6. After a few minutes, the Welcome to turn on the notebook will be lost during the OS CD reinstall. Visit Help and Support...
Reference Guide
Page 97
... 2-6 monitor resolution 5-4 volume 2-6 ALT GR key 2-9 alternate graphics (ALT GR) 2-9 antivirus software 2-15 AT commands 4-4 audio adjusting volume 2-6 device connection 5-3 jack location 1-3 mute button 1-3 port locations 5-3 troubleshooting 6-2 volume control location 1-3 B back panel components 1-3 battery packs checking battery status 1-5, 3-4 creating power schemes 3-3 disposal and recycling 3-8 disposing of 3-8 extending life of 3-6 installing 1-7 location 1-2 low-battery warning 3-5 recharging 3-5 release latch 1-4 saving power automatically 3-2 saving power manually 3-3 status lights...
... 2-6 monitor resolution 5-4 volume 2-6 ALT GR key 2-9 alternate graphics (ALT GR) 2-9 antivirus software 2-15 AT commands 4-4 audio adjusting volume 2-6 device connection 5-3 jack location 1-3 mute button 1-3 port locations 5-3 troubleshooting 6-2 volume control location 1-3 B back panel components 1-3 battery packs checking battery status 1-5, 3-4 creating power schemes 3-3 disposal and recycling 3-8 disposing of 3-8 extending life of 3-6 installing 1-7 location 1-2 low-battery warning 3-5 recharging 3-5 release latch 1-4 saving power automatically 3-2 saving power manually 3-3 status lights...

Reference Guide
Page 98
... 1-4 brightness, adjusting 2-6 buttons Click 1-2 One-Touch 1-2, 2-7 on-off (on TouchPad) 1-2 power 1-2, 1-10 reset 1-4 wireless on-off 1-2 C cable lock slot 1-3 CardBus slot location 1-3 CD-ROM drive copying/creating CDs 2-12 inserting CD 2-10 removing CD 2-10 troubleshooting 6-3 changing the boot device 2-3 cleaning the notebook 2-17 Click buttons 1-2 components back panel 1-3 bottom panel 1-4 keyboard status lights 1-2 left panel 1-3 status lights 1-1 configuring modem 4-4 notebook 6-23 connecting 1394 device 5-6 AC power 1-8 audio device 5-3 external devices 5-1 local area network (LAN...
... 1-4 brightness, adjusting 2-6 buttons Click 1-2 One-Touch 1-2, 2-7 on-off (on TouchPad) 1-2 power 1-2, 1-10 reset 1-4 wireless on-off 1-2 C cable lock slot 1-3 CardBus slot location 1-3 CD-ROM drive copying/creating CDs 2-12 inserting CD 2-10 removing CD 2-10 troubleshooting 6-3 changing the boot device 2-3 cleaning the notebook 2-17 Click buttons 1-2 components back panel 1-3 bottom panel 1-4 keyboard status lights 1-2 left panel 1-3 status lights 1-1 configuring modem 4-4 notebook 6-23 connecting 1394 device 5-6 AC power 1-8 audio device 5-3 external devices 5-1 local area network (LAN...
Reference Guide
Page 99
... CD 2-10 DVD 2-10 PC Card 5-1 RAM (memory) 5-7 K keyboard status lights 1-2, 1-6 troubleshooting 6-7 keys ALT GR 2-9 Applications 2-8 Fn (Function) 2-6 Windows 2-8 L LAN (local area network) connection 4-5 troubleshooting 6-8 using a wireless adapter 4-6 left panel components 1-3 locking hard drive 2-15 notebook 2-13 low-battery warning 3-5 M maintenance and care 2-16, 2-17 Mini PCI cover 1-4 modem AT commands 4-4 blackout periods 4-3 connecting 4-2 settings 4-4 troubleshooting 6-10 monitor resolution 5-4 N network jack, location 1-3 networks LAN 4-5 O One-Touch buttons 1-2, 2-7 on-off button...
... CD 2-10 DVD 2-10 PC Card 5-1 RAM (memory) 5-7 K keyboard status lights 1-2, 1-6 troubleshooting 6-7 keys ALT GR 2-9 Applications 2-8 Fn (Function) 2-6 Windows 2-8 L LAN (local area network) connection 4-5 troubleshooting 6-8 using a wireless adapter 4-6 left panel components 1-3 locking hard drive 2-15 notebook 2-13 low-battery warning 3-5 M maintenance and care 2-16, 2-17 Mini PCI cover 1-4 modem AT commands 4-4 blackout periods 4-3 connecting 4-2 settings 4-4 troubleshooting 6-10 monitor resolution 5-4 N network jack, location 1-3 networks LAN 4-5 O One-Touch buttons 1-2, 2-7 on-off button...
Reference Guide
Page 101
...BIOS 6-24 setup utility 6-23 slot location cable lock 1-3 PC Card and CardBus 1-3 software, restoring 6-32 Standby mode 2-2 startup, troubleshooting 6-19 status lights battery charge 1-5 hard drive 1-5 keyboard 1-2, 1-6 location 1-2 main 1-2, 1-5 meanings 1-5 wireless indicator 1-2 S-Video out jack location 1-3 using 5-4 system recovery 6-28 T telephone line connection 1-9 1394 port connecting 5-6 location 1-3 toggling built-in keypad 2-6 TouchPad 1-2 functions 2-5 troubleshooting 6-7 use of 2-4 troubleshooting audio 6-2 battery packs 6-15 CD-ROM drive 6-3 display 6-4 DVD drive 6-3 hard drive...
...BIOS 6-24 setup utility 6-23 slot location cable lock 1-3 PC Card and CardBus 1-3 software, restoring 6-32 Standby mode 2-2 startup, troubleshooting 6-19 status lights battery charge 1-5 hard drive 1-5 keyboard 1-2, 1-6 location 1-2 main 1-2, 1-5 meanings 1-5 wireless indicator 1-2 S-Video out jack location 1-3 using 5-4 system recovery 6-28 T telephone line connection 1-9 1394 port connecting 5-6 location 1-3 toggling built-in keypad 2-6 TouchPad 1-2 functions 2-5 troubleshooting 6-7 use of 2-4 troubleshooting audio 6-2 battery packs 6-15 CD-ROM drive 6-3 display 6-4 DVD drive 6-3 hard drive...
Startup Guide
Page 19
... internal network interface card. 1. You can also boot the notebook from its internal hard drive. If you will be able to turn off the notebook. See "Configuring Your Notebook" in the "Troubleshooting" chapter in the order listed: ■ If possible, shut down . Select Start > Turn Off Computer > Restart. 2. When the logo screen appears, press esc to boot from a specific device whenever it is present, change the boot order using the BIOS Setup utility. Use the arrow keys to restart. Startup Guide 2-3 Basic Operation...
... internal network interface card. 1. You can also boot the notebook from its internal hard drive. If you will be able to turn off the notebook. See "Configuring Your Notebook" in the "Troubleshooting" chapter in the order listed: ■ If possible, shut down . Select Start > Turn Off Computer > Restart. 2. When the logo screen appears, press esc to boot from a specific device whenever it is present, change the boot order using the BIOS Setup utility. Use the arrow keys to restart. Startup Guide 2-3 Basic Operation...
Startup Guide
Page 32
... connected to the optional S-Video port, you must activate the TV. ■ Install the driver or .inf file for your model, by selecting Start > Control Panel > Appearance and Themes > Display. ■ Adjust the size of the desktop icons and labels. ■ Adjust the brightness of 1024 × 768 or higher, depending on your specific monitor ❏ Select the external monitor as the primary display device in Display-off mode. ■ If the notebook is enabled. 4-2 Startup Guide...
... connected to the optional S-Video port, you must activate the TV. ■ Install the driver or .inf file for your model, by selecting Start > Control Panel > Appearance and Themes > Display. ■ Adjust the size of the desktop icons and labels. ■ Adjust the brightness of 1024 × 768 or higher, depending on your specific monitor ❏ Select the external monitor as the primary display device in Display-off mode. ■ If the notebook is enabled. 4-2 Startup Guide...
Startup Guide
Page 45
...13 updating 4-9 DVD drive creating data disc 2-7 creating movie disc 2-7 playing movies 2-7 setting region code 2-7 E external monitor connecting 2-8 port location 1-4 F function hot keys 2-6 H hard drive activity status light 1-6 location 1-3, 1-5 troubleshooting 4-3 Hibernation mode 2-2 hot keys 2-6 I identifying components 1-2 increasing display brightness 2-6 inserting the battery pack 1-8 K keyboard status lights 1-3, 1-7 troubleshooting 4-3 keys 2-6 L left panel components 1-4 low-battery warning 3-3 M Mini PCI cover 1-5 N network jack, location 1-4 O One-Touch buttons 1-3 on-off button...
...13 updating 4-9 DVD drive creating data disc 2-7 creating movie disc 2-7 playing movies 2-7 setting region code 2-7 E external monitor connecting 2-8 port location 1-4 F function hot keys 2-6 H hard drive activity status light 1-6 location 1-3, 1-5 troubleshooting 4-3 Hibernation mode 2-2 hot keys 2-6 I identifying components 1-2 increasing display brightness 2-6 inserting the battery pack 1-8 K keyboard status lights 1-3, 1-7 troubleshooting 4-3 keys 2-6 L left panel components 1-4 low-battery warning 3-3 M Mini PCI cover 1-5 N network jack, location 1-4 O One-Touch buttons 1-3 on-off button...
Startup Guide
Page 47
Index T telephone line connection 1-10 1394 port location 1-4 toggling built-in keypad 2-6 TouchPad 1-3 functions 2-5 troubleshooting 4-4 use of 2-4 troubleshooting battery packs 4-5 display 4-2 hard drive 4-3 keyboard 4-3 performance 4-4 power 4-5 startup 4-6 turning off the notebook 2-2 turning on the notebook 1-11, 2-2 U updating drivers 4-9 software 4-9 USB port location 1-4 using BIOS Setup Utility 4-7 V volume control 1-4 W wireless indicator light 1-3 on-off button 1-3 Index-4 Startup Guide
Index T telephone line connection 1-10 1394 port location 1-4 toggling built-in keypad 2-6 TouchPad 1-3 functions 2-5 troubleshooting 4-4 use of 2-4 troubleshooting battery packs 4-5 display 4-2 hard drive 4-3 keyboard 4-3 performance 4-4 power 4-5 startup 4-6 turning off the notebook 2-2 turning on the notebook 1-11, 2-2 U updating drivers 4-9 software 4-9 USB port location 1-4 using BIOS Setup Utility 4-7 V volume control 1-4 W wireless indicator light 1-3 on-off button 1-3 Index-4 Startup Guide


