
Wireless Setup Guide
Page 3
... to the manufacturer's instructions. (During this information in the "My Router Security Level" table on page 2. If the light is on, turn on the computer according to the manufacturer's instructions. Web site. 3 Location of the network and to configure the wireless router. 1 Set up and... turn it off by pressing the wireless on/off . If you successfully complete step 6, your Web browser and accessing a Web site. Ensure that...
... to the manufacturer's instructions. (During this information in the "My Router Security Level" table on page 2. If the light is on, turn on the computer according to the manufacturer's instructions. Web site. 3 Location of the network and to configure the wireless router. 1 Set up and... turn it off by pressing the wireless on/off . If you successfully complete step 6, your Web browser and accessing a Web site. Ensure that...

Wireless Setup Guide
Page 4
Highlight your network name in the Available wireless networks list. 3 Complete the following steps that correspond with wireless notebooks and wired desktop PROGRESS CHECK If you 're working, select Start > Connect To > Wireless Network Connection. (The Wireless Network Connection ... Select Connect. 1 Clear the check box for Enable IEEE 802.11x authentication for technical assistance. PROGRESS CHECK After step 1, the blue wireless light turns on. 1 Press the wireless on/off button on each computer in the "My Router Security Level" table on the taskbar. Example of network with...
Highlight your network name in the Available wireless networks list. 3 Complete the following steps that correspond with wireless notebooks and wired desktop PROGRESS CHECK If you 're working, select Start > Connect To > Wireless Network Connection. (The Wireless Network Connection ... Select Connect. 1 Clear the check box for Enable IEEE 802.11x authentication for technical assistance. PROGRESS CHECK After step 1, the blue wireless light turns on. 1 Press the wireless on/off button on each computer in the "My Router Security Level" table on the taskbar. Example of network with...

Wireless Setup Guide
Page 5
...d Change the SSID. Chance of getting a virus, a Trojan horse, or spam over the Web or through the Internet: 1 in turn connects to the Internet. broadband-An always-on the router. Services such as compared to dial-up to 1000 Mbps. 5 encryption-The ...Panel > Network and Internet Connection > Network Connections. DHCP (Dynamic Host Configuration Protocol)-A specification for more of being hacked through email: 1 in turn connects to the Internet. Setting the highest level of Web sites into cyberspace without security. cable modem-A device that connects a computer to a ...
...d Change the SSID. Chance of getting a virus, a Trojan horse, or spam over the Web or through the Internet: 1 in turn connects to the Internet. broadband-An always-on the router. Services such as compared to dial-up to 1000 Mbps. 5 encryption-The ...Panel > Network and Internet Connection > Network Connections. DHCP (Dynamic Host Configuration Protocol)-A specification for more of being hacked through email: 1 in turn connects to the Internet. Setting the highest level of Web sites into cyberspace without security. cable modem-A device that connects a computer to a ...
Wireless Setup Guide
Page 6
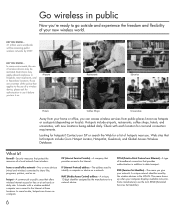
... Now you're ready to go outside and experience the freedom and flexibility of a wireless device, please ask for authorization to use it before you turn it on. If you are known as hotspots or coolspots (depending on . firewall-Security measures that applies to identify a computer or device on a network. A unique...
... Now you're ready to go outside and experience the freedom and flexibility of a wireless device, please ask for authorization to use it before you turn it on. If you are known as hotspots or coolspots (depending on . firewall-Security measures that applies to identify a computer or device on a network. A unique...

HP USB Digital Drive
Page 5
The status light on the Digital Drive turns on , remove the Digital Drive from the USB port, then reinsert the USB connector. 4 User Guide If the status light does not turn on when the connection is successful. To connect the Digital Drive to a USB port directly (with the connector cable in the unextended position): » Insert the USB connector on the Digital Drive into a USB port on your computer.
The status light on the Digital Drive turns on , remove the Digital Drive from the USB port, then reinsert the USB connector. 4 User Guide If the status light does not turn on when the connection is successful. To connect the Digital Drive to a USB port directly (with the connector cable in the unextended position): » Insert the USB connector on the Digital Drive into a USB port on your computer.

HP USB Digital Drive
Page 7
The status light on the Digital Drive turns on your computer. 2. Insert the USB connector on the Digital Drive into a USB port on when the connection is successful. If the status light does not turn on, remove the Digital Drive from the USB port, then reinsert the USB connector. 6 User Guide
The status light on the Digital Drive turns on your computer. 2. Insert the USB connector on the Digital Drive into a USB port on when the connection is successful. If the status light does not turn on, remove the Digital Drive from the USB port, then reinsert the USB connector. 6 User Guide
Reference Guide
Page 3
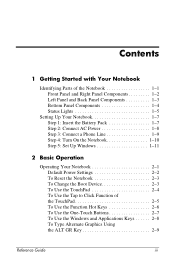
... 1: Insert the Battery Pack 1-7 Step 2: Connect AC Power 1-8 Step 3: Connect a Phone Line 1-9 Step 4: Turn On the Notebook 1-10 Step 5: Set Up Windows 1-11 2 Basic Operation Operating Your Notebook 2-1 Default Power Settings 2-2 To Reset the Notebook 2-3 To Change the Boot Device 2-3 To Use the TouchPad 2-4 To Use the Tap to Click Function of the TouchPad...
... 1: Insert the Battery Pack 1-7 Step 2: Connect AC Power 1-8 Step 3: Connect a Phone Line 1-9 Step 4: Turn On the Notebook 1-10 Step 5: Set Up Windows 1-11 2 Basic Operation Operating Your Notebook 2-1 Default Power Settings 2-2 To Reset the Notebook 2-3 To Change the Boot Device 2-3 To Use the TouchPad 2-4 To Use the Tap to Click Function of the TouchPad...
Reference Guide
Page 5
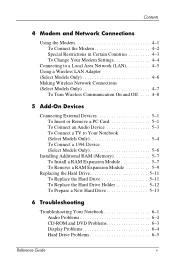
... Only 4-6 Making Wireless Network Connections (Select Models Only 4-7 To Turn Wireless Communication On and Off . . . . . 4-8 5 Add-On Devices Connecting External Devices 5-1 To Insert or Remove a PC Card 5-1 To Connect an Audio Device 5-3 To Connect a TV to Your Notebook (Select Models Only 5-4 To Connect a 1394 Device (Select Models... Drive 5-11 To Replace the Hard Drive Holder 5-12 To Prepare a New Hard Drive 5-13 6 Troubleshooting Troubleshooting Your Notebook 6-1 Audio Problems 6-2 CD-ROM and DVD Problems 6-3 Display Problems 6-4 Hard Drive Problems 6-5 Reference Guide v
... Only 4-6 Making Wireless Network Connections (Select Models Only 4-7 To Turn Wireless Communication On and Off . . . . . 4-8 5 Add-On Devices Connecting External Devices 5-1 To Insert or Remove a PC Card 5-1 To Connect an Audio Device 5-3 To Connect a TV to Your Notebook (Select Models Only 5-4 To Connect a 1394 Device (Select Models... Drive 5-11 To Replace the Hard Drive Holder 5-12 To Prepare a New Hard Drive 5-13 6 Troubleshooting Troubleshooting Your Notebook 6-1 Audio Problems 6-2 CD-ROM and DVD Problems 6-3 Display Problems 6-4 Hard Drive Problems 6-5 Reference Guide v

Reference Guide
Page 8
Hard drive 1-2 Reference Guide Getting Started with Your Notebook Front Panel and Right Panel Components 1 Main status lights (left to right): power mode, hard drive activity, and battery 2 TouchPad, scroll pad, Click buttons, and an on-off button 3 Power button: turns the notebook on and off 4 Keyboard status lights 5 One-Touch buttons 6 Notebook open/close latch 7 CD-ROM, DVD, or other drive 8 Battery pack 9 Wireless on-off button and indicator light (select models only) -
Hard drive 1-2 Reference Guide Getting Started with Your Notebook Front Panel and Right Panel Components 1 Main status lights (left to right): power mode, hard drive activity, and battery 2 TouchPad, scroll pad, Click buttons, and an on-off button 3 Power button: turns the notebook on and off 4 Keyboard status lights 5 One-Touch buttons 6 Notebook open/close latch 7 CD-ROM, DVD, or other drive 8 Battery pack 9 Wireless on-off button and indicator light (select models only) -
Reference Guide
Page 13
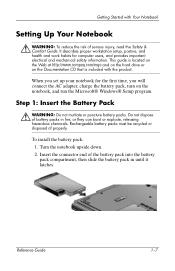
...connector end of battery packs in until it latches. When you set up your notebook for computer users, and provides important electrical and mechanical safety information. This guide is included with Your Notebook Setting Up Your Notebook Å WARNING: To reduce the risk of properly. Reference Guide 1-7 Rechargeable...the first time, you will connect the AC adapter, charge the battery pack, turn on the Documentation CD that is located on the Web at http://www.compaq.com/ergo and on the hard drive or on the notebook, and run the Microsoft® Windows® Setup program...
...connector end of battery packs in until it latches. When you set up your notebook for computer users, and provides important electrical and mechanical safety information. This guide is included with Your Notebook Setting Up Your Notebook Å WARNING: To reduce the risk of properly. Reference Guide 1-7 Rechargeable...the first time, you will connect the AC adapter, charge the battery pack, turn on the Documentation CD that is located on the Web at http://www.compaq.com/ergo and on the hard drive or on the notebook, and run the Microsoft® Windows® Setup program...
Reference Guide
Page 16
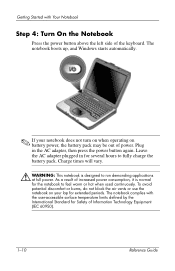
... fully charge the battery pack. To avoid potential discomfort or burns, do not block the air vents or use the notebook on your notebook does not turn on when operating on battery power, the battery pack may be out of increased power consumption, it is designed to...then press the power button again. Charge times will vary. Å WARNING: This notebook is normal for the notebook to run demanding applications at full power. The notebook complies with Your Notebook Step 4: Turn On the Notebook Press the power button above the left side of Information Technology Equipment (IEC 60950)....
... fully charge the battery pack. To avoid potential discomfort or burns, do not block the air vents or use the notebook on your notebook does not turn on when operating on battery power, the battery pack may be out of increased power consumption, it is designed to...then press the power button again. Charge times will vary. Å WARNING: This notebook is normal for the notebook to run demanding applications at full power. The notebook complies with Your Notebook Step 4: Turn On the Notebook Press the power button above the left side of Information Technology Equipment (IEC 60950)....

Reference Guide
Page 17
...Start > Control Panel > Printers and Other Hardware > Phone and Modem Options, then select your setup. 1. If the program prompts you turn on your notebook, the Windows Setup program runs automatically and includes opportunities to enter the Product ID code, locate the code on the bottom of the... notebook. 2. Getting Started with Your Notebook Step 5: Set Up Windows Your notebook has the Microsoft Windows operating system preinstalled on the screen. The first time you to customize your ...
...Start > Control Panel > Printers and Other Hardware > Phone and Modem Options, then select your setup. 1. If the program prompts you turn on your notebook, the Windows Setup program runs automatically and includes opportunities to enter the Product ID code, locate the code on the bottom of the... notebook. 2. Getting Started with Your Notebook Step 5: Set Up Windows Your notebook has the Microsoft Windows operating system preinstalled on the screen. The first time you to customize your ...
Reference Guide
Page 19
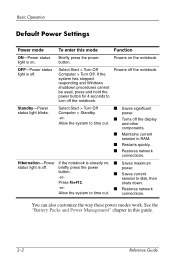
... power power. Briefly press the power button. button. ■ Saves current -or- OFF-Power status light is off the notebook. You can also customize the way these power modes work. and other components. ■ Maintains current session in this mode ...Function ON-Power status light is off the notebook. Hibernation-Power If the notebook is already on, ■ Saves maximum status light is on the notebook. session to turn off . Basic Operation Default Power Settings Power mode To enter this guide. ...
... power power. Briefly press the power button. button. ■ Saves current -or- OFF-Power status light is off the notebook. You can also customize the way these power modes work. and other components. ■ Maintains current session in this mode ...Function ON-Power status light is off the notebook. Hibernation-Power If the notebook is already on, ■ Saves maximum status light is on the notebook. session to turn off . Basic Operation Default Power Settings Power mode To enter this guide. ...
Reference Guide
Page 20
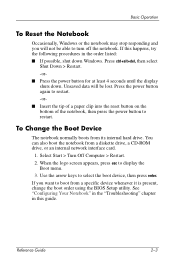
... the following procedures in this guide. If you will be able to display the Boot menu. 3. When the logo screen appears, press esc to turn off the notebook. Press ctrl+alt+del, then select Shut Down > Restart. -or■ Press the power button for at least 4 seconds until the display shuts down...
... the following procedures in this guide. If you will be able to display the Boot menu. 3. When the logo screen appears, press esc to turn off the notebook. Press ctrl+alt+del, then select Shut Down > Restart. -or■ Press the power button for at least 4 seconds until the display shuts down...
Reference Guide
Page 21
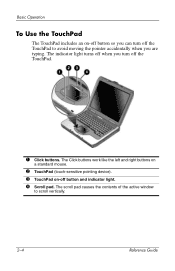
The indicator light turns off when you are typing. The Click buttons work like the left and right buttons on a standard mouse. 2 TouchPad (touch-sensitive pointing device). 3 TouchPad on -off button so you can turn off the TouchPad. 1 Click buttons. Basic Operation To Use the TouchPad The TouchPad includes an on -off button and indicator light. 4 Scroll pad. The scroll pad causes the contents of the active window to avoid moving the pointer accidentally when you turn off the TouchPad to scroll vertically. 2-4 Reference Guide
The indicator light turns off when you are typing. The Click buttons work like the left and right buttons on a standard mouse. 2 TouchPad (touch-sensitive pointing device). 3 TouchPad on -off button so you can turn off the TouchPad. 1 Click buttons. Basic Operation To Use the TouchPad The TouchPad includes an on -off button and indicator light. 4 Scroll pad. The scroll pad causes the contents of the active window to avoid moving the pointer accidentally when you turn off the TouchPad to scroll vertically. 2-4 Reference Guide
Reference Guide
Page 32
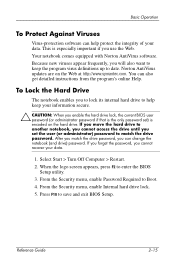
... Ä CAUTION: When you can change the notebook (and drive) password. To Lock the Hard Drive The notebook enables you set ) is the only password set the user (or administrator) password to Boot. 4. Select Start > Turn Off Computer > Restart. 2. From the Security ...menu, enable Password Required to match the drive password. Reference Guide 2-15 Your notebook comes equipped with Norton AntiVirus software. Because new viruses appear frequently, you...
... Ä CAUTION: When you can change the notebook (and drive) password. To Lock the Hard Drive The notebook enables you set ) is the only password set the user (or administrator) password to Boot. 4. Select Start > Turn Off Computer > Restart. 2. From the Security ...menu, enable Password Required to match the drive password. Reference Guide 2-15 Your notebook comes equipped with Norton AntiVirus software. Because new viruses appear frequently, you...

Reference Guide
Page 33
...or other internal components, are not indestructible and can flow freely around the notebook. This turns off the hard drive. A drop of Your Notebook Follow these recommendations to protect against bumps and jolts. ■ Set down the notebook gently. See the "Battery Packs and Power Management" chapter. 2-16 ... operation. ■ Avoid bumps or jolts. ■ Do not operate the notebook while traveling over bumpy terrain. ■ Put the notebook in Standby or shut it down the notebook or put it . Always set the notebook on a flat surface, so that air can be damaged by its display....
...or other internal components, are not indestructible and can flow freely around the notebook. This turns off the hard drive. A drop of Your Notebook Follow these recommendations to protect against bumps and jolts. ■ Set down the notebook gently. See the "Battery Packs and Power Management" chapter. 2-16 ... operation. ■ Avoid bumps or jolts. ■ Do not operate the notebook while traveling over bumpy terrain. ■ Put the notebook in Standby or shut it down the notebook or put it . Always set the notebook on a flat surface, so that air can be damaged by its display....

Reference Guide
Page 34
...(for both AC and battery pack operation) to the shortest comfortable interval. ■ Avoid using AC power and have no external monitor attached, put the notebook in Standby mode when not in the Disk Properties window. Instead, apply the cleaner to keep water out of the Display ■ Set the display... brightness to the lowest comfortable level (Fn+F1). ■ If you are not using an external monitor, set the Turn off or Standby timeouts. ■ If you use a screen saver, enable the option to the display. Do not use an excessively wet cloth, and ...
...(for both AC and battery pack operation) to the shortest comfortable interval. ■ Avoid using AC power and have no external monitor attached, put the notebook in Standby mode when not in the Disk Properties window. Instead, apply the cleaner to keep water out of the Display ■ Set the display... brightness to the lowest comfortable level (Fn+F1). ■ If you are not using an external monitor, set the Turn off or Standby timeouts. ■ If you use a screen saver, enable the option to the display. Do not use an excessively wet cloth, and ...
Reference Guide
Page 36
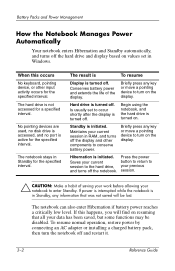
... and restart it. 3-2 Reference Guide If power is interrupted while the notebook is in Standby for the specified interval. Battery Packs and Power Management How the Notebook Manages Power Automatically Your notebook enters Hibernation and Standby automatically, and turns off the notebook. To resume normal operation, restore power by connecting an AC adapter or installing...
... and restart it. 3-2 Reference Guide If power is interrupted while the notebook is in Standby for the specified interval. Battery Packs and Power Management How the Notebook Manages Power Automatically Your notebook enters Hibernation and Standby automatically, and turns off the notebook. To resume normal operation, restore power by connecting an AC adapter or installing...
Reference Guide
Page 39
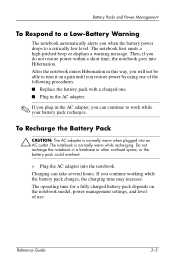
... normally warm when plugged into an AC outlet. Reference Guide 3-5 After the notebook enters Hibernation in this way, you will not be able to turn it on the notebook model, power management settings, and level of the following procedures: ■ Replace the battery pack with a charged one. ■... do not restore power within a short time, the notebook goes into the notebook. Then, if you restore power by using one of use. The notebook first emits a high-pitched beep or displays a warning message. Do not recharge the notebook in the AC adapter, you can take several hours....
... normally warm when plugged into an AC outlet. Reference Guide 3-5 After the notebook enters Hibernation in this way, you will not be able to turn it on the notebook model, power management settings, and level of the following procedures: ■ Replace the battery pack with a charged one. ■... do not restore power within a short time, the notebook goes into the notebook. Then, if you restore power by using one of use. The notebook first emits a high-pitched beep or displays a warning message. Do not recharge the notebook in the AC adapter, you can take several hours....


