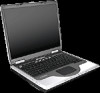
Wireless Setup Guide
Page 2
Your Internet connection should be operational before you can buy a wireless PC Card to record this information. Point-to get started! No action required. Start with integrated 802.11 WLAN (wireless local area network) capability. During router... with the modem, Internet service, and the broadband Internet configuration settings needed to record router security level. TIP: If you did not buy a wireless-enabled notebook, you begin the procedures in this booklet. Your Internet service provider (ISP) will provide you 're ready to -Point over Ethernet User Name (ID) ...
Your Internet connection should be operational before you can buy a wireless PC Card to record this information. Point-to get started! No action required. Start with integrated 802.11 WLAN (wireless local area network) capability. During router... with the modem, Internet service, and the broadband Internet configuration settings needed to record router security level. TIP: If you did not buy a wireless-enabled notebook, you begin the procedures in this booklet. Your Internet service provider (ISP) will provide you 're ready to -Point over Ethernet User Name (ID) ...
Reference Guide
Page 5
...Turn Wireless Communication On and Off . . . . . 4-8 5 Add-On Devices Connecting External Devices 5-1 To Insert or Remove a PC Card 5-1 To Connect an Audio Device 5-3 To Connect a TV to Your Notebook (Select Models Only 5-4 To Connect a 1394 Device (Select Models Only 5-6 Installing Additional RAM (Memory 5-7 To Install a RAM Expansion ... Drive 5-11 To Replace the Hard Drive Holder 5-12 To Prepare a New Hard Drive 5-13 6 Troubleshooting Troubleshooting Your Notebook 6-1 Audio Problems 6-2 CD-ROM and DVD Problems 6-3 Display Problems 6-4 Hard Drive Problems 6-5 Reference Guide v
...Turn Wireless Communication On and Off . . . . . 4-8 5 Add-On Devices Connecting External Devices 5-1 To Insert or Remove a PC Card 5-1 To Connect an Audio Device 5-3 To Connect a TV to Your Notebook (Select Models Only 5-4 To Connect a 1394 Device (Select Models Only 5-6 Installing Additional RAM (Memory 5-7 To Install a RAM Expansion ... Drive 5-11 To Replace the Hard Drive Holder 5-12 To Prepare a New Hard Drive 5-13 6 Troubleshooting Troubleshooting Your Notebook 6-1 Audio Problems 6-2 CD-ROM and DVD Problems 6-3 Display Problems 6-4 Hard Drive Problems 6-5 Reference Guide v
Reference Guide
Page 6
... 6-7 Local Area Network (LAN) Problems 6-8 Memory Problems 6-9 Modem Problems 6-10 PC Card (PCMCIA) Problems 6-13 Performance Problems 6-14 Power and Battery Pack Problems 6-15 Printing Problems 6-17 Serial, Parallel and USB Problems 6-18 Startup Problems 6-19 Wireless Problems 6-21 Configuring Your Notebook 6-23 To Run the BIOS Setup Utility 6-23 Updating Software...
... 6-7 Local Area Network (LAN) Problems 6-8 Memory Problems 6-9 Modem Problems 6-10 PC Card (PCMCIA) Problems 6-13 Performance Problems 6-14 Power and Battery Pack Problems 6-15 Printing Problems 6-17 Serial, Parallel and USB Problems 6-18 Startup Problems 6-19 Wireless Problems 6-21 Configuring Your Notebook 6-23 To Run the BIOS Setup Utility 6-23 Updating Software...
Reference Guide
Page 9
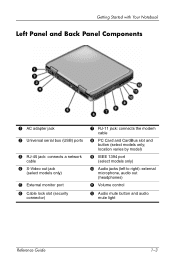
location varies by model) 9 IEEE 1394 port (select models only) - Getting Started with Your Notebook Left Panel and Back Panel Components 1 AC adapter jack 2 Universal serial bus (USB) ports 3 RJ-45 jack: connects a network cable 4 S-Video out jack (select models only) 5 External monitor port 6 Cable lock slot (security connector) 7 RJ-11 jack: connects the modem cable 8 PC Card and CardBus slot and button (select models only; Audio jacks (left to right): external microphone, audio out (headphones) q Volume control w Audio mute button and audio mute light Reference Guide 1-3
location varies by model) 9 IEEE 1394 port (select models only) - Getting Started with Your Notebook Left Panel and Back Panel Components 1 AC adapter jack 2 Universal serial bus (USB) ports 3 RJ-45 jack: connects a network cable 4 S-Video out jack (select models only) 5 External monitor port 6 Cable lock slot (security connector) 7 RJ-11 jack: connects the modem cable 8 PC Card and CardBus slot and button (select models only; Audio jacks (left to right): external microphone, audio out (headphones) q Volume control w Audio mute button and audio mute light Reference Guide 1-3
Reference Guide
Page 40
... off the light. ■ If you have a PC Card, such as a PC Card or a modem. ■ Set the display brightness to the lowest comfortable level (Fn+F1). ■ Put the notebook in Standby when you want to emphasize saving power. If your notebook has a multispeed processor, use significant power even while... they are inactive. ■ If you work with an application that uses the serial port or a PC Card, exit the application when you finish using the notebook for a short while. ■ Put the notebook in Hibernation whenever you will not be using it for a day or more. ■ Set the...
... off the light. ■ If you have a PC Card, such as a PC Card or a modem. ■ Set the display brightness to the lowest comfortable level (Fn+F1). ■ Put the notebook in Standby when you want to emphasize saving power. If your notebook has a multispeed processor, use significant power even while... they are inactive. ■ If you work with an application that uses the serial port or a PC Card, exit the application when you finish using the notebook for a short while. ■ Put the notebook in Hibernation whenever you will not be using it for a day or more. ■ Set the...
Reference Guide
Page 48
... to a compatible wireless network access point or to a mobile telephone service or a cordless telephone. A WLAN adapter cannot be used to connect the notebook to another networking device, such as a PC Card. ■ A wireless access point-Wireless access point functionality can be provided by a standalone device or be included with a WLAN adapter-The...
... to a compatible wireless network access point or to a mobile telephone service or a cordless telephone. A WLAN adapter cannot be used to connect the notebook to another networking device, such as a PC Card. ■ A wireless access point-Wireless access point functionality can be provided by a standalone device or be included with a WLAN adapter-The...
Reference Guide
Page 52
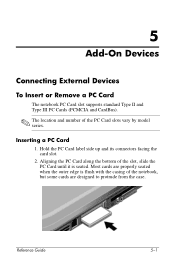
... to protrude from the case. Hold the PC Card label side up and its connectors facing the card slot. 2. 5 Add-On Devices Connecting External Devices To Insert or Remove a PC Card The notebook PC Card slot supports standard Type II and Type III PC Cards (PCMCIA and CardBus). ✎ The... location and number of the notebook, but some cards are properly seated when the outer edge is seated.
... to protrude from the case. Hold the PC Card label side up and its connectors facing the card slot. 2. 5 Add-On Devices Connecting External Devices To Insert or Remove a PC Card The notebook PC Card slot supports standard Type II and Type III PC Cards (PCMCIA and CardBus). ✎ The... location and number of the notebook, but some cards are properly seated when the outer edge is seated.
Reference Guide
Page 53
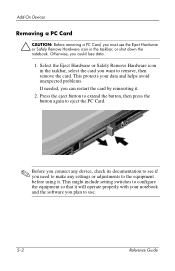
Select the Eject Hardware or Safely Remove Hardware icon in the taskbar, or shut down the notebook. Add-On Devices Removing a PC Card Ä CAUTION: Before removing a PC Card, you want to remove, then remove the card. Otherwise, you need to make any device, check its documentation to use...adjustments to the equipment before using it. This might include setting switches to configure the equipment so that it . 2. This protects your notebook and the software you can restart the card by reinserting it will operate properly with your data and helps avoid unexpected problems. If needed,...
Select the Eject Hardware or Safely Remove Hardware icon in the taskbar, or shut down the notebook. Add-On Devices Removing a PC Card Ä CAUTION: Before removing a PC Card, you want to remove, then remove the card. Otherwise, you need to make any device, check its documentation to use...adjustments to the equipment before using it. This might include setting switches to configure the equipment so that it . 2. This protects your notebook and the software you can restart the card by reinserting it will operate properly with your data and helps avoid unexpected problems. If needed,...
Reference Guide
Page 69
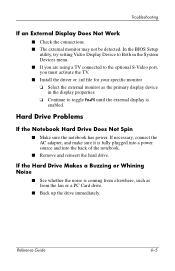
...the TV. ■ Install the driver or .inf file for your specific monitor ❏ Select the external monitor as from the fan or a PC Card drive. ■ Back up the drive immediately. If necessary, connect the AC adapter, and make sure it is enabled. Troubleshooting If an ...; Check the connections. ■ The external monitor may not be detected. Reference Guide 6-5 Hard Drive Problems If the Notebook Hard Drive Does Not Spin ■ Make sure the notebook has power. In the BIOS Setup utility, try setting Video Display Device to Both in the display properties ❏ Continue...
...the TV. ■ Install the driver or .inf file for your specific monitor ❏ Select the external monitor as from the fan or a PC Card drive. ■ Back up the drive immediately. If necessary, connect the AC adapter, and make sure it is enabled. Troubleshooting If an ...; Check the connections. ■ The external monitor may not be detected. Reference Guide 6-5 Hard Drive Problems If the Notebook Hard Drive Does Not Spin ■ Make sure the notebook has power. In the BIOS Setup utility, try setting Video Display Device to Both in the display properties ❏ Continue...
Reference Guide
Page 77
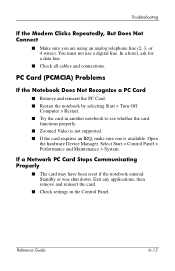
..., make sure one is available. Select Start > Control Panel > Performance and Maintenance > System. PC Card (PCMCIA) Problems If the Notebook Does Not Recognize a PC Card ■ Remove and reinsert the PC Card. ■ Restart the notebook by selecting Start > Turn Off Computer > Restart. ■ Try the card in the Control ...But Does Not Connect ■ Make sure you are using an analog telephone line (2, 3, or 4 wires). Reference Guide 6-13 If a Network PC Card Stops Communicating Properly ■ The card may have been reset if the notebook entered Standby or was shut down.
..., make sure one is available. Select Start > Control Panel > Performance and Maintenance > System. PC Card (PCMCIA) Problems If the Notebook Does Not Recognize a PC Card ■ Remove and reinsert the PC Card. ■ Restart the notebook by selecting Start > Turn Off Computer > Restart. ■ Try the card in the Control ...But Does Not Connect ■ Make sure you are using an analog telephone line (2, 3, or 4 wires). Reference Guide 6-13 If a Network PC Card Stops Communicating Properly ■ The card may have been reset if the notebook entered Standby or was shut down.
Reference Guide
Page 78
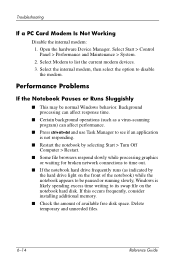
...consider installing additional memory. ■ Check the amount of the notebook) while the notebook appears to be normal Windows behavior. Select the internal modem, then... devices. 3. Open the hardware Device Manager. Performance Problems If the Notebook Pauses or Runs Sluggishly ■ This may be paused or running ...spending excess time writing to time out. ■ If the notebook hard drive frequently runs (as indicated by the hard drive light ... to see if an application is not responding. ■ Restart the notebook by selecting Start > Turn Off Computer > Restart. ■ Some ...
...consider installing additional memory. ■ Check the amount of the notebook) while the notebook appears to be normal Windows behavior. Select the internal modem, then... devices. 3. Open the hardware Device Manager. Performance Problems If the Notebook Pauses or Runs Sluggishly ■ This may be paused or running ...spending excess time writing to time out. ■ If the notebook hard drive frequently runs (as indicated by the hard drive light ... to see if an application is not responding. ■ Restart the notebook by selecting Start > Turn Off Computer > Restart. ■ Some ...
Reference Guide
Page 80
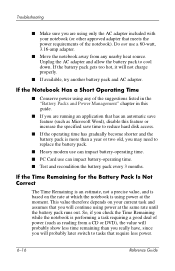
...this feature or increase the specified save feature (such as reading from any of the notebook). Do not use can impact battery-operating time. ■ PC Card use a 60-watt, 3.16-amp adapter. ■ Move the notebook away from a CD or DVD), the value will probably show less time remaining ... can impact battery-operating time. ■ Test and recondition the battery pack every 3 months. So, if you check the Time Remaining while the notebook is performing a task requiring a good deal of power (such as Microsoft Word), disable this guide. ■ If you are using only the ...
...this feature or increase the specified save feature (such as reading from any of the notebook). Do not use can impact battery-operating time. ■ PC Card use a 60-watt, 3.16-amp adapter. ■ Move the notebook away from a CD or DVD), the value will probably show less time remaining ... can impact battery-operating time. ■ Test and recondition the battery pack every 3 months. So, if you check the Time Remaining while the notebook is performing a task requiring a good deal of power (such as Microsoft Word), disable this guide. ■ If you are using only the ...
Reference Guide
Page 83
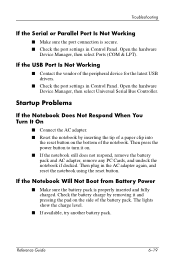
... the pad on the side of the peripheral device for the latest USB drivers. ■ Check the port settings in Control Panel. If the Notebook Will Not Boot from Battery Power ■ Make sure the battery pack is secure. ■ Check the port settings in Control Panel. If ... Connect the AC adapter. ■ Reset the notebook by removing it on the bottom of a paper clip into the reset button on . ■ If the notebook still does not respond, remove the battery pack and AC adapter, remove any PC Cards, and undock the notebook if docked. Check the battery charge by inserting...
... the pad on the side of the peripheral device for the latest USB drivers. ■ Check the port settings in Control Panel. If the Notebook Will Not Boot from Battery Power ■ Make sure the battery pack is secure. ■ Check the port settings in Control Panel. If ... Connect the AC adapter. ■ Reset the notebook by removing it on the bottom of a paper clip into the reset button on . ■ If the notebook still does not respond, remove the battery pack and AC adapter, remove any PC Cards, and undock the notebook if docked. Check the battery charge by inserting...
Reference Guide
Page 99
...mode 2-2 holder, hard drive 5-12 hot keys 2-6 I identifying components 1-1 increasing display brightness 2-6 inserting battery pack 1-7 CD 2-10 DVD 2-10 PC Card 5-1 RAM (memory) 5-7 K keyboard status lights 1-2, 1-6 troubleshooting 6-7 keys ALT GR 2-9 Applications 2-8 Fn (Function) 2-6 Windows 2-8 L... LAN (local area network) connection 4-5 troubleshooting 6-8 using a wireless adapter 4-6 left panel components 1-3 locking hard drive 2-15 notebook 2-13 low-battery warning 3-5 M maintenance and care 2-16, 2-17 Mini PCI cover 1-4 modem AT commands 4-4 blackout periods 4-3 connecting ...
...mode 2-2 holder, hard drive 5-12 hot keys 2-6 I identifying components 1-1 increasing display brightness 2-6 inserting battery pack 1-7 CD 2-10 DVD 2-10 PC Card 5-1 RAM (memory) 5-7 K keyboard status lights 1-2, 1-6 troubleshooting 6-7 keys ALT GR 2-9 Applications 2-8 Fn (Function) 2-6 Windows 2-8 L... LAN (local area network) connection 4-5 troubleshooting 6-8 using a wireless adapter 4-6 left panel components 1-3 locking hard drive 2-15 notebook 2-13 low-battery warning 3-5 M maintenance and care 2-16, 2-17 Mini PCI cover 1-4 modem AT commands 4-4 blackout periods 4-3 connecting ...
Reference Guide
Page 100
...System CD reinstall 6-31 repair 6-30 P parallel connection, troubleshooting 6-19 parts of the notebook back panel 1-3 bottom panel 1-4 left panel 1-3 status lights 1-5 password protection 2-13 PC Cards installing 5-1 removing 5-2 slot location 1-3 troubleshooting 6-13 performance, troubleshooting 6-14 ports 1394...installing 5-7 removing 5-9 troubleshooting 6-9 recharging the battery pack 3-5 reinstalling operating system 6-31 software 6-32 removing CD 2-10 DVD 2-10 PC Cards 5-2 RAM (memory) 5-9 repairing the operating system 6-30 reset button location 1-4 using 2-3 restoring software 6-32 RJ-11 ...
...System CD reinstall 6-31 repair 6-30 P parallel connection, troubleshooting 6-19 parts of the notebook back panel 1-3 bottom panel 1-4 left panel 1-3 status lights 1-5 password protection 2-13 PC Cards installing 5-1 removing 5-2 slot location 1-3 troubleshooting 6-13 performance, troubleshooting 6-14 ports 1394...installing 5-7 removing 5-9 troubleshooting 6-9 recharging the battery pack 3-5 reinstalling operating system 6-31 software 6-32 removing CD 2-10 DVD 2-10 PC Cards 5-2 RAM (memory) 5-9 repairing the operating system 6-30 reset button location 1-4 using 2-3 restoring software 6-32 RJ-11 ...
Reference Guide
Page 101
... attaching a cable 2-14 locking the hard drive 2-15 locking your notebook 2-13 protecting data 2-17 setting up a password 2-13 virus-protection software 2-15 serial port (COM1) troubleshooting 6-18 setting up the notebook connect phone line 1-9 connect power 1-8 install battery pack 1-7 power on... 1-10 set up Windows 1-11 troubleshooting 6-19 settings, BIOS 6-24 setup utility 6-23 slot location cable lock 1-3 PC Card and CardBus 1-3 software, restoring 6-32 Standby...
... attaching a cable 2-14 locking the hard drive 2-15 locking your notebook 2-13 protecting data 2-17 setting up a password 2-13 virus-protection software 2-15 serial port (COM1) troubleshooting 6-18 setting up the notebook connect phone line 1-9 connect power 1-8 install battery pack 1-7 power on... 1-10 set up Windows 1-11 troubleshooting 6-19 settings, BIOS 6-24 setup utility 6-23 slot location cable lock 1-3 PC Card and CardBus 1-3 software, restoring 6-32 Standby...

Startup Guide
Page 8
Getting Started with Your Notebook Left Panel and Back Panel Components 1 AC adapter jack 2 Universal serial bus (USB) ports 3 RJ-45 jack: connects a network cable 4 S-Video out jack (select models only) 5 External monitor port 6 Cable lock slot (security connector) 7 RJ-11 jack: connects the modem cable 8 PC Card and CardBus slot and button (select models only; location varies by model) 9 IEEE 1394 port (select models only) - Audio jacks (left to right): external microphone, audio out (headphones) q Volume control w Audio mute button and audio mute light 1-4 Startup Guide
Getting Started with Your Notebook Left Panel and Back Panel Components 1 AC adapter jack 2 Universal serial bus (USB) ports 3 RJ-45 jack: connects a network cable 4 S-Video out jack (select models only) 5 External monitor port 6 Cable lock slot (security connector) 7 RJ-11 jack: connects the modem cable 8 PC Card and CardBus slot and button (select models only; location varies by model) 9 IEEE 1394 port (select models only) - Audio jacks (left to right): external microphone, audio out (headphones) q Volume control w Audio mute button and audio mute light 1-4 Startup Guide

Startup Guide
Page 28
..., especially when using a CD-ROM or DVD drive, or any external connections such as a PC Card or a modem. ■ Set the display brightness to the lowest comfortable level (Fn+F1). ■ Put the notebook in Hibernation whenever you want to save your current session but will not be using it... it . Press the wireless on -off button, turn off the wireless function when you will not be using it . If your notebook has a wireless on -off button to emphasize saving power. Some PC Cards use the lower speed on battery power (the default settings conserve battery power). ■ If your...
..., especially when using a CD-ROM or DVD drive, or any external connections such as a PC Card or a modem. ■ Set the display brightness to the lowest comfortable level (Fn+F1). ■ Put the notebook in Hibernation whenever you want to save your current session but will not be using it... it . Press the wireless on -off button, turn off the wireless function when you will not be using it . If your notebook has a wireless on -off button to emphasize saving power. Some PC Cards use the lower speed on battery power (the default settings conserve battery power). ■ If your...
Startup Guide
Page 36
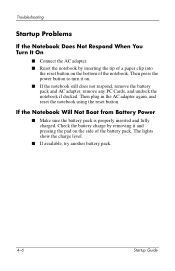
...Not Respond When You Turn It On ■ Connect the AC adapter. ■ Reset the notebook by removing it on the bottom of the notebook. Then plug in the AC adapter again, and reset the notebook using the reset button. Check the battery charge by inserting the tip of a paper clip into... the reset button on . ■ If the notebook still does not respond, remove the battery pack and AC adapter, remove any PC Cards, and undock the notebook if docked. The lights show the charge level. ■ If available, try another battery pack. 4-6 ...
...Not Respond When You Turn It On ■ Connect the AC adapter. ■ Reset the notebook by removing it on the bottom of the notebook. Then plug in the AC adapter again, and reset the notebook using the reset button. Check the battery charge by inserting the tip of a paper clip into... the reset button on . ■ If the notebook still does not respond, remove the battery pack and AC adapter, remove any PC Cards, and undock the notebook if docked. The lights show the charge level. ■ If available, try another battery pack. 4-6 ...
Startup Guide
Page 46
Index P parts of the notebook back panel 1-4 bottom panel 1-5 left panel 1-4 status lights 1-6 PC Card slot location 1-4 performance, troubleshooting 4-4 ports 1394 1-4 external monitor 1-4 USB 1-4 power button 1-3, 1-11 mode status light 1-6 settings 2-2 troubleshooting 4-5 ...(modem) jack connecting 1-10 location 1-4 RJ-45 (network) jack 1-4 S safeguarding data 4-10 safety information 1-1 scroll pad, location 1-3 setting up the notebook connect phone line 1-10 connect power 1-9 install battery pack 1-8 power on 1-11 set up Windows 1-12 troubleshooting 4-6 settings, BIOS 4-8 setup utility 4-7 ...
Index P parts of the notebook back panel 1-4 bottom panel 1-5 left panel 1-4 status lights 1-6 PC Card slot location 1-4 performance, troubleshooting 4-4 ports 1394 1-4 external monitor 1-4 USB 1-4 power button 1-3, 1-11 mode status light 1-6 settings 2-2 troubleshooting 4-5 ...(modem) jack connecting 1-10 location 1-4 RJ-45 (network) jack 1-4 S safeguarding data 4-10 safety information 1-1 scroll pad, location 1-3 setting up the notebook connect phone line 1-10 connect power 1-9 install battery pack 1-8 power on 1-11 set up Windows 1-12 troubleshooting 4-6 settings, BIOS 4-8 setup utility 4-7 ...


