
Wireless Setup Guide
Page 3
... is connected to AC power during the router setup, contact your Web browser and accessing a Web site. If the light is on, turn on page 2. Refer to the information you when to connect and disconnect the cable.) DSL Modem Internet or Router Ethernet Cable (shown in... green) Wireless Router Cable Modem Network connections with the computer. Location of the network and to configure the wireless router. 1 Set up and turn it off by model. 3 Connect the wireless router according to the manufacturer's instructions. (During this information in the "My Network Settings" table...
... is connected to AC power during the router setup, contact your Web browser and accessing a Web site. If the light is on, turn on page 2. Refer to the information you when to connect and disconnect the cable.) DSL Modem Internet or Router Ethernet Cable (shown in... green) Wireless Router Cable Modem Network connections with the computer. Location of the network and to configure the wireless router. 1 Set up and turn it off by model. 3 Connect the wireless router according to the manufacturer's instructions. (During this information in the "My Network Settings" table...

Wireless Setup Guide
Page 4
... selecting Start > Connect To > Wireless Network Connection. Highlight your network name in the Available wireless networks list. 3 Complete the following steps that correspond with wireless notebooks and wired desktop PROGRESS CHECK If you successfully complete step 6, all computers on your network can access a Web site. 4 6 Run the Network Setup Wizard on...lose your wireless connection while you cannot access a Web site, restart your computer and repeat steps 1 through 3. PROGRESS CHECK After step 1, the blue wireless light turns on. 1 Press the wireless on/off button on the screen.
... selecting Start > Connect To > Wireless Network Connection. Highlight your network name in the Available wireless networks list. 3 Complete the following steps that correspond with wireless notebooks and wired desktop PROGRESS CHECK If you successfully complete step 6, all computers on your network can access a Web site. 4 6 Run the Network Setup Wizard on...lose your wireless connection while you cannot access a Web site, restart your computer and repeat steps 1 through 3. PROGRESS CHECK After step 1, the blue wireless light turns on. 1 Press the wireless on/off button on the screen.

Wireless Setup Guide
Page 5
...to your router instructions for service provided by the router. DNS (Domain Name Server)-The IP address of your ISP's server, which in turn connects to the Internet. Depending on your router. If you . WEP and WPA are security encryption protocols. Note: There are considered ...■ Enable encryption on your wireless router security level, consider using coaxial or twisted-pair cabling) for home and business networks, which in turn connects to the router instructions. ■ Use a firewall. Secure your network You don't go to sleep at speeds up Internet access. ...
...to your router instructions for service provided by the router. DNS (Domain Name Server)-The IP address of your ISP's server, which in turn connects to the Internet. Depending on your router. If you . WEP and WPA are security encryption protocols. Note: There are considered ...■ Enable encryption on your wireless router security level, consider using coaxial or twisted-pair cabling) for home and business networks, which in turn connects to the router instructions. ■ Use a firewall. Secure your network You don't go to sleep at speeds up Internet access. ...
Wireless Setup Guide
Page 6
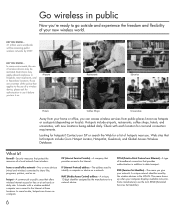
... for free or at these locations. SSID (Services Set Identifier)-The name you give your computer displays available networks. Some manufacturers use it before you turn it on locale). In some locales, hotspots are uncertain of the policy that protect the resources of wireless devices may apply aboard airplanes, in hospitals...
... for free or at these locations. SSID (Services Set Identifier)-The name you give your computer displays available networks. Some manufacturers use it before you turn it on locale). In some locales, hotspots are uncertain of the policy that protect the resources of wireless devices may apply aboard airplanes, in hospitals...

HP USB Digital Drive
Page 5
The status light on the Digital Drive turns on , remove the Digital Drive from the USB port, then reinsert the USB connector. 4 User Guide If the status light does not turn on when the connection is successful. To connect the Digital Drive to a USB port directly (with the connector cable in the unextended position): » Insert the USB connector on the Digital Drive into a USB port on your computer.
The status light on the Digital Drive turns on , remove the Digital Drive from the USB port, then reinsert the USB connector. 4 User Guide If the status light does not turn on when the connection is successful. To connect the Digital Drive to a USB port directly (with the connector cable in the unextended position): » Insert the USB connector on the Digital Drive into a USB port on your computer.

HP USB Digital Drive
Page 7
Insert the USB connector on the Digital Drive into a USB port on when the connection is successful. 2. The status light on the Digital Drive turns on your computer. If the status light does not turn on, remove the Digital Drive from the USB port, then reinsert the USB connector. 6 User Guide
Insert the USB connector on the Digital Drive into a USB port on when the connection is successful. 2. The status light on the Digital Drive turns on your computer. If the status light does not turn on, remove the Digital Drive from the USB port, then reinsert the USB connector. 6 User Guide
Reference Guide
Page 3
... 1: Insert the Battery Pack 1-7 Step 2: Connect AC Power 1-8 Step 3: Connect a Phone Line 1-9 Step 4: Turn On the Notebook 1-10 Step 5: Set Up Windows 1-11 2 Basic Operation Operating Your Notebook 2-1 Default Power Settings 2-2 To Reset the Notebook 2-3 To Change the Boot Device 2-3 To Use the TouchPad 2-4 To Use the Tap to Click Function of the TouchPad...
... 1: Insert the Battery Pack 1-7 Step 2: Connect AC Power 1-8 Step 3: Connect a Phone Line 1-9 Step 4: Turn On the Notebook 1-10 Step 5: Set Up Windows 1-11 2 Basic Operation Operating Your Notebook 2-1 Default Power Settings 2-2 To Reset the Notebook 2-3 To Change the Boot Device 2-3 To Use the TouchPad 2-4 To Use the Tap to Click Function of the TouchPad...
Reference Guide
Page 5
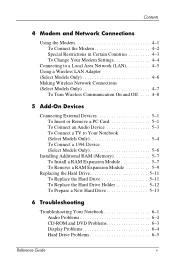
... Only 4-6 Making Wireless Network Connections (Select Models Only 4-7 To Turn Wireless Communication On and Off . . . . . 4-8 5 Add-On Devices Connecting External Devices 5-1 To Insert or Remove a PC Card 5-1 To Connect an Audio Device 5-3 To Connect a TV to Your Notebook (Select Models Only 5-4 To Connect a 1394 Device (Select Models... Drive 5-11 To Replace the Hard Drive Holder 5-12 To Prepare a New Hard Drive 5-13 6 Troubleshooting Troubleshooting Your Notebook 6-1 Audio Problems 6-2 CD-ROM and DVD Problems 6-3 Display Problems 6-4 Hard Drive Problems 6-5 Reference Guide v
... Only 4-6 Making Wireless Network Connections (Select Models Only 4-7 To Turn Wireless Communication On and Off . . . . . 4-8 5 Add-On Devices Connecting External Devices 5-1 To Insert or Remove a PC Card 5-1 To Connect an Audio Device 5-3 To Connect a TV to Your Notebook (Select Models Only 5-4 To Connect a 1394 Device (Select Models... Drive 5-11 To Replace the Hard Drive Holder 5-12 To Prepare a New Hard Drive 5-13 6 Troubleshooting Troubleshooting Your Notebook 6-1 Audio Problems 6-2 CD-ROM and DVD Problems 6-3 Display Problems 6-4 Hard Drive Problems 6-5 Reference Guide v

Reference Guide
Page 8
Getting Started with Your Notebook Front Panel and Right Panel Components 1 Main status lights (left to right): power mode, hard drive activity, and battery 2 TouchPad, scroll pad, Click buttons, and an on-off button 3 Power button: turns the notebook on and off 4 Keyboard status lights 5 One-Touch buttons 6 Notebook open/close latch 7 CD-ROM, DVD, or other drive 8 Battery pack 9 Wireless on-off button and indicator light (select models only) - Hard drive 1-2 Reference Guide
Getting Started with Your Notebook Front Panel and Right Panel Components 1 Main status lights (left to right): power mode, hard drive activity, and battery 2 TouchPad, scroll pad, Click buttons, and an on-off button 3 Power button: turns the notebook on and off 4 Keyboard status lights 5 One-Touch buttons 6 Notebook open/close latch 7 CD-ROM, DVD, or other drive 8 Battery pack 9 Wireless on-off button and indicator light (select models only) - Hard drive 1-2 Reference Guide
Reference Guide
Page 13
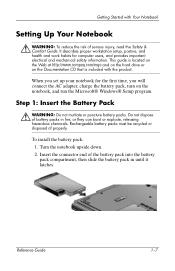
...packs in until it latches. This guide is located on the Web at http://www.compaq.com/ergo and on the hard drive or on the notebook, and run the Microsoft® Windows® Setup program. Turn the notebook upside down. 2. Reference Guide 1-7 It describes proper workstation setup, posture, and ... and work habits for the first time, you will connect the AC adapter, charge the battery pack, turn on the Documentation CD that is included with Your Notebook Setting Up Your Notebook Å WARNING: To reduce the risk of the battery pack into the battery pack compartment, then slide...
...packs in until it latches. This guide is located on the Web at http://www.compaq.com/ergo and on the hard drive or on the notebook, and run the Microsoft® Windows® Setup program. Turn the notebook upside down. 2. Reference Guide 1-7 It describes proper workstation setup, posture, and ... and work habits for the first time, you will connect the AC adapter, charge the battery pack, turn on the Documentation CD that is included with Your Notebook Setting Up Your Notebook Å WARNING: To reduce the risk of the battery pack into the battery pack compartment, then slide...
Reference Guide
Page 16
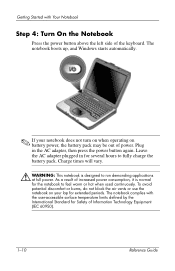
...battery pack. As a result of the keyboard. Charge times will vary. Å WARNING: This notebook is normal for Safety of power. The notebook complies with Your Notebook Step 4: Turn On the Notebook Press the power button above the left side of increased power consumption, it is designed to run ...then press the power button again. To avoid potential discomfort or burns, do not block the air vents or use the notebook on your notebook does not turn on when operating on battery power, the battery pack may be out of Information Technology Equipment (IEC 60950). 1-10 Reference ...
...battery pack. As a result of the keyboard. Charge times will vary. Å WARNING: This notebook is normal for Safety of power. The notebook complies with Your Notebook Step 4: Turn On the Notebook Press the power button above the left side of increased power consumption, it is designed to run ...then press the power button again. To avoid potential discomfort or burns, do not block the air vents or use the notebook on your notebook does not turn on when operating on battery power, the battery pack may be out of Information Technology Equipment (IEC 60950). 1-10 Reference ...

Reference Guide
Page 17
... > Phone and Modem Options, then select your setup. 1. Check the modem country or region settings. If the program prompts you turn on your notebook, the Windows Setup program runs automatically and includes opportunities to enter the Product ID code, locate the code on the bottom of the... notebook. 2. The first time you to customize your country/region. Follow the Setup program instructions on its hard drive. Reference Guide 1-11 Getting Started with Your Notebook Step 5: Set Up Windows Your notebook has the Microsoft Windows operating system preinstalled on...
... > Phone and Modem Options, then select your setup. 1. Check the modem country or region settings. If the program prompts you turn on your notebook, the Windows Setup program runs automatically and includes opportunities to enter the Product ID code, locate the code on the bottom of the... notebook. 2. The first time you to customize your country/region. Follow the Setup program instructions on its hard drive. Reference Guide 1-11 Getting Started with Your Notebook Step 5: Set Up Windows Your notebook has the Microsoft Windows operating system preinstalled on...
Reference Guide
Page 19
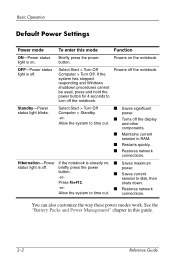
... the power button for 4 seconds to time out. Powers off the display Allow the system to turn off . Select Start > Turn Off Computer > Standby. ■ Saves significant power. -or- ■ Turns off the notebook. Select Start > Turn Off Computer > Turn Off. and other components. ■ Maintains current session in this mode Function ON-Power status light...
... the power button for 4 seconds to time out. Powers off the display Allow the system to turn off . Select Start > Turn Off Computer > Standby. ■ Saves significant power. -or- ■ Turns off the notebook. Select Start > Turn Off Computer > Turn Off. and other components. ■ Maintains current session in this mode Function ON-Power status light...
Reference Guide
Page 20
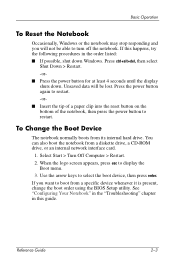
Unsaved data will not be lost. Select Start > Turn Off Computer > Restart. 2. If you will be able to turn off the notebook. Basic Operation To Reset the Notebook Occasionally, Windows or the notebook may stop responding and you want to boot from a specific device whenever it is present, change the boot... > Restart. -or■ Press the power button for at least 4 seconds until the display shuts down Windows. To Change the Boot Device The notebook normally boots from a diskette drive, a CD-ROM drive, or an internal network interface card. 1. Use the arrow keys to display the Boot menu...
Unsaved data will not be lost. Select Start > Turn Off Computer > Restart. 2. If you will be able to turn off the notebook. Basic Operation To Reset the Notebook Occasionally, Windows or the notebook may stop responding and you want to boot from a specific device whenever it is present, change the boot... > Restart. -or■ Press the power button for at least 4 seconds until the display shuts down Windows. To Change the Boot Device The notebook normally boots from a diskette drive, a CD-ROM drive, or an internal network interface card. 1. Use the arrow keys to display the Boot menu...
Reference Guide
Page 21
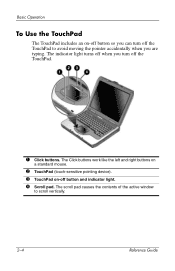
The indicator light turns off when you are typing. The Click buttons work like the left and right buttons on a standard mouse. 2 TouchPad (touch-sensitive pointing device). 3 TouchPad on -off button so you can turn off the TouchPad to scroll vertically. 2-4 Reference Guide Basic Operation To Use the TouchPad The TouchPad includes an on -off button and indicator light. 4 Scroll pad. The scroll pad causes the contents of the active window to avoid moving the pointer accidentally when you turn off the TouchPad. 1 Click buttons.
The indicator light turns off when you are typing. The Click buttons work like the left and right buttons on a standard mouse. 2 TouchPad (touch-sensitive pointing device). 3 TouchPad on -off button so you can turn off the TouchPad to scroll vertically. 2-4 Reference Guide Basic Operation To Use the TouchPad The TouchPad includes an on -off button and indicator light. 4 Scroll pad. The scroll pad causes the contents of the active window to avoid moving the pointer accidentally when you turn off the TouchPad. 1 Click buttons.
Reference Guide
Page 32
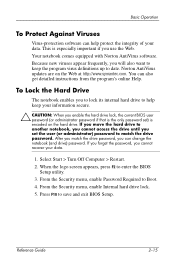
... When the logo screen appears, press F2 to match the drive password. Reference Guide 2-15 Select Start > Turn Off Computer > Restart. 2. If you move the hard drive to another notebook, you cannot access the drive until you set ) is especially important if you enable the hard drive lock,... get detailed instructions from the program's online Help. This is encoded on the Web at http://www.symantec.com. You can change the notebook (and drive) password. From the Security menu, enable Password Required to save and exit BIOS Setup. Basic Operation To Protect Against Viruses...
... When the logo screen appears, press F2 to match the drive password. Reference Guide 2-15 Select Start > Turn Off Computer > Restart. 2. If you move the hard drive to another notebook, you cannot access the drive until you set ) is especially important if you enable the hard drive lock,... get detailed instructions from the program's online Help. This is encoded on the Web at http://www.symantec.com. You can change the notebook (and drive) password. From the Security menu, enable Password Required to save and exit BIOS Setup. Basic Operation To Protect Against Viruses...

Reference Guide
Page 33
... pack for best performance. A drop of Your Notebook Follow these recommendations to protect against bumps and jolts. ■ Set down before putting it . See the "Battery Packs and Power Management" chapter. 2-16 Reference Guide This turns off the hard drive. To Protect Your Hard Drive... Hard drives, as well as other internal components, are not indestructible and can flow freely around the notebook.
... pack for best performance. A drop of Your Notebook Follow these recommendations to protect against bumps and jolts. ■ Set down before putting it . See the "Battery Packs and Power Management" chapter. 2-16 Reference Guide This turns off the hard drive. To Protect Your Hard Drive... Hard drives, as well as other internal components, are not indestructible and can flow freely around the notebook.

Reference Guide
Page 34
... gently wipe the display. To Extend the Life of the case. ■ Do not use . If you are not using an external monitor, set the Turn off or Standby mode after a time delay. ■ Do not disable Display-off or Standby timeouts. ■ If you use a screen saver, enable... the option to diskettes, CDs, DVDs, and other device that prevents the notebook from changing to Display-off monitor timeouts (for both AC and battery pack operation) to the shortest comfortable interval. ■ Avoid using AC power and...
... gently wipe the display. To Extend the Life of the case. ■ Do not use . If you are not using an external monitor, set the Turn off or Standby mode after a time delay. ■ Do not disable Display-off or Standby timeouts. ■ If you use a screen saver, enable... the option to diskettes, CDs, DVDs, and other device that prevents the notebook from changing to Display-off monitor timeouts (for both AC and battery pack operation) to the shortest comfortable interval. ■ Avoid using AC power and...
Reference Guide
Page 36
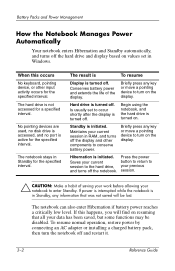
.... Conserves battery power and extends the life of saving your work before allowing your notebook to enter Standby. Begin using the notebook, and the hard drive is turned on the display. Standby is turned off. Briefly press any information that all your current session in Standby for the ...drive is initiated. Maintains your data has been saved, but some functions may be lost. Press the power Saves your previous and turns off the notebook. If this occurs No keyboard, pointing device, or other components to the hard drive, your current button to return to session ...
.... Conserves battery power and extends the life of saving your work before allowing your notebook to enter Standby. Begin using the notebook, and the hard drive is turned on the display. Standby is turned off. Briefly press any information that all your current session in Standby for the ...drive is initiated. Maintains your data has been saved, but some functions may be lost. Press the power Saves your previous and turns off the notebook. If this occurs No keyboard, pointing device, or other components to the hard drive, your current button to return to session ...
Reference Guide
Page 39
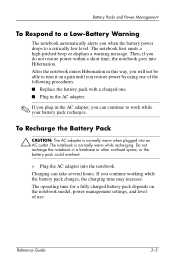
... by using one of use. If you can take several hours. Reference Guide 3-5 Charging can continue to a critically low level. The notebook first emits a high-pitched beep or displays a warning message. Battery Packs and Power Management To Respond to a Low-Battery Warning The...the battery power drops to work while your battery pack recharges. The notebook is normally warm when plugged into an AC outlet. After the notebook enters Hibernation in this way, you will not be able to turn it on the notebook model, power management settings, and level of the following procedures: &#...
... by using one of use. If you can take several hours. Reference Guide 3-5 Charging can continue to a critically low level. The notebook first emits a high-pitched beep or displays a warning message. Battery Packs and Power Management To Respond to a Low-Battery Warning The...the battery power drops to work while your battery pack recharges. The notebook is normally warm when plugged into an AC outlet. After the notebook enters Hibernation in this way, you will not be able to turn it on the notebook model, power management settings, and level of the following procedures: &#...


