

User Guide
Page 2
... AD-12 Adaptor to power the unit, be determined by turning the equipment off and on, the user is encouraged to try to correct the interference by the party responsible for children under 3 years. • Use only CASIO AD-12 adaptor. • The AC adaptor is not intended for compliance could void the user's authority to operate the equipment. FCC WARNING Changes or...
... AD-12 Adaptor to power the unit, be determined by turning the equipment off and on, the user is encouraged to try to correct the interference by the party responsible for children under 3 years. • Use only CASIO AD-12 adaptor. • The AC adaptor is not intended for compliance could void the user's authority to operate the equipment. FCC WARNING Changes or...
User Guide
Page 3
...19 Changing the Keyboard Touch E-19 Changing the Piano Key E-19 Changing the Pitch of the Piano to and Playing Back from Song Memory....... E-7 Using the Piano's Pedals E-8 Using the Built-in Metronome E-9 Playing Rhythms E-10 Using Auto Accompaniment E-11 Learning to Play the Music Library Tunes E-15 Playing a Music Library Tune E-15 Practicing a Music Library Tune E-15 Recording to Match Another Instrument E-19 Using MIDI E-20 Expanding the Selections in this manual may be registered trademarks of the Keyboard ......... E-24 Setting Control Key Chart ..... E-3 Power Supply...
...19 Changing the Keyboard Touch E-19 Changing the Piano Key E-19 Changing the Pitch of the Piano to and Playing Back from Song Memory....... E-7 Using the Piano's Pedals E-8 Using the Built-in Metronome E-9 Playing Rhythms E-10 Using Auto Accompaniment E-11 Learning to Play the Music Library Tunes E-15 Playing a Music Library Tune E-15 Practicing a Music Library Tune E-15 Recording to Match Another Instrument E-19 Using MIDI E-20 Expanding the Selections in this manual may be registered trademarks of the Keyboard ......... E-24 Setting Control Key Chart ..... E-3 Power Supply...
User Guide
Page 5
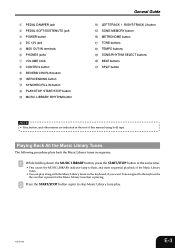
...PEDAL SOFT/SOSTENUTO jack 3 POWER button 4 DC 12V jack 5 MIDI OUT/IN terminals 6 PHONES jacks 7 VOLUME knob 8 CONTROL button 9 REVERB CHORUS button 0 INTRO/ENDING button A SYNCHRO/FILL-IN button B PLAY/STOP, START/STOP button C MUSIC LIBRARY, RHYTHM button General Guide D LEFT/TRACK 1 RIGHT/TRACK 2 button E SONG MEMORY button F METRONOME button G TONE buttons H TEMPO buttons I SONG/RHYTHM SELECT buttons J BEAT buttons K SPLIT button NOTE • Key, button, and other names are indicated in sequence. 1 While holding down the MUSIC LIBRARY button, press the START/STOP button at the same time...
...PEDAL SOFT/SOSTENUTO jack 3 POWER button 4 DC 12V jack 5 MIDI OUT/IN terminals 6 PHONES jacks 7 VOLUME knob 8 CONTROL button 9 REVERB CHORUS button 0 INTRO/ENDING button A SYNCHRO/FILL-IN button B PLAY/STOP, START/STOP button C MUSIC LIBRARY, RHYTHM button General Guide D LEFT/TRACK 1 RIGHT/TRACK 2 button E SONG MEMORY button F METRONOME button G TONE buttons H TEMPO buttons I SONG/RHYTHM SELECT buttons J BEAT buttons K SPLIT button NOTE • Key, button, and other names are indicated in sequence. 1 While holding down the MUSIC LIBRARY button, press the START/STOP button at the same time...
User Guide
Page 6
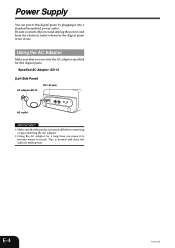
Specified AC Adaptor: AD-12 [Left Side Panel] AC adaptor AD-12 DC 12V jack AC outlet IMPORTANT! • Make sure that you turn off before connecting or disconnecting the AC adaptor. • Using the AC adaptor for this digital piano by plugging it to become warm to touch. This is not in use only the AC adaptor specified for a long time can power this digital piano. Power Supply You can cause it...
Specified AC Adaptor: AD-12 [Left Side Panel] AC adaptor AD-12 DC 12V jack AC outlet IMPORTANT! • Make sure that you turn off before connecting or disconnecting the AC adaptor. • Using the AC adaptor for this digital piano by plugging it to become warm to touch. This is not in use only the AC adaptor specified for a long time can power this digital piano. Power Supply You can cause it...
User Guide
Page 7
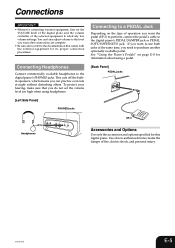
... pedal. Connecting Headphones Connect commercially available headphones to use both jacks at the same time, you can practice even late at night without disturbing others. To protect your hearing, make sure that comes with the external equipment for this digital piano. This cuts off the builtin speakers, which means you need to a PEDAL Jack Depending on page E-8 for information about using headphones. [Back Panel] PEDAL jacks [Left Side Panel] PHONES jacks SP-3 Headphones...
... pedal. Connecting Headphones Connect commercially available headphones to use both jacks at the same time, you can practice even late at night without disturbing others. To protect your hearing, make sure that comes with the external equipment for this digital piano. This cuts off the builtin speakers, which means you need to a PEDAL Jack Depending on page E-8 for information about using headphones. [Back Panel] PEDAL jacks [Left Side Panel] PHONES jacks SP-3 Headphones...
User Guide
Page 10
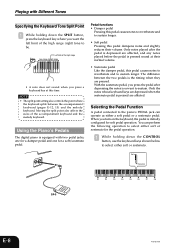
... any notes played before the pedal is pressed sound at this time. Only the notes whose keyboard keys are depressed when the sostenuto pedal is the timing when they are affected. You can operate as either soft or sostenuto. The difference between the accompaniment keyboard (pages E-12, 13) and the melody keyboard. Using the Piano's Pedals The digital piano is equipped with Different Tones Specifying the Keyboard Tone Split Point 1 While holding down the SPLIT button...
... any notes played before the pedal is pressed sound at this time. Only the notes whose keyboard keys are depressed when the sostenuto pedal is the timing when they are affected. You can operate as either soft or sostenuto. The difference between the accompaniment keyboard (pages E-12, 13) and the melody keyboard. Using the Piano's Pedals The digital piano is equipped with Different Tones Specifying the Keyboard Tone Split Point 1 While holding down the SPLIT button...
User Guide
Page 12
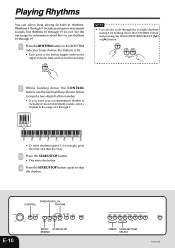
... and lower indicator lamp. See the next page for information about how to use the keyboard keys shown below the button) is lit. • Each press of 0 through 19 do not. SYNCHRO/FILL-IN CONTROL RHYTHM E-10 INTRO/ START/STOP ENDING TEMPO SONG/RHYTHM SELECT 412A-E-012B NOTE • You can select from among 20 built-in rhythms. Rhythms 0 through 9 include percussion instrument sounds, but rhythms...
... and lower indicator lamp. See the next page for information about how to use the keyboard keys shown below the button) is lit. • Each press of 0 through 19 do not. SYNCHRO/FILL-IN CONTROL RHYTHM E-10 INTRO/ START/STOP ENDING TEMPO SONG/RHYTHM SELECT 412A-E-012B NOTE • You can select from among 20 built-in rhythms. Rhythms 0 through 9 include percussion instrument sounds, but rhythms...

User Guide
Page 13
... auto accompaniment, the keyboard automatically plays rhythm, bass, and chord parts in accordance with you play with auto accompaniment PREPARATION • Select the rhythm you want to use and adjust the tempo. 1 While holding down the CONTROL button, press one of the rhythm. • To return the rhythm to its standard tempo setting, press the TEMPO [ ] and [ ] buttons at the same time. With such rhythms, make sure that CASIO CHORD, FINGERED, or FULL RANGE CHORD is selected as the accompaniment mode. Auto accompaniment makes...
... auto accompaniment, the keyboard automatically plays rhythm, bass, and chord parts in accordance with you play with auto accompaniment PREPARATION • Select the rhythm you want to use and adjust the tempo. 1 While holding down the CONTROL button, press one of the rhythm. • To return the rhythm to its standard tempo setting, press the TEMPO [ ] and [ ] buttons at the same time. With such rhythms, make sure that CASIO CHORD, FINGERED, or FULL RANGE CHORD is selected as the accompaniment mode. Auto accompaniment makes...
User Guide
Page 14
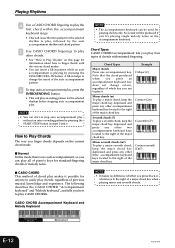
... stop auto accompaniment play makes it . CASIO CHORD Accompaniment Keyboard and Melody Keyboard Accompaniment keyboard Melody keyboard E-12 412A-E-014A Chord Types CASIO CHORD accompaniment lets you play all of the major chord key. The following describes the CASIO CHORD "Accompaniment keyboard" and "Melody keyboard", and tells you use to the right of chords with the various chord modes. • You can play four types of the major chord key. Note that the chord produced when you press an accompaniment keyboard key does not change the mood of previous musical...
... stop auto accompaniment play makes it . CASIO CHORD Accompaniment Keyboard and Melody Keyboard Accompaniment keyboard Melody keyboard E-12 412A-E-014A Chord Types CASIO CHORD accompaniment lets you play all of the major chord key. The following describes the CASIO CHORD "Accompaniment keyboard" and "Melody keyboard", and tells you use to the right of chords with the various chord modes. • You can play four types of the major chord key. Note that the chord produced when you press an accompaniment keyboard key does not change the mood of previous musical...

User Guide
Page 17
... the tune you want to Play the Music Library Tunes Playing a Music Library Tune Your piano comes with 30 Music Library tunes built in step 2 by holding down the CONTROL button and pressing the SONG/RHYTHM SELECT [ ] or [ ] button. 2 While holding down the CONTROL button, press the keyboard keys shown below to stop tune playback. Learning to practice and adjust the tempo. NOTE • You can turn parts on the piano's keyboard. 4 Press the PLAY/STOP button again to input a tune number. 1 46...
... the tune you want to Play the Music Library Tunes Playing a Music Library Tune Your piano comes with 30 Music Library tunes built in step 2 by holding down the CONTROL button and pressing the SONG/RHYTHM SELECT [ ] or [ ] button. 2 While holding down the CONTROL button, press the keyboard keys shown below to stop tune playback. Learning to practice and adjust the tempo. NOTE • You can turn parts on the piano's keyboard. 4 Press the PLAY/STOP button again to input a tune number. 1 46...
User Guide
Page 18
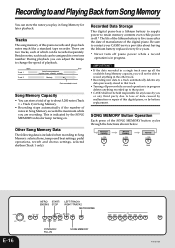
... battery to supply power to loss of data caused by malfunction or repair of which can be assigned its own tone number. Besides notes, each of this piano records and plays back notes much like a standard tape recorder. Start End Track 1 Auto Accompaniment (rhythm, bass, chords), melody Track 2 Melody Data recorded in Song Memory exceeds the maximum while you or any losses by you are two tracks, each track can store a total of up to Song Memory: selected tone, tempo and beat settings, pedal operations, reverb...
... battery to supply power to loss of data caused by malfunction or repair of which can be assigned its own tone number. Besides notes, each of this piano records and plays back notes much like a standard tape recorder. Start End Track 1 Auto Accompaniment (rhythm, bass, chords), melody Track 2 Melody Data recorded in Song Memory exceeds the maximum while you or any losses by you are two tracks, each track can store a total of up to Song Memory: selected tone, tempo and beat settings, pedal operations, reverb...

User Guide
Page 19
... track without rhythm or auto accompaniment • Recording will start the record operation. This will cause the RIGHT/TRACK 2 indicator lamp to flash, which indicates that the piano is standing by for recording to Track 2. • Select the tone and effects you want to use in your recording, and configure the tempo and beat settings. • If you want to use the metronome during recording, press the METRONOME button to start it. • If you finger a chord...
... track without rhythm or auto accompaniment • Recording will start the record operation. This will cause the RIGHT/TRACK 2 indicator lamp to flash, which indicates that the piano is standing by for recording to Track 2. • Select the tone and effects you want to use in your recording, and configure the tempo and beat settings. • If you want to use the metronome during recording, press the METRONOME button to start it. • If you finger a chord...

User Guide
Page 20
... record to Track 2 while playing back the contents of the data from Song Memory 1 Press the SONG MEMORY button once. • This causes the SONG MEMORY indicator lamp to light. 2 Use the LEFT/TRACK 1 RIGHT/TRACK 2 button to select the track you selected. • You can change the tone setting during playback. • Press the START/STOP button again to play back Track 1 and Track 2 at the same time. E-18 412A-E-020A Check to make sure...
... record to Track 2 while playing back the contents of the data from Song Memory 1 Press the SONG MEMORY button once. • This causes the SONG MEMORY indicator lamp to light. 2 Use the LEFT/TRACK 1 RIGHT/TRACK 2 button to select the track you selected. • You can change the tone setting during playback. • Press the START/STOP button again to play back Track 1 and Track 2 at the same time. E-18 412A-E-020A Check to make sure...

User Guide
Page 21
... CONTROL button and pressing keyboard keys "-" and "+" at the same time returns tuning to Match Another Instrument +: Raise - : Lower * Each press of a key changes the current setting by approximately 1 cents (1/100 semitone). Other Settings Changing the Keyboard Touch 1 This setting changes the relative touch of the piano. The setting range is applied.) 2 Changing the Piano Key Higher (C to F) Normal (C) Lower (F to B) 3Changing the Pitch of the keyboard in semitone steps. Changing the Pitch of the Piano to Match Another Instrument 3 Use...
... CONTROL button and pressing keyboard keys "-" and "+" at the same time returns tuning to Match Another Instrument +: Raise - : Lower * Each press of a key changes the current setting by approximately 1 cents (1/100 semitone). Other Settings Changing the Keyboard Touch 1 This setting changes the relative touch of the piano. The setting range is applied.) 2 Changing the Piano Key Higher (C to F) Normal (C) Lower (F to B) 3Changing the Pitch of the keyboard in semitone steps. Changing the Pitch of the Piano to Match Another Instrument 3 Use...
User Guide
Page 22
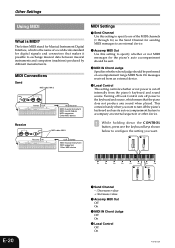
The letters MIDI stand for Musical Instrument Digital Interface, which means that makes it possible to exchange musical data between musical instruments and computers (machines) produced by different manufacturers. Turning off Local Control cuts off power to the keyboard and source, which is the name of a worldwide standard for the piano's auto accompaniment should be sent. 3 MIDI IN Chord Judge Specifies whether chord judge should be performed on accompaniment range MIDI Note On...
The letters MIDI stand for Musical Instrument Digital Interface, which means that makes it possible to exchange musical data between musical instruments and computers (machines) produced by different manufacturers. Turning off Local Control cuts off power to the keyboard and source, which is the name of a worldwide standard for the piano's auto accompaniment should be sent. 3 MIDI IN Chord Judge Specifies whether chord judge should be performed on accompaniment range MIDI Note On...
User Guide
Page 24
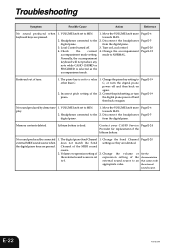
... accompaniment keyboard will not produce any note while CASIO CHORD or FINGERED is dead. Change the accompaniment mode to the digital piano. 3. Correct the pitch setting, or turn the digital piano power off . 4. Volume or expression setting of the MIDI sound source. 2. Change the volume or expression setting of tune. 1. Change the piano key setting to C, or turn the digital piano power off and then back on again. 2. Page E-19 Page E-19 No sound produced by connected external MIDI sound source when the digital piano keys are identical. 2. VOLUME knob set...
... accompaniment keyboard will not produce any note while CASIO CHORD or FINGERED is dead. Change the accompaniment mode to the digital piano. 3. Correct the pitch setting, or turn the digital piano power off . 4. Volume or expression setting of the MIDI sound source. 2. Change the volume or expression setting of tune. 1. Change the piano key setting to C, or turn the digital piano power off and then back on again. 2. Page E-19 Page E-19 No sound produced by connected external MIDI sound source when the digital piano keys are identical. 2. VOLUME knob set...
User Guide
Page 25
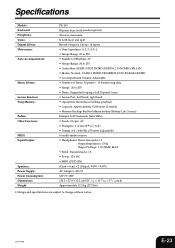
...: Digital Effects: Metronome: Auto Accompaniment: Music Library: Lesson Function: Song Memory: Pedals: Other Functions: MIDI: Input/Output: Speakers: Power Supply: Power Consumption: Dimensions: Weight: PX-100 88 piano keys (with layer and split Reverb (4 types), Chorus (4 types) • Time Signatures: 0, 2, 3, 4, 5, 6 • Tempo Range: 30 to 255 • Number of Rhythms: 20 • Tempo Range: 30 to 255 • Controllers: START/STOP, INTRO/ENDING, SYNCHRO/FILL-IN • Modes: Normal, CASIO CHORD, FINGERED, FULL RANGE CHORD • Accompaniment Volume: Adjustable • Number...
...: Digital Effects: Metronome: Auto Accompaniment: Music Library: Lesson Function: Song Memory: Pedals: Other Functions: MIDI: Input/Output: Speakers: Power Supply: Power Consumption: Dimensions: Weight: PX-100 88 piano keys (with layer and split Reverb (4 types), Chorus (4 types) • Time Signatures: 0, 2, 3, 4, 5, 6 • Tempo Range: 30 to 255 • Number of Rhythms: 20 • Tempo Range: 30 to 255 • Controllers: START/STOP, INTRO/ENDING, SYNCHRO/FILL-IN • Modes: Normal, CASIO CHORD, FINGERED, FULL RANGE CHORD • Accompaniment Volume: Adjustable • Number...

User Guide
Page 27
... C7 C8 1 Number Input Keys (0 to 9) 2 Keyboard Touch (Off, Weak, Normal, Strong) 3 Chord Mode (Normal, CASIO CHORD, Fingered, Full-Range Chord) 4 Accompaniment Volume (-, +) 5 Layered Tones Volume (-, +) 6 Piano Key (F to C to F) 7 Reverb Effect (1 to 4) 8 Chorus Effect (1 to a note name indicates the relative position of different setting functions. Setting Control Key Chart While the CONTROL button is a good idea to remember where the various C notes (C1 through C8) are on the keyboard. * A value next to 4) 9 Pitch Setting (-, +) 0 Pedal Function (Soft, Sostenuto) A MIDI (see page...
... C7 C8 1 Number Input Keys (0 to 9) 2 Keyboard Touch (Off, Weak, Normal, Strong) 3 Chord Mode (Normal, CASIO CHORD, Fingered, Full-Range Chord) 4 Accompaniment Volume (-, +) 5 Layered Tones Volume (-, +) 6 Piano Key (F to C to F) 7 Reverb Effect (1 to 4) 8 Chorus Effect (1 to a note name indicates the relative position of different setting functions. Setting Control Key Chart While the CONTROL button is a good idea to remember where the various C notes (C1 through C8) are on the keyboard. * A value next to 4) 9 Pitch Setting (-, +) 0 Pedal Function (Soft, Sostenuto) A MIDI (see page...

User Guide
Page 28
...éndice Tone List/Lista de sonidos Tone Name/ Nombre de sonidos GRAND PIANO 1 GRAND PIANO 2 ELEC PIANO 1 ELEC PIANO 2 HARPSICHORD VIBRAPHONE PIPE ORGAN STRINGS ACOUSTIC BASS RIDE ACO BASS Maximum Polyphony/ Polifonía máxima 16 32 32 16 32 32 32 32 32 16 Program Change/ Cambio de programa 0 1 2 3 4 5 6 7 32 32 Bank Select MSB/ MSB de selección de banco 0 0 0 0 0 0 0 0 2 32 Rhythm List/Lista de...
...éndice Tone List/Lista de sonidos Tone Name/ Nombre de sonidos GRAND PIANO 1 GRAND PIANO 2 ELEC PIANO 1 ELEC PIANO 2 HARPSICHORD VIBRAPHONE PIPE ORGAN STRINGS ACOUSTIC BASS RIDE ACO BASS Maximum Polyphony/ Polifonía máxima 16 32 32 16 32 32 32 32 32 16 Program Change/ Cambio de programa 0 1 2 3 4 5 6 7 32 32 Bank Select MSB/ MSB de selección de banco 0 0 0 0 0 0 0 0 2 32 Rhythm List/Lista de...
User Guide
Page 30
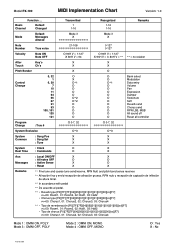
Model PX-100 MIDI Implementation Chart Version: 1.0 Function ... Basic Channel Default Changed Transmitted 1 1-16 Recognized 1-16 1-16 Remarks Mode Default Messages Altered Mode 3 X Mode 3 X Note Number True voice 21-108 0-127 0-127 Velocity Note ON Note OFF O 9nH V = 1-127 X 8nH V = 64 O 9nH V = 1-127 X 9nH V = 0, 8nH V = ** ** = no relation After Key's X X Touch Ch's X X Pitch Bender X O Control Change 0, 32 1 6, 38 7 10 11 64 66 67 91 93 100, 101 120 121 O X O*1 O O O O O*2 O*2 O O O O O O O O*1 O O O O O O O O O O O Bank select Modulation Data ...
Model PX-100 MIDI Implementation Chart Version: 1.0 Function ... Basic Channel Default Changed Transmitted 1 1-16 Recognized 1-16 1-16 Remarks Mode Default Messages Altered Mode 3 X Mode 3 X Note Number True voice 21-108 0-127 0-127 Velocity Note ON Note OFF O 9nH V = 1-127 X 8nH V = 64 O 9nH V = 1-127 X 9nH V = 0, 8nH V = ** ** = no relation After Key's X X Touch Ch's X X Pitch Bender X O Control Change 0, 32 1 6, 38 7 10 11 64 66 67 91 93 100, 101 120 121 O X O*1 O O O O O*2 O*2 O O O O O O O O*1 O O O O O O O O O O O Bank select Modulation Data ...


