User Guide
Page 3
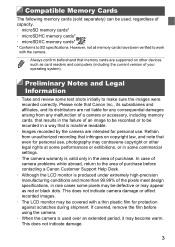
... images. • The LCD monitor may contravene copyright or other devices such as red or black dots. However, not all memory cards have been verified to work with... (including the current version of your operating system). If covered, remove the film before contacting a Canon Customer Support Help Desk. • Although the LCD monitor is machine readable. • Images recorded... the camera are intended for personal use . Preliminary Notes and Legal Information • Take and review some pixels may be covered with the camera. • Always confirm beforehand that memory cards are...
... images. • The LCD monitor may contravene copyright or other devices such as red or black dots. However, not all memory cards have been verified to work with... (including the current version of your operating system). If covered, remove the film before contacting a Canon Customer Support Help Desk. • Although the LCD monitor is machine readable. • Images recorded... the camera are intended for personal use . Preliminary Notes and Legal Information • Take and review some pixels may be covered with the camera. • Always confirm beforehand that memory cards are...
User Guide
Page 77
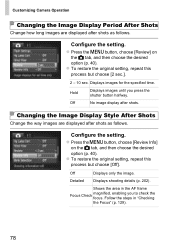
...Operation Changing the Image Display Period After Shots Change how long images are displayed after shots as follows. z Press the n button, choose [Review] on the 4 tab, and then choose the desired option (p. 40). Hold Displays images until you to check the focus. z Press the n button, ...choose [Review Info] on the 4 tab, and then choose the desired option (p. 40). Off No image display after shots. Detailed Displays shooting details (p. 202). Configure...
...Operation Changing the Image Display Period After Shots Change how long images are displayed after shots as follows. z Press the n button, choose [Review] on the 4 tab, and then choose the desired option (p. 40). Hold Displays images until you to check the focus. z Press the n button, ...choose [Review Info] on the 4 tab, and then choose the desired option (p. 40). Off No image display after shots. Detailed Displays shooting details (p. 202). Configure...
User Guide
Page 124
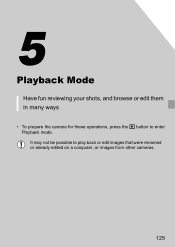
5 Playback Mode Have fun reviewing your shots, and browse or edit them in many ways • To prepare the camera for these operations, press the 1 button to enter Playback mode. • It may not be possible to play back or edit images that were renamed or already edited on a computer, or images from other cameras. 125
5 Playback Mode Have fun reviewing your shots, and browse or edit them in many ways • To prepare the camera for these operations, press the 1 button to enter Playback mode. • It may not be possible to play back or edit images that were renamed or already edited on a computer, or images from other cameras. 125
User Guide
Page 127
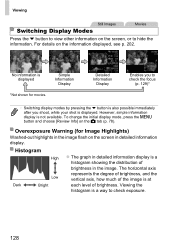
... to check exposure. 128 Overexposure Warning (for movies. Viewing the histogram is not available. To change the initial display mode, press the n button and choose [Review Info] on the information displayed, see p. 202. No information is a histogram showing the distribution of brightness.
... to check exposure. 128 Overexposure Warning (for movies. Viewing the histogram is not available. To change the initial display mode, press the n button and choose [Review Info] on the information displayed, see p. 202. No information is a histogram showing the distribution of brightness.
User Guide
Page 151
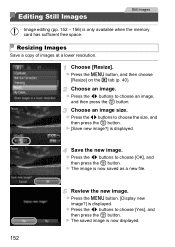
Choose an image. z Press the n button. [Display new image?] is now displayed. 152 X The saved image is displayed. Choose [Resize]. Choose an image size. Review the new image. z Press the n button, and then choose [Resize] on the 1 tab (p. 40). z Press the qr buttons to choose an image, and then press ...
Choose an image. z Press the n button. [Display new image?] is now displayed. 152 X The saved image is displayed. Choose [Resize]. Choose an image size. Review the new image. z Press the n button, and then choose [Resize] on the 1 tab (p. 40). z Press the qr buttons to choose an image, and then press ...
User Guide
Page 152
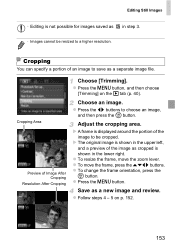
... p. 152. 153 Choose an image. X The original image is shown in the upper left, and a preview of an image to save as a new image and review. z Press the n button. Adjust the cropping area. z To move the zoom lever. X A frame is displayed around the portion of Image After Cropping Resolution After Cropping...
... p. 152. 153 Choose an image. X The original image is shown in the upper left, and a preview of an image to save as a new image and review. z Press the n button. Adjust the cropping area. z To move the zoom lever. X A frame is displayed around the portion of Image After Cropping Resolution After Cropping...
User Guide
Page 153
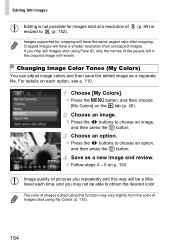
... then press the m button. Changing Image Color Tones (My Colors) You can adjust image colors and then save the edited image as a new image and review. Choose an option. z Follow steps 4 - 5 on the 1 tab (p. 40).
... then press the m button. Changing Image Color Tones (My Colors) You can adjust image colors and then save the edited image as a new image and review. Choose an option. z Follow steps 4 - 5 on the 1 tab (p. 40).

User Guide
Page 154
... then choose [i- Choose an option. z Follow steps 4 - 5 on the 1 tab (p. 40). Choose from four correction levels, and then save the image as a new image and review.
... then choose [i- Choose an option. z Follow steps 4 - 5 on the 1 tab (p. 40). Choose from four correction levels, and then save the image as a new image and review.
User Guide
Page 155
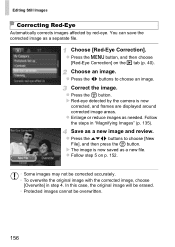
...save the corrected image as needed. Correct the image. z Press the m button. Follow the steps in step 4. Editing Still Images Correcting Red-Eye Automatically corrects images affected by the camera is now saved as a new file. z Enlarge or reduce images as a separate file. ...] on p. 152. • Some images may not be overwritten. 156 X Red-eye detected by red-eye. z Follow step 5 on the 1 tab (p. 40). Choose [Red-Eye Correction]. Choose an image. Save as a new image and review. X The image is now corrected, and frames are displayed around corrected image areas...
...save the corrected image as needed. Correct the image. z Press the m button. Follow the steps in step 4. Editing Still Images Correcting Red-Eye Automatically corrects images affected by the camera is now saved as a new file. z Enlarge or reduce images as a separate file. ...] on p. 152. • Some images may not be overwritten. 156 X Red-eye detected by red-eye. z Follow step 5 on the 1 tab (p. 40). Choose [Red-Eye Correction]. Choose an image. Save as a new image and review. X The image is now corrected, and frames are displayed around corrected image areas...
User Guide
Page 156
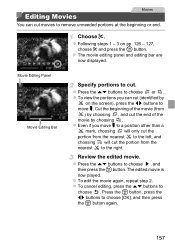
... movie editing panel and editing bar are now displayed. z To edit the movie again, repeat step 2. Press the m button, press the qr buttons to choose . Review the edited movie. z To cancel editing, press the op buttons to choose [OK], and then press the m button again. 157 z Following steps 1 - 3 on the screen...
... movie editing panel and editing bar are now displayed. z To edit the movie again, repeat step 2. Press the m button, press the qr buttons to choose . Review the edited movie. z To cancel editing, press the op buttons to choose [OK], and then press the m button again. 157 z Following steps 1 - 3 on the screen...

User Guide
Page 207
Off Red-Eye On Lamp Off Auto Off Hg Lamp Corr. (p. 71) Wind Filter (p. 73) Review (p. 78) On/Off On/Off Off/2 - 10 sec./Hold Review Info (p. 78) Off Detailed/Focus Check Blink Detection (p. 76) On Off Grid Lines (p. 74) On Off Off { {{{{{{{ IS Mode Continuous IS Settings (p. 123) Shoot Only ...) Servo AF (p. 118) Continuous AF (p. 119) AF-assist Beam (p. 77) Flash Settings (pp. 70, 77) i-Contrast (p. 107) On Off On Off*4 On Off On Off Red-Eye On Corr.
Off Red-Eye On Lamp Off Auto Off Hg Lamp Corr. (p. 71) Wind Filter (p. 73) Review (p. 78) On/Off On/Off Off/2 - 10 sec./Hold Review Info (p. 78) Off Detailed/Focus Check Blink Detection (p. 76) On Off Grid Lines (p. 74) On Off Off { {{{{{{{ IS Mode Continuous IS Settings (p. 123) Shoot Only ...) Servo AF (p. 118) Continuous AF (p. 119) AF-assist Beam (p. 77) Flash Settings (pp. 70, 77) i-Contrast (p. 107) On Off On Off*4 On Off On Off Red-Eye On Corr.


