User Guide
Page 3
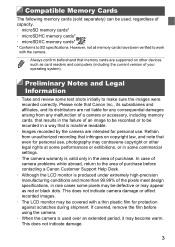
... (including the current version of your operating system). In case of camera problems while abroad, return to the area of purchase before using the camera. • When the camera is used , regardless of capacity. • microSD memory cards* • microSDHC memory cards* • microSDXC memory cards* * Conforms to SD specifications. This does not indicate camera damage or affect recorded images. • The LCD monitor may become warm. Refrain from...
... (including the current version of your operating system). In case of camera problems while abroad, return to the area of purchase before using the camera. • When the camera is used , regardless of capacity. • microSD memory cards* • microSDHC memory cards* • microSDXC memory cards* * Conforms to SD specifications. This does not indicate camera damage or affect recorded images. • The LCD monitor may become warm. Refrain from...
User Guide
Page 4
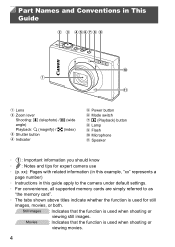
... g (index) Shutter button Indicator Power button Mode switch 1 (Playback) button Lamp Flash Microphone Speaker • : Important information you should know • : Notes and tips for still images, movies, or both. Still Images : Indicates that the function is used when shooting or viewing movies. 4 Movies : Indicates that the function is used for expert camera use • (p. Part Names and Conventions in this guide apply to the camera under default settings. • For convenience, all supported memory cards are simply referred to as "the memory card". • The...
... g (index) Shutter button Indicator Power button Mode switch 1 (Playback) button Lamp Flash Microphone Speaker • : Important information you should know • : Notes and tips for still images, movies, or both. Still Images : Indicates that the function is used when shooting or viewing movies. 4 Movies : Indicates that the function is used for expert camera use • (p. Part Names and Conventions in this guide apply to the camera under default settings. • For convenience, all supported memory cards are simply referred to as "the memory card". • The...
User Guide
Page 5
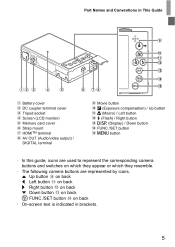
... button on back r Right button on back p Down button on back m FUNC./SET button on back • On-screen text is indicated in This Guide Battery cover DC coupler terminal cover Tripod socket Screen (LCD monitor) Memory card cover Strap mount HDMITM terminal AV OUT (Audio/video output) / DIGITAL terminal Movie button b (Exposure compensation) / Up button e (Macro) / Left button h (Flash) / Right button l (Display) / Down button FUNC./SET button n button • In this guide, icons are used to represent the corresponding camera buttons and switches...
... button on back r Right button on back p Down button on back m FUNC./SET button on back • On-screen text is indicated in This Guide Battery cover DC coupler terminal cover Tripod socket Screen (LCD monitor) Memory card cover Strap mount HDMITM terminal AV OUT (Audio/video output) / DIGITAL terminal Movie button b (Exposure compensation) / Up button e (Macro) / Left button h (Flash) / Right button l (Display) / Down button FUNC./SET button n button • In this guide, icons are used to represent the corresponding camera buttons and switches...
User Guide
Page 16
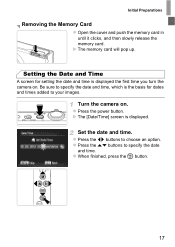
... displayed. z Press the op buttons to choose an option. Initial Preparations Removing the Memory Card z Open the cover and push the memory card in until it clicks, and then slowly release the memory card. Turn the camera on . z Press the power button. z When finished, press the m button. 17 X The [Date/Time] screen is displayed the first time you turn the camera on . X The memory card will pop up. Be sure to your images. Set the date and time...
... displayed. z Press the op buttons to choose an option. Initial Preparations Removing the Memory Card z Open the cover and push the memory card in until it clicks, and then slowly release the memory card. Turn the camera on . z Press the power button. z When finished, press the m button. 17 X The [Date/Time] screen is displayed the first time you turn the camera on . X The memory card will pop up. Be sure to your images. Set the date and time...
User Guide
Page 20
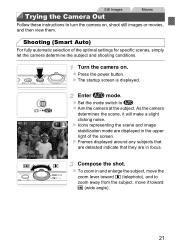
... Movies Follow these instructions to turn the camera on . z Set the mode switch to zoom away from the subject, move the zoom lever toward i (telephoto), and to A. Enter A mode. X Icons representing the scene and image stabilization mode are in and enlarge the subject, move it will make a slight clicking noise. Compose the shot. Shooting (Smart Auto) For fully automatic selection of the screen. z To zoom in focus. Turn the camera on , shoot still images...
... Movies Follow these instructions to turn the camera on . z Set the mode switch to zoom away from the subject, move the zoom lever toward i (telephoto), and to A. Enter A mode. X Icons representing the scene and image stabilization mode are in and enlarge the subject, move it will make a slight clicking noise. Compose the shot. Shooting (Smart Auto) For fully automatic selection of the screen. z To zoom in focus. Turn the camera on , shoot still images...
User Guide
Page 25
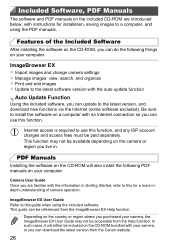
...Camera User Guide Once you are introduced below, with instructions for a more indepth understanding of the Included Software After installing the software on your computer. ImageBrowser EX z Import images and change camera settings z Manage images: view, search, and organize z Print and edit images z Update to the latest software version with the auto update function Auto Update Function Using the included software, you live in Getting Started, refer to this for installation, saving images to a computer, and using the included software. Included Software, PDF Manuals The software...
...Camera User Guide Once you are introduced below, with instructions for a more indepth understanding of the Included Software After installing the software on your computer. ImageBrowser EX z Import images and change camera settings z Manage images: view, search, and organize z Print and edit images z Update to the latest software version with the auto update function Auto Update Function Using the included software, you live in Getting Started, refer to this for installation, saving images to a computer, and using the included software. Included Software, PDF Manuals The software...
User Guide
Page 27
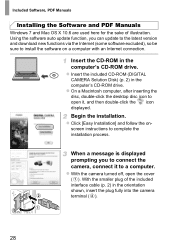
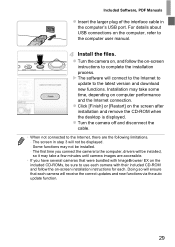
z Click [Easy Installation] and follow the on a computer with an Internet connection. z Insert the included CD-ROM (DIGITAL CAMERA Solution Disk) (p. 2) in the computer's CD-ROM drive. z On a Macintosh computer, after inserting the disc, double-click the desktop disc icon to complete the installation process. z With the camera turned off, open it to install the software on - Included Software, PDF Manuals Installing the Software and PDF Manuals Windows 7 and Mac OS X 10.6 are used here...
z Click [Easy Installation] and follow the on a computer with an Internet connection. z Insert the included CD-ROM (DIGITAL CAMERA Solution Disk) (p. 2) in the computer's CD-ROM drive. z On a Macintosh computer, after inserting the disc, double-click the desktop disc icon to complete the installation process. z With the camera turned off, open it to install the software on - Included Software, PDF Manuals Installing the Software and PDF Manuals Windows 7 and Mac OS X 10.6 are used here...
User Guide
Page 28
... to use each camera will receive the correct updates and new functions via the auto update function. 29 For details about USB connections on the screen after installation and remove the CD-ROM when the desktop is displayed. z Turn the camera off and disconnect the cable. • When not connected to the latest version and download new functions. Some functions may take some time, depending on -screen instructions to the computer user manual. The first time you...
... to use each camera will receive the correct updates and new functions via the auto update function. 29 For details about USB connections on the screen after installation and remove the CD-ROM when the desktop is displayed. z Turn the camera off and disconnect the cable. • When not connected to the latest version and download new functions. Some functions may take some time, depending on -screen instructions to the computer user manual. The first time you...
User Guide
Page 30
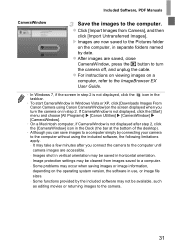
... saved in use, or image file sizes. - Images shot in vertical orientation may not be cleared from Camera], and then click [Import Untransferred Images]. z After images are accessible. - z For instructions on viewing images on the operating system version, the software in horizontal orientation. - Some problems may be available, such as editing movies or returning images to the ImageBrowser EX User Guide. • In Windows 7, if the screen in step 2. If CameraWindow is not displayed...
... saved in use, or image file sizes. - Images shot in vertical orientation may not be cleared from Camera], and then click [Import Untransferred Images]. z After images are accessible. - z For instructions on viewing images on the operating system version, the software in horizontal orientation. - Some problems may be available, such as editing movies or returning images to the ImageBrowser EX User Guide. • In Windows 7, if the screen in step 2. If CameraWindow is not displayed...
User Guide
Page 36
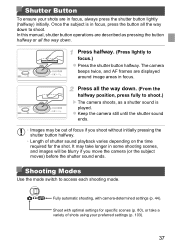
... a shutter sound is in focus, always press the shutter button lightly (halfway) initially. The camera beeps twice, and AF frames are displayed around image areas in some shooting scenes, and images will be out of shutter sound playback varies depending on the time required for specific scenes (p. 80), or take longer in focus. Shutter Button To ensure your preferred settings (p. 103). 37 Press halfway. (Press lightly to access each shooting mode. Shooting Modes Use the mode switch to focus.) z Press...
... a shutter sound is in focus, always press the shutter button lightly (halfway) initially. The camera beeps twice, and AF frames are displayed around image areas in some shooting scenes, and images will be out of shutter sound playback varies depending on the time required for specific scenes (p. 80), or take longer in focus. Shutter Button To ensure your preferred settings (p. 103). 37 Press halfway. (Press lightly to access each shooting mode. Shooting Modes Use the mode switch to focus.) z Press...
User Guide
Page 68
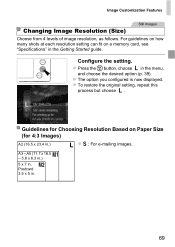
... . 69 z To restore the original setting, repeat this process but choose . Postcard 3.5 x 5 in . X The option you configured is now displayed. For guidelines on how many shots at each resolution setting can fit on Paper Size (for Choosing Resolution Based on a memory card, see "Specifications" in the Getting Started guide. Image Customization Features Still Images Changing Image Resolution (Size) Choose from 4 levels of image resolution, as follows.
... . 69 z To restore the original setting, repeat this process but choose . Postcard 3.5 x 5 in . X The option you configured is now displayed. For guidelines on how many shots at each resolution setting can fit on Paper Size (for Choosing Resolution Based on a memory card, see "Specifications" in the Getting Started guide. Image Customization Features Still Images Changing Image Resolution (Size) Choose from 4 levels of image resolution, as follows.
User Guide
Page 92
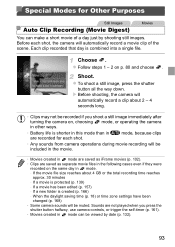
... shot, the camera will be recorded if you press the shutter button halfway, use camera controls, or trigger the self-timer (p. 161). • Movies created in other ways. • Battery life is created (p. 166) - Choose . X Before shooting, the camera will be included in the movie. • Movies created in mode are saved as iFrame movies (p. 102). • Clips are not played when you shoot a still image immediately after turning the camera on, choosing mode, or operating...
... shot, the camera will be recorded if you press the shutter button halfway, use camera controls, or trigger the self-timer (p. 161). • Movies created in other ways. • Battery life is created (p. 166) - Choose . X Before shooting, the camera will be included in the movie. • Movies created in mode are saved as iFrame movies (p. 102). • Clips are not played when you shoot a still image immediately after turning the camera on, choosing mode, or operating...
User Guide
Page 96
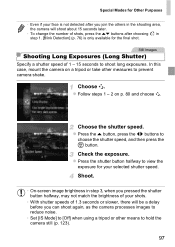
... a shutter speed of shots, press the op buttons after choosing in step 1. [Blink Detection] (p. 76) is not detected after you can shoot again, as the camera processes images to reduce noise. • Set [IS Mode] to [Off] when using a tripod or other measures to prevent camera shake. z Follow steps 1 - 2 on a tripod or take other means to hold the camera still (p. 123). 97 Shoot. • On-screen image...
... a shutter speed of shots, press the op buttons after choosing in step 1. [Blink Detection] (p. 76) is not detected after you can shoot again, as the camera processes images to reduce noise. • Set [IS Mode] to [Off] when using a tripod or other measures to prevent camera shake. z Follow steps 1 - 2 on a tripod or take other means to hold the camera still (p. 123). 97 Shoot. • On-screen image...
User Guide
Page 108
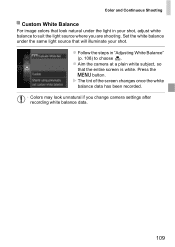
... will illuminate your shot, adjust white balance to choose . X The tint of the screen changes once the white balance data has been recorded. • Colors may look natural under the same light source that the entire screen is white. Press the n button. z Follow the steps in your shot. Set the white balance under the light in "Adjusting White Balance" (p. 108) to suit the light source where you change camera settings after recording white balance data. 109 Color and Continuous Shooting Custom White Balance For image colors that look...
... will illuminate your shot, adjust white balance to choose . X The tint of the screen changes once the white balance data has been recorded. • Colors may look natural under the same light source that the entire screen is white. Press the n button. z Follow the steps in your shot. Set the white balance under the light in "Adjusting White Balance" (p. 108) to suit the light source where you change camera settings after recording white balance data. 109 Color and Continuous Shooting Custom White Balance For image colors that look...
User Guide
Page 165
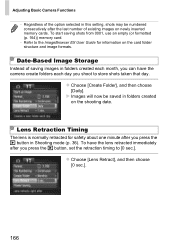
... images on the shooting date. z Choose [Lens Retract], and then choose [0 sec.]. 166 Adjusting Basic Camera Functions • Regardless of the option selected in this setting, shots may be saved in Shooting mode (p. 36). To have the camera create folders each day you shoot to the ImageBrowser EX User Guide for safety about one minute after you press the 1 button in folders created on newly inserted memory cards. X Images will now be numbered...
... images on the shooting date. z Choose [Lens Retract], and then choose [0 sec.]. 166 Adjusting Basic Camera Functions • Regardless of the option selected in this setting, shots may be saved in Shooting mode (p. 36). To have the camera create folders each day you shoot to the ImageBrowser EX User Guide for safety about one minute after you press the 1 button in folders created on newly inserted memory cards. X Images will now be numbered...
User Guide
Page 186
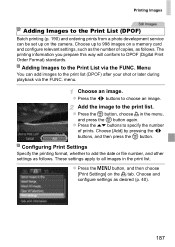
... the qr buttons to all images in the menu, and press the m button again. Menu You can be set up to 998 images on a memory card and configure relevant settings, such as the number of prints. Printing Images Still Images Adding Images to the Print List (DPOF) Batch printing (p. 190) and ordering prints from a photo development service can add images to the print list (DPOF) after your shot or later during playback via the FUNC...
... the qr buttons to all images in the menu, and press the m button again. Menu You can be set up to 998 images on a memory card and configure relevant settings, such as the number of prints. Printing Images Still Images Adding Images to the Print List (DPOF) Batch printing (p. 190) and ordering prints from a photo development service can add images to the print list (DPOF) after your shot or later during playback via the FUNC...
User Guide
Page 195
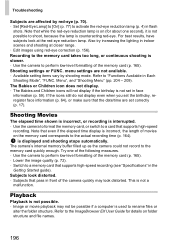
... and shooting at the red-eye reduction lamp. Playback Playback is used to a card that the date/time are affected by shooting mode. Also try increasing the lighting in front of the camera quickly may not be possible if a computer is not possible. • Image or movie playback may look at closer range. • Edit images using red-eye correction (p. 156). Note that supports high-speed recording (see "Specifications" in flash shots. Refer to the ImageBrowser EX User Guide...
... and shooting at the red-eye reduction lamp. Playback Playback is used to a card that the date/time are affected by shooting mode. Also try increasing the lighting in front of the camera quickly may not be possible if a computer is not possible. • Image or movie playback may look at closer range. • Edit images using red-eye correction (p. 156). Note that supports high-speed recording (see "Specifications" in flash shots. Refer to the ImageBrowser EX User Guide...
User Guide
Page 198
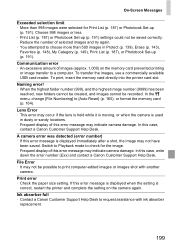
... on the memory card prevented printing or image transfer to print computer-edited images or images shot with ink absorber replacement. 199 In this case, write down the error number (Exx) and contact a Canon Customer Support Help Desk. To transfer the images, use a commercially available USB card reader. To print, insert the memory card directly into the printer card slot. In this case, contact a Canon Customer Support Help Desk. Print error • Check the paper size setting. In the 3 menu, change [File Numbering] to request assistance with another camera. A camera error was...
... on the memory card prevented printing or image transfer to print computer-edited images or images shot with ink absorber replacement. 199 In this case, write down the error number (Exx) and contact a Canon Customer Support Help Desk. To transfer the images, use a commercially available USB card reader. To print, insert the memory card directly into the printer card slot. In this case, contact a Canon Customer Support Help Desk. Print error • Check the paper size setting. In the 3 menu, change [File Numbering] to request assistance with another camera. A camera error was...
User Guide
Page 201
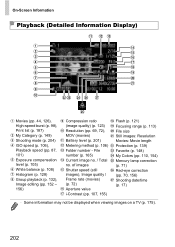
... images Shutter speed (still images), Image quality / Frame rate (movies) (p. 72) Aperture value i-Contrast (pp. 107, 155) Flash (p. 121) Focusing range (p. 113) File size Still images: Resolution Movies: Movie length Protection (p. 139) Favorite (p. 148) My Colors (pp. 110, 154) Mercury lamp correction (p. 71) Red-eye correction (pp. 70, 156) Shooting date/time (p. 17) • Some information may not be displayed when viewing images on a TV (p. 175). 202 File number (p. 165) Current image no. / Total no. On-Screen Information Playback...
... images Shutter speed (still images), Image quality / Frame rate (movies) (p. 72) Aperture value i-Contrast (pp. 107, 155) Flash (p. 121) Focusing range (p. 113) File size Still images: Resolution Movies: Movie length Protection (p. 139) Favorite (p. 148) My Colors (pp. 110, 154) Mercury lamp correction (p. 71) Red-eye correction (pp. 70, 156) Shooting date/time (p. 17) • Some information may not be displayed when viewing images on a TV (p. 175). 202 File number (p. 165) Current image no. / Total no. On-Screen Information Playback...
User Guide
Page 211
... J Focusing AF lock 120 Aspect ratio 68 AUTO mode (shooting mode 21, 44 AV cable 175 B Battery Charging 14 Level 201 Power saving 36 Battery charger 173 Black and white images 110 Blink detection 76 C Camera Reset all 170 Camera shake 123 Center (AF frame mode 117 Clock 41 Color (white balance 108 Color Accent (shooting mode 90 Color Swap (shooting mode 91 Compression ratio (image quality 123 Continuous shooting 111 High-speed burst (shooting mode) ..... 98 Cropping 153 Custom white balance 109 D Date/time Adding date/time to images 57 Changing 19 Setting 17...
... J Focusing AF lock 120 Aspect ratio 68 AUTO mode (shooting mode 21, 44 AV cable 175 B Battery Charging 14 Level 201 Power saving 36 Battery charger 173 Black and white images 110 Blink detection 76 C Camera Reset all 170 Camera shake 123 Center (AF frame mode 117 Clock 41 Color (white balance 108 Color Accent (shooting mode 90 Color Swap (shooting mode 91 Compression ratio (image quality 123 Continuous shooting 111 High-speed burst (shooting mode) ..... 98 Cropping 153 Custom white balance 109 D Date/time Adding date/time to images 57 Changing 19 Setting 17...


