User Guide
Page 3
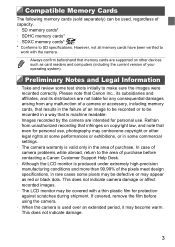
Preliminary Notes and Legal Information • Take and review some commercial settings. • The camera warranty is produced under ...of an image to be recorded or to make sure the images were recorded correctly. Please note that Canon Inc., its subsidiaries and affiliates, and its distributors are not liable for any consequential damages arising from ...However, not all memory cards have been verified to SD specifications. If covered, remove the film before contacting a Canon Customer Support Help Desk. • Although the LCD monitor is valid only in the area of your operating system...
Preliminary Notes and Legal Information • Take and review some commercial settings. • The camera warranty is produced under ...of an image to be recorded or to make sure the images were recorded correctly. Please note that Canon Inc., its subsidiaries and affiliates, and its distributors are not liable for any consequential damages arising from ...However, not all memory cards have been verified to SD specifications. If covered, remove the film before contacting a Canon Customer Support Help Desk. • Although the LCD monitor is valid only in the area of your operating system...

User Guide
Page 66
... the Lamp You can deactivate the lamp that lights up to help you focus in low-light conditions with the flash. z Press the n button, choose [Review] on the 4 tab, and then choose [Off] (p. 45). Displays images for the specified time. Hold Displays images until you press the shutter button halfway or...
... the Lamp You can deactivate the lamp that lights up to help you focus in low-light conditions with the flash. z Press the n button, choose [Review] on the 4 tab, and then choose [Off] (p. 45). Displays images for the specified time. Hold Displays images until you press the shutter button halfway or...
User Guide
Page 103
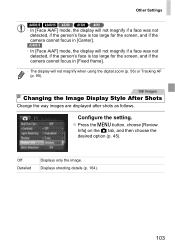
... Style After Shots Change the way images are displayed after shots as follows. z Press the n button, choose [Review Info] on the 4 tab, and then choose the desired option (p. 45). Other Settings A4000 IS A2400 IS A2300 A1300 A810 • In [Face AiAF] mode, the display will not magnify if a face was not...
... Style After Shots Change the way images are displayed after shots as follows. z Press the n button, choose [Review Info] on the 4 tab, and then choose the desired option (p. 45). Other Settings A4000 IS A2400 IS A2300 A1300 A810 • In [Face AiAF] mode, the display will not magnify if a face was not...

User Guide
Page 107
5 Playback Mode Have fun reviewing your shots, and browse or edit them in many ways • To prepare the camera for these operations, press the 1 button to enter Playback mode. • It may not be possible to play back or edit images that were renamed or already edited on a computer, or images from other cameras. 107
5 Playback Mode Have fun reviewing your shots, and browse or edit them in many ways • To prepare the camera for these operations, press the 1 button to enter Playback mode. • It may not be possible to play back or edit images that were renamed or already edited on a computer, or images from other cameras. 107
User Guide
Page 110
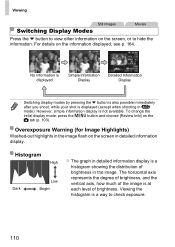
... axis represents the degree of brightness, and the vertical axis, how much of brightness. To change the initial display mode, press the n button and choose [Review Info] on the screen, or to hide the information. For details on the screen in the image. No information is displayed Simple Information Display Detailed...
... axis represents the degree of brightness, and the vertical axis, how much of brightness. To change the initial display mode, press the n button and choose [Review Info] on the screen, or to hide the information. For details on the screen in the image. No information is displayed Simple Information Display Detailed...
User Guide
Page 118
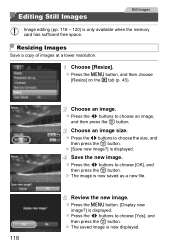
... a new file. X The image is displayed. z Press the n button, and then choose [Resize] on the 1 tab (p. 45). Save the new image. Choose an image size. Review the new image. Editing Still Images Still Images • Image editing (pp. 118 - 120) is only available when the memory card has sufficient free space...
... a new file. X The image is displayed. z Press the n button, and then choose [Resize] on the 1 tab (p. 45). Save the new image. Choose an image size. Review the new image. Editing Still Images Still Images • Image editing (pp. 118 - 120) is only available when the memory card has sufficient free space...

User Guide
Page 119
... m button. z Press the qr buttons to make subjects stand out better. Choose from four correction levels, and then save the image as a new image and review. Insufficient overall image contrast is not possible for images shot at a resolution of saved as in step 3. • Images cannot be resized to a higher resolution...
... m button. z Press the qr buttons to make subjects stand out better. Choose from four correction levels, and then save the image as a new image and review. Insufficient overall image contrast is not possible for images shot at a resolution of saved as in step 3. • Images cannot be resized to a higher resolution...

User Guide
Page 120
... [Red-Eye Correction]. Correct the image. z Press the m button. z Press the opqr buttons to choose an image. z Enlarge or reduce images as a new image and review. Save as needed. You can save the corrected image as a new file. Editing Still Images • If [Auto] does not produce the expected results, try...
... [Red-Eye Correction]. Correct the image. z Press the m button. z Press the opqr buttons to choose an image. z Enlarge or reduce images as a new image and review. Save as needed. You can save the corrected image as a new file. Editing Still Images • If [Auto] does not produce the expected results, try...
User Guide
Page 170
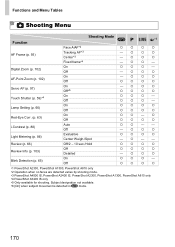
...Review (p. 66) Review Info (p. 103) Blink Detection (p. 65) Shooting Mode AG *1 Face AiAF*2 Tracking AF*3 Center*3 Fixed frame*4 On Off On Off On Off*6 On Off On Off On Off Auto Off Evaluative Center Weigh./Spot Off/2 - 10 sec./Hold Off Detailed On Off *1 PowerShot A2300, PowerShot A1300, PowerShot... A810 only *2 Operation when no faces are detected varies by shooting mode. *3 PowerShot A4000 IS, PowerShot A2400 IS, PowerShot A2300, PowerShot A1300, PowerShot A810 only *4 PowerShot A3400 IS only *5 Only ...
...Review (p. 66) Review Info (p. 103) Blink Detection (p. 65) Shooting Mode AG *1 Face AiAF*2 Tracking AF*3 Center*3 Fixed frame*4 On Off On Off On Off*6 On Off On Off On Off Auto Off Evaluative Center Weigh./Spot Off/2 - 10 sec./Hold Off Detailed On Off *1 PowerShot A2300, PowerShot A1300, PowerShot... A810 only *2 Operation when no faces are detected varies by shooting mode. *3 PowerShot A4000 IS, PowerShot A2400 IS, PowerShot A2300, PowerShot A1300, PowerShot A810 only *4 PowerShot A3400 IS only *5 Only ...


