User Guide
Page 11
... product. • Do not let the product come into contact with the camera interior, immediately turn the camera off and remove the batteries. A4000 IS A3400 IS A2400 IS A2300 If liquids or foreign objects come into contact with any separately sold accessories you read the safety ... electrical shock or fire. Strap: Putting the strap around a child's neck could damage eyesight. This could damage your camera distributor or a Canon Customer Support Help Desk. A1300 A810 If liquids or foreign objects come into contact with water (e.g. This could result in close proximity to severe...
... product. • Do not let the product come into contact with the camera interior, immediately turn the camera off and remove the batteries. A4000 IS A3400 IS A2400 IS A2300 If liquids or foreign objects come into contact with any separately sold accessories you read the safety ... electrical shock or fire. Strap: Putting the strap around a child's neck could damage eyesight. This could damage your camera distributor or a Canon Customer Support Help Desk. A1300 A810 If liquids or foreign objects come into contact with water (e.g. This could result in close proximity to severe...
User Guide
Page 12
... electromagnetic waves emitted by the strap, be careful not to cover it get caught on other devices. Safety Precautions A4000 IS A3400 IS A2400 IS A2300 • Use only the recommended battery. • Do not place the battery near or in direct flame. In the event that a battery leaks and the... adequate caution when using the flash, be careful not to bang it, subject it to strong impacts or shocks, or let it with water. • Turn the camera off in any dust and dirt that has collected on the lens. This could damage the speakers. In the event that batteries leak...
... electromagnetic waves emitted by the strap, be careful not to cover it get caught on other devices. Safety Precautions A4000 IS A3400 IS A2400 IS A2300 • Use only the recommended battery. • Do not place the battery near or in direct flame. In the event that a battery leaks and the... adequate caution when using the flash, be careful not to bang it, subject it to strong impacts or shocks, or let it with water. • Turn the camera off in any dust and dirt that has collected on the lens. This could damage the speakers. In the event that batteries leak...
User Guide
Page 17
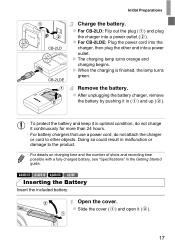
Initial Preparations CB-2LD CB-2LDE Charge the battery. X The charging lamp turns orange and charging begins. z Slide the cover ( ) and open it continuously for more than 24 hours. • For battery chargers that use a power cord, do ... the charger, then plug the other objects. X When the charging is finished, the lamp turns green. Doing so could result in malfunction or damage to other end into a power outlet ( ). A4000 IS A3400 IS A2400 IS A2300 Inserting the Battery Insert the included battery. Open the cover. z After unplugging the battery charger...
Initial Preparations CB-2LD CB-2LDE Charge the battery. X The charging lamp turns orange and charging begins. z Slide the cover ( ) and open it continuously for more than 24 hours. • For battery chargers that use a power cord, do ... the charger, then plug the other objects. X When the charging is finished, the lamp turns green. Doing so could result in malfunction or damage to other end into a power outlet ( ). A4000 IS A3400 IS A2400 IS A2300 Inserting the Battery Insert the included battery. Open the cover. z After unplugging the battery charger...
User Guide
Page 21
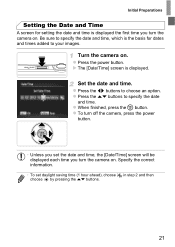
...and time is displayed. Specify the correct information. • To set the date and time, the [Date/Time] screen will be displayed each time you turn the camera on. z Press the op buttons to choose an option. z Press the power button. z When finished, press the m button...date and time. z Press the qr buttons to specify the date and time. X The [Date/Time] screen is displayed the first time you turn the camera on. z To turn off the camera, press the power button. • Unless you set daylight saving time (1 hour ahead), choose choose by pressing the op buttons...
...and time is displayed. Specify the correct information. • To set the date and time, the [Date/Time] screen will be displayed each time you turn the camera on. z Press the op buttons to choose an option. z Press the power button. z When finished, press the m button...date and time. z Press the qr buttons to specify the date and time. X The [Date/Time] screen is displayed the first time you turn the camera on. z To turn off the camera, press the power button. • Unless you set daylight saving time (1 hour ahead), choose choose by pressing the op buttons...
User Guide
Page 22
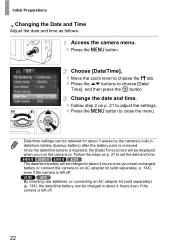
Choose [Date/Time]. A4000 IS A3400 IS A2400 IS A2300 • The date/time battery will be charged in date/time battery (backup battery) after the battery pack is removed. • Once the date/time ... AC adapter kit (sold separately) (p. 134), the date/time battery can be retained for about 3 weeks by the camera's built-in about 4 hours once you turn the camera on p. 21 to set the date and time. A1300 A810 • By inserting new batteries, or connecting an AC adapter kit (sold separately...
Choose [Date/Time]. A4000 IS A3400 IS A2400 IS A2300 • The date/time battery will be charged in date/time battery (backup battery) after the battery pack is removed. • Once the date/time ... AC adapter kit (sold separately) (p. 134), the date/time battery can be retained for about 3 weeks by the camera's built-in about 4 hours once you turn the camera on p. 21 to set the date and time. A1300 A810 • By inserting new batteries, or connecting an AC adapter kit (sold separately...
User Guide
Page 24
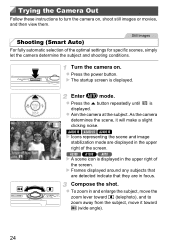
... images or movies, and then view them. z Aim the camera at the subject. As the camera determines the scene, it toward i (telephoto), and to turn the camera on . z Press the power button. z To zoom in focus. z Press the o button repeatedly until is displayed. X Frames displayed around any... in the upper right of the optimal settings for specific scenes, simply let the camera determine the subject and shooting conditions. Enter A mode. A2300 A1300 A810 X A scene icon is displayed in the upper right of the screen. Trying the Camera Out Follow these instructions to zoom away...
... images or movies, and then view them. z Aim the camera at the subject. As the camera determines the scene, it toward i (telephoto), and to turn the camera on . z Press the power button. z To zoom in focus. z Press the o button repeatedly until is displayed. X Frames displayed around any... in the upper right of the optimal settings for specific scenes, simply let the camera determine the subject and shooting conditions. Enter A mode. A2300 A1300 A810 X A scene icon is displayed in the upper right of the screen. Trying the Camera Out Follow these instructions to zoom away...
User Guide
Page 26
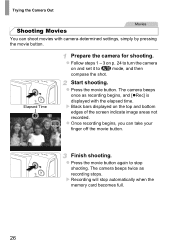
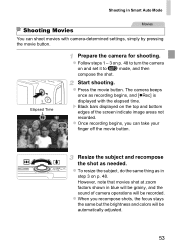
... displayed with camera-determined settings, simply by pressing the movie button. Elapsed Time Prepare the camera for shooting. Start shooting. z Follow steps 1 - 3 on p. 24 to turn the camera on the top and bottom edges of the screen indicate image areas not recorded. X Black bars displayed on and set it to stop...
... displayed with camera-determined settings, simply by pressing the movie button. Elapsed Time Prepare the camera for shooting. Start shooting. z Follow steps 1 - 3 on p. 24 to turn the camera on the top and bottom edges of the screen indicate image areas not recorded. X Black bars displayed on and set it to stop...
User Guide
Page 32
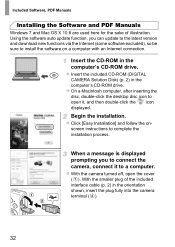
screen instructions to a computer. z With the camera turned off, open it to complete the installation process. Using the software auto update function, you to install the software on - Insert the CD-ROM in ...
screen instructions to a computer. z With the camera turned off, open it to complete the installation process. Using the software auto update function, you to install the software on - Insert the CD-ROM in ...
User Guide
Page 33
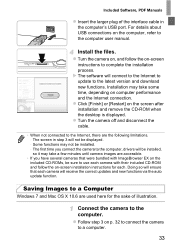
For details about USB connections on the screen after installation and remove the CD-ROM when the desktop is displayed. z Turn the camera on, and follow the on -screen instructions to complete the installation process. X The software will connect to the Internet to update to the ... CD-ROMs, be sure to a computer. 33 Installation may take a few minutes until camera images are accessible. • If you have several cameras that each . z Turn the camera off and disconnect the cable. • When not connected to the computer, drivers will be installed, so it may not be installed. - The...
For details about USB connections on the screen after installation and remove the CD-ROM when the desktop is displayed. z Turn the camera on, and follow the on -screen instructions to complete the installation process. X The software will connect to the Internet to update to the ... CD-ROMs, be sure to a computer. 33 Installation may take a few minutes until camera images are accessible. • If you have several cameras that each . z Turn the camera off and disconnect the cable. • When not connected to the computer, drivers will be installed, so it may not be installed. - The...
User Guide
Page 34
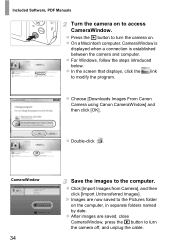
... camera on. z Click [Import Images from Camera], and then click [Import Untransferred Images]. Included Software, PDF Manuals Turn the camera on to turn the camera off, and unplug the cable. z Press the 1 button to access CameraWindow. z In the screen that displays, click the ...link to the Pictures folder on the computer, in separate folders named by date. z Choose [Downloads Images From Canon Camera using Canon CameraWindow] and then click ...
... camera on. z Click [Import Images from Camera], and then click [Import Untransferred Images]. Included Software, PDF Manuals Turn the camera on to turn the camera off, and unplug the cable. z Press the 1 button to access CameraWindow. z In the screen that displays, click the ...link to the Pictures folder on the computer, in separate folders named by date. z Choose [Downloads Images From Canon Camera using Canon CameraWindow] and then click ...

User Guide
Page 35
...Dock (the bar at the bottom of using Adobe Reader. 35 If CameraWindow is not displayed, click the [Start] menu and choose [All Programs] X [Canon Utilities] X [CameraWindow] X [CameraWindow]. • On a Macintosh computer, if CameraWindow is not displayed, click the icon in the taskbar. • To...EX User Guide. • In Windows 7, if the screen in step 2 is not displayed after you turn the camera on in Windows Vista or XP, click [Downloads Images From Canon Camera using the included software, the following limitations apply. - Included Software, PDF Manuals z For instructions ...
...Dock (the bar at the bottom of using Adobe Reader. 35 If CameraWindow is not displayed, click the [Start] menu and choose [All Programs] X [Canon Utilities] X [CameraWindow] X [CameraWindow]. • On a Macintosh computer, if CameraWindow is not displayed, click the icon in the taskbar. • To...EX User Guide. • In Windows 7, if the screen in step 2 is not displayed after you turn the camera on in Windows Vista or XP, click [Downloads Images From Canon Camera using the included software, the following limitations apply. - Included Software, PDF Manuals z For instructions ...
User Guide
Page 40
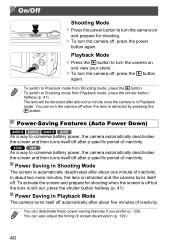
...shooting. On/Off Shooting Mode z Press the power button to turn the camera off when the lens is retracted by pressing the 1 button. Power-Saving Features (Auto Power Down) A4000 IS A3400 IS A2400 IS A2300 As a way to conserve battery power, the camera automatically ...deactivates the screen and then turns itself off after a specific period of inactivity. • You can deactivate these power-saving features...
...shooting. On/Off Shooting Mode z Press the power button to turn the camera off when the lens is retracted by pressing the 1 button. Power-Saving Features (Auto Power Down) A4000 IS A3400 IS A2400 IS A2300 As a way to conserve battery power, the camera automatically ...deactivates the screen and then turns itself off after a specific period of inactivity. • You can deactivate these power-saving features...
User Guide
Page 42
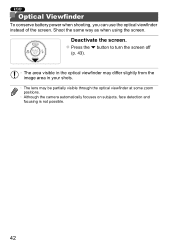
A1300 Optical Viewfinder To conserve battery power when shooting, you can use the optical viewfinder instead of the screen. Deactivate the screen. z Press the p button to turn the screen off (p. 43). • The area visible in the optical viewfinder may differ slightly from the image area in your shots. • The lens may be partially visible through the optical viewfinder at some zoom positions. • Although the camera automatically focuses on subjects, face detection and focusing is not possible. 42 Shoot the same way as when using the screen.
A1300 Optical Viewfinder To conserve battery power when shooting, you can use the optical viewfinder instead of the screen. Deactivate the screen. z Press the p button to turn the screen off (p. 43). • The area visible in the optical viewfinder may differ slightly from the image area in your shots. • The lens may be partially visible through the optical viewfinder at some zoom positions. • Although the camera automatically focuses on subjects, face detection and focusing is not possible. 42 Shoot the same way as when using the screen.
User Guide
Page 46
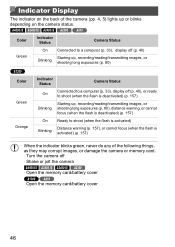
Open the memory card/battery cover A1300 A810 - Shake or jolt the camera A4000 IS A3400 IS A2400 IS A2300 - Open the memory card/battery cover 46 Turn the camera off (p. 40), or ready to shoot (when the flash is activated) (p. 157) • When the indicator blinks ... focus (when the flash is deactivated) (p. 157) Blinking Starting up or blinks depending on the camera status. A4000 IS A3400 IS A2400 IS A2300 A810 Color Indicator Status Camera Status Green On Blinking Connected to a computer (p. 33), display off (p. 40) Starting up, recording/reading/transmitting images...
Open the memory card/battery cover A1300 A810 - Shake or jolt the camera A4000 IS A3400 IS A2400 IS A2300 - Open the memory card/battery cover 46 Turn the camera off (p. 40), or ready to shoot (when the flash is activated) (p. 157) • When the indicator blinks ... focus (when the flash is deactivated) (p. 157) Blinking Starting up or blinks depending on the camera status. A4000 IS A3400 IS A2400 IS A2300 A810 Color Indicator Status Camera Status Green On Blinking Connected to a computer (p. 33), display off (p. 40) Starting up, recording/reading/transmitting images...

User Guide
Page 48
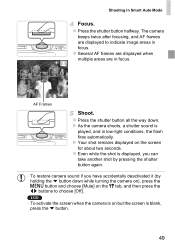
... the shot. z Press the power button. z Aim the camera at optimal settings for specific scenes, simply let the camera determine the subject and shooting conditions. A2300 A1300 A810 X A scene icon is displayed.) 48 Shooting in Smart Auto Mode Still Images Shooting Still Images (Smart Auto) For fully automatic selection at the...
... the shot. z Press the power button. z Aim the camera at optimal settings for specific scenes, simply let the camera determine the subject and shooting conditions. A2300 A1300 A810 X A scene icon is displayed.) 48 Shooting in Smart Auto Mode Still Images Shooting Still Images (Smart Auto) For fully automatic selection at the...
User Guide
Page 49
z Several AF frames are displayed when multiple areas are displayed to choose [Off]. z Press the shutter button all the way down while turning the camera on), press the n button and choose [Mute] on the 3 tab, and then press the qr buttons to indicate image areas in focus. A1300 &#...
z Several AF frames are displayed when multiple areas are displayed to choose [Off]. z Press the shutter button all the way down while turning the camera on), press the n button and choose [Mute] on the 3 tab, and then press the qr buttons to indicate image areas in focus. A1300 &#...
User Guide
Page 53
... p. 48. Start shooting. z To resize the subject, do the same thing as needed. Elapsed Time Prepare the camera for shooting. z Follow steps 1 - 3 on p. 48 to turn the camera on the top and bottom edges of camera operations will be recorded. X Black bars displayed on and set it to A mode, and then...
... p. 48. Start shooting. z To resize the subject, do the same thing as needed. Elapsed Time Prepare the camera for shooting. z Follow steps 1 - 3 on p. 48 to turn the camera on the top and bottom edges of camera operations will be recorded. X Black bars displayed on and set it to A mode, and then...
User Guide
Page 92
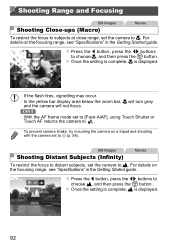
... setting is complete, u is displayed. • If the flash fires, vignetting may occur. • In the yellow bar display area below the zoom bar, e will turn gray and the camera will not focus. z Press the q button, press the qr buttons to choose e, and then press the m button. X Once the setting is...
... setting is complete, u is displayed. • If the flash fires, vignetting may occur. • In the yellow bar display area below the zoom bar, e will turn gray and the camera will not focus. z Press the q button, press the qr buttons to choose e, and then press the m button. X Once the setting is...
User Guide
Page 97
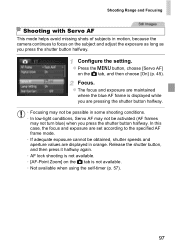
...; [AF-Point Zoom] on the 4 tab is displayed while you are displayed in some shooting conditions. • In low-light conditions, Servo AF may not turn blue) when you press the shutter button halfway. z Press the n button, choose [Servo AF] on the 4 tab, and then choose [On] (p. 45). Focus. In this...
...; [AF-Point Zoom] on the 4 tab is displayed while you are displayed in some shooting conditions. • In low-light conditions, Servo AF may not turn blue) when you press the shutter button halfway. z Press the n button, choose [Servo AF] on the 4 tab, and then choose [On] (p. 45). Focus. In this...

User Guide
Page 115
... card will be erased if you format the card (pp. 126, 127). • Images will not be protected if you switch to Shooting mode or turn the camera off before finishing the setup process in step 3. • Protected images cannot be erased by the camera (p. 116). Protect the image. To erase...
... card will be erased if you format the card (pp. 126, 127). • Images will not be protected if you switch to Shooting mode or turn the camera off before finishing the setup process in step 3. • Protected images cannot be erased by the camera (p. 116). Protect the image. To erase...


