
User Guide
Page 1
ENGLISH Camera User Guide • Before use, be sure to read this guide, including the safety precautions. • This guide will familiarize you with how to use the camera correctly. • Keep the guide handy for future reference.
ENGLISH Camera User Guide • Before use, be sure to read this guide, including the safety precautions. • This guide will familiarize you with how to use the camera correctly. • Keep the guide handy for future reference.
User Guide
Page 2
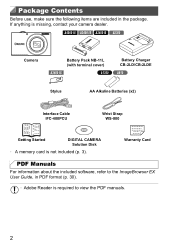
A4000 IS A3400 IS A2400 IS A2300 Camera A3400 IS Battery Pack NB-11L (with terminal cover) A1300 Battery Charger CB-2LD/CB-2LDE A810 Stylus AA Alkaline Batteries (x2) Interface Cable ...
A4000 IS A3400 IS A2400 IS A2300 Camera A3400 IS Battery Pack NB-11L (with terminal cover) A1300 Battery Charger CB-2LD/CB-2LDE A810 Stylus AA Alkaline Batteries (x2) Interface Cable ...
User Guide
Page 3
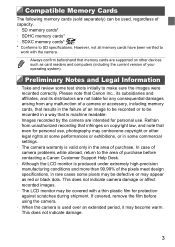
Please note that Canon Inc., its subsidiaries and affiliates, and its distributors are not liable for any consequential damages arising from unauthorized recording that infringes on copyright law, and ... used over an extended period, it may contravene copyright or other devices such as red or black dots. If covered, remove the film before contacting a Canon Customer Support Help Desk. • Although the LCD monitor is produced under extremely high-precision manufacturing conditions and more than 99.99% of the pixels...
Please note that Canon Inc., its subsidiaries and affiliates, and its distributors are not liable for any consequential damages arising from unauthorized recording that infringes on copyright law, and ... used over an extended period, it may contravene copyright or other devices such as red or black dots. If covered, remove the film before contacting a Canon Customer Support Help Desk. • Although the LCD monitor is produced under extremely high-precision manufacturing conditions and more than 99.99% of the pixels...
User Guide
Page 4
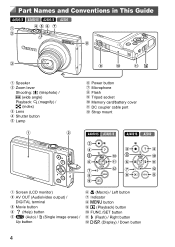
... Shutter button Lamp Power button Microphone Flash Tripod socket Memory card/battery cover DC coupler cable port Strap mount A4000 IS A3400 IS A2400 IS A2300 Screen (LCD monitor) AV OUT (Audio/video output) / DIGITAL terminal Movie button (Help) button A (Auto) / a (Single image erase) / Up button e (Macro) / Left button Indicator n button...
... Shutter button Lamp Power button Microphone Flash Tripod socket Memory card/battery cover DC coupler cable port Strap mount A4000 IS A3400 IS A2400 IS A2300 Screen (LCD monitor) AV OUT (Audio/video output) / DIGITAL terminal Movie button (Help) button A (Auto) / a (Single image erase) / Up button e (Macro) / Left button Indicator n button...

User Guide
Page 5
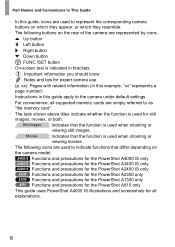
A1300 A810 Part Names and Conventions in This Guide Zoom lever Shooting: i (telephoto) / j (wide angle) Playback: k (magnify) / g (index) Lamp Microphone Lens Shutter button Power button Flash Tripod socket Memory card/battery cover DC coupler cable port Strap mount AV OUT (Audio/video output) / DIGITAL terminal A1300 A810 Screen (LCD monitor) Speaker A1300 Viewfinder Indicator Movie button A (Auto) / a (Single image erase) / Up button e (Macro) / Left button 1 (Playback) button (Help) button FUNC./SET button h (Flash) / Right button l (Display) / Down button n button 5
A1300 A810 Part Names and Conventions in This Guide Zoom lever Shooting: i (telephoto) / j (wide angle) Playback: k (magnify) / g (index) Lamp Microphone Lens Shutter button Power button Flash Tripod socket Memory card/battery cover DC coupler cable port Strap mount AV OUT (Audio/video output) / DIGITAL terminal A1300 A810 Screen (LCD monitor) Speaker A1300 Viewfinder Indicator Movie button A (Auto) / a (Single image erase) / Up button e (Macro) / Left button 1 (Playback) button (Help) button FUNC./SET button h (Flash) / Right button l (Display) / Down button n button 5
User Guide
Page 6
... IS Functions and precautions for the PowerShot A3400 IS only A2400 IS Functions and precautions for the PowerShot A2400 IS only A2300 Functions and precautions for the PowerShot A2300 only A1300 Functions and precautions for the PowerShot A1300 only A810 Functions and precautions for the PowerShot A810 only • This guide uses PowerShot A4000 IS illustrations and screenshots...
... IS Functions and precautions for the PowerShot A3400 IS only A2400 IS Functions and precautions for the PowerShot A2400 IS only A2300 Functions and precautions for the PowerShot A2300 only A1300 Functions and precautions for the PowerShot A1300 only A810 Functions and precautions for the PowerShot A810 only • This guide uses PowerShot A4000 IS illustrations and screenshots...
User Guide
Page 7
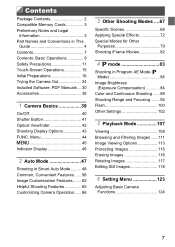
Menu 44 n 45 Indicator Display 46 2 Auto Mode 47 Shooting in Smart Auto Mode ......... 48 Common, Convenient Features ...... 56 Image Customization Features ....... 62 Helpful Shooting Features 65 Customizing Camera Operation...... 66 3 Other Shooting Modes ....67 Specific Scenes 68 Applying Special Effects 72 Special Modes for Other Purposes 79 Shooting iFrame Movies 82 4 G mode 83 Shooting in This Guide 4 Contents 7 Contents: Basic Operations 9 Safety Precautions 11 Touch-Screen Operations 15 Initial Preparations 16 Trying the Camera Out 24 Included Software, PDF Manuals ...
Menu 44 n 45 Indicator Display 46 2 Auto Mode 47 Shooting in Smart Auto Mode ......... 48 Common, Convenient Features ...... 56 Image Customization Features ....... 62 Helpful Shooting Features 65 Customizing Camera Operation...... 66 3 Other Shooting Modes ....67 Specific Scenes 68 Applying Special Effects 72 Special Modes for Other Purposes 79 Shooting iFrame Movies 82 4 G mode 83 Shooting in This Guide 4 Contents 7 Contents: Basic Operations 9 Safety Precautions 11 Touch-Screen Operations 15 Initial Preparations 16 Trying the Camera Out 24 Included Software, PDF Manuals ...
User Guide
Page 8
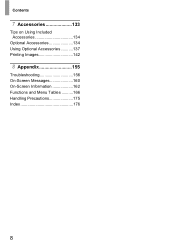
Contents 7 Accessories 133 Tips on Using Included Accessories 134 Optional Accessories 134 Using Optional Accessories...........137 Printing Images 142 8 Appendix 155 Troubleshooting 156 On-Screen Messages 160 On-Screen Information 162 Functions and Menu Tables ..........166 Handling Precautions 175 Index 176 8
Contents 7 Accessories 133 Tips on Using Included Accessories 134 Optional Accessories 134 Using Optional Accessories...........137 Printing Images 142 8 Appendix 155 Troubleshooting 156 On-Screen Messages 160 On-Screen Information 162 Functions and Menu Tables ..........166 Handling Precautions 175 Index 176 8
User Guide
Page 9
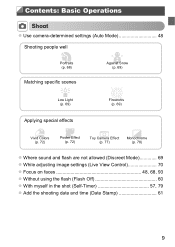
Contents: Basic Operations 4 Shoot z Use camera-determined settings (Auto Mode 48 Shooting people well I Portraits (p. 68) P Against Snow (p. 69) Matching specific scenes Low Light (p. 69) t Fireworks (p. 69) Applying special effects Vivid Colors (p. 72) Poster Effect (p. 72) Toy Camera Effect (p. 77) Monochrome (p. 78) z Where sound and flash are not allowed (Discreet Mode 69 z While adjusting image settings (Live View Control 70 z Focus on faces 48, 68, 93 z Without using the flash (Flash Off 60 z With myself in the shot (Self-Timer 57, 79 z Add the shooting date and time (...
Contents: Basic Operations 4 Shoot z Use camera-determined settings (Auto Mode 48 Shooting people well I Portraits (p. 68) P Against Snow (p. 69) Matching specific scenes Low Light (p. 69) t Fireworks (p. 69) Applying special effects Vivid Colors (p. 72) Poster Effect (p. 72) Toy Camera Effect (p. 77) Monochrome (p. 78) z Where sound and flash are not allowed (Discreet Mode 69 z While adjusting image settings (Live View Control 70 z Focus on faces 48, 68, 93 z Without using the flash (Flash Off 60 z With myself in the shot (Self-Timer 57, 79 z Add the shooting date and time (...
User Guide
Page 11
...battery. Warning Denotes the possibility of children and infants. Strap: Putting the strap around a child's neck could damage your camera distributor or a Canon Customer Support Help Desk. Safety Precautions • Before using the flash. • Store this equipment out of the reach of serious injury or...; Do not trigger the flash in close proximity to also check the guides included with water (e.g. A4000 IS A3400 IS A2400 IS A2300 If liquids or foreign objects come into contact with the camera interior, immediately turn the camera off and remove the batteries. A1300 •...
...battery. Warning Denotes the possibility of children and infants. Strap: Putting the strap around a child's neck could damage your camera distributor or a Canon Customer Support Help Desk. Safety Precautions • Before using the flash. • Store this equipment out of the reach of serious injury or...; Do not trigger the flash in close proximity to also check the guides included with water (e.g. A4000 IS A3400 IS A2400 IS A2300 If liquids or foreign objects come into contact with the camera interior, immediately turn the camera off and remove the batteries. A1300 •...
User Guide
Page 12
... the camera by the camera may result from listening with headphones to contact the terminals or plug. Safety Precautions A4000 IS A3400 IS A2400 IS A2300 • Use only the recommended battery. • Do not place the battery near or in direct flame. The battery may explode or leak, resulting in...
... the camera by the camera may result from listening with headphones to contact the terminals or plug. Safety Precautions A4000 IS A3400 IS A2400 IS A2300 • Use only the recommended battery. • Do not place the battery near or in direct flame. The battery may explode or leak, resulting in...
User Guide
Page 13
... sensor. • When using the camera. Safety Precautions • Avoid using the camera. Humid or dusty areas A4000 IS A3400 IS A2400 IS A2300 These could cause leakage, overheating or an explosion of the unit. A1300 A810 • Remove and store the batteries when you are not using ,... are left inside the camera, damage caused by leakage may lead to remove dirt, dust or other injuries. A4000 IS A3400 IS A2400 IS A2300 • Before you discard the batteries, cover the terminals with tape or other insulators. Places subject to the equipment. • Do not ...
... sensor. • When using the camera. Safety Precautions • Avoid using the camera. Humid or dusty areas A4000 IS A3400 IS A2400 IS A2300 These could cause leakage, overheating or an explosion of the unit. A1300 A810 • Remove and store the batteries when you are not using ,... are left inside the camera, damage caused by leakage may lead to remove dirt, dust or other injuries. A4000 IS A3400 IS A2400 IS A2300 • Before you discard the batteries, cover the terminals with tape or other insulators. Places subject to the equipment. • Do not ...
User Guide
Page 14
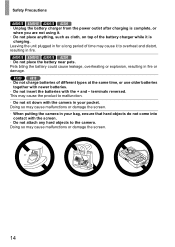
A4000 IS A3400 IS A2400 IS A2300 • Do not place the battery near pets. This may cause malfunctions or damage the screen. • When putting the camera in your pocket. A1300 ..., on top of the battery charger while it to overheat and distort, resulting in fire. terminals reversed. Safety Precautions A4000 IS A3400 IS A2400 IS A2300 • Unplug the battery charger from the power outlet after charging is charging.
A4000 IS A3400 IS A2400 IS A2300 • Do not place the battery near pets. This may cause malfunctions or damage the screen. • When putting the camera in your pocket. A1300 ..., on top of the battery charger while it to overheat and distort, resulting in fire. terminals reversed. Safety Precautions A4000 IS A3400 IS A2400 IS A2300 • Unplug the battery charger from the power outlet after charging is charging.
User Guide
Page 15
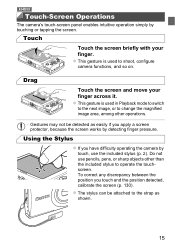
z The stylus can be detected as shown. 15 Using the Stylus z If you touch and the position detected, calibrate the screen (p. 130). Drag Touch the screen and move your finger. To correct any discrepancy between the position you have difficulty operating the camera by touching or tapping the screen. Touch Touch the screen briefly with your finger across it. z This gesture is used to shoot, configure camera functions, and so on. Do not use the included stylus (p. 2). A3400 IS Touch-Screen Operations The camera's touch-screen panel enables intuitive operation simply ...
z The stylus can be detected as shown. 15 Using the Stylus z If you touch and the position detected, calibrate the screen (p. 130). Drag Touch the screen and move your finger. To correct any discrepancy between the position you have difficulty operating the camera by touching or tapping the screen. Touch Touch the screen briefly with your finger across it. z This gesture is used to shoot, configure camera functions, and so on. Do not use the included stylus (p. 2). A3400 IS Touch-Screen Operations The camera's touch-screen panel enables intuitive operation simply ...
User Guide
Page 16
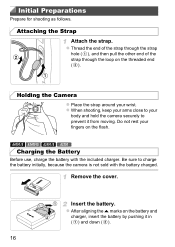
... the strap hole ( ), and then pull the other end of the strap through the loop on the threaded end ( ). A4000 IS A3400 IS A2400 IS A2300 Charging the Battery Before use, charge the battery with the battery charged. Be sure to prevent it in ( ) and down ( ). 16 Attaching the Strap Attach...
... the strap hole ( ), and then pull the other end of the strap through the loop on the threaded end ( ). A4000 IS A3400 IS A2400 IS A2300 Charging the Battery Before use, charge the battery with the battery charged. Be sure to prevent it in ( ) and down ( ). 16 Attaching the Strap Attach...
User Guide
Page 17
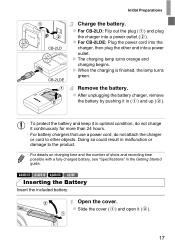
z For CB-2LDE: Plug the power cord into the charger, then plug the other objects. Open the cover. A4000 IS A3400 IS A2400 IS A2300 Inserting the Battery Insert the included battery. z After unplugging the battery charger, remove the battery by pushing it in ( ) and up ( ). • To protect the ...
z For CB-2LDE: Plug the power cord into the charger, then plug the other objects. Open the cover. A4000 IS A3400 IS A2400 IS A2300 Inserting the Battery Insert the included battery. z After unplugging the battery charger, remove the battery by pushing it in ( ) and up ( ). • To protect the ...

User Guide
Page 18
z While pressing the battery lock in the direction of the arrow. z Lower the cover ( ) and hold it down as shown and push it clicks into the locked position. Close the cover. Initial Preparations Terminals Battery Lock Insert the battery. Always confirm that the battery is facing the right way and locks when inserted. X The battery will pop up. 18 Removing the Battery z Open the cover and press the battery lock in until it cannot be locked into the closed position ( ). z If you slide it until it in the direction of the arrow, insert the battery facing as you ...
z While pressing the battery lock in the direction of the arrow. z Lower the cover ( ) and hold it down as shown and push it clicks into the locked position. Close the cover. Initial Preparations Terminals Battery Lock Insert the battery. Always confirm that the battery is facing the right way and locks when inserted. X The battery will pop up. 18 Removing the Battery z Open the cover and press the battery lock in until it cannot be locked into the closed position ( ). z If you slide it until it in the direction of the arrow, insert the battery facing as you ...
User Guide
Page 19
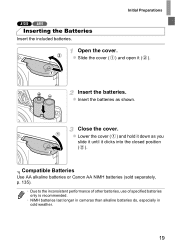
... A1300 A810 Inserting the Batteries Insert the included batteries. z Insert the batteries as you slide it until it ( ). Compatible Batteries Use AA alkaline batteries or Canon AA NiMH batteries (sold separately, p. 135). • Due to the inconsistent performance of other batteries, use of specified batteries only is recommended. • NiMH batteries...
... A1300 A810 Inserting the Batteries Insert the included batteries. z Insert the batteries as you slide it until it ( ). Compatible Batteries Use AA alkaline batteries or Canon AA NiMH batteries (sold separately, p. 135). • Due to the inconsistent performance of other batteries, use of specified batteries only is recommended. • NiMH batteries...
User Guide
Page 20
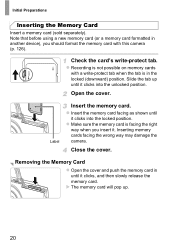
Initial Preparations Inserting the Memory Card Insert a memory card (sold separately). z Insert the memory card facing as shown until it clicks into the locked position. X The memory card will pop up until it . z Recording is not possible on memory cards with this camera (p. 126). Slide the tab up . 20 Open the cover. z Make sure the memory card is in the locked (downward) position. Inserting memory cards facing the wrong way may damage the camera. Note that before using a new memory card (or a memory card formatted in until it clicks into the unlocked position. ...
Initial Preparations Inserting the Memory Card Insert a memory card (sold separately). z Insert the memory card facing as shown until it clicks into the locked position. X The memory card will pop up until it . z Recording is not possible on memory cards with this camera (p. 126). Slide the tab up . 20 Open the cover. z Make sure the memory card is in the locked (downward) position. Inserting memory cards facing the wrong way may damage the camera. Note that before using a new memory card (or a memory card formatted in until it clicks into the unlocked position. ...
User Guide
Page 21
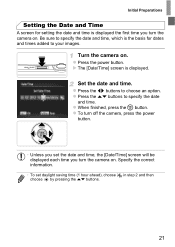
z To turn off the camera, press the power button. • Unless you set daylight saving time (1 hour ahead), choose choose by pressing the op buttons. Initial Preparations Setting the Date and Time A screen for dates and times added to your images. Turn the camera on . X The [Date/Time] screen is displayed the first time you turn the camera on. z Press the op buttons to choose an option. z When finished, press the m button. in step 2 and then 21 Set the date and time. Specify the correct information. • To set the date and time, the [Date/Time] screen will be ...
z To turn off the camera, press the power button. • Unless you set daylight saving time (1 hour ahead), choose choose by pressing the op buttons. Initial Preparations Setting the Date and Time A screen for dates and times added to your images. Turn the camera on . X The [Date/Time] screen is displayed the first time you turn the camera on. z Press the op buttons to choose an option. z When finished, press the m button. in step 2 and then 21 Set the date and time. Specify the correct information. • To set the date and time, the [Date/Time] screen will be ...
