User Guide
Page 2
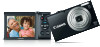
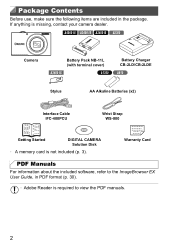
... PDF manuals. 2 If anything is required to the ImageBrowser EX User Guide, in the package. A4000 IS A3400 IS A2400 IS A2300 Camera A3400 IS Battery Pack NB-11L (with terminal cover) A1300 Battery Charger CB-2LD/CB-2LDE A810 Stylus AA Alkaline Batteries (x2) Interface Cable IFC-400PCU Wrist Strap WS-800 Getting Started DIGITAL CAMERA Solution Disk • A memory card is not included (p. 3). Package Contents Before use, make...
... PDF manuals. 2 If anything is required to the ImageBrowser EX User Guide, in the package. A4000 IS A3400 IS A2400 IS A2300 Camera A3400 IS Battery Pack NB-11L (with terminal cover) A1300 Battery Charger CB-2LD/CB-2LDE A810 Stylus AA Alkaline Batteries (x2) Interface Cable IFC-400PCU Wrist Strap WS-800 Getting Started DIGITAL CAMERA Solution Disk • A memory card is not included (p. 3). Package Contents Before use, make...
User Guide
Page 6
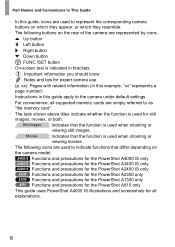
... images, movies, or both. Still Images : Indicates that the function is used when shooting or viewing movies. • The following buttons on the rear of the camera are represented by icons. Part Names and Conventions in This Guide • In this guide apply to the camera under default settings. • For convenience, all supported memory cards are simply referred to indicate functions that differ depending on the camera model: A4000 IS Functions and precautions for the PowerShot...
... images, movies, or both. Still Images : Indicates that the function is used when shooting or viewing movies. • The following buttons on the rear of the camera are represented by icons. Part Names and Conventions in This Guide • In this guide apply to the camera under default settings. • For convenience, all supported memory cards are simply referred to indicate functions that differ depending on the camera model: A4000 IS Functions and precautions for the PowerShot...
User Guide
Page 21
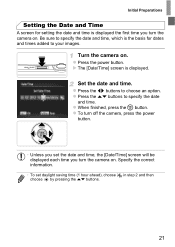
... the date and time. Be sure to specify the date and time, which is the basis for setting the date and time is displayed. Turn the camera on . X The [Date/Time] screen is displayed the first time you turn the camera on . Set the date and time. z To turn off the camera, press the power button. • Unless you set daylight saving time (1 hour ahead), choose choose by pressing the op buttons. Initial Preparations Setting the Date and Time A screen for dates and times...
... the date and time. Be sure to specify the date and time, which is the basis for setting the date and time is displayed. Turn the camera on . X The [Date/Time] screen is displayed the first time you turn the camera on . Set the date and time. z To turn off the camera, press the power button. • Unless you set daylight saving time (1 hour ahead), choose choose by pressing the op buttons. Initial Preparations Setting the Date and Time A screen for dates and times...
User Guide
Page 30
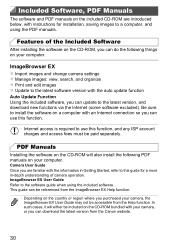
... of camera operation. ImageBrowser EX User Guide Refer to a computer, and using the included software. Included Software, PDF Manuals The software and PDF manuals on the included CD-ROM are familiar with the information in -depth understanding of the Included Software After installing the software on the CD-ROM, you can download the latest version from the Help function. ImageBrowser EX z Import images and change camera settings z Manage images: view, search, and organize z Print and edit images z Update...
... of camera operation. ImageBrowser EX User Guide Refer to a computer, and using the included software. Included Software, PDF Manuals The software and PDF manuals on the included CD-ROM are familiar with the information in -depth understanding of the Included Software After installing the software on the CD-ROM, you can download the latest version from the Help function. ImageBrowser EX z Import images and change camera settings z Manage images: view, search, and organize z Print and edit images z Update...
User Guide
Page 32
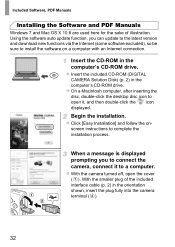
... a message is displayed prompting you can update to the latest version and download new functions via the Internet (some software excluded), so be sure to connect the camera, connect it , and then double-click the icon displayed. Begin the installation. Using the software auto update function, you to install the software on - Insert the CD-ROM in the computer's CD-ROM drive. screen instructions to open the cover ( ). Included Software, PDF Manuals Installing the Software and PDF Manuals Windows 7 and Mac...
... a message is displayed prompting you can update to the latest version and download new functions via the Internet (some software excluded), so be sure to connect the camera, connect it , and then double-click the icon displayed. Begin the installation. Using the software auto update function, you to install the software on - Insert the CD-ROM in the computer's CD-ROM drive. screen instructions to open the cover ( ). Included Software, PDF Manuals Installing the Software and PDF Manuals Windows 7 and Mac...
User Guide
Page 33
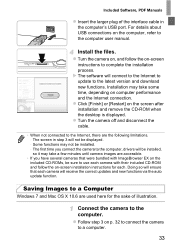
... version and download new functions. For details about USB connections on the screen after installation and remove the CD-ROM when the desktop is displayed. z Click [Finish] or [Restart] on the computer, refer to a Computer Windows 7 and Mac OS X 10.6 are the following limitations. - Some functions may take a few minutes until camera images are accessible. • If you have several cameras that each . Saving Images to the computer user manual.
... version and download new functions. For details about USB connections on the screen after installation and remove the CD-ROM when the desktop is displayed. z Click [Finish] or [Restart] on the computer, refer to a Computer Windows 7 and Mac OS X 10.6 are the following limitations. - Some functions may take a few minutes until camera images are accessible. • If you have several cameras that each . Saving Images to the computer user manual.

User Guide
Page 35
... displayed after you turn the camera on in step 2. Included Software, PDF Manuals z For instructions on viewing images on a computer, refer to the ImageBrowser EX User Guide. • In Windows 7, if the screen in step 2 is not displayed, click the icon in the taskbar. • To start CameraWindow in Windows Vista or XP, click [Downloads Images From Canon Camera using Canon CameraWindow] on the screen displayed when you connect the camera to the computer until camera images are accessible. - Image protection settings...
... displayed after you turn the camera on in step 2. Included Software, PDF Manuals z For instructions on viewing images on a computer, refer to the ImageBrowser EX User Guide. • In Windows 7, if the screen in step 2 is not displayed, click the icon in the taskbar. • To start CameraWindow in Windows Vista or XP, click [Downloads Images From Canon Camera using Canon CameraWindow] on the screen displayed when you connect the camera to the computer until camera images are accessible. - Image protection settings...

User Guide
Page 59
... and adjust image brightness automatically. z The camera beeps twice after focusing. z Release your finger to focus on the screen. Prepare to . • The camera performs the same operations for regular shooting with the shutter button. • You can simply touch the screen and release your finger from the screen. Choose a subject to shoot. A shutter sound is played as for Touch-Shutter shooting as the camera shoots. z Touch and change the mode to use Touch Shutter.
... and adjust image brightness automatically. z The camera beeps twice after focusing. z Release your finger to focus on the screen. Prepare to . • The camera performs the same operations for regular shooting with the shutter button. • You can simply touch the screen and release your finger from the screen. Choose a subject to shoot. A shutter sound is played as for Touch-Shutter shooting as the camera shoots. z Touch and change the mode to use Touch Shutter.
User Guide
Page 62
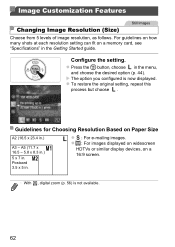
... Resolution Based on a 16:9 screen. • With , digital zoom (p. 56) is now displayed. X The option you configured is not available. 62 z To restore the original setting, repeat this process but choose . Image Customization Features Still Images Changing Image Resolution (Size) Choose from 5 levels of image resolution, as follows. For guidelines on how many shots at each resolution setting can fit on a memory card, see "Specifications" in .
... Resolution Based on a 16:9 screen. • With , digital zoom (p. 56) is now displayed. X The option you configured is not available. 62 z To restore the original setting, repeat this process but choose . Image Customization Features Still Images Changing Image Resolution (Size) Choose from 5 levels of image resolution, as follows. For guidelines on how many shots at each resolution setting can fit on a memory card, see "Specifications" in .
User Guide
Page 80
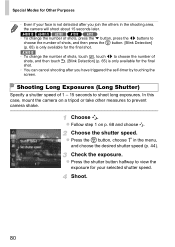
... choose the desired shutter speed (p. 44). Shooting Long Exposures (Long Shutter) Specify a shutter speed of shots, and then touch ^. [Blink Detection] (p. 65) is only available for the final shot. z Press the shutter button halfway to shoot long exposures. Shoot. 80 A4000 IS A2400 IS A2300 A1300 A810 • To change the number of shots, touch , touch qr to choose the number of 1 - 15 seconds to view the exposure for your face is...
... choose the desired shutter speed (p. 44). Shooting Long Exposures (Long Shutter) Specify a shutter speed of shots, and then touch ^. [Blink Detection] (p. 65) is only available for the final shot. z Press the shutter button halfway to shoot long exposures. Shoot. 80 A4000 IS A2400 IS A2300 A1300 A810 • To change the number of shots, touch , touch qr to choose the number of 1 - 15 seconds to view the exposure for your face is...

User Guide
Page 90
... shot, adjust white balance to shoot continuously. 90 For details on the continuous shooting speed, see "Specifications" in "Adjusting White Balance" (p. 89) to shoot continuously. Color and Continuous Shooting Custom White Balance For image colors that look unnatural if you are shooting. Still Images Continuous Shooting Hold the shutter button all the way down to choose . X The tint of the screen changes once the white balance data has been recorded. • Colors may look natural under the same light source that the entire screen is displayed. Configure the setting. Shoot...
... shot, adjust white balance to shoot continuously. 90 For details on the continuous shooting speed, see "Specifications" in "Adjusting White Balance" (p. 89) to shoot continuously. Color and Continuous Shooting Custom White Balance For image colors that look unnatural if you are shooting. Still Images Continuous Shooting Hold the shutter button all the way down to choose . X The tint of the screen changes once the white balance data has been recorded. • Colors may look natural under the same light source that the entire screen is displayed. Configure the setting. Shoot...

User Guide
Page 113
... continuing to restore the original setting. • You can also zoom in and magnify the image, and is displayed. 113 Press the m button again to hold it. A3400 IS Using the Touch-Screen Panel • Touching the screen will zoom in or out by touching continuously, touch and hold the zoom lever. Image Viewing Options Magnifying Images Still Images Approximate Position of Displayed Area Magnify an image. z To zoom...
... continuing to restore the original setting. • You can also zoom in and magnify the image, and is displayed. 113 Press the m button again to hold it. A3400 IS Using the Touch-Screen Panel • Touching the screen will zoom in or out by touching continuously, touch and hold the zoom lever. Image Viewing Options Magnifying Images Still Images Approximate Position of Displayed Area Magnify an image. z To zoom...

User Guide
Page 128
... memory cards. Image numbering is reset to the ImageBrowser EX User Guide for information on the shooting date. 128 To start saving shots from 0001, use an empty (or formatted (p. 126)) memory card. • Refer to 0001 if you switch memory cards, or when a new folder is taken/saved) even if you switch memory cards. You can have the camera create folders each day you shoot to 2,000 images each. z Choose [Create Folder], and then choose [Daily]. Adjusting Basic Camera Functions File Numbering Your shots...
... memory cards. Image numbering is reset to the ImageBrowser EX User Guide for information on the shooting date. 128 To start saving shots from 0001, use an empty (or formatted (p. 126)) memory card. • Refer to 0001 if you switch memory cards, or when a new folder is taken/saved) even if you switch memory cards. You can have the camera create folders each day you shoot to 2,000 images each. z Choose [Create Folder], and then choose [Daily]. Adjusting Basic Camera Functions File Numbering Your shots...

User Guide
Page 148
... Canon PictBridge-compatible printer models earlier than CP720 and CP730. Choose a printing method. Print the image. The printing information you prepare this way will conform DPOF (Digital Print Order Format) standards. 148 You can be set up to choose the printing method. Movie Printing Options Single Sequence Prints the current scene as the number of paper. Still Images Adding Images to choose a movie, and then press the m button. z Follow steps 1 - 5 on a memory card...
... Canon PictBridge-compatible printer models earlier than CP720 and CP730. Choose a printing method. Print the image. The printing information you prepare this way will conform DPOF (Digital Print Order Format) standards. 148 You can be set up to choose the printing method. Movie Printing Options Single Sequence Prints the current scene as the number of paper. Still Images Adding Images to choose a movie, and then press the m button. z Follow steps 1 - 5 on a memory card...

User Guide
Page 158
... ISO speed (p. 87). For best results, have AF frames displayed and the camera focus correctly, try increasing the lighting in indoor scenes and shooting at the red-eye reduction lamp. Shots look too bright, highlights are washed-out. • Shoot within flash range (see "Specifications" in Each Shooting Mode", "FUNC. Recording to the memory card takes too long, or continuous shooting is slower. • Use the camera to "Functions Available in the Getting Started guide). • Set...
... ISO speed (p. 87). For best results, have AF frames displayed and the camera focus correctly, try increasing the lighting in indoor scenes and shooting at the red-eye reduction lamp. Shots look too bright, highlights are washed-out. • Shoot within flash range (see "Specifications" in Each Shooting Mode", "FUNC. Recording to the memory card takes too long, or continuous shooting is slower. • Use the camera to "Functions Available in the Getting Started guide). • Set...
User Guide
Page 159
...; Switch to a card that supports high-speed recording. On the next screen, press the qr buttons to a memory card that you press the o and m buttons at the same time. Try one of the following measures. • Use the camera to perform low-level formatting of movies on the memory card corresponds to rename files or alter the folder structure. Computer Cannot transfer images to enter Playback mode. Refer to the ImageBrowser EX User Guide for...
...; Switch to a card that supports high-speed recording. On the next screen, press the qr buttons to a memory card that you press the o and m buttons at the same time. Try one of the following measures. • Use the camera to perform low-level formatting of movies on the memory card corresponds to rename files or alter the folder structure. Computer Cannot transfer images to enter Playback mode. Refer to the ImageBrowser EX User Guide for...
User Guide
Page 161
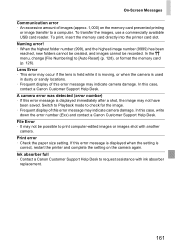
... camera is displayed immediately after a shot, the image may not be recorded. If this case, write down the error number (Exx) and contact a Canon Customer Support Help Desk. Switch to Playback mode to request assistance with another camera. To print, insert the memory card directly into the printer card slot. In this error message is displayed when the setting is correct, restart the printer and complete the setting on the memory card prevented printing or image transfer to [Auto Reset] (p. 128), or format the memory card (p. 126). On-Screen Messages Communication error...
... camera is displayed immediately after a shot, the image may not be recorded. If this case, write down the error number (Exx) and contact a Canon Customer Support Help Desk. Switch to Playback mode to request assistance with another camera. To print, insert the memory card directly into the printer card slot. In this error message is displayed when the setting is correct, restart the printer and complete the setting on the memory card prevented printing or image transfer to [Auto Reset] (p. 128), or format the memory card (p. 126). On-Screen Messages Communication error...
User Guide
Page 168
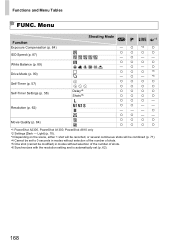
...number of shots. *5 One shot (cannot be modified) in modes without selection of the number of shots. *6 Synchronizes with the resolution setting and is automatically set (p. 62). 168 Functions and Menu Tables FUNC. Menu Function Exposure Compensation (p. 84) ISO Speed (p. 87) White Balance (p. 89) Drive Mode (p. 90) Self-Timer (p. 57) Self-Timer Settings (p. 58) Resolution (p. 62) Movie Quality (p. 64) Shooting Mode AG *1 W ][$ Delay*4 Shots*5 - { *2 { {{{{ -{-- {{{{ -{-{ { { { *3 - { - *3 {{{{ {{{{ {{{{ {{{{ {{{- { {-- ---{ { {-- {{{{ {{{{ *1 PowerShot A2300...
...number of shots. *5 One shot (cannot be modified) in modes without selection of the number of shots. *6 Synchronizes with the resolution setting and is automatically set (p. 62). 168 Functions and Menu Tables FUNC. Menu Function Exposure Compensation (p. 84) ISO Speed (p. 87) White Balance (p. 89) Drive Mode (p. 90) Self-Timer (p. 57) Self-Timer Settings (p. 58) Resolution (p. 62) Movie Quality (p. 64) Shooting Mode AG *1 W ][$ Delay*4 Shots*5 - { *2 { {{{{ -{-- {{{{ -{-{ { { { *3 - { - *3 {{{{ {{{{ {{{{ {{{{ {{{- { {-- ---{ { {-- {{{{ {{{{ *1 PowerShot A2300...
User Guide
Page 176
... Power saving 40 Battery and charger kit 135 Battery charger 2, 134 Blink detection 65 C Camera Reset all 131 Camera shake 104 Center (AF frame mode 94 Color (white balance 89 Continuous shooting 90 Custom white balance 90 D Date/time Adding date/time to images 61 Changing 22 Setting 21 DC coupler 135, 139 Defaults J Reset all DIGITAL CAMERA Solution Disk 2 Digital zoom 56 Display language 23 DPOF 148 176 Drag 15 Drive mode 90 E Editing i-Contrast 119 Red-eye correction 120 Resizing images 118 Erasing 116 Erasing all 116 Error messages 160 Exposure AE lock...
... Power saving 40 Battery and charger kit 135 Battery charger 2, 134 Blink detection 65 C Camera Reset all 131 Camera shake 104 Center (AF frame mode 94 Color (white balance 89 Continuous shooting 90 Custom white balance 90 D Date/time Adding date/time to images 61 Changing 22 Setting 21 DC coupler 135, 139 Defaults J Reset all DIGITAL CAMERA Solution Disk 2 Digital zoom 56 Display language 23 DPOF 148 176 Drag 15 Drive mode 90 E Editing i-Contrast 119 Red-eye correction 120 Resizing images 118 Erasing 116 Erasing all 116 Error messages 160 Exposure AE lock...
User Guide
Page 177
...-screen panel 15 Touch Shutter 59 177 Index I i-Contrast 88, 119 iFrame movies (movie mode 82 Images Display period 66 Erasing 116 Playback J Viewing Protecting 115 Indicator 46 Infinity (focus mode 92 Interface cable 2, 142 ISO speed 87 J Jump display 112 L Lamp 66 Language display 23 Live View Control (shooting mode 70 Long shutter (shooting mode 80 Low-light (shooting mode 69 M Macro (focus mode 92 Magnified display 113 Memory cards 3 Menu Basic operations 45 Table 166 Metering method 86 Miniature effect (shooting mode 74 Monochrome (shooting mode 78 Movies Image...
...-screen panel 15 Touch Shutter 59 177 Index I i-Contrast 88, 119 iFrame movies (movie mode 82 Images Display period 66 Erasing 116 Playback J Viewing Protecting 115 Indicator 46 Infinity (focus mode 92 Interface cable 2, 142 ISO speed 87 J Jump display 112 L Lamp 66 Language display 23 Live View Control (shooting mode 70 Long shutter (shooting mode 80 Low-light (shooting mode 69 M Macro (focus mode 92 Magnified display 113 Memory cards 3 Menu Basic operations 45 Table 166 Metering method 86 Miniature effect (shooting mode 74 Monochrome (shooting mode 78 Movies Image...


