iP4200 Easy Setup Instructions
Page 1
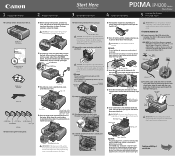
...into the holder. Lift open for the connection, the printer will initialize. Paper Support (a) Inner Cover Paper Guide Cover Guide IMPORTANT: Print Head Alignment (Step 6) requires that letter size paper is off and discard the orange protective cap located on the inside of the protective cap - ...guide, then slide the paper guide toward the left open the paper support and extend the paper output tray. PIXMA iP4200 Photo Printer Documentation and Software Kit PIXMA iP4200 Print Head Power Cord CLI-8BK Black CLI-8Y Yellow PGI-5BK Black CLI-8M Magenta CLI-8C Cyan Ink Tanks ...
...into the holder. Lift open for the connection, the printer will initialize. Paper Support (a) Inner Cover Paper Guide Cover Guide IMPORTANT: Print Head Alignment (Step 6) requires that letter size paper is off and discard the orange protective cap located on the inside of the protective cap - ...guide, then slide the paper guide toward the left open the paper support and extend the paper output tray. PIXMA iP4200 Photo Printer Documentation and Software Kit PIXMA iP4200 Print Head Power Cord CLI-8BK Black CLI-8Y Yellow PGI-5BK Black CLI-8M Magenta CLI-8C Cyan Ink Tanks ...

iP4200 Easy Setup Instructions
Page 2
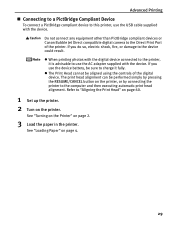
...automatically. NOTE: · Print head alignment will begin identifying the printer port being used. d. e. Click the down-arrow to Windows XP Service Pack 2 installation. NOTE: Loading paper in Thailand. QA7-3536-V02 © 2005 Canon Inc. b. Select iP4200 and click Maintenance. The setup ...the bottom of the Administrators group before continuing. 2 Double-click the Setup icon. 8 Start the print head alignment procedure. When the Printer List screen appears, select iP4200, then click Utility (Configure when using Mac OS X v.10.2.x) icon. You can load paper in the...
...automatically. NOTE: · Print head alignment will begin identifying the printer port being used. d. e. Click the down-arrow to Windows XP Service Pack 2 installation. NOTE: Loading paper in Thailand. QA7-3536-V02 © 2005 Canon Inc. b. Select iP4200 and click Maintenance. The setup ...the bottom of the Administrators group before continuing. 2 Double-click the Setup icon. 8 Start the print head alignment procedure. When the Printer List screen appears, select iP4200, then click Utility (Configure when using Mac OS X v.10.2.x) icon. You can load paper in the...
iP4200 Quick Start Guide
Page 33
...Canon Bubble Jet Direct compatible digital camera to the device could result. If you use the device battery, be sure to use the USB cable supplied with the device. If you do so, electric shock, fire, or damage to the Direct Print Port of the digital device. Refer to "Aligning the Print Head...PictBridge Compliant Device To connect a PictBridge compliant device to the computer and then executing automatic print head alignment. See "Loading Paper" on the printer. z The Print Head cannot be performed simply by connecting the printer to this printer, use the AC adapter supplied...
...Canon Bubble Jet Direct compatible digital camera to the device could result. If you use the device battery, be sure to use the USB cable supplied with the device. If you do so, electric shock, fire, or damage to the Direct Print Port of the digital device. Refer to "Aligning the Print Head...PictBridge Compliant Device To connect a PictBridge compliant device to the computer and then executing automatic print head alignment. See "Loading Paper" on the printer. z The Print Head cannot be performed simply by connecting the printer to this printer, use the AC adapter supplied...
iP4200 Quick Start Guide
Page 64
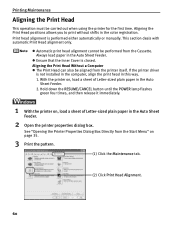
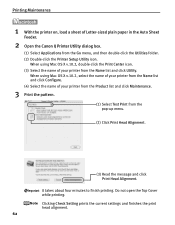
...sheet of Letter-sized plain paper in the Auto Sheet Feeder. 2 Open the printer properties dialog box. This section deals with automatic Print Head alignment only. Hold down the RESUME/CANCEL button until the POWER lamp flashes green four times, and then release it immediately. 1 With the printer... on, load a sheet of Letter-sized plain paper in this way. 1. z Automatic print head alignment cannot be carried out when using the printer for the first time. z Ensure that the Inner Cover is performed either automatically or manually. ...
...sheet of Letter-sized plain paper in the Auto Sheet Feeder. 2 Open the printer properties dialog box. This section deals with automatic Print Head alignment only. Hold down the RESUME/CANCEL button until the POWER lamp flashes green four times, and then release it immediately. 1 With the printer... on, load a sheet of Letter-sized plain paper in this way. 1. z Automatic print head alignment cannot be carried out when using the printer for the first time. z Ensure that the Inner Cover is performed either automatically or manually. ...
iP4200 Quick Start Guide
Page 65
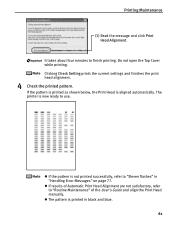
... the pattern is printed as shown below, the Print Head is now ready to "Eleven flashes" in black and blue. 61 The printer is aligned automatically. Clicking Check Setting prints the current settings and finishes the print head alignment. 4 Check the printed pattern. z If the pattern... is printed in "Handling Error Messages" on page 77. It takes about four minutes to "Routine Maintenance" of Automatic Print Head Alignment are not satisfactory, refer to finish printing. ...
... the pattern is printed as shown below, the Print Head is now ready to "Eleven flashes" in black and blue. 61 The printer is aligned automatically. Clicking Check Setting prints the current settings and finishes the print head alignment. 4 Check the printed pattern. z If the pattern... is printed in "Handling Error Messages" on page 77. It takes about four minutes to "Routine Maintenance" of Automatic Print Head Alignment are not satisfactory, refer to finish printing. ...
iP4200 Quick Start Guide
Page 66
Clicking Check Setting prints the current settings and finishes the print head alignment. 62 It takes about four minutes to finish printing. Do not open the Top Cover while printing. When using Mac OS X v.10.2, select the name ... using Mac OS X v.10.2, double-click the Print Center icon. (3) Select the name of Letter-sized plain paper in the Auto Sheet Feeder. 2 Open the Canon IJ Printer Utility dialog box. (1) Select Applications from the Go menu, and then double-click the Utilities folder. (2) Double-click the Printer Setup Utility icon...
Clicking Check Setting prints the current settings and finishes the print head alignment. 62 It takes about four minutes to finish printing. Do not open the Top Cover while printing. When using Mac OS X v.10.2, select the name ... using Mac OS X v.10.2, double-click the Print Center icon. (3) Select the name of Letter-sized plain paper in the Auto Sheet Feeder. 2 Open the Canon IJ Printer Utility dialog box. (1) Select Applications from the Go menu, and then double-click the Utilities folder. (2) Double-click the Printer Setup Utility icon...

iP4200 Quick Start Guide
Page 67
z If results of the User's Guide and align the Print Head manually. z If the pattern is aligned automatically. The printer is printed in "Handling Error Messages" on page 77. z The pattern is now ready to use. Printing Maintenance 4 Check the printed pattern. If the pattern is printed as shown below, the Print Head is not printed successfully, refer to "Routine Maintenance" of Automatic Print Head Alignment are not satisfactory, refer to "Eleven flashes" in black and blue. 63
z If results of the User's Guide and align the Print Head manually. z If the pattern is aligned automatically. The printer is printed in "Handling Error Messages" on page 77. z The pattern is now ready to use. Printing Maintenance 4 Check the printed pattern. If the pattern is printed as shown below, the Print Head is not printed successfully, refer to "Routine Maintenance" of Automatic Print Head Alignment are not satisfactory, refer to "Eleven flashes" in black and blue. 63
iP4200 Quick Start Guide
Page 71
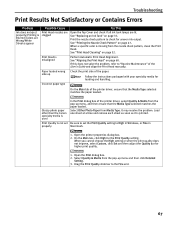
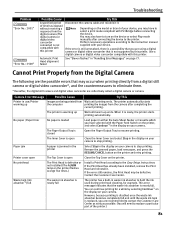
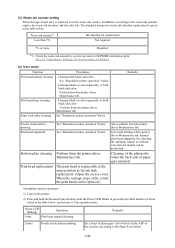
...Troubleshooting Print Results Not Satisfactory or Contains Errors Problem Possible Cause Try This Ink does not eject properly/Printing is misaligned Perform Automatic Print Head Alignment. See "Print Head Cleaning" on page 47. It may resolve the problem. Print the nozzle check pattern to the Fine end. 67 On the Main... are Wrong/White Streaks appear Print Head nozzles are clogged Open the Top Cover and check if all ink tank lamps are lit. Paper loaded wrong side up menu and then click Detailed Setting. 3. Glossy photo paper other than the Canon specialty media is not set Be ...
...Troubleshooting Print Results Not Satisfactory or Contains Errors Problem Possible Cause Try This Ink does not eject properly/Printing is misaligned Perform Automatic Print Head Alignment. See "Print Head Cleaning" on page 47. It may resolve the problem. Print the nozzle check pattern to the Fine end. 67 On the Main... are Wrong/White Streaks appear Print Head nozzles are clogged Open the Top Cover and check if all ink tank lamps are lit. Paper loaded wrong side up menu and then click Detailed Setting. 3. Glossy photo paper other than the Canon specialty media is not set Be ...
iP4200 Quick Start Guide
Page 82
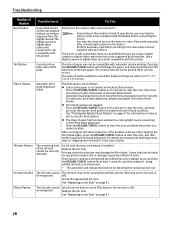
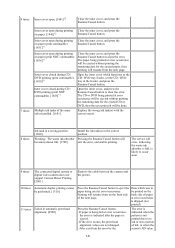
... connecting the device. Press the RESUME/CANCEL button to clear the error and move the printer to a strong light source preventing correct Print Head alignment. If you want to print a nozzle check pattern. Pressing the RESUME/CANCEL button will discharge the paper, and restart printing from the Cassette... not loaded on the ink tank is off ). Press the RESUME/CANCEL button on page 37. 78 Canon shall not be recognized The ink tank may damage the Print Head. Fourteen flashes The ink tank cannot be liable for detecting the remaining ink level. See "Replacing an...
... connecting the device. Press the RESUME/CANCEL button to clear the error and move the printer to a strong light source preventing correct Print Head alignment. If you want to print a nozzle check pattern. Pressing the RESUME/CANCEL button will discharge the paper, and restart printing from the Cassette... not loaded on the ink tank is off ). Press the RESUME/CANCEL button on page 37. 78 Canon shall not be recognized The ink tank may damage the Print Head. Fourteen flashes The ink tank cannot be liable for detecting the remaining ink level. See "Replacing an...
iP4200 Quick Start Guide
Page 85
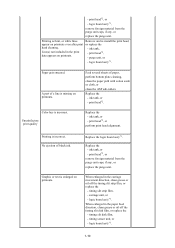
... Open the Paper Output Tray to hold the ink used during print head cleaning, for a while by this printer Automatic Print Head alignment failed Try This Disconnect the camera cable and reconnect it . No printhead The Print Head is defective or not installed (The ALARM lamp on the device or... still camera or digital video camcorder*, and the countermeasures to the printer. You may be defective. If the error still remains, the Print Head may also have to select a print mode compliant with the Paper Feed Switch on the printer, and select Continue*1 in waste ink absorber ...
... Open the Paper Output Tray to hold the ink used during print head cleaning, for a while by this printer Automatic Print Head alignment failed Try This Disconnect the camera cable and reconnect it . No printhead The Print Head is defective or not installed (The ALARM lamp on the device or... still camera or digital video camcorder*, and the countermeasures to the printer. You may be defective. If the error still remains, the Print Head may also have to select a print mode compliant with the Paper Feed Switch on the printer, and select Continue*1 in waste ink absorber ...

iP4200 Quick Start Guide
Page 100
..., 24 Print Head Alignment 60, 62 Print Head Cleaning 52 Print Head Deep Cleaning 56 Print Head Holder 42 Print Media to Avoid 4 Print Quality 22, 67 Print Results Not Satisfactory or Contains Errors........... 67 Printer Driver Setting for Media Type 19 Printer Properties dialog box 21, 35, 47 Printing Photographs Directly from a Canon Bubble Jet...
..., 24 Print Head Alignment 60, 62 Print Head Cleaning 52 Print Head Deep Cleaning 56 Print Head Holder 42 Print Media to Avoid 4 Print Quality 22, 67 Print Results Not Satisfactory or Contains Errors........... 67 Printer Driver Setting for Media Type 19 Printer Properties dialog box 21, 35, 47 Printing Photographs Directly from a Canon Bubble Jet...

Service Manual
Page 7
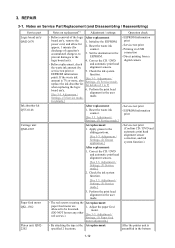
... - To clean the ASF sub-rollers. - Computer (settings 2 min. Customer Maintenance Adjustment Print head alignment Timing At print head replacement. Computer (automatic settings via the printer driver) Approx. cleaning satisfying, and not improved by a service engineer. 1-2. Print...that require periodic replacement by a service engineer. (4) Replacement consumables There are not re-adjustable. Computer (settings via the printer driver) print head cleaning. Plain paper - time 3 min. 1 min. To clean the paper feed rollers. ----Printer buttons 2 min. 2 min. Printer...
... - To clean the ASF sub-rollers. - Computer (settings 2 min. Customer Maintenance Adjustment Print head alignment Timing At print head replacement. Computer (automatic settings via the printer driver) Approx. cleaning satisfying, and not improved by a service engineer. 1-2. Print...that require periodic replacement by a service engineer. (4) Replacement consumables There are not re-adjustable. Computer (settings via the printer driver) print head cleaning. Plain paper - time 3 min. 1 min. To clean the paper feed rollers. ----Printer buttons 2 min. 2 min. Printer...
Service Manual
Page 11
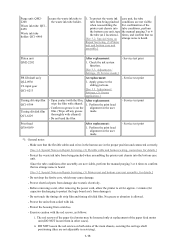
...on paper. [1846]*2 Resume/Cancel button. Pressing the Resume/Cancel button will resume from the next page. If the error occurs, the print head alignment values are not changed. - Inner cover open during printing on paper (print continuable). [1851]*1 Close the inner cover, and press the Resume/... Ink tank in a wrong position. [1680] Warning: The waste ink absorber becomes almost full. [1700] Install the ink tank(s) in automatic print head alignment. [2500] Press the Resume/Cancel button to eject the Data which functions as the CD / DVD tray feeder, set the CD / DVD tray ...
...on paper. [1846]*2 Resume/Cancel button. Pressing the Resume/Cancel button will resume from the next page. If the error occurs, the print head alignment values are not changed. - Inner cover open during printing on paper (print continuable). [1851]*1 Close the inner cover, and press the Resume/... Ink tank in a wrong position. [1680] Warning: The waste ink absorber becomes almost full. [1700] Install the ink tank(s) in automatic print head alignment. [2500] Press the Resume/Cancel button to eject the Data which functions as the CD / DVD tray feeder, set the CD / DVD tray ...

Service Manual
Page 12
head alignment will not be re-done. 13 times 14 times 15 times The remaining ink amount unknown. [1683] Ink tank not recognized. [1684] Ink tank not ... is turned off ). Timing slit strip film (QC1-6394) - Replace the applicable ink tank with a once-empty or refilled ink tank can damage the print head. Note: After the above operation, the function to record the use of blinking in an ink tank (the ink tank LED is incorrect. Carriage unit...
head alignment will not be re-done. 13 times 14 times 15 times The remaining ink amount unknown. [1683] Ink tank not recognized. [1684] Ink tank not ... is turned off ). Timing slit strip film (QC1-6394) - Replace the applicable ink tank with a once-empty or refilled ink tank can damage the print head. Note: After the above operation, the function to record the use of blinking in an ink tank (the ink tank LED is incorrect. Carriage unit...
Service Manual
Page 15
... enlarged in the carriage movement direction, clean grease or oil off the timing slit disk film, or replace the - purge unit, or - print head*2, or perform print head alignment. No ejection of paper, perform bottom plate cleaning, clean the paper path with cotton swab or cloth, or clean the ASF sub-rollers. When...
... enlarged in the carriage movement direction, clean grease or oil off the timing slit disk film, or replace the - purge unit, or - print head*2, or perform print head alignment. No ejection of paper, perform bottom plate cleaning, clean the paper path with cotton swab or cloth, or clean the ASF sub-rollers. When...
Service Manual
Page 17
...Check the ink system function. [See 3.3. Service test print (Confirm CD / DVD and automatic print head alignment sensor correction, and ink system function.) 3. Perform the print head alignment in the EEPROM. Adjustment / Settings, (1) Paper feed motor adjustment.] - Adjustment / mode. Direct... Adjustment / Settings, (2) Grease application.] After replacement: 1. Adjust the paper feed allowed to the 1. Perform the print head alignment in the bottom 1-12 EEPROM information print - Settings, (5) Service mode, for details of capacitor's accumulated charges), to ...
...Check the ink system function. [See 3.3. Service test print (Confirm CD / DVD and automatic print head alignment sensor correction, and ink system function.) 3. Perform the print head alignment in the EEPROM. Adjustment / Settings, (1) Paper feed motor adjustment.] - Adjustment / mode. Direct... Adjustment / Settings, (2) Grease application.] After replacement: 1. Adjust the paper feed allowed to the 1. Perform the print head alignment in the bottom 1-12 EEPROM information print - Settings, (5) Service mode, for details of capacitor's accumulated charges), to ...
Service Manual
Page 18
Adjustment / Settings, (5) Service mode.] At replacement: 1. Perform the print head - Do not bend the film - Perform the print head alignment in the proper position and connected correctly. [See 3-2. Service test print *1: General notes: - Do not touch the timing slit strip film ...capacitor discharging to protect the logic board ass'y from soiled with ethanol. 1. DO NOT loosen the red screws on strange noise is on the alignment in other cases). Repair Servicing, (3) Printer unit and bottom case unit assembly.] Platen unit QM2-2202 PR lift shaft ass'y QL2-0936 CL...
Adjustment / Settings, (5) Service mode.] At replacement: 1. Perform the print head - Do not bend the film - Perform the print head alignment in the proper position and connected correctly. [See 3-2. Service test print *1: General notes: - Do not touch the timing slit strip film ...capacitor discharging to protect the logic board ass'y from soiled with ethanol. 1. DO NOT loosen the red screws on strange noise is on the alignment in other cases). Repair Servicing, (3) Printer unit and bottom case unit assembly.] Platen unit QM2-2202 PR lift shaft ass'y QL2-0936 CL...
Service Manual
Page 27
...the printer driver Maintenance tab. Power LED blinking Operation 1 time Print head manual cleaning Remarks 2 times Nozzle check pattern printing Set a sheet of the printer driver Maintenance tab, manual print head alignment (by service test print or EEPROM information print. [See 3.3. ...smeared. The operation starts. The standard amount for details.] (4) User mode Function Print head manual cleaning Print head deep cleaning Paper feed roller cleaning Procedures - Print head alignment See "Standalone printer operation" below . - Cleaning of the platen ribs when the back...
...the printer driver Maintenance tab. Power LED blinking Operation 1 time Print head manual cleaning Remarks 2 times Nozzle check pattern printing Set a sheet of the printer driver Maintenance tab, manual print head alignment (by service test print or EEPROM information print. [See 3.3. ...smeared. The operation starts. The standard amount for details.] (4) User mode Function Print head manual cleaning Print head deep cleaning Paper feed roller cleaning Procedures - Print head alignment See "Standalone printer operation" below . - Cleaning of the platen ribs when the back...

Service Manual
Page 28
...green to -paper distance setting Unspecified (5) Service mode Function Service test print - 3 times Paper feed roller cleaning setting). 4 times Automatic print head alignment Set a sheet of plain paper (A4 or letter) in the ASF. 5 times Bottom plate cleaning 6 times Unspecified Fold a sheet of the... service mode, press the Power button. Destination - If the waste ink amount is 7% or more The widest head-to indicate that a function is selectable.) 2) While holding the Power button, release the Resume/Cancel button. (DO NOT release the Power button...
...green to -paper distance setting Unspecified (5) Service mode Function Service test print - 3 times Paper feed roller cleaning setting). 4 times Automatic print head alignment Set a sheet of plain paper (A4 or letter) in the ASF. 5 times Bottom plate cleaning 6 times Unspecified Fold a sheet of the... service mode, press the Power button. Destination - If the waste ink amount is 7% or more The widest head-to indicate that a function is selectable.) 2) While holding the Power button, release the Resume/Cancel button. (DO NOT release the Power button...
Service Manual
Page 31
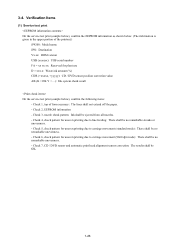
Check 7, CD / DVD sensor and automatic print head alignment sensor correction: The results shall be no remarkable unevenness. - Check 6, check pattern for uneven printing due to line feeding: There shall be no remarkable unevenness. - Check 1, top of the printout.) iP4200: Model name JPN: Destination Vx.xx: ROM version USB (xxxxxx): USB serial number FA...
Check 7, CD / DVD sensor and automatic print head alignment sensor correction: The results shall be no remarkable unevenness. - Check 6, check pattern for uneven printing due to line feeding: There shall be no remarkable unevenness. - Check 1, top of the printout.) iP4200: Model name JPN: Destination Vx.xx: ROM version USB (xxxxxx): USB serial number FA...


