
iP4200 Easy Setup Instructions
Page 2
...For A5 or larger sized paper, pull the tab towards you would like to select Test Print. After restarting the computer, select Applications from step 3 to install the printer driver. 7... information visit the electronic User's Guide. QA7-3536-V02 © 2005 Canon Inc. The software will take several minutes to register your administrator name and password. Doubleclick...Found New Hardware Wizard, click Cancel. Select iP4200 and click Maintenance. NOTE: When the Authenticate screen appears, enter your product. 6 When the Print Head Alignment Recommended screen appears, click Next....
...For A5 or larger sized paper, pull the tab towards you would like to select Test Print. After restarting the computer, select Applications from step 3 to install the printer driver. 7... information visit the electronic User's Guide. QA7-3536-V02 © 2005 Canon Inc. The software will take several minutes to register your administrator name and password. Doubleclick...Found New Hardware Wizard, click Cancel. Select iP4200 and click Maintenance. NOTE: When the Authenticate screen appears, enter your product. 6 When the Print Head Alignment Recommended screen appears, click Next....
iP4200 Quick Start Guide
Page 53
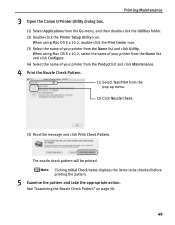
... Name list and click Configure. (4) Select the name of your printer from the Product list and click Maintenance. 4 Print the Nozzle Check Pattern. (1) Select Test Print from the Go menu, and then double-click the Utilities folder. (2) Double-click the Printer Setup Utility icon. When... the Name list and click Utility. The nozzle check pattern will be checked before printing the pattern. 5 Examine the pattern and take the appropriate action. 3 Open the Canon IJ Printer Utility dialog box. Printing Maintenance (1) Select Applications from the pop-up menu. (2) Click Nozzle Check. (3)...
... Name list and click Configure. (4) Select the name of your printer from the Product list and click Maintenance. 4 Print the Nozzle Check Pattern. (1) Select Test Print from the Go menu, and then double-click the Utilities folder. (2) Double-click the Printer Setup Utility icon. When... the Name list and click Utility. The nozzle check pattern will be checked before printing the pattern. 5 Examine the pattern and take the appropriate action. 3 Open the Canon IJ Printer Utility dialog box. Printing Maintenance (1) Select Applications from the pop-up menu. (2) Click Nozzle Check. (3)...
iP4200 Quick Start Guide
Page 66
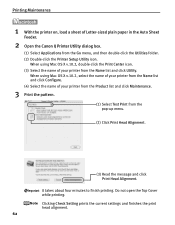
... Print the pattern. (1) Select Test Print from the Go menu, and then double-click the Utilities folder. (2) Double-click the Printer Setup Utility icon. Do not open the Top Cover while printing. Clicking Check Setting prints the current settings and finishes the print head alignment. 62 Printing ...Maintenance 1 With the printer on, load a sheet of Letter-sized plain paper in the Auto Sheet Feeder. 2 Open the Canon IJ Printer Utility dialog box...
... Print the pattern. (1) Select Test Print from the Go menu, and then double-click the Utilities folder. (2) Double-click the Printer Setup Utility icon. Do not open the Top Cover while printing. Clicking Check Setting prints the current settings and finishes the print head alignment. 62 Printing ...Maintenance 1 With the printer on, load a sheet of Letter-sized plain paper in the Auto Sheet Feeder. 2 Open the Canon IJ Printer Utility dialog box...

Service Manual
Page 4
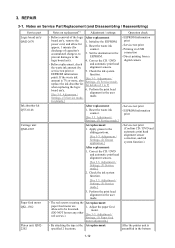
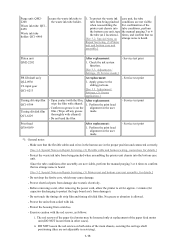
... motor adjustment (2) Grease application (3) Waste ink counter setting (4) User mode (5) Service mode Service test print, EEPROM initialization, Waste ink counter reset Destination settings 3-4. REPAIR 3-1. Carriage Board (Print Head Connector) PIXMA iP4200 Specifications TABLE OF CONTENTS Part 1: MAINTENANCE 1. Warnings 2-4. Customer Maintenance 1-3. NEW TECHNOLOGIES 2. PRINT MODE 4. Serial Number Location 2. CLEANING MODE AND AMOUNT OF INK PURGED 3. Notes on...
... motor adjustment (2) Grease application (3) Waste ink counter setting (4) User mode (5) Service mode Service test print, EEPROM initialization, Waste ink counter reset Destination settings 3-4. REPAIR 3-1. Carriage Board (Print Head Connector) PIXMA iP4200 Specifications TABLE OF CONTENTS Part 1: MAINTENANCE 1. Warnings 2-4. Customer Maintenance 1-3. NEW TECHNOLOGIES 2. PRINT MODE 4. Serial Number Location 2. CLEANING MODE AND AMOUNT OF INK PURGED 3. Notes on...

Service Manual
Page 13
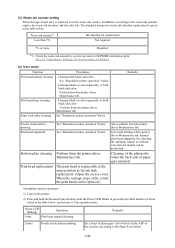
Sheet feed unit (QM2-2211) Internal temperature error [5400] Waste ink absorber full [5B00] - Ink absorber kit (QY5-0146) Print head temperature rise error [5200] - Print head (QY6-0059) - PR lift shaft ass'y (QL2-0936) - Logic board ass'y (QM2-2670)*1 - Logic board ass'y (QM2-2670)*1 -...2670)*1 - Logic board ass'y (QM2-2670)*1 *1: Before replacement of the logic board ass'y, check the waste ink amount (by service test print or EEPROM information print). Logic board ass'y (QM2-2670)*1 Carriage lift mechanism error [5110] - Carriage lift sensor unit (QM2-2678) 12 times 13 times...
Sheet feed unit (QM2-2211) Internal temperature error [5400] Waste ink absorber full [5B00] - Ink absorber kit (QY5-0146) Print head temperature rise error [5200] - Print head (QY6-0059) - PR lift shaft ass'y (QL2-0936) - Logic board ass'y (QM2-2670)*1 - Logic board ass'y (QM2-2670)*1 -...2670)*1 - Logic board ass'y (QM2-2670)*1 *1: Before replacement of the logic board ass'y, check the waste ink amount (by service test print or EEPROM information print). Logic board ass'y (QM2-2670)*1 Carriage lift mechanism error [5110] - Carriage lift sensor unit (QM2-2678) 12 times 13 times...

Service Manual
Page 16
If the waste ink amount is performed 2 times, and when the problem persists. *1: Before replacement of the logic board ass'y, check the waste ink amount (by service test print or EEPROM information print). Adjustment / Settings, (5) Service mode, for details.] *2: Replace the print head only after the print head deep cleaning is 7% or more, also replace the ink absorber kit (QY5-0146) when replacing the logic board ass'y. [See Section 3-3. To the top 1-11
If the waste ink amount is performed 2 times, and when the problem persists. *1: Before replacement of the logic board ass'y, check the waste ink amount (by service test print or EEPROM information print). Adjustment / Settings, (5) Service mode, for details.] *2: Replace the print head only after the print head deep cleaning is 7% or more, also replace the ink absorber kit (QY5-0146) when replacing the logic board ass'y. [See Section 3-3. To the top 1-11
Service Manual
Page 17
... information function. Adjustment / amount is assembled in the EEPROM. EEPROM information print - EEPROM information print At replacement: 1. Adjustment / Settings, (5) Service mode.] 2. Service test print (Confirm CD / DVD and automatic print head alignment sensor correction, and ink system function.) 3. The red screws...1502 Platen unit: QM22202 Notes on replacement*1 Adjustment / settings Operation check - Set the destination in the bottom 1-12 Service test print - By attaching the tape at the At replacement: specified 2 locations, After the printer unit is 7% or more, ...
... information function. Adjustment / amount is assembled in the EEPROM. EEPROM information print - EEPROM information print At replacement: 1. Adjustment / Settings, (5) Service mode.] 2. Service test print (Confirm CD / DVD and automatic print head alignment sensor correction, and ink system function.) 3. The red screws...1502 Platen unit: QM22202 Notes on replacement*1 Adjustment / settings Operation check - Set the destination in the bottom 1-12 Service test print - By attaching the tape at the At replacement: specified 2 locations, After the printer unit is 7% or more, ...
Service Manual
Page 18
...purging 3 or 4 the tube (at 2 locations). Adjustment / Settings, (2) Grease application.] - Confirm no [See 3-2. Service test print - Perform the print head alignment in other cases). Special Notes on both sides of the main chassis, securing the carriage shaft positioning (they are not ...Timing slit strip film QC1-6394 Timing slit disk film QC1-6229 After replacement: 1. Perform the print head - Service test print Print head QY6-0059 After replacement: 1. Service test print *1: General notes: - Protect the waste ink tube from damages). - Do not drop the ...
...purging 3 or 4 the tube (at 2 locations). Adjustment / Settings, (2) Grease application.] - Confirm no [See 3-2. Service test print - Perform the print head alignment in other cases). Special Notes on both sides of the main chassis, securing the carriage shaft positioning (they are not ...Timing slit strip film QC1-6394 Timing slit disk film QC1-6229 After replacement: 1. Perform the print head - Service test print Print head QY6-0059 After replacement: 1. Service test print *1: General notes: - Protect the waste ink tube from damages). - Do not drop the ...

Service Manual
Page 24
Note: The red screws securing the paper feed motor may be sure to perform the service test print, and confirm that the belt is replaced: 1) When attaching the motor, fasten the screws so that no strange noise or faulty print operation (due to dislocation of the belt or gear, or out-of the paper...
Note: The red screws securing the paper feed motor may be sure to perform the service test print, and confirm that the belt is replaced: 1) When attaching the motor, fasten the screws so that no strange noise or faulty print operation (due to dislocation of the belt or gear, or out-of the paper...
Service Manual
Page 27
... blinks in the table below , and release it. Power LED blinking Operation 1 time Print head manual cleaning Remarks 2 times Nozzle check pattern printing Set a sheet of the printer driver Maintenance tab, manual print head alignment (by service test print or EEPROM information print. [See 3.3. The standard amount for ink tank replacement. (Open the access cover. Adjustment...
... blinks in the table below , and release it. Power LED blinking Operation 1 time Print head manual cleaning Remarks 2 times Nozzle check pattern printing Set a sheet of the printer driver Maintenance tab, manual print head alignment (by service test print or EEPROM information print. [See 3.3. The standard amount for ink tank replacement. (Open the access cover. Adjustment...

Service Manual
Page 28
... procedures" below . Destination settings - The Power LED lights in green to -paper distance setting Unspecified (5) Service mode Function Service test print - Destination - For print sample, see 3-4. USB serial number - If the waste ink amount is not on: - CD / DVD sensor correction value ...Cancel button, press and hold the Power button. (DO NOT release the buttons. Verification Items, (1) Service test print, . 3 times Paper feed roller cleaning setting). 4 times Automatic print head alignment Set a sheet of plain paper (A4 or letter) in the ASF. 5 times Bottom plate...
... procedures" below . Destination settings - The Power LED lights in green to -paper distance setting Unspecified (5) Service mode Function Service test print - Destination - For print sample, see 3-4. USB serial number - If the waste ink amount is not on: - CD / DVD sensor correction value ...Cancel button, press and hold the Power button. (DO NOT release the buttons. Verification Items, (1) Service test print, . 3 times Paper feed roller cleaning setting). 4 times Automatic print head alignment Set a sheet of plain paper (A4 or letter) in the ASF. 5 times Bottom plate...

Service Manual
Page 29
Verification Items, (1) Service test print. 2 times Green (Power) EEPROM information See 3-4. Verification Items, (2) EEPROM print information print. 3 times Orange (Alarm) EEPROM initialization 4 times Green (Power) Waste ink counter resetting 5 times Orange (Alarm) Destination settings After entering the destination settings mode...Note: If the Resume/Cancel button is not installed, the carriage returns and locks in the home position capped. 1 time Orange (Alarm) Service test print See 3-4. according to the function listed in the table below , and press the Power button.
Verification Items, (1) Service test print. 2 times Green (Power) EEPROM information See 3-4. Verification Items, (2) EEPROM print information print. 3 times Orange (Alarm) EEPROM initialization 4 times Green (Power) Waste ink counter resetting 5 times Orange (Alarm) Destination settings After entering the destination settings mode...Note: If the Resume/Cancel button is not installed, the carriage returns and locks in the home position capped. 1 time Orange (Alarm) Service test print See 3-4. according to the function listed in the table below , and press the Power button.

Service Manual
Page 30
6 times Green (Power) Asia Supported 7 times Orange (Alarm) China Supported 8 times Green (Power) Taiwan Supported 9 times Orange (Alarm) Return to the menu selection Note: After setting the destination, confirm the model name and destination in service test print or EEPROM information print. [See 3.4. Verification Items, (1) Service test print, or (2) EEPROM information print.] To the top 1-25
6 times Green (Power) Asia Supported 7 times Orange (Alarm) China Supported 8 times Green (Power) Taiwan Supported 9 times Orange (Alarm) Return to the menu selection Note: After setting the destination, confirm the model name and destination in service test print or EEPROM information print. [See 3.4. Verification Items, (1) Service test print, or (2) EEPROM information print.] To the top 1-25
Service Manual
Page 31
...DVD sensor position correction value AB (K = OK Y = ...): Ink system check result On the service test print (sample below), confirm the following items: - Check 6, check pattern for uneven printing due to carriage movement (9600 dpi mode): There shall be no remarkable unevenness. - 3-4. Check 5, ...check pattern for uneven printing due to carriage movement (standard mode): There shall be no remarkable unevenness. - Check 2, EEPROM information - Check 1, top of the printout.) iP4200: Model name JPN: Destination Vx.xx: ROM version USB (...
...DVD sensor position correction value AB (K = OK Y = ...): Ink system check result On the service test print (sample below), confirm the following items: - Check 6, check pattern for uneven printing due to carriage movement (9600 dpi mode): There shall be no remarkable unevenness. - 3-4. Check 5, ...check pattern for uneven printing due to carriage movement (standard mode): There shall be no remarkable unevenness. - Check 2, EEPROM information - Check 1, top of the printout.) iP4200: Model name JPN: Destination Vx.xx: ROM version USB (...
Service Manual
Page 32
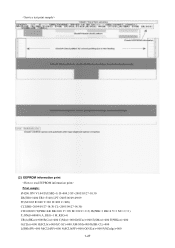
(2) EEPROM information print Print sample: iP4200 JPN V1.04 IF(USB2=1) D=004.5 ST=2005/05/27-18:30 ER(ER0=1000 ER1=5100) LPT=2005/06/09-09:09 PC(M=002 R=000 T=001 D=009 C=009) CLT(BK=2004/09/27-18:30 CL=2001/09/27-18:30) CH=00002 CT(PBK=040 BK=020 Y=109 M=012 C=113) IS(PBK=1 BK=0 Y=1 M=1 C=1) P_ON(S=00009) A_REG=1 M_REG=0 UR(A(BKoe)=000 B(Coe)=000 C(Moe)=000 D(SCoe)=000 E(SMoe)=000 F(PBKoe)=000 G(CLbi)=000 H(SCLbi)=000 I(C-SC)=000 J(M-SM)=000 K(BK-CL)=000 L(BKbiPP)=000 M(CLbiPP)=000 N(SCLbiPP)=000) O(NZctr)=000 P(NZedge)=000 1-27
(2) EEPROM information print Print sample: iP4200 JPN V1.04 IF(USB2=1) D=004.5 ST=2005/05/27-18:30 ER(ER0=1000 ER1=5100) LPT=2005/06/09-09:09 PC(M=002 R=000 T=001 D=009 C=009) CLT(BK=2004/09/27-18:30 CL=2001/09/27-18:30) CH=00002 CT(PBK=040 BK=020 Y=109 M=012 C=113) IS(PBK=1 BK=0 Y=1 M=1 C=1) P_ON(S=00009) A_REG=1 M_REG=0 UR(A(BKoe)=000 B(Coe)=000 C(Moe)=000 D(SCoe)=000 E(SMoe)=000 F(PBKoe)=000 G(CLbi)=000 H(SCLbi)=000 I(C-SC)=000 J(M-SM)=000 K(BK-CL)=000 L(BKbiPP)=000 M(CLbiPP)=000 N(SCLbiPP)=000) O(NZctr)=000 P(NZedge)=000 1-27


