iP4200 Easy Setup Instructions
Page 1
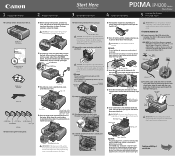
... inside of the front cover and pull down to change. 1 Unpack the Printer 2 Prepare the Printer Start Here Easy Setup Instructions 3 Install the Print Head 4 Install the Ink Tanks Series Photo Printer 5 Connect the Printer and Load Paper 1 Carefully remove all items from the print head. Lower the ... ink tank. Auto Sheet Feeder Print Side Refer to open ink port once the protective cap is removed, as shown. PIXMA iP4200 Photo Printer Documentation and Software Kit PIXMA iP4200 Print Head Power Cord CLI-8BK Black CLI-8Y Yellow PGI-5BK Black CLI-8M Magenta CLI-8C Cyan Ink Tanks 1...
... inside of the front cover and pull down to change. 1 Unpack the Printer 2 Prepare the Printer Start Here Easy Setup Instructions 3 Install the Print Head 4 Install the Ink Tanks Series Photo Printer 5 Connect the Printer and Load Paper 1 Carefully remove all items from the print head. Lower the ... ink tank. Auto Sheet Feeder Print Side Refer to open ink port once the protective cap is removed, as shown. PIXMA iP4200 Photo Printer Documentation and Software Kit PIXMA iP4200 Print Head Power Cord CLI-8BK Black CLI-8Y Yellow PGI-5BK Black CLI-8M Magenta CLI-8C Cyan Ink Tanks 1...

iP4200 Easy Setup Instructions
Page 2
... the Authenticate screen appears, enter your confirmation to Windows XP Service Pack 2 installation. e. For additional information visit the electronic User's Guide. The system is restarted automatically. QA7-3536-V02 © 2005 Canon Inc. "Macintosh" and "Mac" are trademarks of applications to unlock and ...the Printer List, click Add to the online instructions. When the Printer List screen appears, select iP4200, then click Utility (Configure when using Mac OS X v.10.2.x) icon. Select iP4200 and click Maintenance. The setup program should run , click Start, then Run, then type ...
... the Authenticate screen appears, enter your confirmation to Windows XP Service Pack 2 installation. e. For additional information visit the electronic User's Guide. The system is restarted automatically. QA7-3536-V02 © 2005 Canon Inc. "Macintosh" and "Mac" are trademarks of applications to unlock and ...the Printer List, click Add to the online instructions. When the Printer List screen appears, select iP4200, then click Utility (Configure when using Mac OS X v.10.2.x) icon. Select iP4200 and click Maintenance. The setup program should run , click Start, then Run, then type ...
iP4200 Quick Start Guide
Page 5
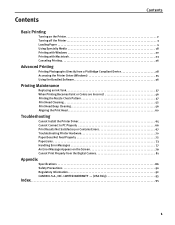
... are Incorrect 46 Printing the Nozzle Check Pattern 47 Print Head Cleaning 52 Print Head Deep Cleaning 56 Aligning the Print Head 60 Troubleshooting Cannot Install the Printer Driver 65 Cannot Connect to PC Properly 66 Print Results Not Satisfactory or Contains Errors 67 Troubleshooting Printer Hardware 70 Paper Does Not... An Error Message Appears on the Screen 79 Cannot Print Properly from the Digital Camera 81 Appendix Specifications 86 Safety Precautions 90 Regulatory Information 92 CANON U.S.A., INC.
... are Incorrect 46 Printing the Nozzle Check Pattern 47 Print Head Cleaning 52 Print Head Deep Cleaning 56 Aligning the Print Head 60 Troubleshooting Cannot Install the Printer Driver 65 Cannot Connect to PC Properly 66 Print Results Not Satisfactory or Contains Errors 67 Troubleshooting Printer Hardware 70 Paper Does Not... An Error Message Appears on the Screen 79 Cannot Print Properly from the Digital Camera 81 Appendix Specifications 86 Safety Precautions 90 Regulatory Information 92 CANON U.S.A., INC.
iP4200 Quick Start Guide
Page 6
... click the Help button when displayed. When the Help window appears, select your printer and how to know more information, view the iP4200 User's Guide and Printer Driver Guide installed on your computer, or use them. Then click the feature you want to use the online help within your printer driver interface...
... click the Help button when displayed. When the Help window appears, select your printer and how to know more information, view the iP4200 User's Guide and Printer Driver Guide installed on your computer, or use them. Then click the feature you want to use the online help within your printer driver interface...
iP4200 Quick Start Guide
Page 10
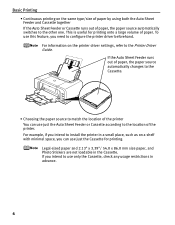
For example, if you intend to install the printer in the Cassette. If the Auto Sheet Feeder runs out of paper, the paper source automatically changes to the Cassette. • Choosing the ...
For example, if you intend to install the printer in the Cassette. If the Auto Sheet Feeder runs out of paper, the paper source automatically changes to the Cassette. • Choosing the ...
iP4200 Quick Start Guide
Page 26
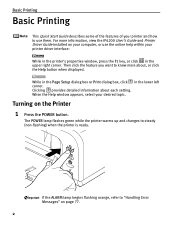
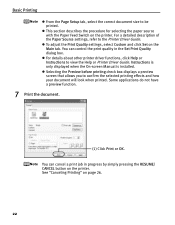
.... z To adjust the Print Quality settings, select Custom and click Set on page 26. 22 Instructions is only displayed when the On-screen Manual is installed. You can control the print quality in progress by simply pressing the RESUME/ CANCEL button on the printer. Basic Printing z From the Page Setup tab...
.... z To adjust the Print Quality settings, select Custom and click Set on page 26. 22 Instructions is only displayed when the On-screen Manual is installed. You can control the print quality in progress by simply pressing the RESUME/ CANCEL button on the printer. Basic Printing z From the Page Setup tab...
iP4200 Quick Start Guide
Page 29
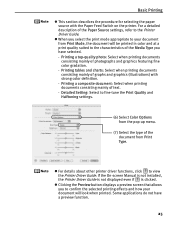
... Switch on the printer. z Clicking the Preview button displays a preview screen that allows you have a preview function. 25 If the On-screen Manual is not installed, the Printer Driver Guide is not displayed even if is clicked. Some applications do not have selected. - Detailed Setting: Select to fine-tune the Print...
... Switch on the printer. z Clicking the Preview button displays a preview screen that allows you have a preview function. 25 If the On-screen Manual is not installed, the Printer Driver Guide is not displayed even if is clicked. Some applications do not have selected. - Detailed Setting: Select to fine-tune the Print...

iP4200 Quick Start Guide
Page 40
...the paper type on how to set each function, refer to the Easy Setup Instructions. It is automatically added to print. z To install applications, refer to the Help or Printer Driver Guide. This application is compatible with ExifPrint*. „ PhotoRecord (Windows) You can ...Ports tab, or the Details tab) are displayed. Internet Explorer 5.5 or later must be installed. * ExifPrint is opened from Properties, the tabs related to the Windows documentation. Canon PIXMA Printers support ExifPrint and use the application(s) suitable for specific camera settings and functions such as...
...the paper type on how to set each function, refer to the Easy Setup Instructions. It is automatically added to print. z To install applications, refer to the Help or Printer Driver Guide. This application is compatible with ExifPrint*. „ PhotoRecord (Windows) You can ...Ports tab, or the Details tab) are displayed. Internet Explorer 5.5 or later must be installed. * ExifPrint is opened from Properties, the tabs related to the Windows documentation. Canon PIXMA Printers support ExifPrint and use the application(s) suitable for specific camera settings and functions such as...

iP4200 Quick Start Guide
Page 41
Printing Maintenance Printing Maintenance Replacing an Ink Tank Replace ink tank(s) if they are Incorrect" on page 46. 37 When replacing them, check the model numbers and their installation positions. With this printer, the ink tanks must be installed in the order (from left to right) indicated below: z Black: CLI-8BK z Black: PGI-5BK z Yellow: CLI-8Y z Magenta: CLI-8M z Cyan: CLI-8C Should missing characters or white streaks appear despite sufficient ink levels, refer to "When Printing Becomes Faint or Colors are out of ink.
Printing Maintenance Printing Maintenance Replacing an Ink Tank Replace ink tank(s) if they are Incorrect" on page 46. 37 When replacing them, check the model numbers and their installation positions. With this printer, the ink tanks must be installed in the order (from left to right) indicated below: z Black: CLI-8BK z Black: PGI-5BK z Yellow: CLI-8Y z Magenta: CLI-8M z Cyan: CLI-8C Should missing characters or white streaks appear despite sufficient ink levels, refer to "When Printing Becomes Faint or Colors are out of ink.
iP4200 Quick Start Guide
Page 44
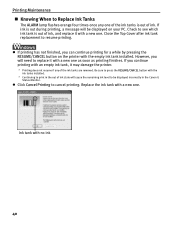
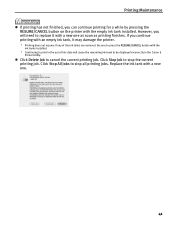
...on your PC. If you will be displayed incorrectly in the out of the ink tanks are removed. Ink tank with the empty ink tank installed. Printing Maintenance „ Knowing When to Replace Ink Tanks The ALARM lamp flashes orange four times once any of ink state will cause the remaining... the printer with no ink 40 Close the Top Cover after ink tank replacement to cancel printing. Replace the ink tank with the ink tanks installed. * Continuing to print in the Canon IJ Status Monitor. Be sure to press the RESUME/CANCEL button with a new one as soon as printing finishes.
...on your PC. If you will be displayed incorrectly in the out of the ink tanks are removed. Ink tank with the empty ink tank installed. Printing Maintenance „ Knowing When to Replace Ink Tanks The ALARM lamp flashes orange four times once any of ink state will cause the remaining... the printer with no ink 40 Close the Top Cover after ink tank replacement to cancel printing. Replace the ink tank with the ink tanks installed. * Continuing to print in the Canon IJ Status Monitor. Be sure to press the RESUME/CANCEL button with a new one as soon as printing finishes.
iP4200 Quick Start Guide
Page 45
.../CANCEL button with the ink tanks installed. * Continuing to replace it with the empty ink tank installed. Replace the ink tank with an empty ink tank, it may damage the printer. * Printing does not resume if any of ink state will need to print in the Canon IJ Printer Utility. If you continue...
.../CANCEL button with the ink tanks installed. * Continuing to replace it with the empty ink tank installed. Replace the ink tank with an empty ink tank, it may damage the printer. * Printing does not resume if any of ink state will need to print in the Canon IJ Printer Utility. If you continue...
iP4200 Quick Start Guide
Page 48
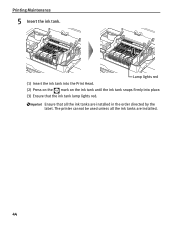
Lamp lights red (1) Insert the ink tank into the Print Head. (2) Press on the mark on the ink tank until the ink tank snaps firmly into place. (3) Ensure that all the ink tanks are installed in the order directed by the label. Printing Maintenance 5 Insert the ink tank. The printer cannot be used unless all the ink tanks are installed. 44 Ensure that the ink tank lamp lights red.
Lamp lights red (1) Insert the ink tank into the Print Head. (2) Press on the mark on the ink tank until the ink tank snaps firmly into place. (3) Ensure that all the ink tanks are installed in the order directed by the label. Printing Maintenance 5 Insert the ink tank. The printer cannot be used unless all the ink tanks are installed. 44 Ensure that the ink tank lamp lights red.
iP4200 Quick Start Guide
Page 49
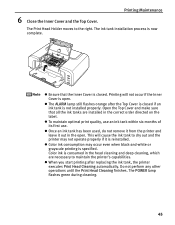
...its first use. This will not occur if the Inner Cover is reinstalled. The POWER lamp flashes green during cleaning. 45 The ink tank installation process is not installed properly. z Once an ink tank has been used, do not remove it from the printer and leave it is open . z The ...the Print Head Cleaning finishes. z Color ink consumption may not operate properly if it out in the head cleaning and deep cleaning, which are installed in the correct order directed on the label. The Print Head Holder moves to maintain the printer's capabilities. Color ink is consumed in the open...
...its first use. This will not occur if the Inner Cover is reinstalled. The POWER lamp flashes green during cleaning. 45 The ink tank installation process is not installed properly. z Once an ink tank has been used, do not remove it from the printer and leave it is open . z The ...the Print Head Cleaning finishes. z Color ink consumption may not operate properly if it out in the head cleaning and deep cleaning, which are installed in the correct order directed on the label. The Print Head Holder moves to maintain the printer's capabilities. Color ink is consumed in the open...
iP4200 Quick Start Guide
Page 64
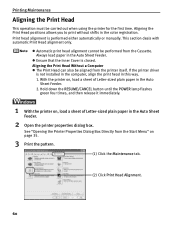
... pattern. (1) Click the Maintenance tab. (2) Click Print Head Alignment. 60 This section deals with automatic Print Head alignment only. If the printer driver is not installed in the computer, align the print head in the color registration. Always load paper in the Auto Sheet Feeder. 2.
... pattern. (1) Click the Maintenance tab. (2) Click Print Head Alignment. 60 This section deals with automatic Print Head alignment only. If the printer driver is not installed in the computer, align the print head in the color registration. Always load paper in the Auto Sheet Feeder. 2.
iP4200 Quick Start Guide
Page 68
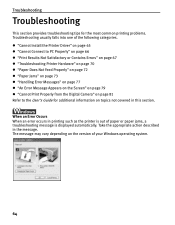
Take the appropriate action described in the message. z "Cannot Install the Printer Driver" on page 65 z "Cannot Connect to PC Properly" on page 66 z "Print Results Not Satisfactory or Contains Errors" on page 67 z "Troubleshooting ...
Take the appropriate action described in the message. z "Cannot Install the Printer Driver" on page 65 z "Cannot Connect to PC Properly" on page 66 z "Print Results Not Satisfactory or Contains Errors" on page 67 z "Troubleshooting ...
iP4200 Quick Start Guide
Page 69
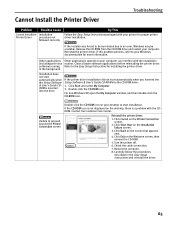
... the driver. 65 Double-click the CD-ROM icon. If the CD-ROM icon is a problem with your computer can interfere with the installation (including anti-virus routine. Unable to proceed beyond the Printer Connection screen Double-click the CD-ROM icon on your desktop to your computer.... Click Exit on the Installation Failure screen. 3. Close all open the My Computer window, and then double-click the CD-ROM icon. Click Start Over on the Welcome ...
... the driver. 65 Double-click the CD-ROM icon. If the CD-ROM icon is a problem with your computer can interfere with the installation (including anti-virus routine. Unable to proceed beyond the Printer Connection screen Double-click the CD-ROM icon on your desktop to your computer.... Click Exit on the Installation Failure screen. 3. Close all open the My Computer window, and then double-click the CD-ROM icon. Click Start Over on the Welcome ...

iP4200 Quick Start Guide
Page 70
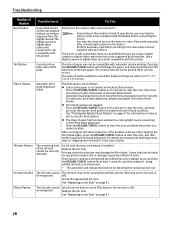
... / USB 2.0 Hi-Speed Connection Does Not Work Your environment is not fully compatible with USB 2.0. Obtain the latest version of the OS update program and install it on your PC environment supports USB 2.0 HiSpeed connection. z The USB port on your PC. z Both the USB cable and USB hub support USB 2.0 ... not fully compatible with USB 2.0. z Your PC supports the USB 2.0 Hi-Speed connection. Obtain the latest version of the USB 2.0 Hi-Speed driver and install it on page 66. 66 If your PC. Troubleshooting Cannot Connect to use a certified USB 2.0 Hi-Speed cable.
... / USB 2.0 Hi-Speed Connection Does Not Work Your environment is not fully compatible with USB 2.0. Obtain the latest version of the OS update program and install it on your PC environment supports USB 2.0 HiSpeed connection. z The USB port on your PC. z Both the USB cable and USB hub support USB 2.0 ... not fully compatible with USB 2.0. z Your PC supports the USB 2.0 Hi-Speed connection. Obtain the latest version of the USB 2.0 Hi-Speed driver and install it on page 66. 66 If your PC. Troubleshooting Cannot Connect to use a certified USB 2.0 Hi-Speed cable.
iP4200 Quick Start Guide
Page 74
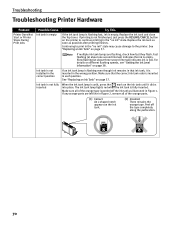
... off the tape completely along the perforation. 70 Fast flashing (at about one second interval) indicates the ink is fully inserted. Ink tank is not installed in the correct position If an ink tank lamp is flashing even though ink remains in that the correct ink tank color is inserted in...
... off the tape completely along the perforation. 70 Fast flashing (at about one second interval) indicates the ink is fully inserted. Ink tank is not installed in the correct position If an ink tank lamp is flashing even though ink remains in that the correct ink tank color is inserted in...
iP4200 Quick Start Guide
Page 81
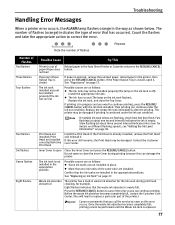
...ALARM lamp flashes orange in waste ink absorber for the ink used during printing because this can continue under the ink out condition. Install the appropriate ink tank. Then printing can damage the printer. Contact the Customer Care Center. Once the waste ink absorber becomes ...check how fast they flash. Slow flashing (at about three second interval) indicates ink is out of the printer.) Canon recommends that the ink tanks are installed. Press the RESUME/CANCEL button to cancel the error so you want to continue printing, press the RESUME/ CANCEL ...
...ALARM lamp flashes orange in waste ink absorber for the ink used during printing because this can continue under the ink out condition. Install the appropriate ink tank. Then printing can damage the printer. Contact the Customer Care Center. Once the waste ink absorber becomes ...check how fast they flash. Slow flashing (at about three second interval) indicates ink is out of the printer.) Canon recommends that the ink tanks are installed. Press the RESUME/CANCEL button to cancel the error so you want to continue printing, press the RESUME/ CANCEL ...
iP4200 Quick Start Guide
Page 82
... have to print a nozzle check pattern. Automatic head alignment cannot be performed using a digital camera or digital video camcorder that was once empty is installed. If you want to clear the error, then load one sheet of Letter-sized paper in the User's Guide... connecting the device to "Aligning the Print Head" in the Auto Sheet Feeder. For details on how to select a print mode compliant with this printer. Canon shall not be compatible with automatic duplex printing. Using refilled ink tanks are Letter and 5" x 7"/ 127.0 x 177.8 mm. be correctly detected An ink tank...
... have to print a nozzle check pattern. Automatic head alignment cannot be performed using a digital camera or digital video camcorder that was once empty is installed. If you want to clear the error, then load one sheet of Letter-sized paper in the User's Guide... connecting the device to "Aligning the Print Head" in the Auto Sheet Feeder. For details on how to select a print mode compliant with this printer. Canon shall not be compatible with automatic duplex printing. Using refilled ink tanks are Letter and 5" x 7"/ 127.0 x 177.8 mm. be correctly detected An ink tank...


