iP4200 Easy Setup Instructions
Page 1
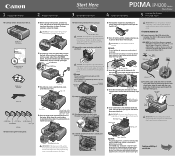
... the remaining four ink tanks into the back of the USB cable to the computer, the other end to the center. PIXMA iP4200 Photo Printer Documentation and Software Kit PIXMA iP4200 Print Head Power Cord CLI-8BK Black CLI-8Y Yellow PGI-5BK Black CLI-8M Magenta CLI-8C Cyan Ink Tanks 1 ...down to open the top cover and remove the protective material and tape from the box. NOTE: The iP4200 Photo Printer is removed, as shown. Press the mark on the sides of the paper. Close and reopen the top cover to return the holder to a power outlet. NOTE: Paper Output Tray ·...
... the remaining four ink tanks into the back of the USB cable to the computer, the other end to the center. PIXMA iP4200 Photo Printer Documentation and Software Kit PIXMA iP4200 Print Head Power Cord CLI-8BK Black CLI-8Y Yellow PGI-5BK Black CLI-8M Magenta CLI-8C Cyan Ink Tanks 1 ...down to open the top cover and remove the protective material and tape from the box. NOTE: The iP4200 Photo Printer is removed, as shown. Press the mark on the sides of the paper. Close and reopen the top cover to return the holder to a power outlet. NOTE: Paper Output Tray ·...

iP4200 Quick Start Guide
Page 11
...is curled, hold the opposing curled corners and gently bend them in either side of the paper before loading it . 2 Pull out the Paper Output Tray Extension completely. (3) Press the Paper Feed Switch so that the Auto Sheet Feeder lamp lights. Auto Sheet Feeder Lamp 1 2 (2) 1 Put your... Guide. 7 Basic Printing „ Loading Plain Paper in the Auto Sheet Feeder z For detailed information on the specialty media Canon provides for detailed instructions on page 18. For details, refer to open it . z See "Printing Media" in the User's Guide for use with the printer driver.
...is curled, hold the opposing curled corners and gently bend them in either side of the paper before loading it . 2 Pull out the Paper Output Tray Extension completely. (3) Press the Paper Feed Switch so that the Auto Sheet Feeder lamp lights. Auto Sheet Feeder Lamp 1 2 (2) 1 Put your... Guide. 7 Basic Printing „ Loading Plain Paper in the Auto Sheet Feeder z For detailed information on the specialty media Canon provides for detailed instructions on page 18. For details, refer to open it . z See "Printing Media" in the User's Guide for use with the printer driver.

iP4200 Quick Start Guide
Page 18
... to accommodate paper sizes larger than 5" x 7", the front edge of the cassette will extend beyond the front of the printer. 6 Prepare the Paper Output Tray. (1) 1 Put your media. z Do not touch the printed surfaces until the ink dries. For specific drying times, refer to the instructions packaged with... in the notches in either side of the Front Cover and pull down to the Printer Driver Guide. For details, refer to open it. 2 Pull out the Paper Output Tray Extension completely. 1 Cassette Lamp 2 14 (2) Press the Paper Feed Switch so that the Cassette lamp lights. Push the Cassette ...
... to accommodate paper sizes larger than 5" x 7", the front edge of the cassette will extend beyond the front of the printer. 6 Prepare the Paper Output Tray. (1) 1 Put your media. z Do not touch the printed surfaces until the ink dries. For specific drying times, refer to the instructions packaged with... in the notches in either side of the Front Cover and pull down to the Printer Driver Guide. For details, refer to open it. 2 Pull out the Paper Output Tray Extension completely. 1 Cassette Lamp 2 14 (2) Press the Paper Feed Switch so that the Cassette lamp lights. Push the Cassette ...

iP4200 Quick Start Guide
Page 46
...your fingers in the notches in either side of the Paper Output Tray and pull down to open it, and then pull down the Inner Cover forward to open it using the following steps. 1 Ensure that the printer is on, and then open for more than 10 minutes, the Print Head Holder moves ...to replace ink tanks one by one when replacing more than one ink tank. 42 z Handle ink tanks carefully to the center. 2 Open the Paper Output Tray. z Discard empty ink tanks according to the center. The Print Head Holder moves to the local laws and regulations regarding disposal of consumables. ...
...your fingers in the notches in either side of the Paper Output Tray and pull down to open it, and then pull down the Inner Cover forward to open it using the following steps. 1 Ensure that the printer is on, and then open for more than 10 minutes, the Print Head Holder moves ...to replace ink tanks one by one when replacing more than one ink tank. 42 z Handle ink tanks carefully to the center. 2 Open the Paper Output Tray. z Discard empty ink tanks according to the center. The Print Head Holder moves to the local laws and regulations regarding disposal of consumables. ...
iP4200 Quick Start Guide
Page 81
.... (You will need to continue printing, press the RESUME/ CANCEL button with the ink tank installed. not feed Paper jam/Paper Output Tray is closed , open Close the Inner Cover and press the RESUME/CANCEL button. Then printing can continue printing. Print Head not installed/Print Head not installed... because this error still remains, the Print Head may not be performed until the Waste ink tank is open it . Fast flashing (at about one ink tanks of the printer.) Canon recommends that the waste ink absorber is already installed, remove the Print Head and reinstall it . Repeats...
.... (You will need to continue printing, press the RESUME/ CANCEL button with the ink tank installed. not feed Paper jam/Paper Output Tray is closed , open Close the Inner Cover and press the RESUME/CANCEL button. Then printing can continue printing. Print Head not installed/Print Head not installed... because this error still remains, the Print Head may not be performed until the Waste ink tank is open it . Fast flashing (at about one ink tanks of the printer.) Canon recommends that the waste ink absorber is already installed, remove the Print Head and reinstall it . Repeats...
iP4200 Quick Start Guide
Page 85
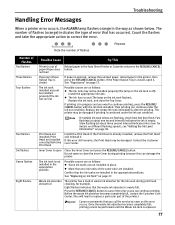
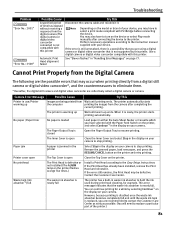
... it . Perform necessary operations according to hold the ink used during print head cleaning, for a while by this printer. The Paper Output Tray is nearly full The printer has a built-in waste ink absorber to the instruction manual supplied with this printer. Contact the Customer Care... Center. Waste tank (ink absorber*2) full The waste ink absorber is closed Open the Paper Output Tray to stop printing. The Inner Cover is open Close the Inner Cover and select Stop in the display on your camera to resume printing. Cannot Print...
... it . Perform necessary operations according to hold the ink used during print head cleaning, for a while by this printer. The Paper Output Tray is nearly full The printer has a built-in waste ink absorber to the instruction manual supplied with this printer. Contact the Customer Care... Center. Waste tank (ink absorber*2) full The waste ink absorber is closed Open the Paper Output Tray to stop printing. The Inner Cover is open Close the Inner Cover and select Stop in the display on your camera to resume printing. Cannot Print...
Service Manual
Page 10
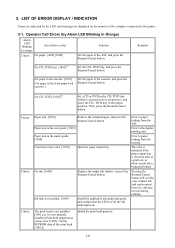
... the duplex printing unit. Error in paper feeding from the cassette. Error in the under guide. [1304] Front door close error. [1250] Open the paper output tray. Install the print head properly. 1-5 LIST OF ERROR DISPLAY / INDICATION Errors are indicated by Alarm LED Blinking in Orange) Alarm LED blinking in... the error without ink tank replacement, however, ink may run out during printing. The error is indicated if the paper output tray is closed at error occurrence), and insert the CD / DVD tray in the proper position. No CD / DVD. [1002]*1 Set a CD or DVD in the CD / DVD...
... the duplex printing unit. Error in paper feeding from the cassette. Error in the under guide. [1304] Front door close error. [1250] Open the paper output tray. Install the print head properly. 1-5 LIST OF ERROR DISPLAY / INDICATION Errors are indicated by Alarm LED Blinking in Orange) Alarm LED blinking in... the error without ink tank replacement, however, ink may run out during printing. The error is indicated if the paper output tray is closed at error occurrence), and insert the CD / DVD tray in the proper position. No CD / DVD. [1002]*1 Set a CD or DVD in the CD / DVD...

Service Manual
Page 56
...after the printer is turned on, the access cover is opened, and the carriage moves to 240V, 50/60Hz Approx. 23W Standby Approx. 0.8W Approx. 0.8W Power-off Approx. 0.4W Approx. 0.4W Printer: With the paper support and output tray retracted: Approx. 419 (W) x 299 (D) x 160 ...Law on Promoting Green Purchasing On the carriage flexible cable holder (visible on the right of CD / DVD Acoustic noise (Highest - PIXMA iP4200 Specifications Type Paper feeding method Resolution Throughput (target value) Printing direction Print width Desktop serial color bubble jet printer Auto sheet feed (ASF...
...after the printer is turned on, the access cover is opened, and the carriage moves to 240V, 50/60Hz Approx. 23W Standby Approx. 0.8W Approx. 0.8W Power-off Approx. 0.4W Approx. 0.4W Printer: With the paper support and output tray retracted: Approx. 419 (W) x 299 (D) x 160 ...Law on Promoting Green Purchasing On the carriage flexible cable holder (visible on the right of CD / DVD Acoustic noise (Highest - PIXMA iP4200 Specifications Type Paper feeding method Resolution Throughput (target value) Printing direction Print width Desktop serial color bubble jet printer Auto sheet feed (ASF...


