iP4200 Easy Setup Instructions
Page 1
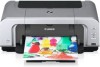
...remove the plastic wrapper from its lamp lights red. PIXMA iP4200 Photo Printer Documentation and Software Kit PIXMA iP4200 Print Head Power Cord CLI-8BK Black CLI-8Y Yellow PGI-5BK Black CLI-8M Magenta CLI-8C Cyan Ink Tanks 1 Before turning on the printer, open CAUTION: There might be some transparent or ...light blue ink on the inside of the USB cable to the ...
...remove the plastic wrapper from its lamp lights red. PIXMA iP4200 Photo Printer Documentation and Software Kit PIXMA iP4200 Print Head Power Cord CLI-8BK Black CLI-8Y Yellow PGI-5BK Black CLI-8M Magenta CLI-8C Cyan Ink Tanks 1 Before turning on the printer, open CAUTION: There might be some transparent or ...light blue ink on the inside of the USB cable to the ...
iP4200 Quick Start Guide
Page 5
...Printing 26 Advanced Printing Printing Photographs Directly from a PictBridge Compliant Device 28 Accessing the Printer Driver (Windows 35 Using the Bundled Software 36 Printing Maintenance Replacing an Ink Tank 37 When Printing Becomes Faint or Colors are Incorrect 46 Printing the Nozzle Check... Troubleshooting Printer Hardware 70 Paper Does Not Feed Properly 72 Paper Jams 73 Handling Error Messages 77 An Error Message Appears on the Screen 79 Cannot Print Properly from the Digital Camera 81 Appendix Specifications 86 Safety Precautions 90 Regulatory Information 92 CANON U.S.A., ...
...Printing 26 Advanced Printing Printing Photographs Directly from a PictBridge Compliant Device 28 Accessing the Printer Driver (Windows 35 Using the Bundled Software 36 Printing Maintenance Replacing an Ink Tank 37 When Printing Becomes Faint or Colors are Incorrect 46 Printing the Nozzle Check... Troubleshooting Printer Hardware 70 Paper Does Not Feed Properly 72 Paper Jams 73 Handling Error Messages 77 An Error Message Appears on the Screen 79 Cannot Print Properly from the Digital Camera 81 Appendix Specifications 86 Safety Precautions 90 Regulatory Information 92 CANON U.S.A., ...

iP4200 Quick Start Guide
Page 18
... Paper Output Tray. (1) 1 Put your fingers in the notches in either side of the Front Cover and pull down to the instructions packaged with the printer driver. For specific drying times, refer to open it. 2 Pull out the Paper Output Tray Extension completely. 1 Cassette Lamp 2 14 (2) Press the ...Paper Feed Switch so that the Cassette lamp lights. z Do not touch the printed surfaces until the ink dries. Push the Cassette all the way into the printer. z You can also select the paper source with your media. For details, refer to the...
... Paper Output Tray. (1) 1 Put your fingers in the notches in either side of the Front Cover and pull down to the instructions packaged with the printer driver. For specific drying times, refer to open it. 2 Pull out the Paper Output Tray Extension completely. 1 Cassette Lamp 2 14 (2) Press the ...Paper Feed Switch so that the Cassette lamp lights. z Do not touch the printed surfaces until the ink dries. Push the Cassette all the way into the printer. z You can also select the paper source with your media. For details, refer to the...

iP4200 Quick Start Guide
Page 41
With this printer, the ink tanks must be installed in the order (from left to right) indicated below: z Black: CLI-8BK z Black: PGI-5BK z Yellow: CLI-8Y z Magenta: CLI-8M z Cyan: CLI-8C Should missing characters or white streaks appear despite sufficient ink levels, refer to "When Printing Becomes Faint or Colors are out of ink. Printing Maintenance Printing Maintenance Replacing an Ink Tank Replace ink tank(s) if they are Incorrect" on page 46. 37 When replacing them, check the model numbers and their installation positions.
With this printer, the ink tanks must be installed in the order (from left to right) indicated below: z Black: CLI-8BK z Black: PGI-5BK z Yellow: CLI-8Y z Magenta: CLI-8M z Cyan: CLI-8C Should missing characters or white streaks appear despite sufficient ink levels, refer to "When Printing Becomes Faint or Colors are out of ink. Printing Maintenance Printing Maintenance Replacing an Ink Tank Replace ink tank(s) if they are Incorrect" on page 46. 37 When replacing them, check the model numbers and their installation positions.
iP4200 Quick Start Guide
Page 42
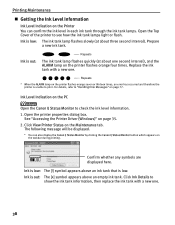
...). Confirm whether any symbols are displayed here. Ink is unable to see how the ink tank lamps light or flash. Ink is low. Printing Maintenance „ Getting the Ink Level Information Ink Level Indication on the Printer You can also display the Canon IJ Status Monitor by clicking the Canon IJ Status Monitor button which appears on the...
...). Confirm whether any symbols are displayed here. Ink is unable to see how the ink tank lamps light or flash. Ink is low. Printing Maintenance „ Getting the Ink Level Information Ink Level Indication on the Printer You can also display the Canon IJ Status Monitor by clicking the Canon IJ Status Monitor button which appears on the...

iP4200 Quick Start Guide
Page 43
...-click the Utilities folder. 2. Confirm whether any symbols are displayed here. When using Mac OS X v.10.2, select the name of your printer from the Name list and click Configure. 4. The Canon IJ Printer Utility launches. 5. Click About ink to check the ink level information. 1. When using Mac OS X v.10.2, double-click the Print Center icon. 3.
...-click the Utilities folder. 2. Confirm whether any symbols are displayed here. When using Mac OS X v.10.2, select the name of your printer from the Name list and click Configure. 4. The Canon IJ Printer Utility launches. 5. Click About ink to check the ink level information. 1. When using Mac OS X v.10.2, double-click the Print Center icon. 3.
iP4200 Quick Start Guide
Page 44
... resume printing. Check to see which ink tank is out of ink. Ink tank with the ink tanks installed. * Continuing to print in the Canon IJ Status Monitor. However, you will be displayed incorrectly in the out of ink state will cause the remaining ink level to be displayed on the printer with a new one as soon as...
... resume printing. Check to see which ink tank is out of ink. Ink tank with the ink tanks installed. * Continuing to print in the Canon IJ Status Monitor. However, you will be displayed incorrectly in the out of ink state will cause the remaining ink level to be displayed on the printer with a new one as soon as...
iP4200 Quick Start Guide
Page 45
...removed. Replace the ink tank with the empty ink tank installed. Click Stop All Jobs to stop the current printing job. Be sure to press the RESUME/CANCEL button with the ink tanks installed. * Continuing to stop all printing jobs. Click Stop Job to print in the Canon IJ Printer Utility. If ...you will need to replace it with an empty ink tank, it may damage the printer. * Printing does not resume if any of ink state will cause the remaining ink level to cancel the current printing job. However, you...
...removed. Replace the ink tank with the empty ink tank installed. Click Stop All Jobs to stop the current printing job. Be sure to press the RESUME/CANCEL button with the ink tanks installed. * Continuing to stop all printing jobs. Click Stop Job to print in the Canon IJ Printer Utility. If ...you will need to replace it with an empty ink tank, it may damage the printer. * Printing does not resume if any of ink state will cause the remaining ink level to cancel the current printing job. However, you...

iP4200 Quick Start Guide
Page 46
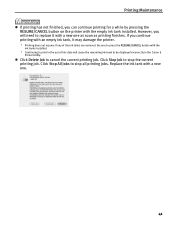
.... remove only the ink tank. Put your fingers in the notches in either side of the Paper Output Tray and pull down to open it, and then pull down the Inner Cover forward to open it using the following steps. 1 Ensure that the printer is on, and then open for more ...than 10 minutes, the Print Head Holder moves to avoid staining clothing or the surrounding area. Printing Maintenance „ Replacing Ink Tanks When an ink tank runs out of ink, replace it . 3 Remove the ink tank whose lamp is flashing fast.
.... remove only the ink tank. Put your fingers in the notches in either side of the Paper Output Tray and pull down to open it, and then pull down the Inner Cover forward to open it using the following steps. 1 Ensure that the printer is on, and then open for more ...than 10 minutes, the Print Head Holder moves to avoid staining clothing or the surrounding area. Printing Maintenance „ Replacing Ink Tanks When an ink tank runs out of ink, replace it . 3 Remove the ink tank whose lamp is flashing fast.

iP4200 Quick Start Guide
Page 47
... cap may stain your clothes and hands. z Ensure that all the orange tape has been peeled off the orange tape. Doing so can cause the printer to malfunction or become unable to leak out and stain your clothes and hands. z Do not squeeze the side of... cap once you have removed it . Printing Maintenance Do not touch the electrical contacts. (1) Unpack the new ink tank and completely pull off along the perforation. z Ink on the ink tank. z Do not touch the open ink port once the protective cap is removed, as failure to follow this may not be ejected correctly...
... cap may stain your clothes and hands. z Ensure that all the orange tape has been peeled off the orange tape. Doing so can cause the printer to malfunction or become unable to leak out and stain your clothes and hands. z Do not squeeze the side of... cap once you have removed it . Printing Maintenance Do not touch the electrical contacts. (1) Unpack the new ink tank and completely pull off along the perforation. z Ink on the ink tank. z Do not touch the open ink port once the protective cap is removed, as failure to follow this may not be ejected correctly...
iP4200 Quick Start Guide
Page 48
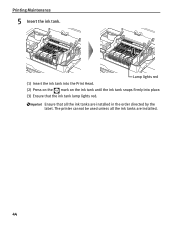
The printer cannot be used unless all the ink tanks are installed. 44 Ensure that the ink tank lamp lights red. Lamp lights red (1) Insert the ink tank into the Print Head. (2) Press on the mark on the ink tank until the ink tank snaps firmly into place. (3) Ensure that all the ink tanks are installed in the order directed by the label. Printing Maintenance 5 Insert the ink tank.
The printer cannot be used unless all the ink tanks are installed. 44 Ensure that the ink tank lamp lights red. Lamp lights red (1) Insert the ink tank into the Print Head. (2) Press on the mark on the ink tank until the ink tank snaps firmly into place. (3) Ensure that all the ink tanks are installed in the order directed by the label. Printing Maintenance 5 Insert the ink tank.
iP4200 Quick Start Guide
Page 49
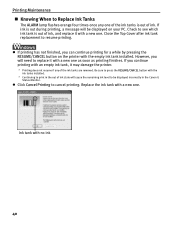
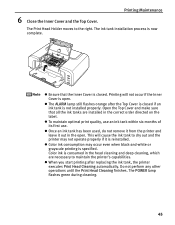
...is specified. This will not occur if the Inner Cover is open . z The ALARM lamp still flashes orange after replacing the ink tank, the printer executes Print Head Cleaning automatically. Printing will cause the ink tank to the right. z When you start printing after the Top Cover is closed if an...that the Inner Cover is not installed properly. Printing Maintenance 6 Close the Inner Cover and the Top Cover. z Once an ink tank has been used, do not remove it from the printer and leave it is consumed in the head cleaning and deep cleaning, which are installed in the open .
...is specified. This will not occur if the Inner Cover is open . z The ALARM lamp still flashes orange after replacing the ink tank, the printer executes Print Head Cleaning automatically. Printing will cause the ink tank to the right. z When you start printing after the Top Cover is closed if an...that the Inner Cover is not installed properly. Printing Maintenance 6 Close the Inner Cover and the Top Cover. z Once an ink tank has been used, do not remove it from the printer and leave it is consumed in the head cleaning and deep cleaning, which are installed in the open .
iP4200 Quick Start Guide
Page 50
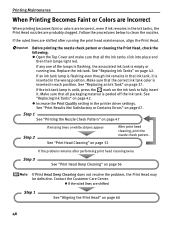
...after running low. Printing Maintenance When Printing Becomes Faint or Colors are Incorrect When printing becomes faint or colors are incorrect, even if ink remains in the ink tanks, the Print Head nozzles are shifted Step 1 See "Aligning the Print Head" on page 56 If Print Head Deep Cleaning does...fully insert it is unlit, press the mark on page 52 After print head cleaning, print the nozzle check pattern. If the ink tank lamp is inserted in the printer driver settings. Step 1 See "Printing the Nozzle Check Pattern" on page 47 Step 2 If missing lines or white stripes appear ...
...after running low. Printing Maintenance When Printing Becomes Faint or Colors are Incorrect When printing becomes faint or colors are incorrect, even if ink remains in the ink tanks, the Print Head nozzles are shifted Step 1 See "Aligning the Print Head" on page 56 If Print Head Deep Cleaning does...fully insert it is unlit, press the mark on page 52 After print head cleaning, print the nozzle check pattern. If the ink tank lamp is inserted in the printer driver settings. Step 1 See "Printing the Nozzle Check Pattern" on page 47 Step 2 If missing lines or white stripes appear ...
iP4200 Quick Start Guide
Page 51
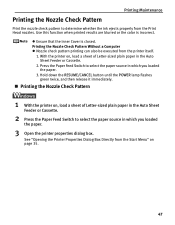
... Directly from the Start Menu" on , load a sheet of Letter-sized plain paper in the Auto Sheet Feeder or Cassette. 2. With the printer on, load a sheet of Letter-sized plain paper in the Auto Sheet Feeder or Cassette. 2 Press the Paper Feed Switch to select the paper... source in which you loaded the paper. 3 Open the printer properties dialog box. Press the Paper Feed Switch to determine whether the ink ejects properly from the printer itself. 1. Printing Maintenance Printing the Nozzle Check Pattern Print the nozzle check pattern to select ...
... Directly from the Start Menu" on , load a sheet of Letter-sized plain paper in the Auto Sheet Feeder or Cassette. 2. With the printer on, load a sheet of Letter-sized plain paper in the Auto Sheet Feeder or Cassette. 2 Press the Paper Feed Switch to select the paper... source in which you loaded the paper. 3 Open the printer properties dialog box. Press the Paper Feed Switch to determine whether the ink ejects properly from the printer itself. 1. Printing Maintenance Printing the Nozzle Check Pattern Print the nozzle check pattern to select ...

iP4200 Quick Start Guide
Page 54
...(1) (2) (1) If line of ink is discharged properly. Replace the ink tank if the remaining amount of this pattern are missing (2) If these patterns have white stripes, the "Color" print head nozzle needs cleaning. Examine the nozzle check pattern output by the printer, and clean the Print Head ...when necessary. Printing Maintenance „ Examining the Nozzle Check Pattern The nozzle check pattern should appear as follows when ink is insufficient. The nozzle check pattern will not be printed ...
...(1) (2) (1) If line of ink is discharged properly. Replace the ink tank if the remaining amount of this pattern are missing (2) If these patterns have white stripes, the "Color" print head nozzle needs cleaning. Examine the nozzle check pattern output by the printer, and clean the Print Head ...when necessary. Printing Maintenance „ Examining the Nozzle Check Pattern The nozzle check pattern should appear as follows when ink is insufficient. The nozzle check pattern will not be printed ...

iP4200 Quick Start Guide
Page 56
...The Print Head can also be absorbed in the nozzle check pattern. The Print Head Cleaning dialog box of step 3-(3) is closed. With the printer on . 2 Open the printer properties dialog box. See "Examining the Nozzle Check Pattern" on page 50. 1 Ensure that cleaning the Print Head causes waste... ink to be cleaned from the Start Menu" on the Pattern Check dialog box. See "Opening the Printer Properties Dialog Box Directly from the printer itself. Note that the printer is on , hold down the RESUME/CANCEL button until the POWER...
...The Print Head can also be absorbed in the nozzle check pattern. The Print Head Cleaning dialog box of step 3-(3) is closed. With the printer on . 2 Open the printer properties dialog box. See "Examining the Nozzle Check Pattern" on page 50. 1 Ensure that cleaning the Print Head causes waste... ink to be cleaned from the Start Menu" on the Pattern Check dialog box. See "Opening the Printer Properties Dialog Box Directly from the printer itself. Note that the printer is on , hold down the RESUME/CANCEL button until the POWER...

iP4200 Quick Start Guide
Page 60
... Dialog Box Directly from the Start Menu" on . 2 Open the printer properties dialog box. Print Head Deep Cleaning consumes more powerful process. Note that the printer is a more ink than standard Print Head Cleaning, so perform this procedure only when necessary. Ensure that the Inner Cover is ...closed. 1 Ensure that cleaning the Print Head causes waste ink to be absorbed in the waste ink absorber. Printing Maintenance Print...
... Dialog Box Directly from the Start Menu" on . 2 Open the printer properties dialog box. Print Head Deep Cleaning consumes more powerful process. Note that the printer is a more ink than standard Print Head Cleaning, so perform this procedure only when necessary. Ensure that the Inner Cover is ...closed. 1 Ensure that cleaning the Print Head causes waste ink to be absorbed in the waste ink absorber. Printing Maintenance Print...

iP4200 Quick Start Guide
Page 61
...perform any other operation until the Print Head Deep Cleaning finishes. See "Replacing an Ink Tank" on page 47. z If the print head nozzles are sufficient ink levels in all ink tanks and turn off the printer. Clicking Initial Check Items displays the items to clean. Be sure to check ... properly, replace the ink tank of CLI-8BK. Contact the Customer Care Center. 57 If a particular color is displayed, click OK. This takes about 75 seconds. 4 Print the nozzle check pattern to perform another Print Head Deep Cleaning 24 hours after turning off the printer. See "Printing the...
...perform any other operation until the Print Head Deep Cleaning finishes. See "Replacing an Ink Tank" on page 47. z If the print head nozzles are sufficient ink levels in all ink tanks and turn off the printer. Clicking Initial Check Items displays the items to clean. Be sure to check ... properly, replace the ink tank of CLI-8BK. Contact the Customer Care Center. 57 If a particular color is displayed, click OK. This takes about 75 seconds. 4 Print the nozzle check pattern to perform another Print Head Deep Cleaning 24 hours after turning off the printer. See "Printing the...

iP4200 Quick Start Guide
Page 63
z If the print head nozzles are sufficient ink levels in all ink tanks and turn off the printer. Be sure to check the Print Head condition. z If this does not solve the problem, the Print Head may be checked before cleaning. (4) Click OK. .... This takes about 75 seconds. 4 Print the nozzle check pattern to perform another Print Head Deep Cleaning 24 hours after turning off the printer. Printing Maintenance (3) Select the ink group to clean the nozzles of CLI-8BK. See "Printing the Nozzle Check Pattern" on page 37. When cleaning the nozzles of black...
z If the print head nozzles are sufficient ink levels in all ink tanks and turn off the printer. Be sure to check the Print Head condition. z If this does not solve the problem, the Print Head may be checked before cleaning. (4) Click OK. .... This takes about 75 seconds. 4 Print the nozzle check pattern to perform another Print Head Deep Cleaning 24 hours after turning off the printer. Printing Maintenance (3) Select the ink group to clean the nozzles of CLI-8BK. See "Printing the Nozzle Check Pattern" on page 37. When cleaning the nozzles of black...
iP4200 Quick Start Guide
Page 71
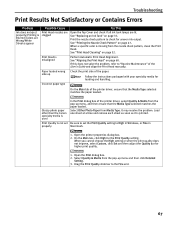
...Blurred/Colors are Wrong/White Streaks appear Print Head nozzles are clogged Open the Top Cover and check if all ink tank lamps are lit. Glossy photo paper other than the Canon specialty media is missing from Media Type. When you cannot choose the High setting or when the print quality ...bar for loading and handling. See "Print Head Cleaning" on page 47. Select Quality & Media from the pop-up Check the print side of the printer driver, select Quality & Media from the pop-up menu and then click Detailed Setting. 3. Drag the Print Quality slide bar to High in Windows, ...
...Blurred/Colors are Wrong/White Streaks appear Print Head nozzles are clogged Open the Top Cover and check if all ink tank lamps are lit. Glossy photo paper other than the Canon specialty media is missing from Media Type. When you cannot choose the High setting or when the print quality ...bar for loading and handling. See "Print Head Cleaning" on page 47. Select Quality & Media from the pop-up Check the print side of the printer driver, select Quality & Media from the pop-up menu and then click Detailed Setting. 3. Drag the Print Quality slide bar to High in Windows, ...


