MX300 series Quick Start Guide
Page 17
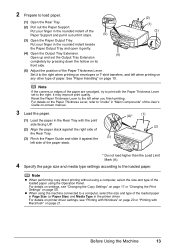
... completely by pressing down the hollow on -screen manual. 3 Load the paper. (1) Load the paper in the rounded indent beside the Paper Output Tray and open it against the right side of the Rear Tray. (3) Pinch the Paper Guide and slide it gently. (4) Open the Output Tray Extension. (4) Open up and set to the right. For details on settings, see...
... completely by pressing down the hollow on -screen manual. 3 Load the paper. (1) Load the paper in the rounded indent beside the Paper Output Tray and open it against the right side of the Rear Tray. (3) Pinch the Paper Guide and slide it gently. (4) Open the Output Tray Extension. (4) Open up and set to the right. For details on settings, see...
MX300 series Quick Start Guide
Page 55
...fax: press the FAX button. Refer to receive faxes (remote reception). When the problem is printed automatically. z OFF is incorrect: correct the paper size/type setting. Important z The machine can carry out remote control operations, the security code for AUTO PRINT RX: select ON. z Ink is... closed: open it in its memory. z Output Tray is low or has run out while receiving a fax: load the paper and press the OK button. z Paper has run out while receiving a fax: replace the FINE Cartridge. Faxing 51 z...
...fax: press the FAX button. Refer to receive faxes (remote reception). When the problem is printed automatically. z OFF is incorrect: correct the paper size/type setting. Important z The machine can carry out remote control operations, the security code for AUTO PRINT RX: select ON. z Ink is... closed: open it in its memory. z Output Tray is low or has run out while receiving a fax: load the paper and press the OK button. z Paper has run out while receiving a fax: replace the FINE Cartridge. Faxing 51 z...

MX300 series Quick Start Guide
Page 62
See "Examining the Nozzle Check Pattern" on its front side. (3) Set the Paper Thickness Lever to the left. Printing the Nozzle Check Pattern Print the nozzle check pattern to determine whether the ink ejects properly from the print ..., refer to "Inside" in the rounded indent beside the Paper Output Tray and open it gently. (2) Open up and set the Paper Thickness Lever. (1) Put your finger in "Main Components" of A4 or Letter-sized plain paper in the Rear Tray. 2 Open the Paper Output Tray, then set the Output Tray Extension completely by pressing down the hollow on page 59...
See "Examining the Nozzle Check Pattern" on its front side. (3) Set the Paper Thickness Lever to the left. Printing the Nozzle Check Pattern Print the nozzle check pattern to determine whether the ink ejects properly from the print ..., refer to "Inside" in the rounded indent beside the Paper Output Tray and open it gently. (2) Open up and set the Paper Thickness Lever. (1) Put your finger in "Main Components" of A4 or Letter-sized plain paper in the Rear Tray. 2 Open the Paper Output Tray, then set the Output Tray Extension completely by pressing down the hollow on page 59...

MX300 series Quick Start Guide
Page 66
...Maintenance The print head alignment pattern is turned on, then load two sheets of A4 or Letter-sized plain paper in the Rear Tray. 2 Open the Paper Output Tray, then set the Output Tray Extension completely by pressing down the hollow on -screen manual. 3 Print the print head alignment pattern. (1) ... of the User's Guide on its front side. (3) Set the Paper Thickness Lever to "Inside" in "Main Components" of the pattern in the rounded indent beside the Paper Output Tray and open it gently. (2) Open up and set the Paper Thickness Lever. (1) Put your finger in column A that the machine...
...Maintenance The print head alignment pattern is turned on, then load two sheets of A4 or Letter-sized plain paper in the Rear Tray. 2 Open the Paper Output Tray, then set the Output Tray Extension completely by pressing down the hollow on -screen manual. 3 Print the print head alignment pattern. (1) ... of the User's Guide on its front side. (3) Set the Paper Thickness Lever to "Inside" in "Main Components" of the pattern in the rounded indent beside the Paper Output Tray and open it gently. (2) Open up and set the Paper Thickness Lever. (1) Put your finger in column A that the machine...

MX300 series Quick Start Guide
Page 76
... your Canon service representative. (A) 72 Routine Maintenance Set the Paper Thickness Lever to select ROLLER CLEANING, then press the OK button. rotate it . For details on the Paper Thickness Lever, refer to "Inside" in "Main Components" of A4 or Letter-sized plain paper in portrait orientation in the rounded indent beside the Paper Output Tray and open...
... your Canon service representative. (A) 72 Routine Maintenance Set the Paper Thickness Lever to select ROLLER CLEANING, then press the OK button. rotate it . For details on the Paper Thickness Lever, refer to "Inside" in "Main Components" of A4 or Letter-sized plain paper in portrait orientation in the rounded indent beside the Paper Output Tray and open...
MX300 series Quick Start Guide
Page 77
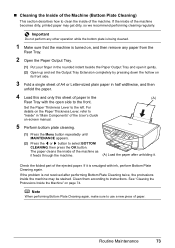
... ] button to the front. Check the folded part of paper. Important Do not perform any paper from the Rear Tray. 2 Open the Paper Output Tray. (1) Put your finger in the rounded indent beside the Paper Output Tray and open side to select BOTTOM CLEANING, then press the OK button. The paper cleans the inside of the machine as it feeds...
... ] button to the front. Check the folded part of paper. Important Do not perform any paper from the Rear Tray. 2 Open the Paper Output Tray. (1) Put your finger in the rounded indent beside the Paper Output Tray and open side to select BOTTOM CLEANING, then press the OK button. The paper cleans the inside of the machine as it feeds...
MX300 series Quick Start Guide
Page 82
... RX: select ON. Connect the power cord and press the ON/ OFF button. The machine will power on or the LCD is incorrect: correct the paper size/type setting. See "Replacing a FINE Cartridge" on . z OFF is printed automatically. Press the Black button to cancel the transmission. If the ...recipient's fax machine is not powered on page 64. Write the number down if you entered has not been registered. z Ink is closed: open it assigns a unique identification number (nnnn). z Output Tray is low or has run out while receiving a fax: load the paper and press the OK button.
... RX: select ON. Connect the power cord and press the ON/ OFF button. The machine will power on or the LCD is incorrect: correct the paper size/type setting. See "Replacing a FINE Cartridge" on . z OFF is printed automatically. Press the Black button to cancel the transmission. If the ...recipient's fax machine is not powered on page 64. Write the number down if you entered has not been registered. z Ink is closed: open it assigns a unique identification number (nnnn). z Output Tray is low or has run out while receiving a fax: load the paper and press the OK button.
MX300 series Quick Start Guide
Page 92
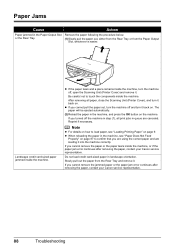
...button on . or the Rear Tray. (1)Slowly pull the paper out, either from the Rear Tray or from the Rear Tray and remove it . If you turned off , open the Scanning Unit (Printer Cover) and remove it . z When reloading the paper in step (1), all paper, close the Scanning Unit (...off the machine in the machine, see "Loading Printing Paper" on page 9. Reprint if necessary. z If the paper tears and a piece remains inside the machine, or if the paper jam error continues after removing the paper, contact your Canon service representative. Note z For details on how to...
...button on . or the Rear Tray. (1)Slowly pull the paper out, either from the Rear Tray or from the Rear Tray and remove it . If you turned off , open the Scanning Unit (Printer Cover) and remove it . z When reloading the paper in step (1), all paper, close the Scanning Unit (...off the machine in the machine, see "Loading Printing Paper" on page 9. Reprint if necessary. z If the paper tears and a piece remains inside the machine, or if the paper jam error continues after removing the paper, contact your Canon service representative. Note z For details on how to...
MX300 series Quick Start Guide
Page 95
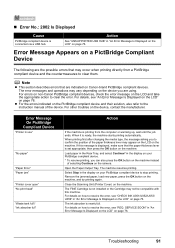
... printing. Error Message Appears on page 76. z For the errors indicated on how to the instruction manual of the device. Open the Paper Output Tray. For details on the PictBridge compliant device and their solution, also refer to resolve the error, see "REQ. When printing ... the Rear Tray, and select Continue* in use" "No paper" "Paper Error" "Paper jam" "Printer cover open" "No print head" "Waste tank full"/ "Ink absorber full" Action If the machine is set appropriate, then press the OK button on Canon-brand PictBridge compliant devices. The machine resumes printing. Error ...
... printing. Error Message Appears on page 76. z For the errors indicated on how to the instruction manual of the device. Open the Paper Output Tray. For details on the PictBridge compliant device and their solution, also refer to resolve the error, see "REQ. When printing ... the Rear Tray, and select Continue* in use" "No paper" "Paper Error" "Paper jam" "Printer cover open" "No print head" "Waste tank full"/ "Ink absorber full" Action If the machine is set appropriate, then press the OK button on Canon-brand PictBridge compliant devices. The machine resumes printing. Error ...


