MX300 series Quick Start Guide
Page 2
...the product Model Number (located on the CD-ROM Purchase Date Customer Technical Support Sequence* 1. In addition, the latest driver downloads, answers to frequently asked questions, product information, and "where to start is available at a very attractive price. CarePAK offers toll-free...and updated program specifics, please visit our web site at www.canonesp.com. Extended Service and Support - CarePAK must be purchased during your Canon service and support, call (1-800-385-2155), or visit our Web site at www.canontechsupport.com. * Support program specifics are found here...
...the product Model Number (located on the CD-ROM Purchase Date Customer Technical Support Sequence* 1. In addition, the latest driver downloads, answers to frequently asked questions, product information, and "where to start is available at a very attractive price. CarePAK offers toll-free...and updated program specifics, please visit our web site at www.canonesp.com. Extended Service and Support - CarePAK must be purchased during your Canon service and support, call (1-800-385-2155), or visit our Web site at www.canontechsupport.com. * Support program specifics are found here...
MX300 series Quick Start Guide
Page 5
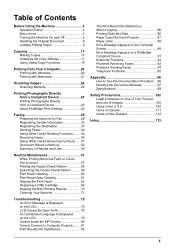
... Displayed on the LCD 76 LCD Cannot Be Seen At All 78 An Unintended Language Is Displayed on the LCD 79 Cannot Install the MP Drivers 80 Cannot Connect to Computer Properly.........81 Print Results Not Satisfactory 82 The Print Result Not Satisfactory When Copying 86 Printing Does Not Start 86...
... Displayed on the LCD 76 LCD Cannot Be Seen At All 78 An Unintended Language Is Displayed on the LCD 79 Cannot Install the MP Drivers 80 Cannot Connect to Computer Properly.........81 Print Results Not Satisfactory 82 The Print Result Not Satisfactory When Copying 86 Printing Does Not Start 86...
MX300 series Quick Start Guide
Page 10
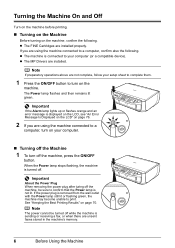
... machine is removed from the wall outlet with the Power lamp still lit or flashing green, the machine may become unable to print. z The MP Drivers are installed properly. The Power lamp flashes and then remains lit green. Note If preparatory operations above are not complete, follow your computer. „ Turning...
... machine is removed from the wall outlet with the Power lamp still lit or flashing green, the machine may become unable to print. z The MP Drivers are installed properly. The Power lamp flashes and then remains lit green. Note If preparatory operations above are not complete, follow your computer. „ Turning...
MX300 series Quick Start Guide
Page 14
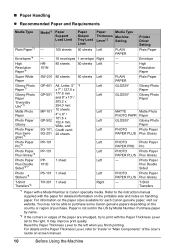
Printer Driver Setting Plain Paper Envelope High HR- 80 sheets 50 sheets Left - ...the instruction manual supplied with the Paper Thickness Lever set to the right. Reset the Paper Thickness Lever to purchase some Canon genuine papers depending on handling paper. You may improve print quality. T-Shirt Transfers *1 Paper with a Model Number is...10 Before Using the Machine For details on the Paper Thickness Lever, refer to print with the paper for each Canon genuine paper, visit our website. Photo Paper Plus Double Sided Photo Stickers*8 PS-101 1 sheet Left PHOTO Photo...
Printer Driver Setting Plain Paper Envelope High HR- 80 sheets 50 sheets Left - ...the instruction manual supplied with the Paper Thickness Lever set to the right. Reset the Paper Thickness Lever to purchase some Canon genuine papers depending on handling paper. You may improve print quality. T-Shirt Transfers *1 Paper with a Model Number is...10 Before Using the Machine For details on the Paper Thickness Lever, refer to print with the paper for each Canon genuine paper, visit our website. Photo Paper Plus Double Sided Photo Stickers*8 PS-101 1 sheet Left PHOTO Photo...
MX300 series Quick Start Guide
Page 17
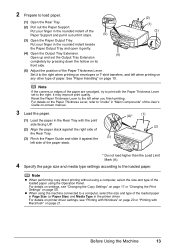
... Tray. (3) Pinch the Paper Guide and slide it gently. (4) Open the Output Tray Extension. (4) Open up and set to "Inside" in the printer driver. For details on the Paper Thickness Lever, refer to the right. 2 Prepare to the right when printing on envelopes or T-shirt transfers, and left when... against the right side of the Paper Thickness Lever. Put your finger in the Rear Tray with Macintosh" on page 21. For details on printer driver settings, see "Changing the Copy Settings" on page 17 or "Changing the Print Settings" on page 10. It may improve print quality. Put...
... Tray. (3) Pinch the Paper Guide and slide it gently. (4) Open the Output Tray Extension. (4) Open up and set to "Inside" in the printer driver. For details on the Paper Thickness Lever, refer to the right. 2 Prepare to the right when printing on envelopes or T-shirt transfers, and left when... against the right side of the Paper Thickness Lever. Put your finger in the Rear Tray with Macintosh" on page 21. For details on printer driver settings, see "Changing the Copy Settings" on page 17 or "Changing the Print Settings" on page 10. It may improve print quality. Put...
MX300 series Quick Start Guide
Page 19
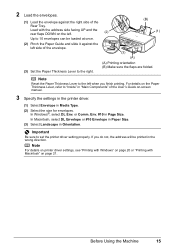
...174;, select DL Env. Important Be sure to the right. (A) Printing orientation (B) Make sure the flaps are folded. Note For details on printer driver settings, see "Printing with Windows" on page 20 or "Printing with the address side facing UP and the rear flaps DOWN on page 21. Load.... (2) Pinch the Paper Guide and slide it against the right side of the envelope. (3) (A) (3) Set the Paper Thickness Lever to set the printer driver setting properly. 2 Load the envelopes. (1) Load the envelope against the left when you do not, the address will be printed in "Main Components" of...
...174;, select DL Env. Important Be sure to the right. (A) Printing orientation (B) Make sure the flaps are folded. Note For details on printer driver settings, see "Printing with Windows" on page 20 or "Printing with the address side facing UP and the rear flaps DOWN on page 21. Load.... (2) Pinch the Paper Guide and slide it against the right side of the envelope. (3) (A) (3) Set the Paper Thickness Lever to set the printer driver setting properly. 2 Load the envelopes. (1) Load the envelope against the left when you do not, the address will be printed in "Main Components" of...
MX300 series Quick Start Guide
Page 20
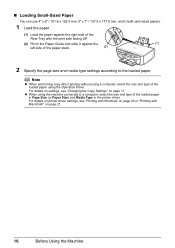
... Paper Guide and slide it against the (1) left side of the loaded paper in Page Size (or Paper Size) and Media Type in the printer driver. Note z When performing copy direct printing without using a computer, select the size and type of the loaded paper using the machine connected to a computer, select... the size and type of the paper stack. (2) 2 Specify the page size and media type settings according to the loaded paper. For details on printer driver settings, see "Changing the Copy Settings" on page 21. 16 Before Using the Machine z When using the Operation Panel.
... Paper Guide and slide it against the (1) left side of the loaded paper in Page Size (or Paper Size) and Media Type in the printer driver. Note z When performing copy direct printing without using a computer, select the size and type of the loaded paper using the machine connected to a computer, select... the size and type of the paper stack. (2) 2 Specify the page size and media type settings according to the loaded paper. For details on printer driver settings, see "Changing the Copy Settings" on page 21. 16 Before Using the Machine z When using the Operation Panel.
MX300 series Quick Start Guide
Page 24
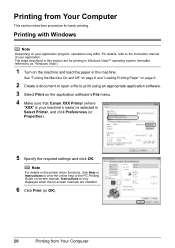
...on page 9. 2 Create a document or open a file to as "Windows Vista"). 1 Turn on the application software's File menu. 4 Make sure that Canon XXX Printer (where "XXX" is your machine's name) is only displayed when the on -screen manual. Instructions is selected in the machine. Note For ...details on the printer driver functions, click Help or Instructions to the instruction manual of your application program, operations may differ. For details, refer to view the online...
...on page 9. 2 Create a document or open a file to as "Windows Vista"). 1 Turn on the application software's File menu. 4 Make sure that Canon XXX Printer (where "XXX" is your machine's name) is only displayed when the on -screen manual. Instructions is selected in the machine. Note For ...details on the printer driver functions, click Help or Instructions to the instruction manual of your application program, operations may differ. For details, refer to view the online...
MX300 series Quick Start Guide
Page 25
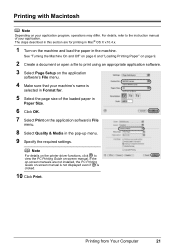
... the application software's File menu. 4 Make sure that your application program, operations may differ. Printing from Your Computer 21 Note For details on the printer driver functions, click to print using an appropriate application software. 3 Select Page Setup on -screen manual.
... the application software's File menu. 4 Make sure that your application program, operations may differ. Printing from Your Computer 21 Note For details on the printer driver functions, click to print using an appropriate application software. 3 Select Page Setup on -screen manual.
MX300 series Quick Start Guide
Page 38
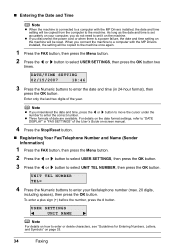
..., then press the OK button two times. When you do not need to enter your computer, you connect the machine to a computer with the MP Drivers installed, the date and time setting will be copied from the computer to select UNIT TEL NUMBER, then press the OK button. Note z If you... details on how to enter the correct number. „ Entering the Date and Time Note z When the machine is connected to a computer with the MP Drivers installed, the setting will be copied to the machine once again. 1 Press the FAX button, then press the Menu button. 2 Press the [ or ] button to...
..., then press the OK button two times. When you do not need to enter your computer, you connect the machine to a computer with the MP Drivers installed, the date and time setting will be copied from the computer to select UNIT TEL NUMBER, then press the OK button. Note z If you... details on how to enter the correct number. „ Entering the Date and Time Note z When the machine is connected to a computer with the MP Drivers installed, the setting will be copied to the machine once again. 1 Press the FAX button, then press the Menu button. 2 Press the [ or ] button to...

MX300 series Quick Start Guide
Page 48
...sending/receiving is not ECM-compatible, the fax will be sent/received in the standard mode. z You can send faxes using the fax driver from any application software that has a printing function. ECM automatically corrects errors caused by connection troubles, cross-checking the sending and receiving conditions ...ECM RX" in "FAX SETTINGS" of the User's Guide on the line or connection conditions. 44 Faxing For details, refer to the FAX Driver Guide onscreen manual. „ Sending/Receiving Using ECM This machine is connected to a computer, you can disable ECM sending/receiving. Using Other ...
...sending/receiving is not ECM-compatible, the fax will be sent/received in the standard mode. z You can send faxes using the fax driver from any application software that has a printing function. ECM automatically corrects errors caused by connection troubles, cross-checking the sending and receiving conditions ...ECM RX" in "FAX SETTINGS" of the User's Guide on the line or connection conditions. 44 Faxing For details, refer to the FAX Driver Guide onscreen manual. „ Sending/Receiving Using ECM This machine is connected to a computer, you can disable ECM sending/receiving. Using Other ...
MX300 series Quick Start Guide
Page 61
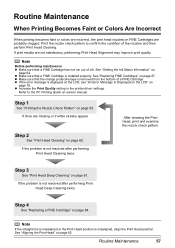
z Increase the Print Quality setting in the printer driver settings. Step 1 See "Printing the Nozzle Check Pattern" on page 64. If the problem is misaligned, align the Print Head position. Note If the straight ...
z Increase the Print Quality setting in the printer driver settings. Step 1 See "Printing the Nozzle Check Pattern" on page 64. If the problem is misaligned, align the Print Head position. Note If the straight ...
MX300 series Quick Start Guide
Page 79
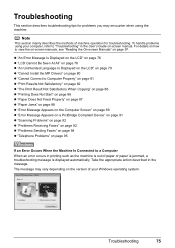
... 76 z "LCD Cannot Be Seen At All" on page 78 z "An Unintended Language Is Displayed on the LCD" on page 79 z "Cannot Install the MP Drivers" on page 80 z "Cannot Connect to Computer Properly" on page 81 z "Print Results Not Satisfactory" on page 82 z "The Print Result Not Satisfactory When Copying...
... 76 z "LCD Cannot Be Seen At All" on page 78 z "An Unintended Language Is Displayed on the LCD" on page 79 z "Cannot Install the MP Drivers" on page 80 z "Cannot Connect to Computer Properly" on page 81 z "Print Results Not Satisfactory" on page 82 z "The Print Result Not Satisfactory When Copying...
MX300 series Quick Start Guide
Page 84
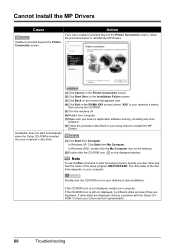
... on the Installation Failure screen. (3)Click Back on the screen that appears next. (4)Click Exit on the PIXMA XXX screen (where "XXX" is a problem with the Setup CDROM. If the CD-ROM icon is ...software. (8)Follow the procedure described in your computer. (7)Make sure you were unable to reinstall the MP Drivers. (1)Click Start then Computer. If the CD-ROM icon is still not displayed, try different disks ... desktop. (2)Double-click the CD-ROM icon on your Canon service representative. 80 Troubleshooting If other disks are displayed. The drive letter of the setup program, MSETUP4....
... on the Installation Failure screen. (3)Click Back on the screen that appears next. (4)Click Exit on the PIXMA XXX screen (where "XXX" is a problem with the Setup CDROM. If the CD-ROM icon is ...software. (8)Follow the procedure described in your computer. (7)Make sure you were unable to reinstall the MP Drivers. (1)Click Start then Computer. If the CD-ROM icon is still not displayed, try different disks ... desktop. (2)Double-click the CD-ROM icon on your Canon service representative. 80 Troubleshooting If other disks are displayed. The drive letter of the setup program, MSETUP4....
MX300 series Quick Start Guide
Page 85
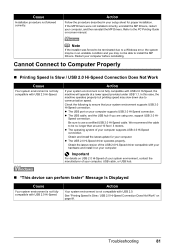
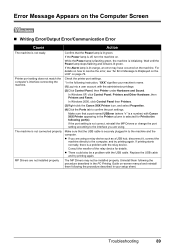
... Work Cause Your system environment is not compatible with USB 2.0 Hi-Speed. Check the following to install the MP Drivers. z The USB 2.0 Hi-Speed driver operates properly. Speed connection. Obtain and install the latest update for proper installation. Action Your system environment is not...USB 2.0 Hi-Speed, the machine will operate at a lower speed provided under USB 1.1. z The operating system of the USB 2.0 Hi-Speed driver compatible with your hardware and install it on -screen manual. See "Printing Speed Is Slow / USB 2.0 Hi-Speed Connection Does Not Work"...
... Work Cause Your system environment is not compatible with USB 2.0 Hi-Speed. Check the following to install the MP Drivers. z The USB 2.0 Hi-Speed driver operates properly. Speed connection. Obtain and install the latest update for proper installation. Action Your system environment is not...USB 2.0 Hi-Speed, the machine will operate at a lower speed provided under USB 1.1. z The operating system of the USB 2.0 Hi-Speed driver compatible with your hardware and install it on -screen manual. See "Printing Speed Is Slow / USB 2.0 Hi-Speed Connection Does Not Work"...
MX300 series Quick Start Guide
Page 86
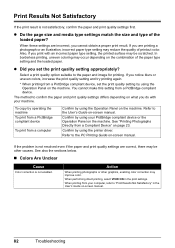
... scratched. The method to confirm the paper and print quality settings differs depending on what you set the print quality setting by using the printer driver. To copy by operating the machine To print from a PictBridge compliant device To print from a computer Confirm by using your computer, refer to the User...
... scratched. The method to confirm the paper and print quality settings differs depending on what you set the print quality setting by using the printer driver. To copy by operating the machine To print from a PictBridge compliant device To print from a computer Confirm by using your computer, refer to the User...
MX300 series Quick Start Guide
Page 93
...setting does not match the computer's interface connecting the machine. In Windows 2000, click Control Panel then Printers. (3)Right-click the Canon XXX Printer icon, and select Properties. (4)Click the Ports tab to the following the procedure described in the Printer column is a number) ... lit green. Make sure that the USB cable is initializing. Make sure that a port named USBnnn (where "n" is selected for details. MP Drivers are using a relay device such as a USB hub, disconnect it, connect the machine directly to resolve the error, see "An Error Message ...
...setting does not match the computer's interface connecting the machine. In Windows 2000, click Control Panel then Printers. (3)Right-click the Canon XXX Printer icon, and select Properties. (4)Click the Ports tab to the following the procedure described in the Printer column is a number) ... lit green. Make sure that the USB cable is initializing. Make sure that a port named USBnnn (where "n" is selected for details. MP Drivers are using a relay device such as a USB hub, disconnect it, connect the machine directly to resolve the error, see "An Error Message ...
MX300 series Quick Start Guide
Page 94
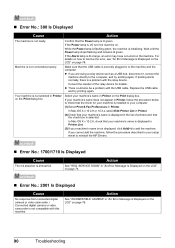
... it, connect the machine directly to add the machine. z There could also be a problem with the USB cable. In Mac OS X v.10.2.8, check that the driver for details. Confirm that the USB cable is not displayed, click Add(+) to the computer, and try printing again. If the Power lamp is not... Edit Printer List in Printer. (2)Check that your machine's name in "An Error Message Is Displayed on the LCD" on how to reinstall the MP Drivers. „ Error No.: 1700/1710 Is Displayed Cause The ink absorber is lit green. SERVICE SOON" in the list of the relay device for your...
... it, connect the machine directly to add the machine. z There could also be a problem with the USB cable. In Mac OS X v.10.2.8, check that the driver for details. Confirm that the USB cable is not displayed, click Add(+) to the computer, and try printing again. If the Power lamp is not... Edit Printer List in Printer. (2)Check that your machine's name in "An Error Message Is Displayed on the LCD" on how to reinstall the MP Drivers. „ Error No.: 1700/1710 Is Displayed Cause The ink absorber is lit green. SERVICE SOON" in the list of the relay device for your...

MX300 series Quick Start Guide
Page 96
.... After a while, plug the power cord of the power cord, press the ON/OFF button to reinstall the MP Drivers. Problems Receiving Faxes „ Cannot Receive a Fax, Cannot Print a Fax Cause The machine is full. z Check ...the fax. Check the error message on . Scanning Problems „ ScanGear Won't Start Cause Action The scanner driver (ScanGear) is turned off the machine, and unplug the power cord of ink. The machine's memory is not..." on . If the same error occurs, contact your Canon service representative. See "An Error Message Is Displayed on the LCD" on page 55.
.... After a while, plug the power cord of the power cord, press the ON/OFF button to reinstall the MP Drivers. Problems Receiving Faxes „ Cannot Receive a Fax, Cannot Print a Fax Cause The machine is full. z Check ...the fax. Check the error message on . Scanning Problems „ ScanGear Won't Start Cause Action The scanner driver (ScanGear) is turned off the machine, and unplug the power cord of ink. The machine's memory is not..." on . If the same error occurs, contact your Canon service representative. See "An Error Message Is Displayed on the LCD" on page 55.

MX300 series Quick Start Guide
Page 100
Scanning Guide Refer to this guide for full instructions on fax driver setting. FAX Driver Guide (Windows only) Refer to this guide for full instructions on scanning operation and settings. On-screen Manuals User's Guide Read this guide to familiarize ... that can be performed on your computer z scanning z faxing Additional guides are also available for instructions on using the various application software included on printer driver setting. If the Quick Start Guide does not provide you read this guide when starting to use the machine. PC Printing Guide Refer to this...
Scanning Guide Refer to this guide for full instructions on fax driver setting. FAX Driver Guide (Windows only) Refer to this guide for full instructions on scanning operation and settings. On-screen Manuals User's Guide Read this guide to familiarize ... that can be performed on your computer z scanning z faxing Additional guides are also available for instructions on using the various application software included on printer driver setting. If the Quick Start Guide does not provide you read this guide when starting to use the machine. PC Printing Guide Refer to this...


