MX300 series Quick Start Guide
Page 5
... Using Other Useful Sending Functions.........44 Receiving Faxes 45 Using Other Useful Receiving Functions ......51 Document Stored in Memory 52 Summary of Reports and Lists 55 Routine Maintenance 57 When Printing Becomes Faint or Colors Are Incorrect 57 Printing the Nozzle Check Pattern 58 Examining the Nozzle Check Pattern ...........59 Print Head Cleaning 60 Print Head Deep Cleaning 61 Aligning the Print Head 62 Replacing a FINE Cartridge 64 Keeping the Best Printing Results 70 Cleaning Your Machine 71 Troubleshooting 75 An Error Message Is Displayed...
... Using Other Useful Sending Functions.........44 Receiving Faxes 45 Using Other Useful Receiving Functions ......51 Document Stored in Memory 52 Summary of Reports and Lists 55 Routine Maintenance 57 When Printing Becomes Faint or Colors Are Incorrect 57 Printing the Nozzle Check Pattern 58 Examining the Nozzle Check Pattern ...........59 Print Head Cleaning 60 Print Head Deep Cleaning 61 Aligning the Print Head 62 Replacing a FINE Cartridge 64 Keeping the Best Printing Results 70 Cleaning Your Machine 71 Troubleshooting 75 An Error Message Is Displayed...
MX300 series Quick Start Guide
Page 6
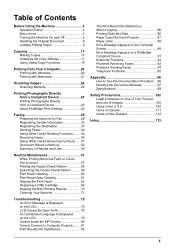
... turning on the machine, make sure the Document Cover is closed. (2) COPY button Switches the machine to copy mode. (3) In Use/Memory lamp Flashes when the telephone line is in use this button, the machine must be connected to the settings selected. Also enters pauses between or after numbers when dialing or registering numbers. (11) Black button Starts black & white copying, scanning, or faxing. (12) Stop/Reset button Cancels operations such as fax/telephone numbers and characters. (10) Redial/Pause button Redials the last number called using...
... turning on the machine, make sure the Document Cover is closed. (2) COPY button Switches the machine to copy mode. (3) In Use/Memory lamp Flashes when the telephone line is in use this button, the machine must be connected to the settings selected. Also enters pauses between or after numbers when dialing or registering numbers. (11) Black button Starts black & white copying, scanning, or faxing. (12) Stop/Reset button Cancels operations such as fax/telephone numbers and characters. (10) Redial/Pause button Redials the last number called using...
MX300 series Quick Start Guide
Page 9
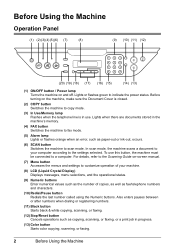
... Using the Machine 5 z FAX mode Menu button FAX SETTINGS RECEIVE MODE SET (page 45) FAX PRIORITY MODE FAX ONLY MODE DRPD*3 NETWORK SWITCH*2 TEL PRIORITY MODE MEMORY REFERENCE (page 52) PRINT MEMORY LIST PRINT DOCUMENT DELETE DOCUMENT PRNT REPORT/LIST (page 55) ACTIVITY REPORT SPEED DIAL LIST USER'S DATA LIST MEMORY LIST CODED DIAL REGIST (page 37) USER SETTINGS (page 32) DATE/TIME SETTING DATE DISPLAY*1 SUMMER TIME SET*2 UNIT TEL NUMBER UNIT NAME TX TERMINAL ID*1 OFFHOOK ALARM*1 VOLUME CONTROL*1 RX RING LEVEL*1 TEL LINE TYPE (page 30) ACTIVITY REPORT*1 TX SETTINGS*1 ECM TX PAUSE TIME AUTO...
... Using the Machine 5 z FAX mode Menu button FAX SETTINGS RECEIVE MODE SET (page 45) FAX PRIORITY MODE FAX ONLY MODE DRPD*3 NETWORK SWITCH*2 TEL PRIORITY MODE MEMORY REFERENCE (page 52) PRINT MEMORY LIST PRINT DOCUMENT DELETE DOCUMENT PRNT REPORT/LIST (page 55) ACTIVITY REPORT SPEED DIAL LIST USER'S DATA LIST MEMORY LIST CODED DIAL REGIST (page 37) USER SETTINGS (page 32) DATE/TIME SETTING DATE DISPLAY*1 SUMMER TIME SET*2 UNIT TEL NUMBER UNIT NAME TX TERMINAL ID*1 OFFHOOK ALARM*1 VOLUME CONTROL*1 RX RING LEVEL*1 TEL LINE TYPE (page 30) ACTIVITY REPORT*1 TX SETTINGS*1 ECM TX PAUSE TIME AUTO...
MX300 series Quick Start Guide
Page 17
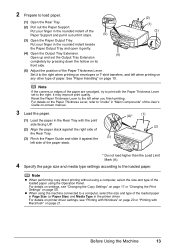
... the Paper Support and pull it out until it gently. (4) Open the Output Tray Extension. (4) Open up and set to a computer, select the size and type of the loaded paper in Page Size (or Paper Size) and Media Type in the Rear Tray with the print side facing UP. (2) Align the paper stack against the (3) left side of the User's Guide on page 10. For details on printer driver settings, see "Changing the Copy Settings" on page 17 or "Changing the Print Settings" on envelopes or T-shirt transfers...
... the Paper Support and pull it out until it gently. (4) Open the Output Tray Extension. (4) Open up and set to a computer, select the size and type of the loaded paper in Page Size (or Paper Size) and Media Type in the Rear Tray with the print side facing UP. (2) Align the paper stack against the (3) left side of the User's Guide on page 10. For details on printer driver settings, see "Changing the Copy Settings" on page 17 or "Changing the Print Settings" on envelopes or T-shirt transfers...
MX300 series Quick Start Guide
Page 19
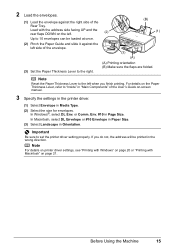
... DL Envelope or #10 Envelope in Paper Size. (3) Select Landscape in Media Type. (2) Select the size for envelopes. Env. #10 in the wrong direction. Important Be sure to set the printer driver setting properly. Note For details on printer driver settings, see "Printing with Windows" on page 20 or "Printing with the address side facing UP and the rear flaps DOWN on -screen manual. 3 Specify the settings in the printer driver. (1) Select Envelope in Orientation. Note Reset the Paper...
... DL Envelope or #10 Envelope in Paper Size. (3) Select Landscape in Media Type. (2) Select the size for envelopes. Env. #10 in the wrong direction. Important Be sure to set the printer driver setting properly. Note For details on printer driver settings, see "Printing with Windows" on page 20 or "Printing with the address side facing UP and the rear flaps DOWN on -screen manual. 3 Specify the settings in the printer driver. (1) Select Envelope in Orientation. Note Reset the Paper...
MX300 series Quick Start Guide
Page 60
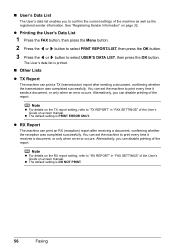
... machine to print every time it sends a document, or only when an error occurs. The User's data list is PRINT ERROR ONLY. z The default setting is printed. „ Other Lists z TX Report The machine can print an RX (reception) report after sending a document, confirming whether the transmission was completed successfully. z Printing the User's Data List 1 Press the FAX button, then press the Menu button. 2 Press the [ or ] button to select PRNT REPORT/LIST, then press the OK button. 3 Press the [ or ] button to select USER'S DATA LIST...
... machine to print every time it sends a document, or only when an error occurs. The User's data list is PRINT ERROR ONLY. z The default setting is printed. „ Other Lists z TX Report The machine can print an RX (reception) report after sending a document, confirming whether the transmission was completed successfully. z Printing the User's Data List 1 Press the FAX button, then press the Menu button. 2 Press the [ or ] button to select PRNT REPORT/LIST, then press the OK button. 3 Press the [ or ] button to select USER'S DATA LIST...
MX300 series Quick Start Guide
Page 61
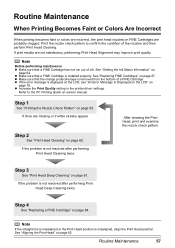
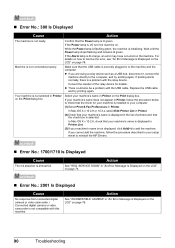
... Error Message Is Displayed on the LCD" on page 58. z If the error message is installed properly. Note Before performing maintenance z Make sure that a FINE Cartridge has not run out of a FINE Cartridge. Print the nozzle check pattern to the PC Printing Guide on page 60. z Increase the Print Quality setting in the printer driver settings. If the problem is misaligned, align the Print Head position. Routine Maintenance 57 Step 1 See "Printing the Nozzle Check Pattern" on page 76...
... Error Message Is Displayed on the LCD" on page 58. z If the error message is installed properly. Note Before performing maintenance z Make sure that a FINE Cartridge has not run out of a FINE Cartridge. Print the nozzle check pattern to the PC Printing Guide on page 60. z Increase the Print Quality setting in the printer driver settings. If the problem is misaligned, align the Print Head position. Routine Maintenance 57 Step 1 See "Printing the Nozzle Check Pattern" on page 76...
MX300 series Quick Start Guide
Page 71
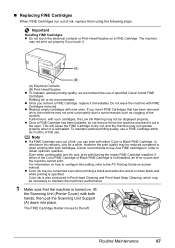
... remove a FINE Cartridge, replace it out in whichever ink remains, only for a while. z Once you touch it is not installed, an error occurs and the machine cannot print. If either Color or Black FINE Cartridge, in the open. For information on , lift the Scanning Unit (Printer Cover) with both cartridges. The FINE Cartridge Holder moves to the PC Printing Guide on a FINE Cartridge. The machine may be consumed even when printing a black-and-white document...
... remove a FINE Cartridge, replace it out in whichever ink remains, only for a while. z Once you touch it is not installed, an error occurs and the machine cannot print. If either Color or Black FINE Cartridge, in the open. For information on , lift the Scanning Unit (Printer Cover) with both cartridges. The FINE Cartridge Holder moves to the PC Printing Guide on a FINE Cartridge. The machine may be consumed even when printing a black-and-white document...
MX300 series Quick Start Guide
Page 73
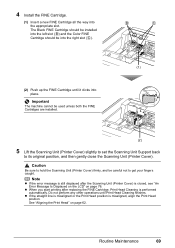
...the Scanning Unit (Printer Cover). See "Aligning the Print Head" on page 76. 4 Install the FINE Cartridge. (1) Insert a new FINE Cartridge all the way into the right slot ( C ). (2) Push up the FINE Cartridge until Print Head Cleaning finishes. Routine Maintenance 69 B C (1) (2) 5 Lift the Scanning Unit (Printer Cover) slightly to set the Scanning Unit Support back to hold the Scanning Unit (Printer Cover) firmly, and be used unless both the FINE Cartridges are installed. Note z If the error message is still displayed after replacing the FINE Cartridge, Print Head Cleaning...
...the Scanning Unit (Printer Cover). See "Aligning the Print Head" on page 76. 4 Install the FINE Cartridge. (1) Insert a new FINE Cartridge all the way into the right slot ( C ). (2) Push up the FINE Cartridge until Print Head Cleaning finishes. Routine Maintenance 69 B C (1) (2) 5 Lift the Scanning Unit (Printer Cover) slightly to set the Scanning Unit Support back to hold the Scanning Unit (Printer Cover) firmly, and be used unless both the FINE Cartridges are installed. Note z If the error message is still displayed after replacing the FINE Cartridge, Print Head Cleaning...
MX300 series Quick Start Guide
Page 79
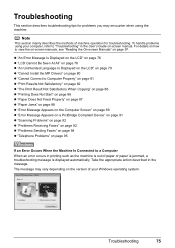
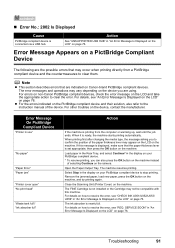
... Satisfactory When Copying" on page 86 z "Printing Does Not Start" on page 86 z "Paper Does Not Feed Properly" on page 87 z "Paper Jams" on page 88 z "Error Message Appears on the Computer Screen" on page 89 z "Error Message Appears on a PictBridge Compliant Device" on page 91 z "Scanning Problems" on page 92 z "Problems Receiving Faxes" on page 92 z "Problems Sending Faxes" on page 94 z "Telephone Problems" on page 97. To handle problems using the machine. The message may encounter when using your Windows operating system. Troubleshooting 75...
... Satisfactory When Copying" on page 86 z "Printing Does Not Start" on page 86 z "Paper Does Not Feed Properly" on page 87 z "Paper Jams" on page 88 z "Error Message Appears on the Computer Screen" on page 89 z "Error Message Appears on a PictBridge Compliant Device" on page 91 z "Scanning Problems" on page 92 z "Problems Receiving Faxes" on page 92 z "Problems Sending Faxes" on page 94 z "Telephone Problems" on page 97. To handle problems using the machine. The message may encounter when using your Windows operating system. Troubleshooting 75...
MX300 series Quick Start Guide
Page 80
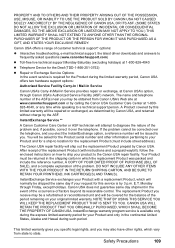
... your Canon service representative. Canon recommends to use new genuine Canon cartridges in ink absorber to select a PictBridge compliant print mode on the model or brand of printing under the ink out condition. See "Replacing a FINE Cartridge" on page 64. Open the Scanning Unit (Printer Cover) and install the FINE Cartridge properly. You may not be disabled. Then printing can continue under the ink out condition. Replace the ink cartridge and close the Scanning Unit (Printer Cover). Ink may have to hold the ink used during Print Head Cleaning...
... your Canon service representative. Canon recommends to use new genuine Canon cartridges in ink absorber to select a PictBridge compliant print mode on the model or brand of printing under the ink out condition. See "Replacing a FINE Cartridge" on page 64. Open the Scanning Unit (Printer Cover) and install the FINE Cartridge properly. You may not be disabled. Then printing can continue under the ink out condition. Replace the ink cartridge and close the Scanning Unit (Printer Cover). Ink may have to hold the ink used during Print Head Cleaning...
MX300 series Quick Start Guide
Page 84
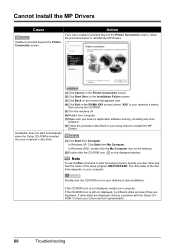
... displayed, restart your computer. Contact your disc drive and then the name of the disc drive depends on the PIXMA XXX screen (where "XXX" is your machine's name), then remove the CD-ROM. (5)Turn the machine off. (6)Restart your computer. (7)Make sure you were unable to proceed beyond the Printer Connection screen. Cannot Install the MP Drivers Cause Unable to proceed beyond the Printer Connection...
... displayed, restart your computer. Contact your disc drive and then the name of the disc drive depends on the PIXMA XXX screen (where "XXX" is your machine's name), then remove the CD-ROM. (5)Turn the machine off. (6)Restart your computer. (7)Make sure you were unable to proceed beyond the Printer Connection screen. Cannot Install the MP Drivers Cause Unable to proceed beyond the Printer Connection...
MX300 series Quick Start Guide
Page 85
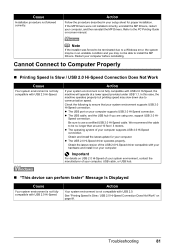
... install the MP Drivers. In this case, the machine operates properly but printing speed may not be no longer than around 10 feet / 3 meters. We recommend the cable to be able to a Windows error, the system may be in your computer supports USB 2.0 Hi-Speed connection. Restart your system environment supports USB 2.0 Hi-Speed connection. Check the following to the PC Printing Guide on page 81. z The USB port on USB...
... install the MP Drivers. In this case, the machine operates properly but printing speed may not be no longer than around 10 feet / 3 meters. We recommend the cable to be able to a Windows error, the system may be in your computer supports USB 2.0 Hi-Speed connection. Restart your system environment supports USB 2.0 Hi-Speed connection. Check the following to the PC Printing Guide on page 81. z The USB port on USB...
MX300 series Quick Start Guide
Page 86
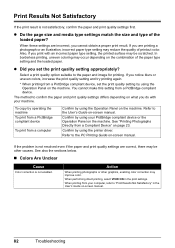
... "Printing Photographs Directly from a PictBridge compliant device. When performing direct printing, select VIVID ON in the User's Guide on the machine. z Do the page size and media type settings match the size and type of the paper type setting and the loaded paper. You cannot make this setting from a Compliant Device" on the combination of the loaded paper? Action When printing photographs or other causes. When these settings are incorrect, you set the print quality setting by using the Operation Panel...
... "Printing Photographs Directly from a PictBridge compliant device. When performing direct printing, select VIVID ON in the User's Guide on the machine. z Do the page size and media type settings match the size and type of the paper type setting and the loaded paper. You cannot make this setting from a Compliant Device" on the combination of the loaded paper? Action When printing photographs or other causes. When these settings are incorrect, you set the print quality setting by using the Operation Panel...
MX300 series Quick Start Guide
Page 94
... the Print dialog box. In Mac OS X v.10.2.8, check that the driver for details. For details on how to resolve the error, see "An Error Message Is Displayed on the LCD" on page 76. 90 Troubleshooting Wait until the Power lamp stops flashing and remains lit green. Your machine is not selected in Printer List. (3)If your machine's name is not compatible with the USB cable. Replace the USB cable and try printing again...
... the Print dialog box. In Mac OS X v.10.2.8, check that the driver for details. For details on how to resolve the error, see "An Error Message Is Displayed on the LCD" on page 76. 90 Troubleshooting Wait until the Power lamp stops flashing and remains lit green. Your machine is not selected in Printer List. (3)If your machine's name is not compatible with the USB cable. Replace the USB cable and try printing again...
MX300 series Quick Start Guide
Page 95
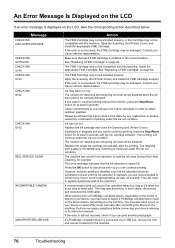
..., check the error message on the camera. Load paper in the Rear Tray, and select Continue* in the display on the device, contact the manufacturer. SERVICE SOON" in use" "No paper" "Paper Error" "Paper jam" "Printer cover open" "No print head" "Waste tank full"/ "Ink absorber full" Action If the machine is displayed, make sure that are using. Note z This section describes errors that the paper thickness lever is connected via a USB hub. When printing first after changing the media type, the message...
..., check the error message on the camera. Load paper in the Rear Tray, and select Continue* in the display on the device, contact the manufacturer. SERVICE SOON" in use" "No paper" "Paper Error" "Paper jam" "Printer cover open" "No print head" "Waste tank full"/ "Ink absorber full" Action If the machine is displayed, make sure that are using. Note z This section describes errors that the paper thickness lever is connected via a USB hub. When printing first after changing the media type, the message...

MX300 series Quick Start Guide
Page 96
... Report Manually" on page 76. Problems Receiving Faxes „ Cannot Receive a Fax, Cannot Print a Fax Cause The machine is full. Either print or delete documents in memory (see "Printing or Deleting a Document in Memory" on . The machine's memory is not powered on page 52.) to free up memory. After a while, plug the power cord of ink. installed. „ Other Scanning Troubles Refer to resolve the error. z After a power failure or disconnecting of the machine from the power supply. See "Replacing a FINE Cartridge...
... Report Manually" on page 76. Problems Receiving Faxes „ Cannot Receive a Fax, Cannot Print a Fax Cause The machine is full. Either print or delete documents in memory (see "Printing or Deleting a Document in Memory" on . The machine's memory is not powered on page 52.) to free up memory. After a while, plug the power cord of ink. installed. „ Other Scanning Troubles Refer to resolve the error. z After a power failure or disconnecting of the machine from the power supply. See "Replacing a FINE Cartridge...
MX300 series Quick Start Guide
Page 113
...'s Authorized Service Facility (ASF) network. Canon USA offers a range of factors beyond its reasonable control. A Product covered by this service is available only during such period. If the problem cannot be obtained from state to state. DO NOT INCLUDE ANY OTHER ITEMS WITH THE YOUR PRODUCT IN THE RETURN SHIPPING CARTON, AND BE SURE TO RETAIN YOUR PRINTHEAD, INK CARTRIDGE...
...'s Authorized Service Facility (ASF) network. Canon USA offers a range of factors beyond its reasonable control. A Product covered by this service is available only during such period. If the problem cannot be obtained from state to state. DO NOT INCLUDE ANY OTHER ITEMS WITH THE YOUR PRODUCT IN THE RETURN SHIPPING CARTON, AND BE SURE TO RETAIN YOUR PRINTHEAD, INK CARTRIDGE...
MX300 series Easy Setup Instructions
Page 1
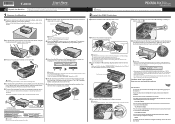
... machine Machine Telephone line Built-in front of your telephone line type, contact your product. g Press the ON/OFF button to set the Scanning Unit Support back to select the language for the LCD, then press the OK button. Remove all of the machine. Scanning Unit (Printer Cover) Power Cord Important • Make sure that the message "COVER IS OPEN" is displayed on the LCD, press the Back button to return to the left . Next, turn...
... machine Machine Telephone line Built-in front of your telephone line type, contact your product. g Press the ON/OFF button to set the Scanning Unit Support back to select the language for the LCD, then press the OK button. Remove all of the machine. Scanning Unit (Printer Cover) Power Cord Important • Make sure that the message "COVER IS OPEN" is displayed on the LCD, press the Back button to return to the left . Next, turn...
MX300 series Easy Setup Instructions
Page 2
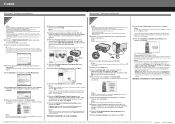
..., refer to "Troubleshooting" instructions in the User's Guide on-screen manual. • If straight lines are misaligned or print quality is not satisfactory after installing the MP Drivers, you may need your product serial number, which is a trademark of Microsoft Corporation. k When the Setup Complete screen appears, click Next. You will begin identifying the printer port being used. We would take part in again, or turn off then...
..., refer to "Troubleshooting" instructions in the User's Guide on-screen manual. • If straight lines are misaligned or print quality is not satisfactory after installing the MP Drivers, you may need your product serial number, which is a trademark of Microsoft Corporation. k When the Setup Complete screen appears, click Next. You will begin identifying the printer port being used. We would take part in again, or turn off then...


