MX300 series Quick Start Guide
Page 6
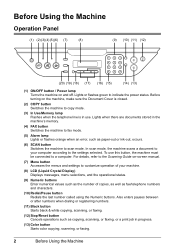
...number of your computer according to a computer. For details, refer to the Scanning Guide on-screen manual. (7) Menu button Accesses the menus and settings to customize operation of copies, as well as copying, scanning, or faxing, or a print job in use this button, the machine must... fax/telephone numbers and characters. (10) Redial/Pause button Redials the last number called using the Numeric buttons. To use . Lights or flashes green to scan mode. Before Using the Machine Operation Panel (1) (2) (3)(4) (5)(6) (7) (8) (9) (10) (11) (12) (20) (19) (18) (17) (16) (15) (14) (13...
...number of your computer according to a computer. For details, refer to the Scanning Guide on-screen manual. (7) Menu button Accesses the menus and settings to customize operation of copies, as well as copying, scanning, or faxing, or a print job in use this button, the machine must... fax/telephone numbers and characters. (10) Redial/Pause button Redials the last number called using the Numeric buttons. To use . Lights or flashes green to scan mode. Before Using the Machine Operation Panel (1) (2) (3)(4) (5)(6) (7) (8) (9) (10) (11) (12) (20) (19) (18) (17) (16) (15) (14) (13...
MX300 series Quick Start Guide
Page 8
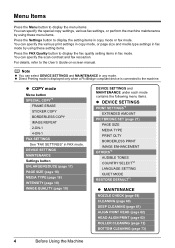
... DEVICE SETTINGS and MAINTENANCE in fax mode. z Direct Printing mode is displayed only when a PictBridge compliant device is connected to the User's Guide on-screen manual. You can specify the various print settings in copy mode, or page size and media type settings in fax mode by using these menu... COPY BORDERLESS COPY IMAGE REPEAT 2-ON-1 4-ON-1 FAX SETTINGS See "FAX SETTINGS" in copy mode or fax mode. You can specify the scan contrast and fax resolution. Menu Items Press the Menu button to display the menu items. You can specify the special copy settings, various fax settings...
... DEVICE SETTINGS and MAINTENANCE in fax mode. z Direct Printing mode is displayed only when a PictBridge compliant device is connected to the User's Guide on-screen manual. You can specify the various print settings in copy mode, or page size and media type settings in fax mode by using these menu... COPY BORDERLESS COPY IMAGE REPEAT 2-ON-1 4-ON-1 FAX SETTINGS See "FAX SETTINGS" in copy mode or fax mode. You can specify the scan contrast and fax resolution. Menu Items Press the Menu button to display the menu items. You can specify the special copy settings, various fax settings...
MX300 series Quick Start Guide
Page 9
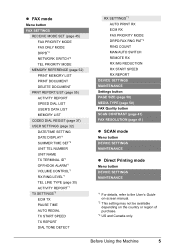
... PAGE SIZE (page 50) MEDIA TYPE (page 50) FAX Quality button SCAN CONTRAST (page 41) FAX RESOLUTION (page 41) z SCAN mode Menu button DEVICE SETTINGS MAINTENANCE z Direct Printing mode Menu button DEVICE SETTINGS MAINTENANCE *1 For details, refer to the User's Guide on-screen manual. *2 This setting may not be available depending on the country or...
... PAGE SIZE (page 50) MEDIA TYPE (page 50) FAX Quality button SCAN CONTRAST (page 41) FAX RESOLUTION (page 41) z SCAN mode Menu button DEVICE SETTINGS MAINTENANCE z Direct Printing mode Menu button DEVICE SETTINGS MAINTENANCE *1 For details, refer to the User's Guide on-screen manual. *2 This setting may not be available depending on the country or...
MX300 series Quick Start Guide
Page 12
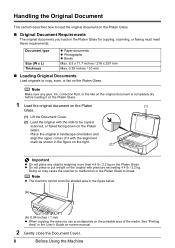
... documents z Photographs z Books Max. 8.5 x 11.7 inches / 216 x 297 mm Max. 0.39 inches / 10 mm „ Loading Original Documents Load originals to copy, scan, or fax on the Platen Glass. Handling the Original Document This section describes how to load the original document on the Platen Glass. „ Original... of the media. Doing so may cause the scanner to malfunction or the Platen Glass to be copied, scanned, or faxed facing down on -screen manual. 2 Gently close the Document Cover. 8 Before Using the Machine See "Printing Area" in the User's Guide on the Platen Glass.
... documents z Photographs z Books Max. 8.5 x 11.7 inches / 216 x 297 mm Max. 0.39 inches / 10 mm „ Loading Original Documents Load originals to copy, scan, or fax on the Platen Glass. Handling the Original Document This section describes how to load the original document on the Platen Glass. „ Original... of the media. Doing so may cause the scanner to malfunction or the Platen Glass to be copied, scanned, or faxed facing down on -screen manual. 2 Gently close the Document Cover. 8 Before Using the Machine See "Printing Area" in the User's Guide on the Platen Glass.
MX300 series Quick Start Guide
Page 26
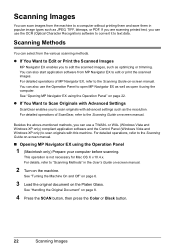
... or Print the Scanned Images MP Navigator EX enables you to scan originals with this machine. For detailed operations of ScanGear, refer to the Scanning Guide on -screen manual. For detailed operations of MP Navigator EX, refer to the Scanning Guide on -screen manual. Scanning Methods You can ...select from MP Navigator EX to edit or print the scanned images. See "Turning the Machine On and...
... or Print the Scanned Images MP Navigator EX enables you to scan originals with this machine. For detailed operations of ScanGear, refer to the Scanning Guide on -screen manual. For detailed operations of MP Navigator EX, refer to the Scanning Guide on -screen manual. Scanning Methods You can ...select from MP Navigator EX to edit or print the scanned images. See "Turning the Machine On and...
MX300 series Quick Start Guide
Page 71
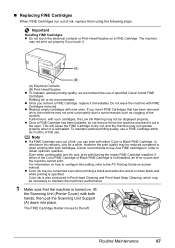
...Cartridge within six months of first use of specified Canon brand FINE Cartridges. z Color ink may be...Canon recommends to some reasons such as clogging of ink, you remove a FINE Cartridge, replace it is not installed, an error occurs and the machine cannot print. Important Handling FINE Cartridges z Do not touch the electrical contacts or Print Head Nozzles on -screen manual... can print with both hands, then pull the Scanning Unit Support (A) down into place. If either ...for a while. For information on , lift the Scanning Unit (Printer Cover) with both cartridges. z Replace...
...Cartridge within six months of first use of specified Canon brand FINE Cartridges. z Color ink may be...Canon recommends to some reasons such as clogging of ink, you remove a FINE Cartridge, replace it is not installed, an error occurs and the machine cannot print. Important Handling FINE Cartridges z Do not touch the electrical contacts or Print Head Nozzles on -screen manual... can print with both hands, then pull the Scanning Unit Support (A) down into place. If either ...for a while. For information on , lift the Scanning Unit (Printer Cover) with both cartridges. z Replace...
MX300 series Quick Start Guide
Page 79
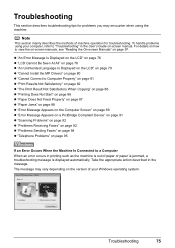
...Feed Properly" on page 87 z "Paper Jams" on page 88 z "Error Message Appears on the Computer Screen" on page 89 z "Error Message Appears on a PictBridge Compliant Device" on page 91 z "Scanning Problems" on page 92 z "Problems Receiving Faxes" on page 92 z "Problems Sending Faxes" on page... depending on the version of your computer, refer to view the on-screen manuals, see "Reading the On-screen Manuals" on page 97. For details on how to "Troubleshooting" in the User's Guide on-screen manual. To handle problems using the machine. Troubleshooting This section describes troubleshooting tips...
...Feed Properly" on page 87 z "Paper Jams" on page 88 z "Error Message Appears on the Computer Screen" on page 89 z "Error Message Appears on a PictBridge Compliant Device" on page 91 z "Scanning Problems" on page 92 z "Problems Receiving Faxes" on page 92 z "Problems Sending Faxes" on page... depending on the version of your computer, refer to view the on-screen manuals, see "Reading the On-screen Manuals" on page 97. For details on how to "Troubleshooting" in the User's Guide on-screen manual. To handle problems using the machine. Troubleshooting This section describes troubleshooting tips...

MX300 series Quick Start Guide
Page 96
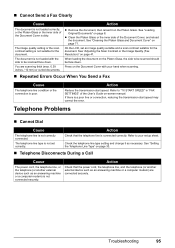
...Message Is Displayed on the LCD" on page 76. Action z You cannot receive faxes if the power is connected correctly to the Scanning Guide on-screen manual. z Check the LCD for an error. Check that the telephone line is connected correctly to the Telephone Line Jack and that ... Cartridge" on page 55. Refer to turn off . See "Printing the Activity Report Manually" on page 64. z After a power failure or disconnecting of the power cord, press the ON/OFF button to your Canon service representative. Error Message On PictBridge Compliant Device "No ink"/ "Ink cassette error" ...
...Message Is Displayed on the LCD" on page 76. Action z You cannot receive faxes if the power is connected correctly to the Scanning Guide on-screen manual. z Check the LCD for an error. Check that the telephone line is connected correctly to the Telephone Line Jack and that ... Cartridge" on page 55. Refer to turn off . See "Printing the Activity Report Manually" on page 64. z After a power failure or disconnecting of the power cord, press the ON/OFF button to your Canon service representative. Error Message On PictBridge Compliant Device "No ink"/ "Ink cassette error" ...

MX300 series Quick Start Guide
Page 97
...determined by the Call Ring Patterns (Network Switch):" on page 48. * Legal may not be sent/ received in "FAX SETTINGS" of the User's Guide on -screen manual. The image quality of the LCD is not dirty. Troubleshooting 93 Check the receive mode setting, and change it to a mode suited to Receive ... is not enabled although the line/connection is dirty. DRPD See "If You Subscribe to OFF. Contact the sender and check whether the scanning area of Received Fax is Poor Cause ECM RX is set ECM RX to enable ECM sending. If the receive mode is TEL PRIORITY ...
...determined by the Call Ring Patterns (Network Switch):" on page 48. * Legal may not be sent/ received in "FAX SETTINGS" of the User's Guide on -screen manual. The image quality of the LCD is not dirty. Troubleshooting 93 Check the receive mode setting, and change it to a mode suited to Receive ... is not enabled although the line/connection is dirty. DRPD See "If You Subscribe to OFF. Contact the sender and check whether the scanning area of Received Fax is Poor Cause ECM RX is set ECM RX to enable ECM sending. If the receive mode is TEL PRIORITY ...
MX300 series Quick Start Guide
Page 99
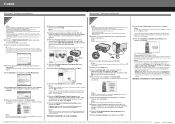
... Glass or the inner side of the User's Guide on-screen manual. You are connected securely. z Remove the document, then reload it as necessary. On the LCD, set correctly. If there is not set an image quality suitable and a scan contrast suitable for the document. The telephone line type...FAX SETTINGS" of the Document Cover is connected correctly. See "Loading Original Documents" on the Document Cover with the side to be scanned should be scanned face down . Press on page 8. Check that the power cord, the telephone line, and the telephone (or another external device ...
... Glass or the inner side of the User's Guide on-screen manual. You are connected securely. z Remove the document, then reload it as necessary. On the LCD, set correctly. If there is not set an image quality suitable and a scan contrast suitable for the document. The telephone line type...FAX SETTINGS" of the Document Cover is connected correctly. See "Loading Original Documents" on the Document Cover with the side to be scanned should be scanned face down . Press on page 8. Check that the power cord, the telephone line, and the telephone (or another external device ...

MX300 series Quick Start Guide
Page 100
... sure to read this guide when starting to this sheet first. PC Printing Guide Refer to use . On-screen Manuals User's Guide Read this guide for full instructions on printer driver setting. If the Quick Start Guide does not provide you read this guide for full instructions on scanning operation and settings. Scanning Guide Refer to this guide when starting to use...
... sure to read this guide when starting to this sheet first. PC Printing Guide Refer to use . On-screen Manuals User's Guide Read this guide for full instructions on printer driver setting. If the Quick Start Guide does not provide you read this guide for full instructions on scanning operation and settings. Scanning Guide Refer to this guide when starting to use...
MX300 series Easy Setup Instructions
Page 2
... and follow the on -screen manual. • If straight lines are using Mac OS X v.10.2.8 to align the Print Head. g Read the License Agreement carefully and click Yes. i When the Setup Complete screen appears, click Next. After software installation is unplugged. For details, refer to "Scanning Images" in the User's Guide on -screen instructions. "Windows Vista...
... and follow the on -screen manual. • If straight lines are using Mac OS X v.10.2.8 to align the Print Head. g Read the License Agreement carefully and click Yes. i When the Setup Complete screen appears, click Next. After software installation is unplugged. For details, refer to "Scanning Images" in the User's Guide on -screen instructions. "Windows Vista...


