User Manual
Page 1
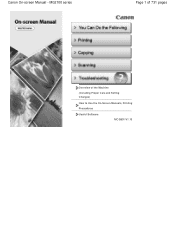
MG2100 series Page 1 of 731 pages Overview of the Machine (Including Proper Care and Setting Changes) How to Use the On-Screen Manuals, Printing Procedures Useful Software MC-5801-V1.10 Canon On-screen Manual -
MG2100 series Page 1 of 731 pages Overview of the Machine (Including Proper Care and Setting Changes) How to Use the On-Screen Manuals, Printing Procedures Useful Software MC-5801-V1.10 Canon On-screen Manual -
User Manual
Page 13
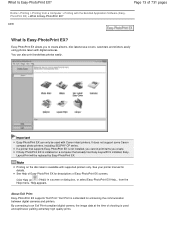
...Print-compliant digital camera, the image data at the time of shooting is available with digital cameras. It does not support some Canon compact photo printers, including SELPHY CP series. Important Easy-PhotoPrint EX can also print borderless photos easily. Note Printing on a... computer that supports Easy-PhotoPrint EX is a standard for details. See your printer manual for enhancing the communication between digital cameras and printers. By connecting to create albums, disc labels/case covers, calendars and stickers easily...
...Print-compliant digital camera, the image data at the time of shooting is available with digital cameras. It does not support some Canon compact photo printers, including SELPHY CP series. Important Easy-PhotoPrint EX can also print borderless photos easily. Note Printing on a... computer that supports Easy-PhotoPrint EX is a standard for details. See your printer manual for enhancing the communication between digital cameras and printers. By connecting to create albums, disc labels/case covers, calendars and stickers easily...
User Manual
Page 14
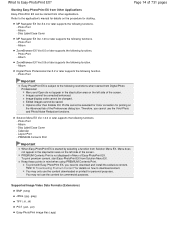
... corrected/enhanced. To print with Easy-PhotoPrint EX, you cannot use the content downloaded or printed for commercial purposes. Therefore, you need to the application's manual for details on the procedure for printing on the left side of Easy-PhotoPrint EX. Calendar - You may only use the Vivid Photo and Photo...
... corrected/enhanced. To print with Easy-PhotoPrint EX, you cannot use the content downloaded or printed for commercial purposes. Therefore, you need to the application's manual for details on the procedure for printing on the left side of Easy-PhotoPrint EX. Calendar - You may only use the Vivid Photo and Photo...

User Manual
Page 26
... Disc Labels and Case Covers A004 Printing Disc Labels and Case Covers You can print your own disc labels and case covers using your printer manual for details. Printing Disc Labels and Case Covers Page 26 of 731 pages Home > Printing > Printing from Menu. Starting Easy-PhotoPrint EX 2. Steps...
... Disc Labels and Case Covers A004 Printing Disc Labels and Case Covers You can print your own disc labels and case covers using your printer manual for details. Printing Disc Labels and Case Covers Page 26 of 731 pages Home > Printing > Printing from Menu. Starting Easy-PhotoPrint EX 2. Steps...
User Manual
Page 54
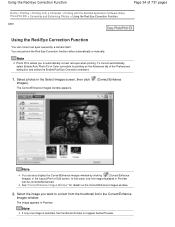
... list does not appear below Preview. In that case, only the image displayed in Preview can perform the Red-Eye Correction function either automatically or manually. Select the image you to correct from a Computer > Printing with the Bundled Application Software (EasyPhotoPrint EX) > Correcting and Enhancing Photos > Using the Red-Eye Correction...
... list does not appear below Preview. In that case, only the image displayed in Preview can perform the Red-Eye Correction function either automatically or manually. Select the image you to correct from a Computer > Printing with the Bundled Application Software (EasyPhotoPrint EX) > Correcting and Enhancing Photos > Using the Red-Eye Correction...
User Manual
Page 55
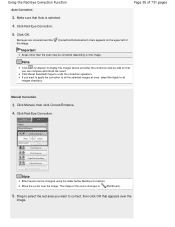
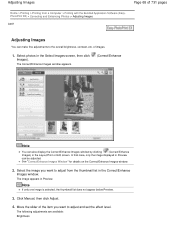
...-Eye Correction. Click OK. Note Click (Compare) to display the images before and after the correction side by side so that Auto is selected. 4. Click Manual, then click Correct/Enhance. 4. Move the cursor over the image. Make sure that you can be corrected depending on the upper left of Important Areas...
...-Eye Correction. Click OK. Note Click (Compare) to display the images before and after the correction side by side so that Auto is selected. 4. Click Manual, then click Correct/Enhance. 4. Move the cursor over the image. Make sure that you can be corrected depending on the upper left of Important Areas...
User Manual
Page 58
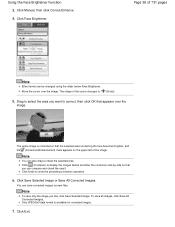
... appears over the image. You can also drag to correct, then click OK that you can be changed using the slider below Face Brightener. Click Manual, then click Correct/Enhance. 4. Note You can save corrected images as new files. Drag to select the area you like, click Save Selected Image. Note...
... appears over the image. You can also drag to correct, then click OK that you can be changed using the slider below Face Brightener. Click Manual, then click Correct/Enhance. 4. Note You can save corrected images as new files. Drag to select the area you like, click Save Selected Image. Note...
User Manual
Page 60
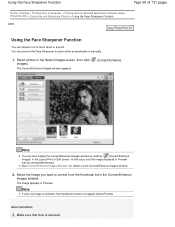
.../Print or Edit screen. Auto Correction 3. Make sure that case, only the image displayed in Preview can perform the Face Sharpener function either automatically or manually. 1. Select the image you want to correct from a Computer > Printing with the Bundled Application Software (EasyPhotoPrint EX) > Correcting and Enhancing Photos > Using the Face Sharpener...
.../Print or Edit screen. Auto Correction 3. Make sure that case, only the image displayed in Preview can perform the Face Sharpener function either automatically or manually. 1. Select the image you want to correct from a Computer > Printing with the Bundled Application Software (EasyPhotoPrint EX) > Correcting and Enhancing Photos > Using the Face Sharpener...
User Manual
Page 61
Note Click (Compare) to (Cross). 5. Click Manual, then click Correct/Enhance. 4. Click Face Sharpener. Note Effect levels can be changed using the slider below Face Sharpener. The shape of the cursor changes .... Move the cursor over the image. Click OK. The face is sharpened and the (Correction/Enhancement) mark appears on the upper left of 731 pages 5. Manual Correction 3. Note Effect levels can compare and check the result. Click Face Sharpener. If you can be changed using the slider below Face Sharpener.
Note Click (Compare) to (Cross). 5. Click Manual, then click Correct/Enhance. 4. Click Face Sharpener. Note Effect levels can be changed using the slider below Face Sharpener. The shape of the cursor changes .... Move the cursor over the image. Click OK. The face is sharpened and the (Correction/Enhancement) mark appears on the upper left of 731 pages 5. Manual Correction 3. Note Effect levels can compare and check the result. Click Face Sharpener. If you can be changed using the slider below Face Sharpener.
User Manual
Page 63
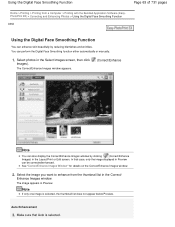
... does not appear below Preview. The Correct/Enhance Images window appears. (Correct/Enhance Note You can perform the Digital Face Smoothing function either automatically or manually. 1. You can also display the Correct/Enhance Images window by reducing blemishes and wrinkles.
... does not appear below Preview. The Correct/Enhance Images window appears. (Correct/Enhance Note You can perform the Digital Face Smoothing function either automatically or manually. 1. You can also display the Correct/Enhance Images window by reducing blemishes and wrinkles.
User Manual
Page 64
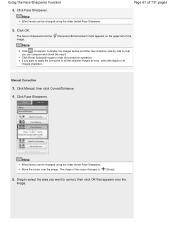
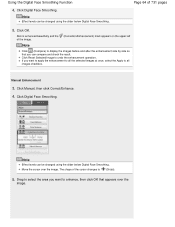
... the image. Using the Digital Face Smoothing Function 4. Note Effect levels can be changed using the slider below Digital Face Smoothing. Manual Enhancement 3. Note Click (Compare) to all images checkbox. Note Effect levels can be changed using the slider below Digital Face Smoothing.... Click Digital Face Smoothing. Page 64 of the image. Click Digital Face Smoothing. Click Manual, then click Correct/Enhance. 4. The shape of the cursor changes to undo the enhancement operation. Skin is enhanced beautifully and the...
... the image. Using the Digital Face Smoothing Function 4. Note Effect levels can be changed using the slider below Digital Face Smoothing. Manual Enhancement 3. Note Click (Compare) to all images checkbox. Note Effect levels can be changed using the slider below Digital Face Smoothing.... Click Digital Face Smoothing. Page 64 of the image. Click Digital Face Smoothing. Click Manual, then click Correct/Enhance. 4. The shape of the cursor changes to undo the enhancement operation. Skin is enhanced beautifully and the...
User Manual
Page 66
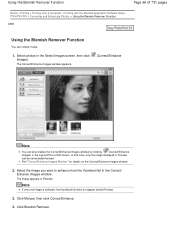
In that case, only the image displayed in Preview can also display the Correct/Enhance Images window by clicking (Correct/Enhance Images) in Preview. Click Manual, then click Correct/Enhance. 4. Select photos in the Correct/ Enhance Images window. Select the image you want to enhance from a Computer > Printing with the Bundled ...
In that case, only the image displayed in Preview can also display the Correct/Enhance Images window by clicking (Correct/Enhance Images) in Preview. Click Manual, then click Correct/Enhance. 4. Select photos in the Correct/ Enhance Images window. Select the image you want to enhance from a Computer > Printing with the Bundled ...
User Manual
Page 68
... appears in the Select Images screen, then click Images). Note If only one image is selected, the thumbnail list does not appear below Preview. 3. Click Manual, then click Adjust. 4. of images. 1. See "Correct/Enhance Images Window " for details on the Correct/Enhance Images window. 2.
... appears in the Select Images screen, then click Images). Note If only one image is selected, the thumbnail list does not appear below Preview. 3. Click Manual, then click Adjust. 4. of images. 1. See "Correct/Enhance Images Window " for details on the Correct/Enhance Images window. 2.
User Manual
Page 70
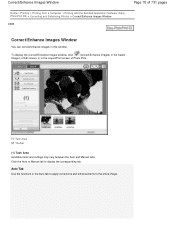
... window. Correct/Enhance Images Window Page 70 of Photo Print. (1) Task Area (2) Toolbar (1) Task Area Available tasks and settings may vary between the Auto and Manual tabs. To display the Correct/Enhance Images window, click (Correct/Enhance Images) in the Select Images or Edit screen, or in the Layout/Print screen...
... window. Correct/Enhance Images Window Page 70 of Photo Print. (1) Task Area (2) Toolbar (1) Task Area Available tasks and settings may vary between the Auto and Manual tabs. To display the Correct/Enhance Images window, click (Correct/Enhance Images) in the Select Images or Edit screen, or in the Layout/Print screen...
User Manual
Page 72
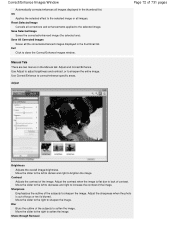
... subjects to soften the image. Blur Blurs the outline of the subjects to lack of focus or text is out of contrast. Manual Tab There are two menus on the Manual tab: Adjust and Correct/Enhance. Use Adjust to adjust brightness and contrast, or to correct/enhance specific areas. Use Correct/Enhance...
... subjects to soften the image. Blur Blurs the outline of the subjects to lack of focus or text is out of contrast. Manual Tab There are two menus on the Manual tab: Adjust and Correct/Enhance. Use Adjust to adjust brightness and contrast, or to correct/enhance specific areas. Use Correct/Enhance...
User Manual
Page 74
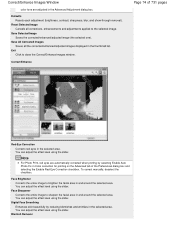
Defaults Resets each adjustment (brightness, contrast, sharpness, blur, and show-through removal). To correct manually, deselect the checkbox. You can adjust the effect level using the slider. Digital Face Smoothing Enhances skin beautifully by selecting Enable Auto Photo Fix in ...
Defaults Resets each adjustment (brightness, contrast, sharpness, blur, and show-through removal). To correct manually, deselect the checkbox. You can adjust the effect level using the slider. Digital Face Smoothing Enhances skin beautifully by selecting Enable Auto Photo Fix in ...
User Manual
Page 122
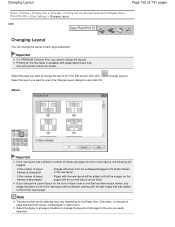
... layout you cannot change the layout of in the new layout. Important For PREMIUM Contents Print, you want to change the layouts. See your printer manual for the front or back cover to change the current layout for details. Select the page you want to use in the new layout will...
... layout you cannot change the layout of in the new layout. Important For PREMIUM Contents Print, you want to change the layouts. See your printer manual for the front or back cover to change the current layout for details. Select the page you want to use in the new layout will...
User Manual
Page 154
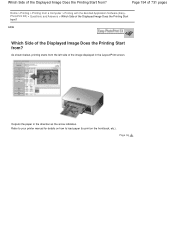
Outputs the paper in the Layout/Print screen. Refer to your printer manual for details on how to load paper (to print on the front/back, etc.). As shown below, printing starts from the left side of the ...
Outputs the paper in the Layout/Print screen. Refer to your printer manual for details on how to load paper (to print on the front/back, etc.). As shown below, printing starts from the left side of the ...
User Manual
Page 165
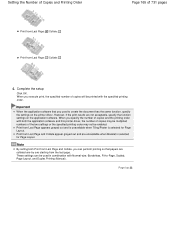
When you can be used to -Page, Scaled, Page Layout, and Duplex Printing (Manual). Complete the setup Click OK. Print from Last Page appears grayed out and is unavailable when Tiling/Poster is selected for Page Layout. Print from ...
When you can be used to -Page, Scaled, Page Layout, and Duplex Printing (Manual). Complete the setup Click OK. Print from Last Page appears grayed out and is unavailable when Tiling/Poster is selected for Page Layout. Print from ...
User Manual
Page 167
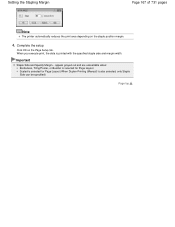
appear grayed out and are unavailable when: Borderless, Tiling/Poster, or Booklet is selected for Page Layout Scaled is selected for Page Layout (When Duplex Printing (Manual) is printed with the specified staple side and margin width. Important Staple Side and Specify Margin... Complete the setup Click OK on the staple position margin. 4. When you execute print, the data is also selected, only Staple Side can be specified) Page top Setting the Stapling Margin Page 167 of 731 pages Note The printer automatically reduces the print area depending on the Page Setup tab.
appear grayed out and are unavailable when: Borderless, Tiling/Poster, or Booklet is selected for Page Layout Scaled is selected for Page Layout (When Duplex Printing (Manual) is printed with the specified staple side and margin width. Important Staple Side and Specify Margin... Complete the setup Click OK on the staple position margin. 4. When you execute print, the data is also selected, only Staple Side can be specified) Page top Setting the Stapling Margin Page 167 of 731 pages Note The printer automatically reduces the print area depending on the Page Setup tab.


